Loading...
Loading...
Loading...
Loading...
Loading...
Loading...
Loading...
Loading...
Loading...
Loading...
Loading...
Loading...
Loading...
Loading...
Loading...
Loading...
Loading...
Loading...
Loading...
Loading...
Loading...
Loading...
Loading...
Loading...
Loading...
Loading...
Loading...
Loading...
Loading...
Loading...
Loading...
Loading...
Loading...
Loading...
Loading...
Loading...
Loading...
Loading...
Loading...
Loading...
Loading...
Loading...
Loading...
Loading...
Loading...
Loading...
Loading...
Loading...
Loading...
Loading...
Loading...
Loading...
Loading...
Loading...
Loading...
Loading...
Loading...
Loading...
Loading...
Loading...
Loading...
Loading...
Loading...
Loading...
Loading...
Loading...
Loading...
Loading...
Loading...
Loading...
Loading...
Loading...
Loading...
Loading...
Loading...
Loading...
Loading...
Loading...
Loading...
Loading...
Loading...
To access Cymmetri, users must use a web browser, such as Google Chrome or Safari, and enter the appropriate address in the address bar as shown below:
URL: https://<companyname>.cymmetri.com/login
Example: https://helpdocs.cymmetri.com/login
Once the address is entered it opens a page as shown below, where the users may enter their username and password to access Cymmetri.
Enter your country, phone number (mandatory to receive OTP), and enter a domain name for your tenant. In case the domain available message is not shown, choose a different domain name. Click on Start Trial button.
You will receive an OTP on your mobile number from the previous step. Enter the OTP here and wait for a few seconds for your tenant to be created.
You will be redirected to your domain to create the first Organization Admin user. Ensure that your password matches the password policy.
You will receive a message to show that your tenant has been created.
Click on the Login button for proceeding with the onboarding process
Enter your username and press Next
Enter your password and proceed with the setup of your tenant by clicking on the Login button
Choose applications from the application catalogue, click on the application icon for all the applications you wish to add. Then click on the Next button.
Enter details to create a second administrator account. Click on Send Invite button to create an administrator. Click on Next button to proceed.
(Optional) Add users if you wish to. Then click on Finish.
You will be redirected to the Dashboard to proceed with the system.
Start by clicking on the link to start the registration of your tenant on the Cymmetri Cloud 2.0 and enter your personal details with your work email. Click on Next.
Cymmetri is a Converged Identity & Access Management Platform and a well-trusted platform acting as an advisor and an end-to-end partner for Security-aware teams looking to deploy Identity and Access Management Solutions across their organization.
We offer an industry-standard product backed by a strong team that always aims to innovate our solutions to cater to a wide variety of enterprise needs.
Notifications are triggered from the Cymmetri platform for various actions occuring on the platform either through direct action by the end-user or by the virtue of some backend action (such as running of a scheduler for a campaign). Cymmetri platform ships with default notification templates that may be modified by the administrator using the following process:
Access the notification templates menu by clicking on the configuration menu on the left-hand side menu bar and then clicking on the Notification templates pop-up menu.
Click on the eye icon to preview the corresponding template
Values in <> anchor tags and ${} reflect macros.
We may treat this template as an email, and edit the subject of the mail.
By default, the email notification will be sent to the corresponding affected end-user, but selecting the toggle option for “Send notification to Reporting Manager” will also copy the mail to the Reporting manager of the affected end-user, allowing for offline followup for the notification.
The administrator may edit the HTML using the provided HTML editor to add/change any template button/text/background. The macros required for the particular template are already provided in the sample default notification template.
Click on the Save button to save the notification template.
The Cymmetri Help Page serves as a vital resource, offering users a comprehensive documentation hub that breaks down all the features and provides step-by-step configurations for various functionalities.
Comprehensive Feature Explanation: The Cymmetri Help Page covers all the features of the platform in a straightforward manner. Whether you are a beginner or an experienced user, you can find detailed explanations of each feature, ensuring you have a clear understanding of its purpose and functionality.
Step-by-Step Configurations: One of the highlights of the Help Page is its provision of step-by-step configurations for various features. This means you can follow a simple, structured guide to set up and customize different aspects of Cymmetri according to your specific needs.
User-Friendly Language: The documentation is crafted in a manner that balances technical precision with user-friendly language. You won't find unnecessary jargon, making it accessible for users with varying levels of technical expertise.
Click on the pencil icon to edit the template.
To access this valuable documentation, you can visit directly. Alternatively, you can simply click on the help icon located at the bottom left of your Cymmetri tenant screens.
Tenant branding in Cymmetri allows you to personalize and enhance the visual identity of your environment. With tenant branding, you can customize the appearance of your platform, including logos, color schemes, and even tailored messages, aligning it with your organization's branding guidelines.
This not only creates a cohesive and professional user experience but also reinforces your brand's presence throughout the Cymmetri environment. It's a powerful tool for organizations looking to maintain a consistent and recognizable image while utilizing Cymmetri's identity and management capabilities.
The Cymmetri platform allows a certain level of customization to your tenant from the administration panel. This includes the ability to modify the default Cymmetri branding scheme to your own Organization’s branding scheme.
Your Organization Name and Tagline
Your Organization Logo
Your Organization Branding Colors (Primary, Secondary, Accent Colors)
To access the branding menu, first click on the Configuration menu on the left-hand side and then proceed by clicking on the Branding menu item.
Start the configuration by entering your Organization Name and Tag Line
Proceed by adding your URL to the Website text box and click on “Fetch Brand”.
If your organization’s branding is available, the logo and the corresponding color scheme will be displayed in the menu below.
If your branding is not available, you may configure it yourself by uploading your logo and editing your primary color, secondary color, and accent color.
Click on Save and Sync Server button to make the branding configuration apply to the entire website.
The configuration will be applied in a few seconds to reflect your branding.
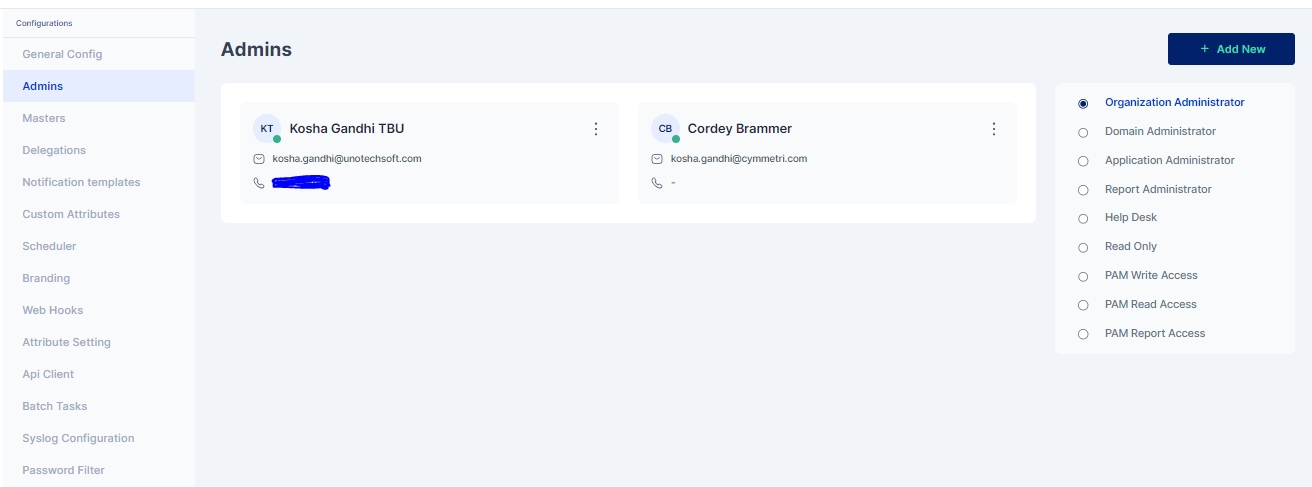
Cymmetri platform has six different admin roles with various levels of access to the various menus and resources on the administration portal of the Cymmetri.
In addition to these six admin roles, Cymmetri also supports three different privileged user roles that grant varying levels of access (read, write, report) to privileged users within Cymmetri.
The various admin roles on the Cymmetri Identity Platform may be described as follows:
This is the so-called 'super admin' administrator role in the Cymmetri platform. Administrators with this role have the authorization to modify any settings or make changes to the tenant.
This is a slightly less privileged administrator. Most tenant-wide system settings, such as the configuration of SMS and email providers (when configured by the tenant), are restricted for domain administrators. All other configurations can be viewed and edited by administrators with the Domain Administrator role.
An administrator with the role of Application Administrator has access to Identity Hub configurations, including Application, User, and Group configurations. The Application Administrator can map users and groups to applications and has the ability to edit all configurations related to Application Management.
An administrator with the role of Report Administrator has access to the Reports menu, which includes the ability to view, modify, and add new reports.
Helpdesk administrator has access to a very limited set of administrative functionalities, such as, reset password of end-user, remove configured Multifactor authentication options, and other such common use-case
All administrative users have editing access to the various administrative sections of the Cymmetri platform. However, administrators with the "Read Only Administrator" role do not have editing access to any of the settings or configurations; they only have "Read Only" access to the administrative section.
PAM Write Access in Cymmetri grants users the privilege to connect to servers via RDP or SSH and perform write or modification actions on those servers. Users with PAM Write Access have the ability to make changes, update configurations, and perform tasks that involve altering data or settings on the connected servers. This access level is typically assigned to administrators and IT personnel responsible for making configuration changes or updates on various servers within the Cymmetri environment.
PAM Read Access provides users with the ability to connect to servers using RDP or SSH and view the content and configurations on those servers. However, users with PAM Read Access do not have the authority to make modifications or changes to the server settings or data. This level of access is suitable for individuals who need to monitor server activities, check logs, or retrieve information from servers without the need to alter any server configurations.
PAM Report Access is designed for users who require access to PAM-related reports without the need to connect to servers via RDP or SSH directly. Users with PAM Report Access can generate and access reports that provide insights into server activities, access logs, or other relevant data within the Cymmetri. Such users can also configure schedulers to send timely reports to various other users. This level of access is beneficial for auditors, compliance teams, or individuals focused on analyzing server-related information for reporting and auditing purposes.
Follow the steps mentioned below to promote a user as an admin in Cymmetri platform.
Click on the Configuration menu on the right-hand side
Now click on the Admins sub menu within the Configuration menu
Click on the "+Add New" new button to add a new administrator
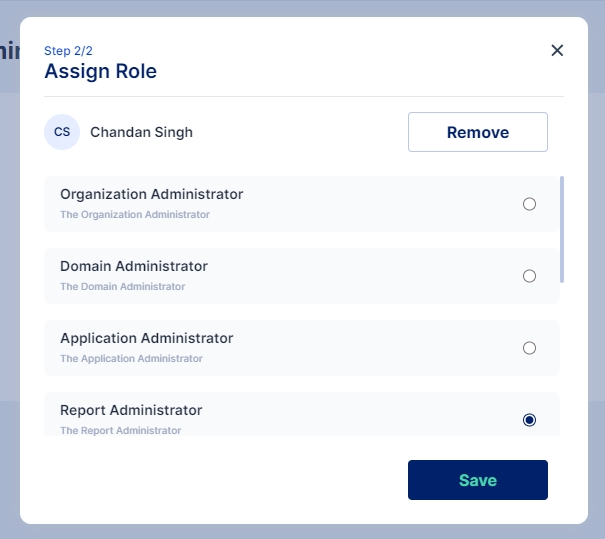
To assign an administrator role to a user, search for the user and then click the 'Assign' button.
Select the chosen administration role and click on Save
Administrator has been assigned the role as “Report Administrator”.
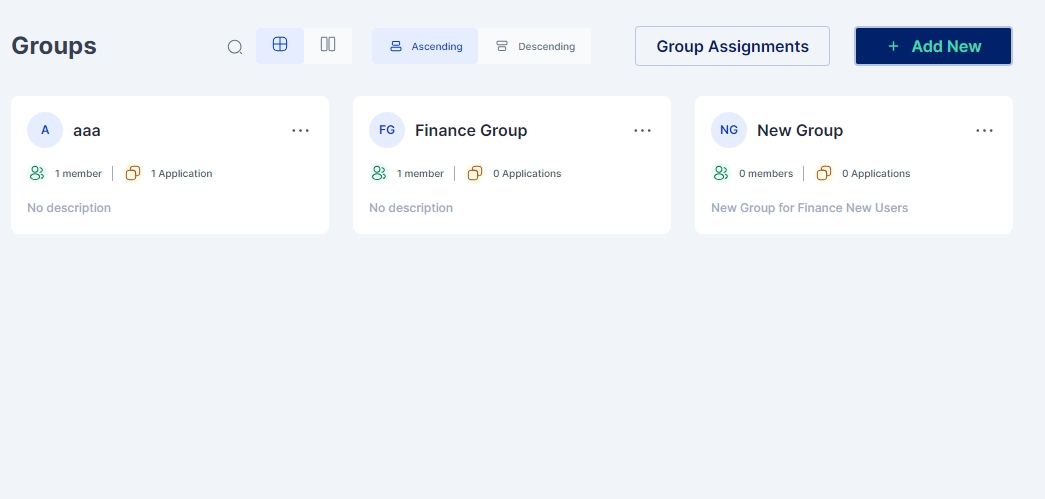
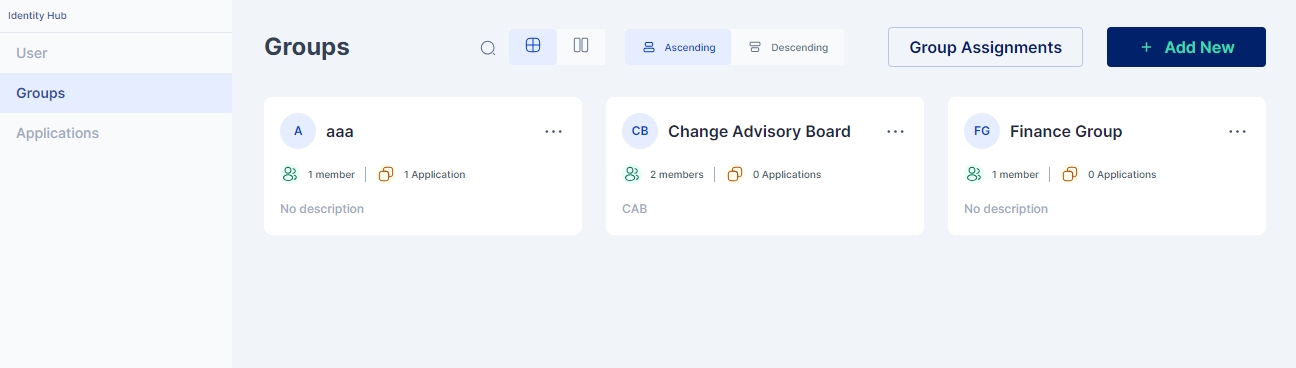
Administrator tasks pertaining to bulk users may be eased by creating groups of users.
Access the group configuration page by clicking the Identity Hub >Groups menu on the left-hand side.
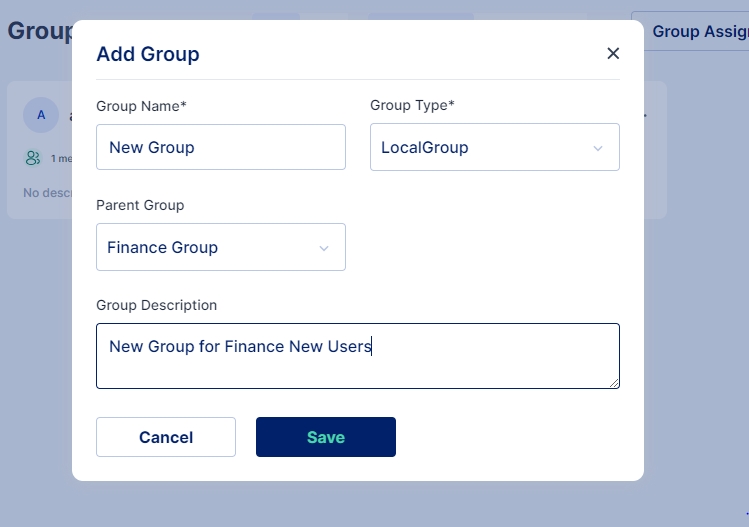
Click on the “+Add New” button to start creating a new group
Group Name: Indicates name of the group.
Group Type: For environments not using Active Directory, either Local or Remote Group may be chosen, in case Active Directory is being used for synchronization in the tenant, the appropriate type according to the group policy object must be chosen.
Parent Group: If a parent group is chosen, all the policies and rules applicable to the parent group will be assigned to this new group, in addition to the policies and rules specifically applied to this new group.
Group Description: Optionally, a description may be provided to the group.
Once all the details have been entered click on Save button and a new group is created.
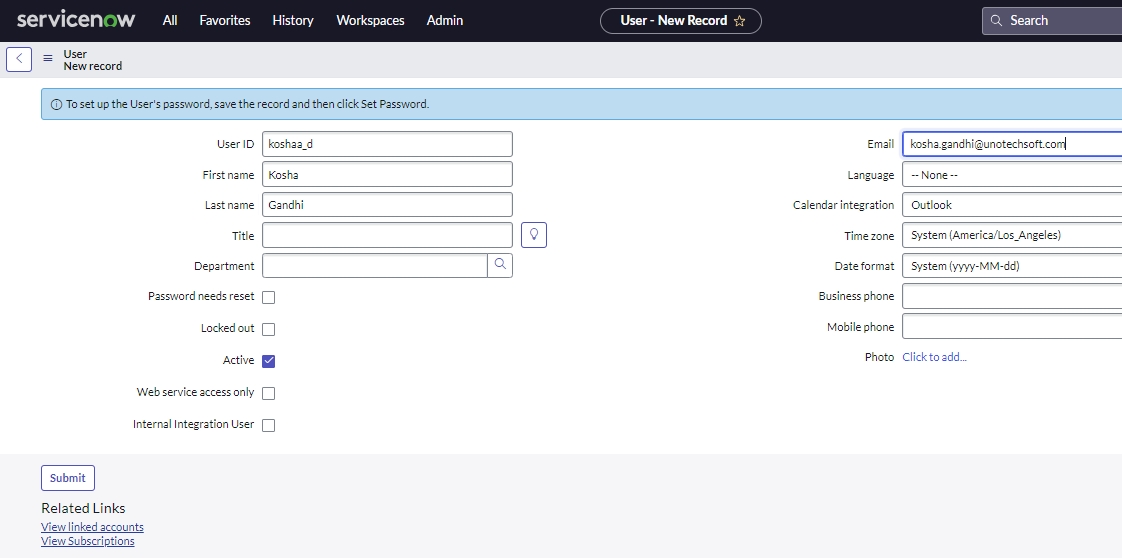
While users may be imported and sychronized from other Identity providers, sometimes users may need to be added manually by the administrator.
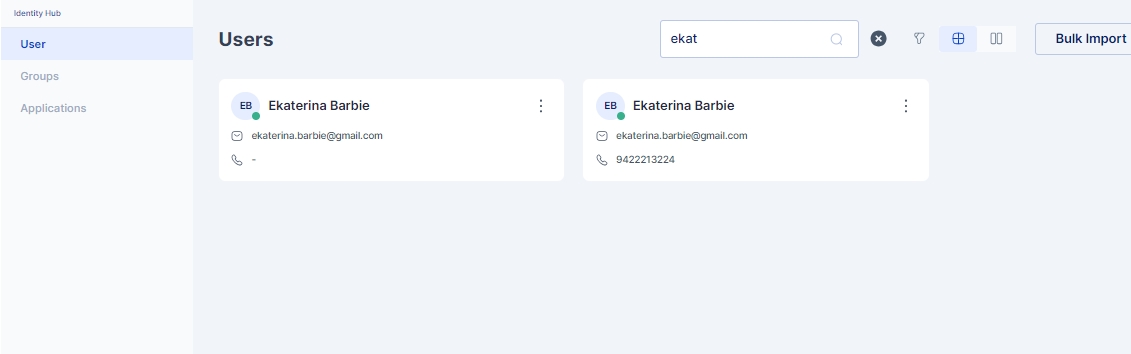
First navigate to the User configuration page, by clicking on the Identity Hub > User menu on the left-hand side panel.
Click on the “+Add New” button.
Enter the required information and scroll down to add further information
Click on the Save button to move to the next configuration page, and copy the automatically generated password.
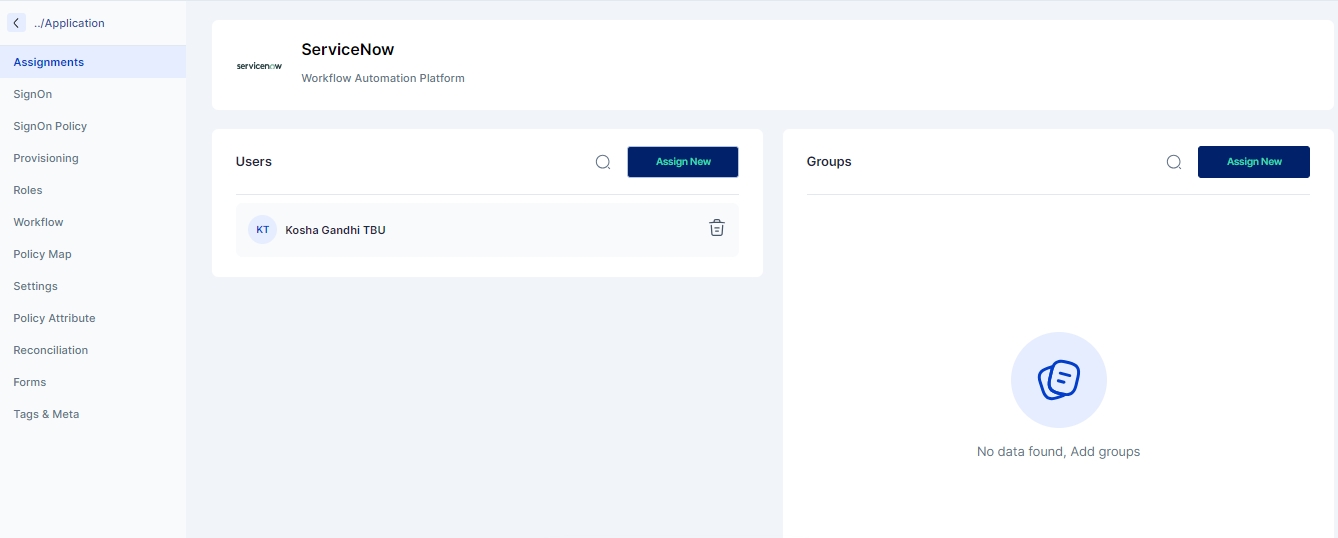
Optionally a group can be assigned to the user.
And also applications can be assigned to the user.
Once all the above steps are completed successfully the user is created with the assigned groups and assigned applications.
Following are the steps to delegate work to an delegatee:
The logged in user needs to go to their Settings Page by clicking on the user's username on top right
Once on the Settings Page user needs click on My Delegations menu
Toggle Status: Enable the Toggle Status to Active
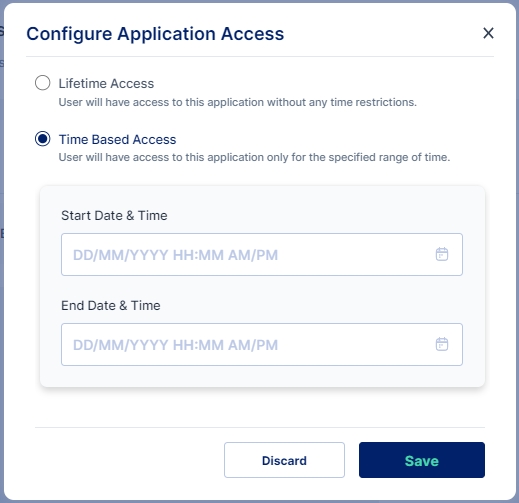
Start Date: The date from which the user is delegate the work
End Date: The date upto which the access is delegated
Delegated To: The user (delegatee) to whom the work is delegated. This dropdown populates the list of all users to whom the task can be assigned
Excluded Applications: List of applications whose access is not provided to the delegatee
Once all the details are filled the user is expected to accept the consent to be able to configure the delegation. The consent looks something similar to as show below:
Once confirmed the user needs to click on the I agree check box and save the delegation
Once save the delegatee can see and accept the delegation in their My Delegation Page under Settings.
For any user to be able to delegate their work to other users, the user should be added to the delegation users list; Check how to Add Users to the delegation list so that they can delegate their activities.
Note: My Delegations menu will appear only if the logged in user is added to the delegation users list. is how to Add Users to the delegation list.
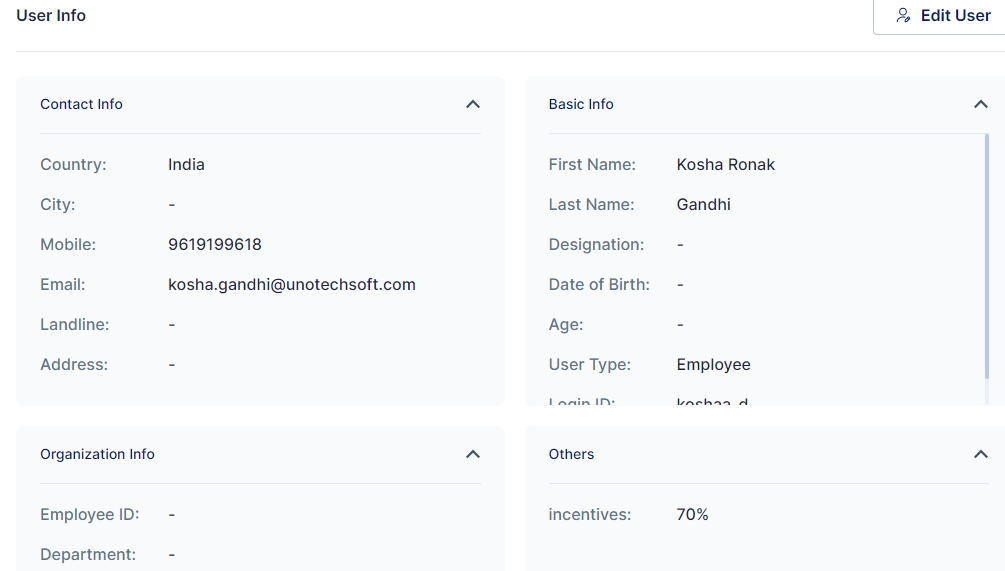
Custom Attributes may be added for all user entities in your Cymmetri Platform. This allows organizations to add custom user attributes, that are used across the applications in the organization.
For example, your organization has a custom attribute that captures and uses the local language of your employees and vendors for the purpose of providing local services. This attribute may be stored in your Active Directory, and may need to be synchronized to your organization’s other applications during the course of an employee or vendor’s employment.
Cymmetri platform allows the administrator to define custom attributes on a tenant-wide level.
Custom attributes can be used at various places like when creating a user, as a filter when searching for users, and is visible in the others section of user info
To start configuring custom attributes, click on the Configurations menu on the left-hand side and then click on the Custom Attributes menu.
Click on the Add New button to start adding a custom attribute
Fields to be updated:
Name/ Key: refers to the label assigned to the custom attribute.
Description: allows you to provide additional details or notes about the custom attribute for reference and clarity.
Status: Allows to activate the custom attribute. Only if it is set to active, is the attribute available to use in the User Object.
Note: A custom attribute once created can only be set to inactive, it cannot be deleted.


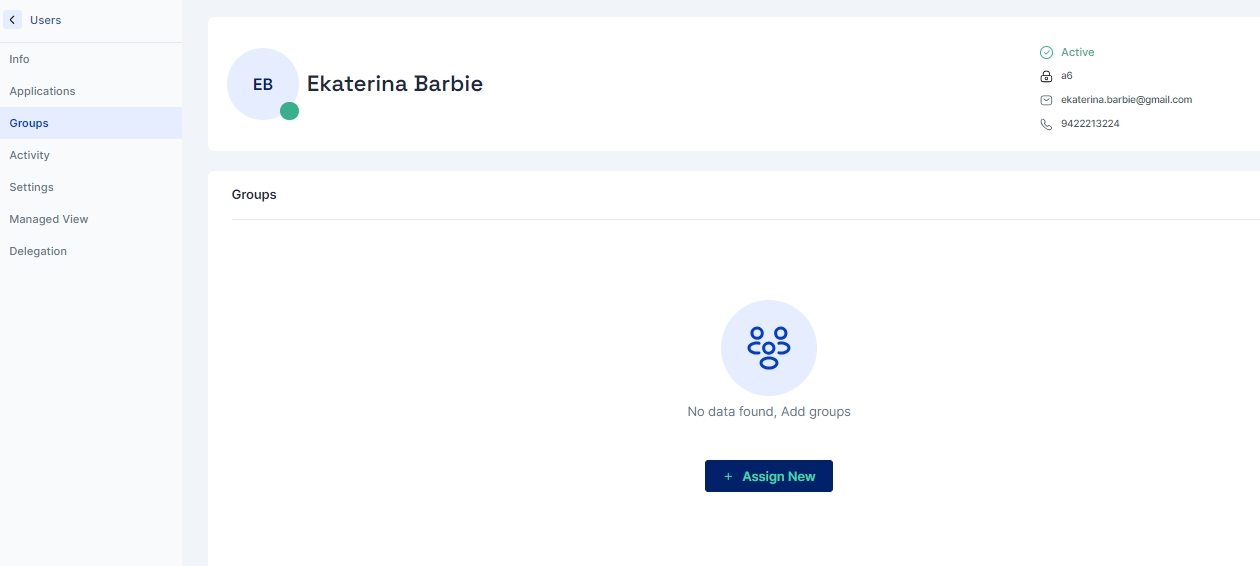
Users once created in the Cymmetri platform can be assigned to a group. Assigning users to a group helps ease the administrative efforts to apply the same policies and assigning applications to multiple users.
When assigning users to groups there can be various approaches which can be used:
Adding User to Group (from the Group Page)
Assigning a Group to a User (from the User's Page)
Bulk Assigning Users to a Group (Using Group Assignment on Group Page)
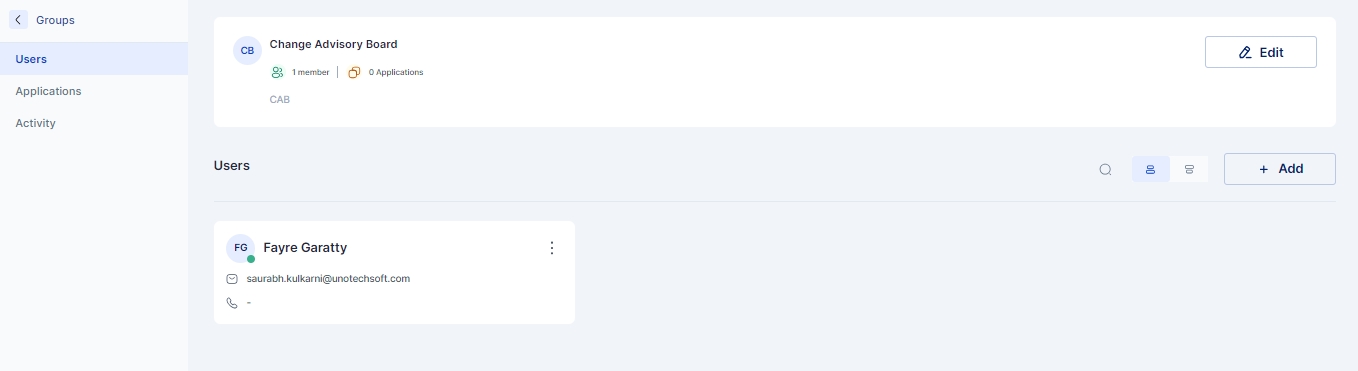
First the administrator needs to click on the group name and enter the configuration for the group.
Now Go to the Users Page and click on +Add button to get a list of users to add to the group
3. Now click on the assign button next to the user you wish to add to the group.
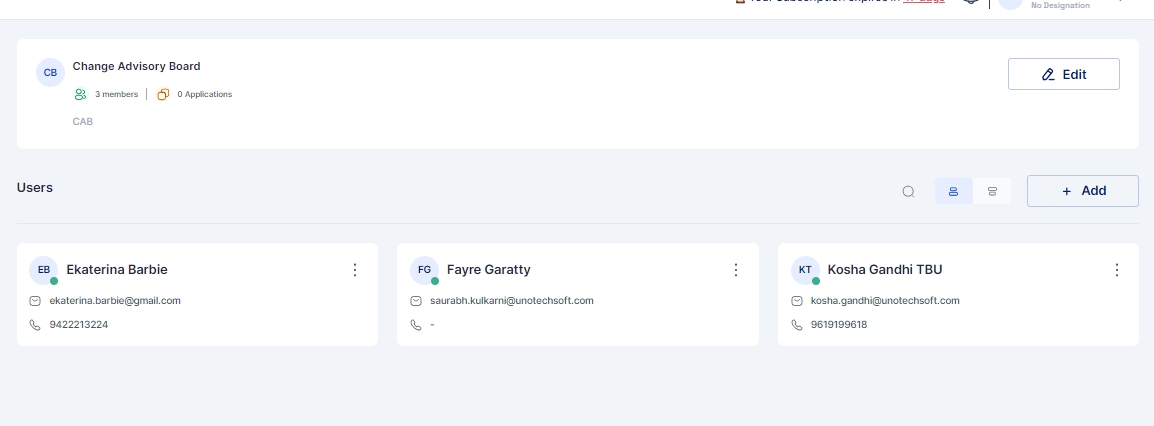
Once assigned the user can be seen on the Users page of the Group as shown below:
For this approach the Administrator needs to go to Identity Hub > User page and then select the user from the list to whom the group needs to be assigned
Go to the user's page and select the Groups menu and click on "+Assign New" button
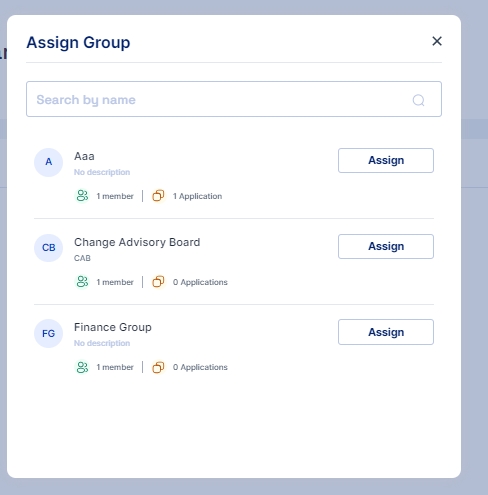
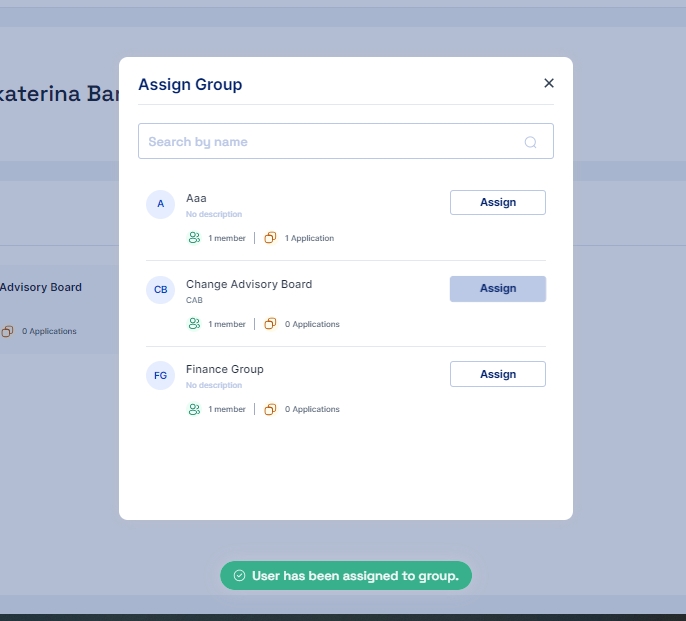
This opens a pop up window where a list of all groups is visible
Click on the assign button and the group is assigned to the user or you may say the user becomes a part of the group
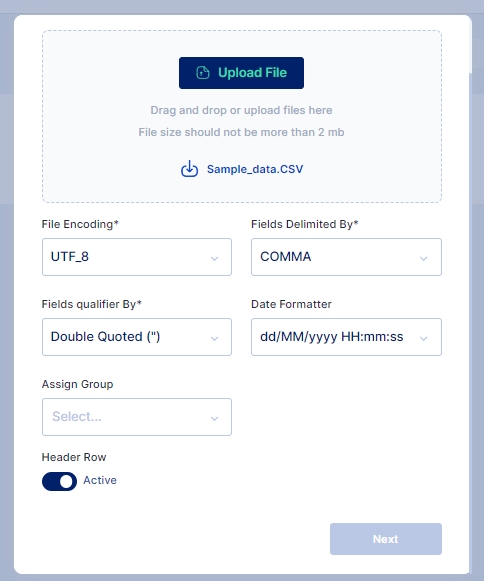
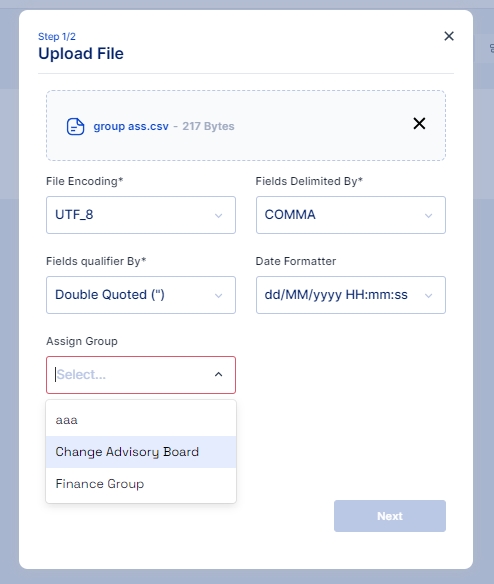
For this approach the Administrator needs to go to Identity Hub > Group page and then click on the Group Assignment button
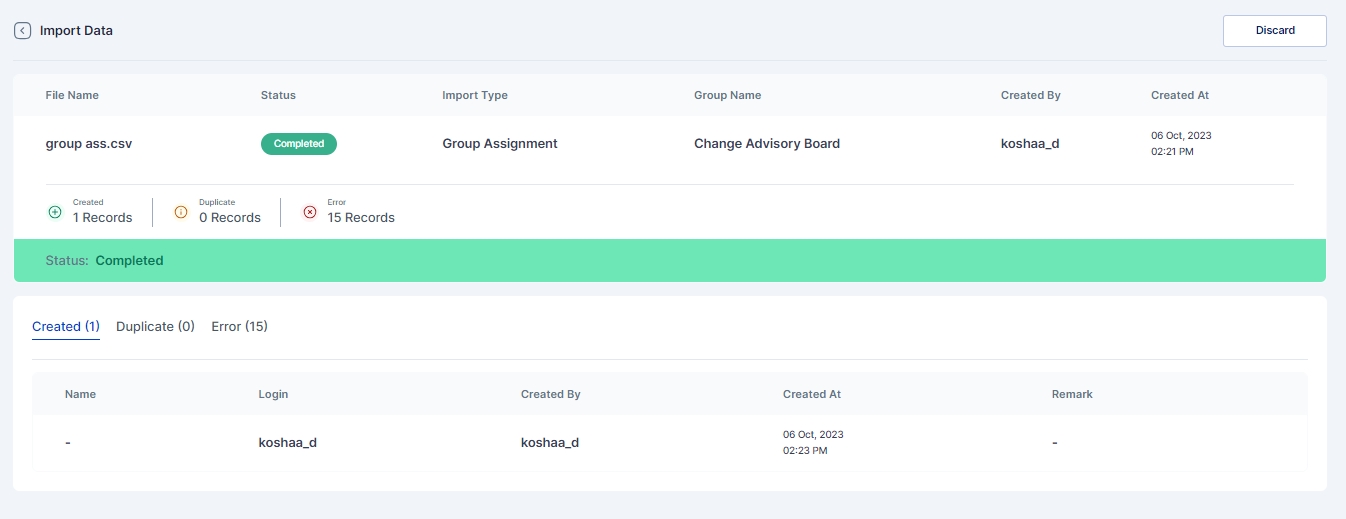
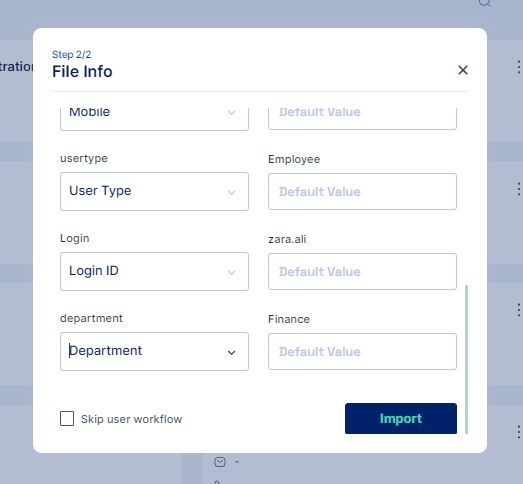
A screen pops up that lets you select the csv file you want to upload to import the users that needs to be assigned to the group. This csv file needs to have one column that contains login id of users; Upload the csv file, you may also use the sample data file available and modify it to match your user's login id.
Once the file is selected and uploaded next you need to select the group to which you want to assign the users.
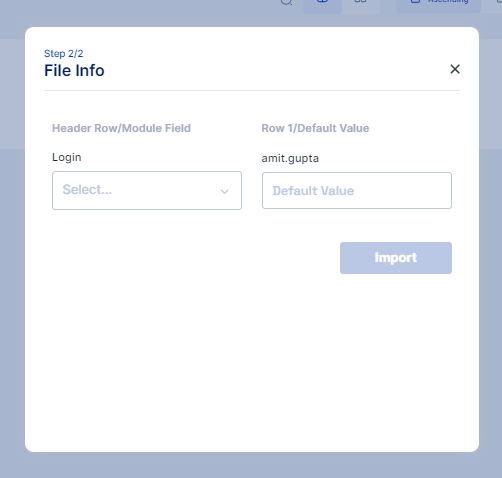
After selecting the group the column in the csv file needs to be mapped with the Cymmetri login column.
Once mapped click on the import button and the users would be mapped to the assigned group provided the login id is correct
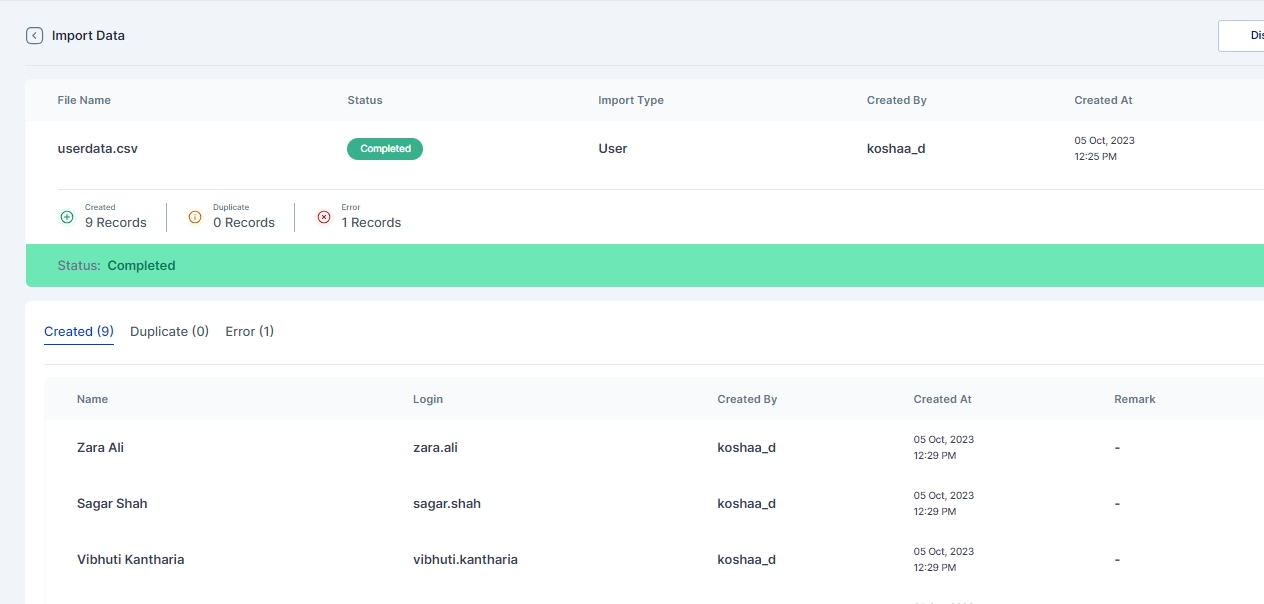
Results of successfully Imported Users, Duplicate Users or any error that occurred during import can be see in Logs > Import History page
Delegation as a process in the Cymmetri platform refers to the ability of any end-user to delegate their responsibilities to any other end-user on the platform. As such, delegation provides the ability to the delegatee to perform various actions, including Single Sign On, Application Requests, managing workflows by providing approvals, performing Cymmetri administrative actions (if the delegator has the required permissions on the platform), among other actions. However, the login flow for the delegatee stays the same.
Access the Delegation administration panel, by clicking on the Configuration left-hand side menu item and then click on the Delegations menu item.
For any user to be able to delegate their work to other users, the user should be added to the delegation users list; To Add Users who can delegate their activities, click on the Assign New button and select one or more users to add to this list
The User and Assignee Consent sections allow organizations to align task delegation practices with their unique policies. This customizable feature empowers administrators to define specific consent texts, ensuring that both the user delegating a task and the assignee receiving it acknowledge and agree to these terms.
The user consent will be displayed whenever the delegator (user) will go to their settings in their Workspace and assign a delegation to an end-user (assignee).This consent will be recorded in the Cymmetri backend for audit logging purpose.
Similarly, the assignee consent will be recorded when the end-user (delegate/assignee) logs into the account for their manager (delegator/user).
Here's how it works:
Administrator Configuration: Administrators can craft consent texts tailored to their organization's requirements. These texts typically outline the responsibilities, expectations, and any legal or compliance aspects associated with task delegation.
User Perspective: When a user decides to delegate a task to someone else, they will be presented with the customized consent text. The user must carefully review and accept the terms before proceeding with the delegation process. This step ensures that the user is aware of the implications of task delegation and is willing to proceed.
Assignee Perspective: On the other side, the assignee who is about to receive the delegated task will also be presented with relevant consent text. They must thoroughly read and accept these terms before taking on the responsibility. This step helps establish clarity and accountability for the assignee.
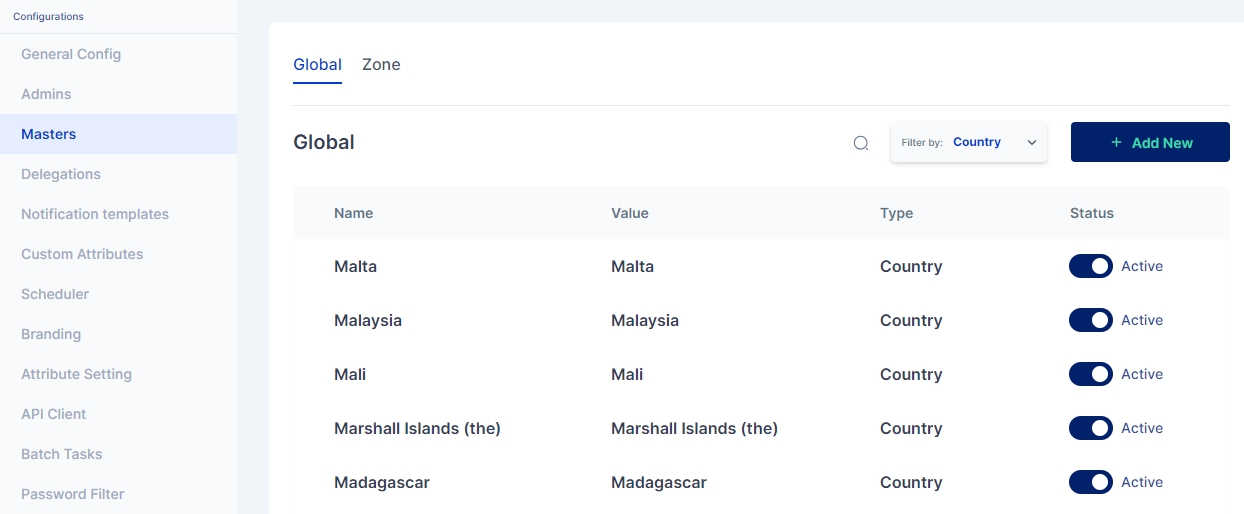
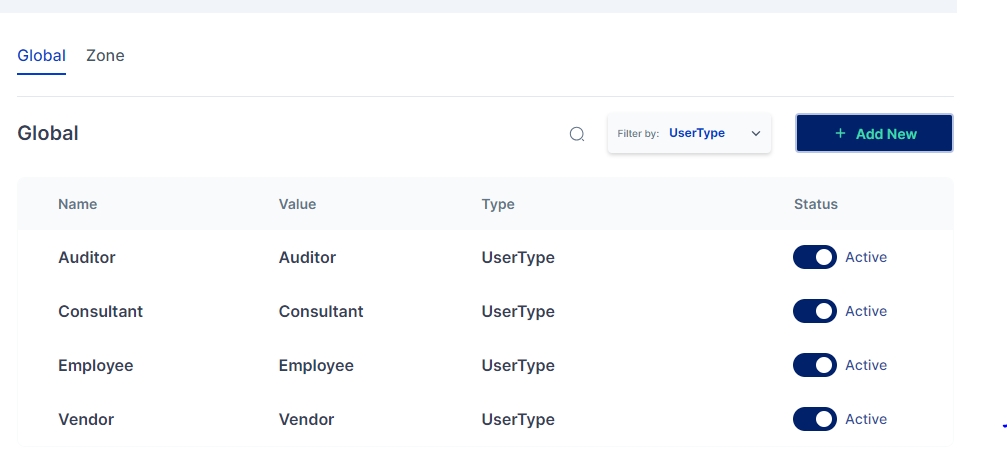
Masters are key-value pairs that can be defined for the entire tenant. The key(name) in this context refers to the label to be shown on the Cymmetri User Interface, and the value is the backend identifier used to reference this field in various processes, rules, and policies defined in the Cymmetri platform.
Cymmetri platform allows for configuring a number of masters in the system, the major classification among which is Global masters (which allow for creating master key-value pairs that may be used for various situations, such as creating a new department, designation, and other custom attributes for users in the system) and Zone masters (which are network configurations that may be used to whitelist or blacklist user access onto the platform as well as act as a source for adaptive Multi-factor authentication).
These are system-wide key value pairs primarily used to setup key value pairs referring to various masters as given below:
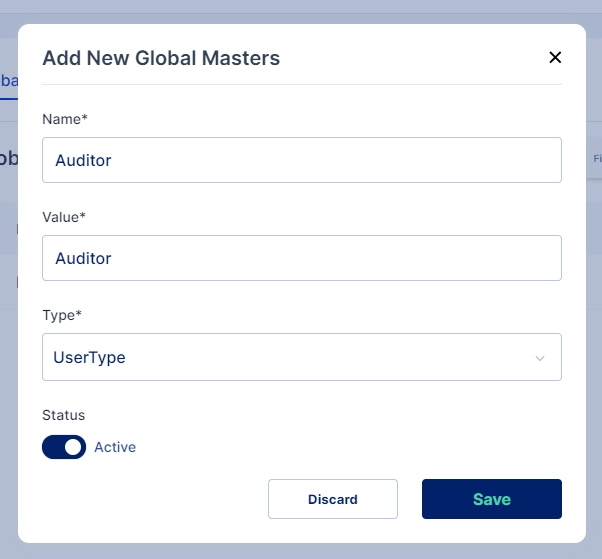
Follow the steps below to Add a New Master:
Click on the "+Add New" button to add a new master of any category mentioned above.
Enter the Name and Value for the new Master, then select the type of master you wish to create and enable the active toggle button to make the master active. Once all values are entered click on Save button
A new Global Master is successfully created in the selected category
Zone masters indicate the network zones that may be used for blacklisting or whitelisting access to the Cymmetri Identity platform deployment. It may also be used for detecting users from certain zone and assign relevant multi-factor authentication policies.
Zone Name: Used to refer to a zone in other configurations on the Cymmetri platform.
Inactive/Active: Toggle button to check whether the zone is active (configurable as a condition for other rules on the Cymmetri platform.)
Gateway IP: Refers to the Gateway IP address for the network zone.
Proxy IPs: Proxy Server IP addresses that may be used to be directed to this network or the IP addresses outside of the zone that would indicate a connection from this zone.
For adding a new Zone Master or for editing an existing one, Fill all the mandatory details in the screen as shown above, click on the enable toggle button and finally click a “Save” button.
CIDR: Refers to the CIDR notation of the subnet of the network that this zone refers to. .
Country
Country key-value pairs are stored in the system, and are available as drop-downs wherever needed in the system - User attributes, Policies and other mappings.
UserType
UserType is used as one of the conditions while defining authentication policies and as an input in the rule engine.
Department
Department is used as one of the conditions while defining authentication policies and as an input in the rule engine, and also as a user attribute.
Designation
Designation is used as one of the conditions while defining authentication policies and as an input in the rule engine, and also as a user attribute.
RBAC
RBAC (System Roles) is used as one of the conditions while defining authentication policies and as an input in the rule engine, and also as a user attribute.
Upon receiving a delegation request, the user is notified via email and within the platform.
To view the delegated task the delegatee can go to Settings->Delegation to Me to see details about the delegated tasks and the user who has assigned the task
The user needs to click on the Accept button to accept the delegation. On click the Accept button an Assignee(delegatee) Consent is shown which the users needs to read and confirm. The Consent also shows details of the delegator and the duration of the delegation.
Once the user accepts the delegation the user sees a login button, to login into cymmetri as the delegator
On clicking the login button the delegatee is redirected to the delegator's My Workspace Dashboard.
The delegatee can access and perform actions on all the applications assigned to them and if any application is excluded during delegation they are not visible to the delegatee.
To access Internal Identity Providers navigate to Authentication-> Identity Provider->Internal IDP
Since Cymmetri is a default Internal IDP no configuration is needed for it. An administrator may still have an option to disable Cymmetri Authentication which can be done by editing the Cymmetri Authentication Internal IDP mechanism
An administrator may also change the Display Name and/ or Description as shown in the screen above.
Active Directory (AD) serves as a robust Identity Provider (IDP) in enterprise environments. It authenticates and authorizes users, facilitating seamless access to resources. AD centralizes user management, streamlining security protocols and ensuring efficient user provisioning.
Active Directory can be utilized in Cymmetri as an Identity Provider (IDP), leveraging existing AD user accounts to access Cymmetri, as the platform supports the LDAP protocol.
For configuring AD as an Identity Provider on the primary service needed is the Adapter Service.
The Adapter Service or Auth Adapter Service is exposed as a rest service which runs on https acts as an adapter to facilitate authentication using the LDAP protocol which is often employed for authentication purposes in various systems and every adapter service instance is called by the secret generated while installation/configuration of adapter service.
The rest endpoints are called by cymmetri-cloud AuthenticationService to connect to On-Prem AD/Ldap or cloud AD/Ldap. The AdaptorService is used to test connection, authenticate, change, reset password of an user.
For configuring Active Directory as an internal IDP navigate to Authentication -> Identity Provider -> Internal IDP. Here you may either configure the already created AD Authentication instance or +Add New
In either cases a screen opens where you need to provide the below mentioned details
Name: AD Authentication
IDP Type: Active Directory
Description: A general description about the IDP type
Status: Active
Adapter Service Domain: Location (IP) of the server on which the Adapter Service is deployed
Adapter Service Secret: The secret generated while installation/configuration of adapter service
Base DN: Active Directory root domain name
Search Scope: A search scope for locating users in Active Directory
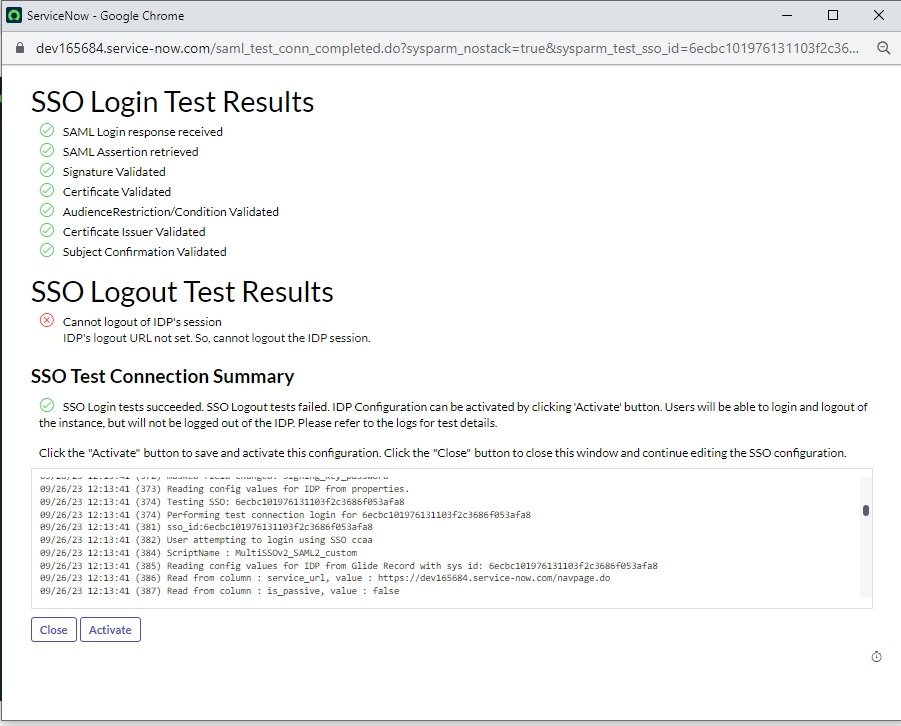
Once all the details are entered Save the changes and Test the Connection using Test Connection button.
Once the rule is configured, whenever a user matches the rule conditions, their credentials are verified against those stored in Active Directory. Upon successful verification, the user is granted access to log in to Cymmetri.
Lightweight Directory Access Protocol (LDAP) serves as a important Identity Provider (IDP) in enterprise environments. It authenticates and authorizes users, facilitating seamless access to resources. LDAP is commonly used as a directory service for managing user identities and authentication information within an organization.
LDAP can be utilized in Cymmetri as an Identity Provider (IDP), leveraging existing user accounts to access Cymmetri, as the platform supports the LDAP protocol.
For configuring LDAP as an Identity Provider one of the primary service needed is the Adapter Service.
The Adapter Service or Auth Adapter Service is exposed as a rest service which runs on https acts as an adapter to facilitate authentication using the LDAP protocol which is often employed for authentication purposes in various systems and every adapter service instance is called by the secret generated while installation/configuration of adapter service.
The rest endpoints are called by cymmetri-cloud AuthenticationService to connect to On-Prem AD/Ldap or cloud AD/Ldap. The AdaptorService is used to test connection, authenticate, change, reset password of an user.
For configuring Active Directory as an internal IDP navigate to Authentication -> Identity Provider -> Internal IDP. Here you may either configure the already created LDAP Authentication instance or +Add New
In either cases a screen opens where you need to provide the below mentioned details
Name: LDAP Authentication
IDP Type: Open LDAP
Description: A general description about the IDP type
Status: Active
Adapter Service Domain: Location (IP) of the server on which the Adapter Service is deployed
Adapter Service Secret: The secret generated while installation/configuration of adapter service
Base DN: LDAP root domain name
Search Scope: A search scope for locating users in LDAP
Once all the details are entered Save the changes and Test the Connection using Test Connection button.
Once the rule is configured, whenever a user matches the rule conditions, their credentials are verified against those stored in LDAP. Upon successful verification, the user is granted access to log in to Cymmetri.
External Identity Providers (IdPs) in Cymmetri refers to third-party services or systems that handle the authentication of users. Instead of managing user identities internally, an IAM solution can leverage external IdPs to authenticate users and provide access to applications and resources. This externalization of identity management can enhance security, user experience, and streamline the onboarding process.
Cymmetri dashboard provides administrators with a centralized and visual representation of key information and controls related to identity management, access governance, and administration.
The dashboard serves as a command center for overseeing and managing the identity lifecycle, compliance, and other aspects of identity and access governance within an organization.
Upon Logging in the admin is landed on the dashboard where he can see the following:
Shortcut to configure recently added application - Configuration the application means adding roles, defining provisioning, reconciliation, SSO and so on
Users Activity - Total Successful user logins in Cymmetri
Accounts Locked - User account locked event
Users Onboarded - New users being onboarded in the system
Password reset - Password reset activity in the system
Authentication stats - Number of successful and failed login attempt in a timeframe
App Identity - It displays the application reconciliation activity with respect to the users.
Cymmetri also displays some important system KPIs to the admin as shown below
Application - The count of applications integrated into the Cymmetri system.
Active Users - The total number of users currently active within the system.
Total Users - The overall number of users registered and onboarded into Cymmetri.
Roles - The total count of roles created for applications within the Cymmetri platform.
Workflows - The total number of approval workflows established in the Cymmetri system.
Password policy - The total count of password policies configured for user authentication in Cymmetri.
Rules - The cumulative count of rules implemented in the system, covering provisioning, Multi-Factor Authentication (MFA), approval workflows, etc.
Users unlogged - The number of users who have not initiated a login session in Cymmetri since their registration.
Additionally, there are some useful system shortcuts placed on the right side of the page to make faster business decisions.
For enabling Active Directory to be used as an IDP for specific set of users an Authentication Rule needs to be configured. you can see the steps on how to configure Authentication Rules.
For enabling Open LDAP to be used as an IDP for specific set of users an Authentication Rule needs to be configured. you can see the steps on how to configure Authentication Rules.


Log in to your Google admin account and go to the Admin Section as shown below:
Once in the admin section click on Apps > Overview
In the overview page click on Web and mobile apps tile to add a new custom app
On the Web and mobile apps page click on the Add app dropdown and then select Add custom SAML app to add the Cymmetri tenant as a custom app
Provide a relevant App Name, Optionally a description for the application can be provided. An App Icon can also be attached if required. Once entered click on Continue button
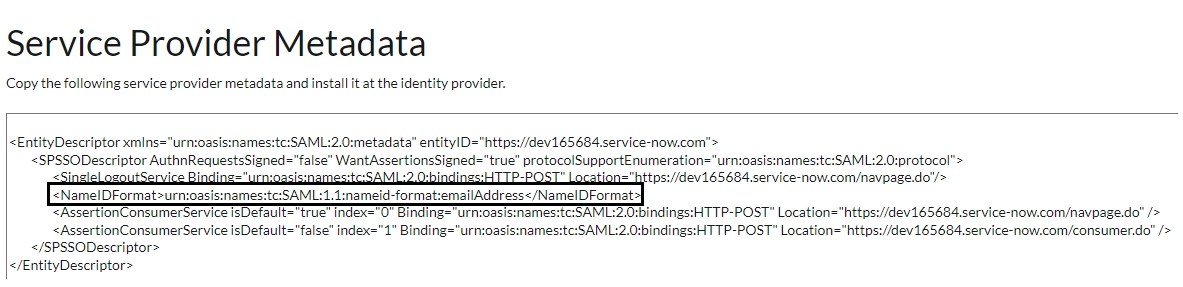
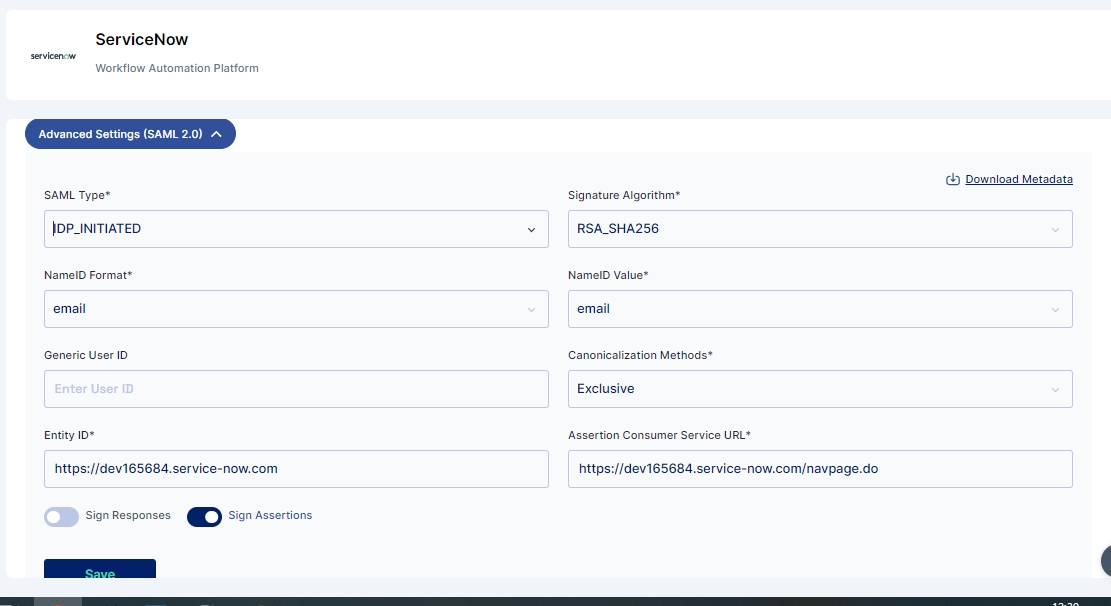
Once the IDP metadata and certificate is obtained the Service Provider(i.e. Cymmetri) details need to be provided. We need to provide the ACS URL and the Entity ID these details can be obtained from Cymmetri as shown here. No change need to be done for Name ID format and Name ID it can be kept to UNSPECIFIED and Basic Information > Primary email. Once done click on Continue
Attributes can be added on this creen which could then be sent as a SAML response to Cymmetri. These values can be used to create a user in Cymmetri if JIT provisioning is enabled on Cymmetri's side
Group membership information can also be sent by cinfiguring groups here and if the user belonged to the configured group. Once attributes and groups are configured click on FINISH.
Once you click on the FINISH button the below screen appears that shows the configuration details. It also shows various shortcuts to Test SAML Login, Download Metadata, Edit Details and Delete App
If the administrator does not download the certificate while configuring the custom application, it can be later downloaded. For the same the administrator needs to go to Security>Authentication>SSO with SAML applications. This will open the Security Settings page from where either the IDP details like SSO URL and Entity ID can be copied and IDP Certificate can be downloaded. These details can be used to configure the IDP in Cymmetri.
Once Google IDP is configured, the administrator must proceed with the configuration on the Cymmetri side. To achieve this, the administrator needs to set up Cymmetri as a Service Provider and also incorporate Google as an external IDP.
Once the Service Provider is configured next we need to configure Google as an external IDP.
Administrator needs to go to Authentication->Identity Provider->External IDP. Here you may either configure the already created google-idp instance or +Add New
In either cases a screen opens where you need to provide the below mentioned details
Name: Google IdP
IDP Type: Google
Entity ID: https://accounts.google.com/o/saml2?idpid=xxxxxxxxxxxx
SSO Service URL: https://accounts.google.com/o/saml2/idp?idpid=xxxxxxxxxxxx
Destination: https://<hostname>/spsamlsrvc/samlSP/SingleSignOn
Protocol Binding: HTTP Post (can also be set to HTTP Redirect if it is set so in Google IDP)
Name ID Policy:
Policy: Email (This may change based on what is configured in Google IDP)
Value: Email (This may change based on what is configured in Google IDP)
Certificate: Certificate downloaded from Google IDP
Logout Request URL: Need to mention the SingleLogoutService url from the metadata file if SLO (Single Logout) is configured in Google.
Logout Protocol Binding:HTTP Post (can also be set to HTTP Redirect if it is set so in Google IDP)
Service Provider Id: cymmetri (Need to the select the configured Service Provider as shown above)
Once all the details are entered Save the changes.
Once the rule is configured whenever a user matches with the rule conditions the user is redirected to Google screen and the user needs to provide his/her Google credentials to be able to login into Cymmetri.
Cymmetri's External Identity Provider (IdP) feature allows you to authenticate user identities using different IdPs for various user types. This flexible configuration enables you to streamline access for both internal employees and external users, such as consultants, vendors, and their employees. In this documentation, we will guide you through the process of configuring an External IdP within Cymmetri's identity and access management system.
For internal employees, you can configure Cymmetri's Internal IdP mechanisms like Active Directory or LDAP. This allows seamless authentication for your organization's employees.
Whereas external users, such as consultants, vendors, and their employees, can be verified using popular External IdPs like Google, Azure, Salesforce, or any other supported IdP. This approach simplifies access for external parties while maintaining security and control.
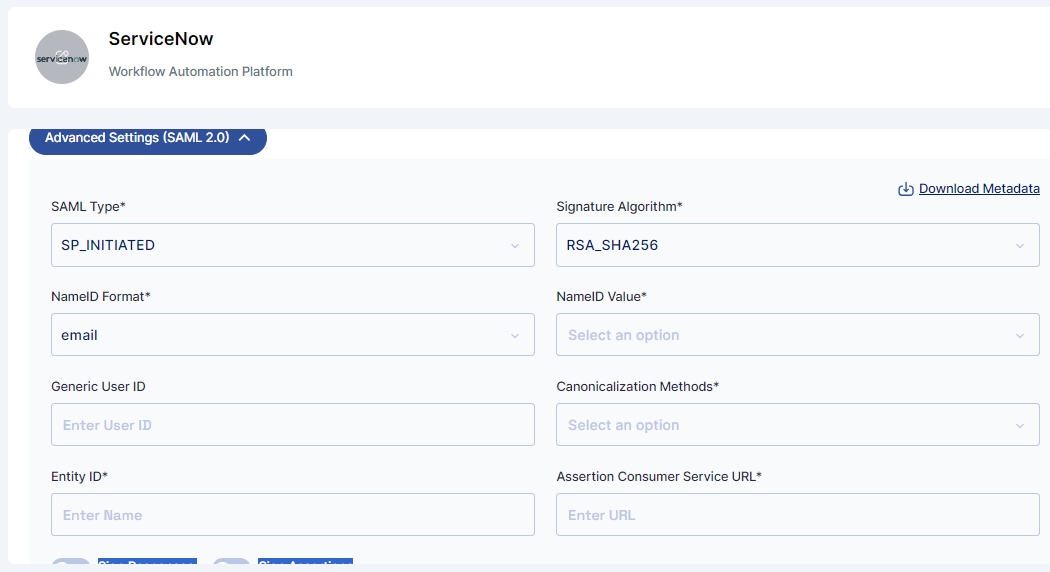
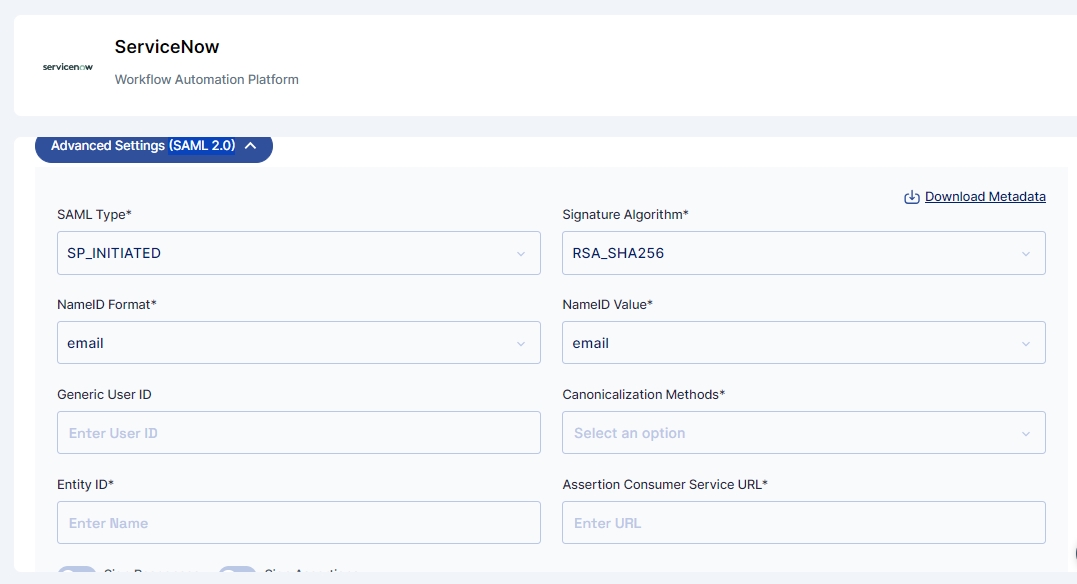
To configure an External IdP in Cymmetri, administrator needs to provide the following information:
Name: A descriptive name for the External IdP configuration.
IDP Type: The type or provider of the IdP (e.g., Google, Azure, Salesforce).
Entity ID: The unique identifier for the IdP entity.
SSO Service URL: The URL where Single Sign-On (SSO) requests should be sent.
Destination: The location where authentication responses should be directed.
Protocol Binding: The protocol used for communication with the IdP (e.g., HTTP Post, HTTP Redirect).
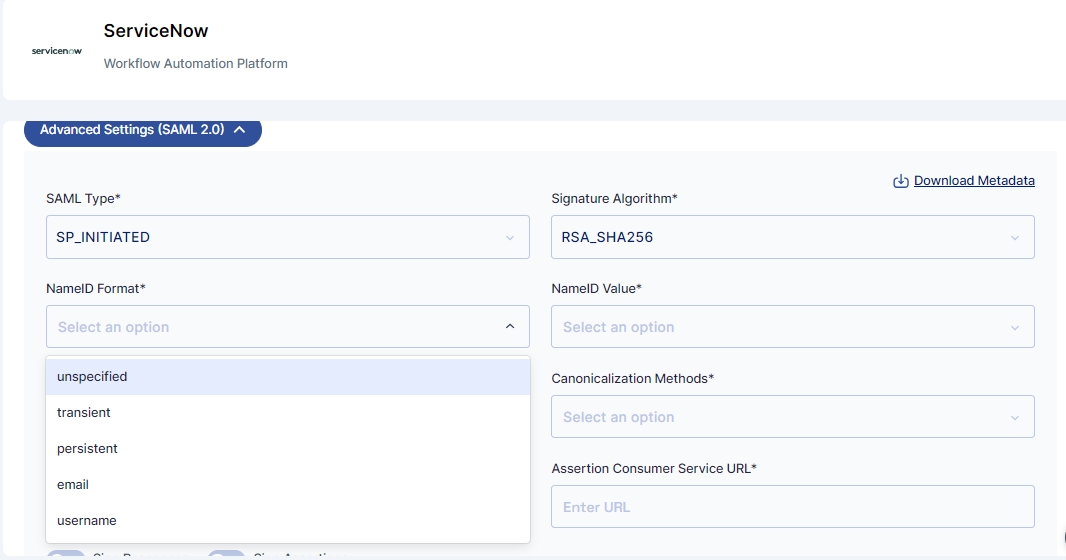
Name ID Policy and Value: This policy defines the format and content of the identifier that represents the authenticated user. For example:
Policy: email
Value: email
Certificate: The certificate used for secure communication between Cymmetri and the External IdP.
In the upcoming sections we will learn step by step implemenatation of the various External IDP mechanisms:
Google serves as a robust external Identity Provider (IDP) through its Identity Platform. Leveraging various authentication mechanisms, it facilitates secure user authentication for Cymmetri. This allows users to sign in with their Google credentials, ensuring a seamless and familiar login experience. Google's IDP mechanism is adopted for its reliability and user-friendly authentication processes, thus making it a preferred choice for integration into Cymmetri as and External IDP.
Azure AD serves as a robust external IDP, facilitating secure access into Cymmetri. Employing industry standards like OAuth 2.0 and SAML, it enables Single Sign-On (SSO) and multi-factor authentication. Azure AD seamlessly integrates with Cymmetri providing easy identity management and ensuring compliance with modern security standards.
Salesforce as an external Identity Provider (IDP) offers robust authentication and access control solutions. Utilizing industry-standard protocols like SAML and OAuth, Salesforce IDP ensures secure Single Sign-On (SSO) experiences.
Configuring External Identity Providers in Cymmetri gives you the flexibility to authenticate user identities using different IdPs tailored to specific user types. Whether it's for internal employees or external collaborators, Cymmetri's External IdP feature ensures secure and convenient access to your organization's resources.
Within Cymmetri, the authentication process is highly customizable through the definition of authentication rules. While the platform provides a default authentication rule, administrators have the ability to define custom authentication rules that align with the specific business needs and the variety of identity providers at their disposal.
For instance, let's consider a scenario where an organization has distinct user types, such as regular employees, contractors, and administrators. The administrators might require to authenticate employees with Active Directory as the identity provider and use Cymmetri's own authentication engine to verify the identity of vendors and contractors. With Cymmetri's flexibility, administrators can create authentication rules that cater to these varying requirements, ensuring a tailored and secure authentication experience based on user roles and organizational needs.
Admins can find authentication rules in Authentication tab in Cymmetri.
To create a new authentication rule, admin must simply click on the "Add New" button on the top right corner of the page.
The admin must fill in the following details
The name of the rule
Identity provider radio button ( Enable for External IDP or Disable for Internal IDP)
Identity provider
Description of the rule
Active Radio Button
Conditions
The administrator has the capability to establish rules based on conditions like: Department, designation, User Type, country, and Login Pattern.
Subsequently, the administrator defines regular expressions for conditions, specifying whether they should be equal to, not equal to, and assigns corresponding values.
Cymmetri facilitates the creation of multiple conditions for an authentication rule and provides the option to group these conditions using AND or OR logic.
In the image presented above, an exemplar authentication rule is showcased. This rule is structured to authenticate a user in Cymmetri through Active Directory if two conditions are met: the user's department must be equal to "Compliance," and the user type should be "Employee."
Similarly If you wish to set the Identity provider for users having email address ending with "@cymmetri.com" then you may select condition as LoginPattern > Regular Expression and its value as (.)*(@cymmetri.com)+$; and save the details.
This demonstrates how authentication rules can be precisely configured to suit specific criteria and streamline the authentication process based on defined conditions.
A comprehensive list of all known Cymmetri error codes and their summary understanding:
The Global Auth Policy allows to configure various user login parameters as shown below:
Auth Failed Count: The Auth Failed Count parameter signifies after how many failed login attempts will the user account be locked.
Unlock after Minutes: The Unlock after Minutes parameter signifies after how many minutes will a locked account be automatically unlocked.
Token Expiry Minutes: The Token Expiry Minutes parameter signifies after how many minutes will the session token expire.
Refresh Token Expiry Minutes: The Refresh Token Expiry Minutes parameter signifies after how many minutes will the refresh token expire.
On the Google Identity Provider Detail page download the metadata file by clicking on the DOWNLOAD METADATA button. This metadata file needs to be used to get Entity ID, SSO URL and Certificate. Administrator can download the certificate here or later as shown . Once downloaded click on Continue.
The page shows how to configure a Service Provider.
For enabling Google IDP to be used as an IDP for specific set of users an Authentication Rule needs to be configured. you can see the steps on how to configure Authentication Rules.
CONNECTION_ERROR
Unable to connect. Please check your connection and try again.
USRSRVC.LAST_DATE_REACHED
Application's request end date is greater than the user's end date.
USRSRVC.MISSING_DATES
Incorrect dates Please ensure selected date range should be proper.
USRSRVC.EXPIRED_TIME_BOUND
Access request duration has ended
REGSRVC.UNKNOWN
Error. Please try again later or contact Cymmetri Administrator.
REGSRVC.USER_NOT_FOUND
User not found.
REGSRVC.INVALID_TOKEN
Token expired. Try again.
REGSRVC.OTP_EXPIRED
OTP expired. Please resend and try again.
REGSRVC.OTP_LIMIT_EXCEED
Otp limit exceeded.
REGSRVC.INVALID_OTP
OTP does not match. Please check & try again
REGSRVC.INVALID_ARGUMENTS
Error. Please correct input and try again.
REGSRVC.INVALID_DOMAIN
Invalid Domain. Please try again.
REGSRVC.INVALID_CREDENTIALS
Invalid Credentials. Please try again.
REGSRVC.TERMS_AND_CONDITIONS_NOT_FOUND
Invalid Terms & Conditions. Please try again.
REGSRVC.INVALID_ACCOUNT_VERIFICATION_TOKEN
Invalid request. Contact Cymmetri administrator.
REGSRVC.DATA_IS_NOT_VALID
Invalid data. Please try again.
REGSRVC.PASSWORD_NOT_VALID
Invalid password. Please try again
REGSRVC.EMAIL_EXISTS
Duplicate Email Address. Please try again.
REGSRVC.DOMAIN_EXISTS
Duplicate Domain.
REGSRVC.DB_CONFIG_EXISTS
Database already exists. Contact Cymmetri administrator.
REGSRVC.USER_ALREADY_ACTIVE
User status is active. Contact Cymmetri administrator.
USRSRVC.MANAGER_NOT_FOUND
No Manager Found
USRSRVC.UNSUPPORTED_FILE_TYPE
Unsupported File Type
USRSRVC.UNKNOWN
Error. Please try again later or contact Cymmetri Administrator.
USRSRVC.INVALID_ARGUMENTS
Error. Please correct input and try again.
USRSRVC.NONUNIQUE_GROUPNAME
Group name already exists. Please try again.
USRSRVC.GROUPTYPE_NOT_FOUND
Group type not found. Contact Cymmetri administrator.
USRSRVC.OU_NOT_FOUND
Organization Unit not found. Please try again.
USRSRVC.PARENTGROUP_NOT_FOUND
Parent Group not found. Please try again.
USRSRVC.GROUP_NOT_FOUND
Group not found. Please try again.
USRSRVC.USER_NOT_FOUND
User not found. Please try again.
USRSRVC.CYCLIC_UPDATE
Operation not allowed for current input.
USRSRVC.INHERITED_GROUP
Operation not allowed for current input.
USRSRVC.USERTYPE_NOT_FOUND
User type not found. Please try again.
USRSRVC.EXISTING_MOBILE
User mobile number in use. Please try again.
USRSRVC.EXISTING_EMAIL
User email address in use. Please try again.
USRSRVC.DEPARTMENT_NOT_FOUND
Department not found. Please try again.
USRSRVC.DESIGNATION_NOT_FOUND
Designation not found. Please try again.
USRSRVC.COUNTRY_NOT_FOUND
Country not found. Please try again.
USRSRVC.EXISTING_LOGIN
User Login ID in use. Please try again.
USRSRVC.APPLICATION_NOT_FOUND
Application not found. Please try again.
USRSRVC.APPLICATION_ROLE_NOT_FOUND
Application role not found. Please try again.
PROVSRVC.CYMMETRI_LOGIN_FIELD_NOT_CONFIGURED
Please configure Cymmetri Login field for Policy Mapping.
PROVSRVC.APPLICATION_TEST_FAILED
Provision Configuration failed.
USRSRVC.USER_NOT_PROVISIONED
User not provisioned. Please try again.
USRSRVC.CHILD_GROUP_FOUND
Cannot Delete as Child group found.
USRSRVC.GROUP_HAS_ASSIGNED_APPS
Group has assigned applications. Remove and try again.
USRSRVC.USER_ASSIGNED_GROUP
Cannot delete as User assigned to group.
USRSRVC.USER_MUST_PRESENT_IN_TARGET
User must present in target system before assign it to group.
USRSRVC.INACTIVE_USER
Inactive User cannot perform this action.
USRSRVC.INVALID_MANAGER
Invalid manager.
USRSRVC.MIN_ORG_ADMIN_RULE_VIOLATION
Admin role cannot be removed for this user.
USRSRVC.USER_ROLE_MAPPING_EXISTS
Role Already Exists.
USRSRVC.APPLICATION_ROLE_ALREADY_ASSIGNED
Application role is already assigned.
USRSRVC.APPLICATION_ALREADY_ASSIGNED
Application is already assigned.
USRSRVC.USER_ROLE_MAPPING_NOT_EXISTS
User role mapping does not exists.
USRSRVC.CANNOT_REMOVE_PROVISIONED_APPLICATION
Cannot remove already provisioned application.
USRSRVC.EMPTY_FILE
Empty file uploaded.
USRSRVC.SELF_STATUS_CHANGE_NOT_ALLOWED
This user cannot be deleted.
USRSRVC.MANAGER_ASSIGNMENT_REJECTED
Error. The manager assignment is invalid.
USRSRVC.INVALID_ENDDATE
The end date should be greater than start date.
USRSRVC.SELF_ROLE_CHANGE_NOT_ALLOWED
Self role change is not allowed.
USRSRVC.CUSTOM_ATTRIBUTE_MASTER_EXIST
Custom attribute already exist.
USRSRVC.CUSTOM_ATTRIBUTE_MASTER_NOT_FOUND
Custom attribute not found.
USRSRVC.DUPLICATE_NAME
Duplicate name record already exist.
USRSRVC.DUPLICATE_LABEL
Duplicate label record already exist.
USRSRVC.ATTRIBUTE_RIGHTS_NOT_FOUND
Attribute rights not found.
USRSRVC.REMOTE_GROUP_APPLICATION_NOT_FOUND
Application must present before assign user to remote group.
USRSRVC.REMOTE_GROUP_NAME_NOT_MODIFIED_EXCEPTION
Remote group name not able to update
USRSRVC.EMPTY_LOGIN
Something went wrong Please contact the administrator.
USRSRVC.TOO_LARGE_FILE
File size should not be more than {size}
USRSRVC.FORM_DEACTIVATED_EXCEPTION
Form is inactive
USRSRVC.ACTION_NOT_SUPPORTED
This action is not supported
AUTHSRVC.ACCESS_DENIED
Invalid Credentials.
AUTHSRVC.TENANT_EXPIRED
Free trial expired. Please contact Cymmetri administrator.
AUTHSRVC.UNKNOWN
Please contact system administrator.
AUTHSRVC.INVALID_TOKEN
Token is invalid.
AUTHSRVC.USER_NOT_FOUND
User not found.
AUTHSRVC.CANT_SET_FALSE_DEFAULT_PASSWORD_POLICY
Default password policy cannot be false.
AUTHSRVC.CONNECTION_FAILED
Connection failed.
AUTHSRVC.CANT_DELETE_DEFAULT_PASSWORD_POLICY
Cannot delete default password policy.
AUTHSRVC.INVALID_ARGUMENTS
Invalid argument.
AUTHSRVC.INVALID_AUTH_POLICY_CONFIG
Invalid auth policy config.
AUTHSRVC.ACCESS_DENIED_TOKEN
Session expired. Please login again
AUTHSRVC.ADAPTIVE_BLOCK_ACTION
Action blocked. Please contact administrator.
SESSION_EXPIRED
Session expired. Please refresh and try again
AUTHSRVC.NON_REMOVABLE_REFERENCED_ENTITY
Cannot modify IDP configuration till active under Authentication Policy.
AUTHSRVC.PASSWORD_POLICY_NAME_ALRAEDY_EXISTS
Password policy name already exists.
AUTHSRVC.PASSWORD_POLICY_CONDITION_ALRAEDY_EXISTS
Policy Conditions already exists.
AUTHSRVC.DEFAULT_POLICY_UPDATE_NOT_ALLOWED
Default password policy update not allowed.
AUTHSRVC.PASSWORD_COMPOSITION_RULE_VIOLATION
Password provided does not match the required guidelines.
AUTHSRVC.MOBILE_NOT_FOUND
Mobile number is not registered please contact Cymmetri Administrator.
AUTHSRVC.ALREADY_EXISTS
Name already exist. Please enter unique name.
AUTHSRVC.LDAP_ACCESS_DENIED
Access denied.
AUTHSRVC.CLIENT_EXISTS
API Client with same name already configured.
AUTHSRVC.USER_NOT_ACTIVE
Delegated user not active
AUTHSRVC.INVALID_AUTH_CONFIG
Invalid auth config
AUTHSRVC.PASSWORD_POLICY_NAME_ALREADY_EXISTS
Password policy name already exists.
AUTHSRVC.TRUST_DEVICE_MAX_DEVICE_EXCEPTION
Exceeded device trust max limit
AUTHSRVC.TRUST_DEVICE_EXPIRY_EXCEPTION
Exceeded expiration time for trust devices
AUTHSRVC.MULTIPLE_TRUST_DEVICE_CONFIG
Multiple trust device configuration found
AUTHSRVC.INVALID_GLOBAL_SESSION_CONFIGURATION
Invalid global auth configuration
AUTHSRVC.MULTI_SESSION_ACCESS_DENIED
Session(s) already in progress. Logout from all sessions to continue.
MFASRVC.UNKNOWN
Error. Please try again.
MFASRVC.USER_NOT_FOUND
User not found. Please try again.
MFASRVC.ALREADY_SENT_SMS_OTP
SMS OTP already sent.
MFASRVC.INVALID_SMS_OTP
Invalid SMS OTP provided.
MFASRVC.RESEND_COUNT_EXCEED
Allowed resend attempt exceed please try after some time
MFASRVC.PUSH_NOTIFICATION_FAILED
Failed to send the push notification. Please try again later or contact Cymmetri Administrator.
MFASRVC.MFA_CONFIG_NOT_FOUND
Multi Factor Authentication configuration not found.
MFASRVC.INVALID_ARGUMENTS
Error. Invalid request.
MFASRVC.QUESTION_NOT_FOUND
Question not found.
MFASRVC.DUPLICATE_QUESTION
Question field is duplicate. Please try again.
MFASRVC.INCORRECT_ANSWER
Answer field is incorrect. Please try again.
MFASRVC.INVALID_USERID
Invalid User. Please try again.
MFASRVC.INVALID_QUESTIONID
Question is invalid. Please try again.
MFASRVC.USER_NOT_REGISTERED
User is not registered for TOTP/Push Authentication
MFASRVC.EMPTY_QUESTION
Question field is empty. Please try again.
MFASRVC.FAILED_MINIMUM_CORRECT_ANSWER
Please provide correct answer for each question.
MFASRVC.INVALID_TOTP
Invalid Time based OTP provided.
MFASRVC.INVALID_ANSWER
Answer field is invalid. Please try again.
MFASRVC.QUESTION_NOT_REGISTERED
Question is not registered.
MFASRVC.NON_REMOVABLE_QUESTION
Question in use and cannot be removed.
MFASRVC.USER_RESPONSE_PENDING
User response is pending.
MFASRVC.USER_DENIED_ACCESS
User denied access.
MFASRVC.NOT_ABLE_TO_MODIFY
Not able to modify. Please try again
MFASRVC.INVALID_ANSWER_LENGTH
Invalid answer length
MFASRVC.DISPOSABLE_EMAIL
MFASRVC.FIREHOL_IP_REPUTATION
Ip reputation sync failed
MFASRVC.SYNC_PROCESS_RUNNING
Sync is in progress. Please wait
MFASRVC.IMPOSSIBLE_TRAVEL_NOT_FOUND
Config not found
MFASRVC.DEVICE_TRUST_NOT_FOUND
Config not found
MFASRVC.BLACKLISTED_LOCATION_NOT_FOUND
Config not found
MFASRVC.LOCATION_EMPTY
MFASRVC.BLACKLISTED_IP_NOT_FOUND
Blacklisted IP not found
MFASRVC.IP_ADDRESS_EMPTY
MFASRVC.MFA_NOT_FOUND
MFA not found
MFASRVC.INVALID_CONFIG
Invalid configuration
MFASRVC.SERVICE_NOT_SUPPORTED
MFASRVC.PLUGIN_REGISTRY_NOT_REGISTERED
MFASRVC.BLACKLISTED_IPADDRESS_CONFIG_NOT_FOUND
Config not found
MFASRVC.BLACKLISTED_LOCATION_CONFIG_NOT_FOUND
Config not found
MFASRVC.IMPOSSIBLE_TRAVEL_CONFIG_NOT_FOUND
Config not found
MFASRVC.BREACHED_PASSWORD_CONFIG_NOT_FOUND
Config not found
MFASRVC.COUNTRY_CODE_MISMATCH_CONFIG_NOT_FOUND
Config not found
MFASRVC.SHORT_LIVED_DOMAIN_CONFIG_NOT_FOUND
Config not found
MFASRVC.USER_BEHAVIOUR_CONFIG_NOT_FOUND
Config not found
MFASRVC.MULTIPLE_DEVICE_TRUST_FOUND
Multiple config found
MFASRVC.COMMON_CREDENTIAL_DOWNLOAD_FAILED
WKFLSRVC.UNKNOWN
Please contact system Administrator
WKFLSRVC.WORKFLOW_NOT_FOUND
No workflow available
WKFLSRVC.INVALID_ARGUMENTS
Please check input and try again.
WKFLSRVC.INVALID_LEVEL
Workflow Config issue
WKFLSRVC.EXCEEDED_REPORTING_MANAGER
Can not more than reporting manager
WKFLSRVC.WORKFLOW_SETUP_NOT_FOUND
No workflow config available
WKFLSRVC.REQUESTOR_NOT_FOUND
Requestor not found in the system.
WKFLSRVC.WORKFLOW_IN_PROGESS
Request is pending for approval.
WKFLSRVC.REPORTING_MANAGER_NOT_FOUND
Please assign approver's manager to complete workflow.
WKFLSRVC.LEVEL_NOT_IN_RANGE
Workflow level is not in range.
WKFLSRVC.WORKFLOW_SETUP_ALREADY_EXISTS
Workflow setup already exists.
WKFLSRVC.COMMON_REQ_ASSG_ID
Self-approval is not allowed Please contact the administrator for the reassignment.
WKFLSRVC.SAME_REQUESTOR_ASSIGNEE
Workflow cannot be assigned to same user.
WKFLSRVC.WORKFLOW_ALREADY_EXISTS
Workflow with same name already exists.
WKFLSRVC.DAYS_THRESHOLD_EXCEED_EXCEPTION
Max allowed TAT is {maxAllowedDays} days
WKFLSRVC.DELEGATE_COMMON_REQ_ASSG_ID
Approver and assignee can't be same.
WKFLSRVC.APPLICATION_DECOMMISSIONED
This application is decommissioned so the request can not be approved/rejected please refresh the page.
SSOCONFIGSRVC.UNKNOWN
Error. Please try again.
SSOCONFIGSRVC.SSO_CONFIG_NOT_FOUND
SSO config not found.
SSOCONFIGSRVC.SAML_CONFIG_NOT_FOUND
Saml config not found.
SSOCONFIGSRVC.OPENID_CLIENT_NOT_FOUND
OpenID config not found.
SSOCONFIGSRVC.DUPLICATE_OPENID_CLIENT_ID
Duplicate OpenID Client ID.
SSOCONFIGSRVC.API_CONFIG_NOT_FOUND
API config not found.
SSOCONFIGSRVC.INVALID_ARGUMENTS
Invalid Arguments.
SSOCONFIGSRVC.INVALID_CIDR
Not all CIDR are valid
SSOCONFIGSRVC.UNSUPPORTED_FILE_TYPE
Unsupported File Type
SSOCONFIGSRVC.ERROR_GENERATING_KEYS
Failed to generate keys.
SSOCONFIGSRVC.CERTIFICATE_PARSING_ERROR
Failed to read certificate. Please try again.
SSOCONFIGSRVC.ERROR_DEACTIVATING_KEYS
Failed to deactivate key. Please try again.
SSOCONFIGSRVC.KEY_GENERATION_FAILED
Failed to generate keys.
SSOCONFIGSRVC.METADATA_GENERATION_FAILED
Could not generate Metadata.
SSOCONFIGSRVC.ALRAEDY_EXISTS
Configuration for same Entity ID already exists.
SSOCONFIGSRVC.KEYS_CANNOT_BE_DISABLED
Key is being used in IDP or SP
SSOCONFIGSRVC.KEY_DOES_NOT_EXISTS
No related key found
SSOCONFIGSRVC.IDENTITY_PROVIDER_IS_DISABLED
Identity Provider is disabled
SSOCONFIGSRVC.DUPLICATE_POLICY_MAPPING
Policy mapping already exists
SSOCONFIGSRVC.USER_DOES_NOT_HAVE_ACCESS
User does not have access
SSOCONFIGSRVC.KEYS_IS_DISABLED
Keys Disabled
SSOCONFIGSRVC.IDENTITY_PROVIDER_DOES_NOT_EXISTS
Identity Provider does not exist
SSOCONFIGSRVC.IDENTITY_PROVIDER_KEY_IS_DISABLED
Identity Provider key disabled
SSOCONFIGSRVC.SERVICE_PROVIDER_IS_DISABLED
Service Provider disabled
SSOCONFIGSRVC.IDENTITY_PROVIDER_ALREADY_ENABLED
Identity Provider already enabled
SSOCONFIGSRVC.IDENTITY_PROVIDER_CANNOT_BE_DISABLED
Identity Provider can not be disabled
SSOCONFIGSRVC.KEYS_ALREADY_EXISTS
Keys already exists
SSOCONFIGSRVC.KEY_MINIMUM_EXPIRATION
Key Minimum expiration
SSOCONFIGSRVC.SERVICE_PROVIDER_ENABLED
Service provider enabled
SSOCONFIGSRVC.SERVICE_PROVIDER_DISABLED
Service provider disabled
SSOCONFIGSRVC.KEY_IS_BEING_USED
Key already used
SSOCONFIGSRVC.SERVICE_PROVIDER_CANNOT_BE_UPDATED
Service provider can not be updated
SSOCONFIGSRVC.SERVICE_PROVIDER_IS_BEING_USED
Service provider is being used
SSOCONFIGSRVC.INVALID_SAML_CONFIG
invalid saml configuration
SSOCONFIGSRVC.NOT_FOUND
SSO cofiguration not found
SSOCONFIGSRVC.CONNECTION_FAILED
SSO configuration connection failed
SSOCONFIGSRVC.FORBIDDEN
SSO configuration forbidden
SSOCONFIGSRVC.UNAUTHORIZED
SSO configuration unauthorized
SSOCONFIGSRVC.CERTIFICATE_EXPIRED
SSO configuration certificate is expired
SSOCONFIGSRVC.SAML_APP_CONFIG_NOT_FOUND
SSO configuration saml application configuration not found
SSOCONFIGSRVC.SAML_ATTR_CONFIG_NOT_FOUND
SSO configuration saml attribute configuration not found
SSOCONFIGSRVC.OPENID_SCOPE_NOT_FOUND
SSO configuration openid scope not found
SSOCONFIGSRVC.OPENID_CLAIM_NOT_FOUND
SSO configuration openid claim not found
SSOCONFIGSRVC.APPLICATION_NOT_FOUND
SSO configuration application not found
SSOCONFIGSRVC.DUPLICATE_POLICYATTRIBUTE
SSO configuration policy attribute is duplicate
SSOCONFIGSRVC.INVALID_POLICYATTRIBUTE_ID
SSO configuration policy attribute is invalid
SSOCONFIGSRVC.INAVLID_POLICYATTRIBUTE_APPLICATION
SSO configuration policy attribute application is invalid
SSOCONFIGSRVC.MANDATORY_ENTRY
SSO configuration policy field is mandatory
SSOCONFIGSRVC.INVALID_POLICY_MAP
SSO configuration policy map is invalid
SSOCONFIGSRVC.NO_MAPPING_FOUND
SSO configuration mapping is not found
SSOCONFIGSRVC.IDENTITY_PROVIDER_DOES_EXISTS
SSO configuration identity provider does not exist
SSOCONFIGSRVC.MULTIPLE_IDENTITY_PROVIDER_EXISTS
SSO configuration multiple identity provider exists
SSOCONFIGSRVC.SERVICE_PROVIDER_EXISTS
SSO configuration service provider already exists
SSOCONFIGSRVC.SERVICE_PROVIDER_DOES_NOT_EXISTS
Service provider does not exist
SSOCONFIGSRVC.DOMAIN_EXISTS
Domain doesn't exists
SAMLSRVC.KEY_DOES_NOT_EXISTS
Key doesn't exists
SAMLSRVC.INVALID_COOKIE
Invalid session. Re-login and try again
SAMLSRVC.IDENTITY_PROVIDER_IS_DISABLED
Identity Provider is disabled
SAMLSRVC.EXPIRED_TOKEN
Session Expired. Please re-login and try again
SAMLSRVC.KEYS_IS_DISABLED
Key is disabled
SAMLSRVC.KEYS_IS_EXPIRED
Key is expired
SAMLSRVC.KEYS_NOT_GENERATED
Public and private key is not generated
SAMLSRVC.SAML_TYPE_NOT_APPLICABLE
SAML type configured and SAML type received mismatched
SAMLSRVC.NAMEID_MISMATCH
SAML nameId configured and nameId received mismatched
SAMLSRVC.INVALID_SAML2_AUTHN_REQUEST_SIGNATURE
SAML authentication request signature is invalid
SAMLSRVC.ISSUE_INSTANT_MISMATCH
SAML authentication response is invalid with issue instant
SAMLSRVC.MESSAGE_REPLAY
SAML message is being sent again
SAMLSRVC.DESITNATION_MISMATCH
SAML destination configured and received mismatched
SAMLSRVC.VERSION_MISMATCH
SAML version does not match
SAMLSRVC.PROTOCOL_BINDING_MISMATCH
SAML protocol binding does not match
SAMLSRVC.REQUEST_ISSUER_URI_MISMATCH
SAML request issuer uri does not match
SAMLSRVC.ASSERTION_CONSUMER_SERVICE_URI_MISMATCH
SAML request assertion consumer service uri does not match
SAMLSRVC.INVALID_USER_SESSION
SAML user session is invalid
SAMLSRVC.USER_DOES_NOT_HAVE_ACCESS
User does not have access
SAMLSRVC.IDENTITY_PROVIDER_DOES_NOT_EXISTS
Identity Provider does not exist
SAMLSRVC.IDENTITY_PROVIDER_KEY_IS_DISABLED
Identity Provider key is disabled
SAMLSRVC.SERVICE_PROVIDER_IS_DISABLED
Service Provider is disabled
UTILSRVC.UNKNOWN
Error. Please try again.
UTILSRVC.INVALID_ARGUMENTS
Error. Please correct input and try again.
UTILSRVC.CONFIGURATION_EXIST
Hook already present.
UTILSRVC.ALREADY_EXISTS
Hook already present.
UTILSRVC.META_ATTRIBUTE_EXISTS
Name/Key or Value already exist.
UTILSRVC.MODULES_ENQUIRY_EXIST
Sales team is working on your request. We will get back to you soon.
UTILSRVC.LABEL_ALREADY_EXIST
Label Already Exists
UTILSRVC.EVENT_ALREADY_EXIST
Event Already Exists
UTILSRVC.BEHALF_CONFIG_NOT_FOUND
On Behalf configuration is not found.
UTILSRVC.MULTIPLE_BEHALF_CONFIG_FOUND
Multiple Behalf configurations found.
UTILSRVC.LENGTH_EXCEED_EXCEPTION
Length exceeded
UTILSRVC.SCRIPT_CUSTOM_ERROR-MOBILEALREADYEXIST
Mobile number already in use Try again with another number.
UTILSRVC.SCRIPT_CUSTOM_ERROR-EMAILALREADYEXIST
Email already in use Try again with another email.
USRSRVC.FORM_NOT_FOUND
Form not found
UTILSRVC.WEBHOOK_CALL_FAILED
Webhook test failed.
UTILSRVC.BATCH_TASK_EXECUTION_FAILED
Batch process execution failed.
UTILSRVC.BATCH_TASK_ALREADY_EXIST
Batch task already exists.
PROVSRVC.UNKNOWN
Error. Please try again later or contact Cymmetri Administrator.
PROVSRVC.USER_NOT_FOUND
User not found.
PROVSRVC.INVALID_ARGUMENTS
Error. Please correct input and try again.
PROVSRVC.APPLICATION_NOT_FOUND
Application not found. Please try again.
PROVSRVC.INVALID_USER_ACTION
User action not allowed. Please check configuration.
PROVSRVC.INVALID_GROUP_ACTION
Group action not allowed. Please check configuration.
PROVSRVC.INVALID_ROLE_ACTION
Role action not allowed. Please check configuration.
PROVSRVC.INAVLID_ACTION
Error. Please try again.
PROVSRVC.UID_NOT_FOUND
Record not found. Please try again.
PROVSRVC.Empty_Role_Id
Role not provided. Please try again.
PROVSRVC.Duplicate_GroupID
Duplicate Group association.
PROVSRVC.Invalid_GroupId
Invalid Group association.
PROVSRVC.CONNECTOR_NOT_FOUND
Connector not available. Please contact Cymmetri administrator.
PROVSRVC.UNSUPPORTED_OPERATION
Operation not supported.
PROVSRVC.APPLICATION_ALREADY_EXISTS
Application already exists.
PROVSRVC.INVALID_POLICYATTRIBUTE_ID
Invalid Policy configuration. Please try again.
PROVSRVC.DUPLICATE_POLICYATTRIBUTE
Duplicate Policy attribute selected.
PROVSRVC.INVALID_POLICY_MAP
Invalid Policy map.
PROVSRVC.INVALID_MASTER_AAPPLICATION_Id
Invalid master application reference.
PROVSRVC.NO_MAPPING_FOUND
Policy map not found.
PROVSRVC.DUPLICATE_POLICY_MAPPING
Duplicate Policy mapping.
PROVSRVC.INAVLID_POLICYATTRIBUTE_APPLICATION
Invalid Policy association. Please try again.
PROVSRVC.PROVISIONING_NOT_ENABLE
Provisioning not enable
PROVSRVC.DUPLICATE_ROLE
Role ID in use. Please try again.
PROVSRVC.DUPPLICATE_NAME
Name already in use.
PROVSRVC.IDENTITY_ALREADY_EXISTS_EXCEPTION
User principle is already checked Please reset and try again.
PROVSRVC.IDENTITY_NOT_CHECKED_EXCEPTION
At least one user principle should be checked.
RULESRVC.UNKNOWN
Error. Please try again.
RULESRVC.RULE_NOT_FOUND
Rule not found.
RULESRVC.RULE_CONDITION_NOT_FOUND
Rule condition not found.
RULESRVC.RULE_ACTION_GROUP_NOT_FOUND
No group associated with rule. Please try again.
RULESRVC.NON_REMOVABLE_REFERENCED_ENTITY
Cannot be modified as entity in use.
RULESRVC.ALRAEDY_EXISTS
Rule with same name already exists.
RULESRVC.RULE_CONFIGURE_ALREADY_EXIST
Rule with same condition configuration already exists.
RULESRVC.MULTIPLE_ZONES_FOUND
Multiple zones found.
RULESRVC.ZONE_NOT_FOUND
Zone not found.
RULESRVC.INVALID_ARGUMENTS
Please correct the input and try again.
RULESRVC.DEFAULT_RULE_NOT_FOUND
Default rule not found.
IGSRVC.UNKNOWN
Error. Please try again.
IGSRVC.INVALID_JWT
Error. Invalid JWT token.
IGSRVC.CAMPAIGN_COMPLETION_PERIOD_EXCEED
Error. Campaign Completion Period Exceeded.
IGSRVC.CAMPAIGN_STAGE_NOT_FOUND
Error. Campaign Stage Not Found.
IGSRVC.CAMPAIGN_SCOPE_NOT_FOUND
Error. Campaign Scope Not Found.
IGSRVC.CAMPAIGN_ALREADY_IN_DRAFT_STATE
Error. Campaign Already In Draft State.
IGSRVC.CAMPAIGN_ALREADY_IN_PUBLISHED_STATE
Error. Campaign Already In Published State.
IGSRVC.CAMPAIGN_EXECUTION_IN_PROGRESS
Error. Campaign Execution in Progress.
IGSRVC.CAMPAIGN_ASSIGNMENT_NOT_FOUND
Error. Campaign Assignment Not Found.
IGSRVC.CAMPAIGN_HISTORY_NOT_FOUND
Error. Campaign History Not Found.
IGSRVC.UNABLE_TO_PROCESS_RESPONSE
Error. Unable To Process Response.
IGSRVC.CAMPAIGN_ASSIGNMENT_APPLICATION_NOT_FOUND
Error. Campaign Assignment Application Not Found.
IGSRVC.CAMPAIGN_ASSIGNMENT_APPLICATION_ROLE_NOT_FOUND
Error. Campaign Assignment Application Role Not Found.
IGSRVC.APP_ROLE_ALREADY_PROCEED
Error. App Role Already Proceeded.
IGSRVC.INACTIVE_USER_FOUND
Error. Inactive User Found.
IGSRVC.NO_ACTIVE_EXECUTION_FOUND
Error. No Active Execution Found.
IGSRVC.INVALID_CRON_EXPRESSION
Error. Invalid Cron Expression.
IGSRVC.DUPLICATE_CAMPAIGNNAME
Error. Duplicate Campaign Name.
IGSRVC.CAMPAIGN_NOT_FOUND
Campaign not found.
IGSRVC.INVALID_ARGUMENTS
Error. Please correct input and try again.
IGSRVC.CAMPAIGN_STATE_STARTED
Error. Campaign State Already Started.
IGSRVC.STAGE_LIMIT_EXCEED
Error. Stage Limit Exceeded.
IGSRVC.DUPLICATE_STAGE
Error. Duplicate Stage.
IGSRVC.ASSIGNMENT_ALREADY_PROCEED
Error. Assignment Already Proceeded.
IGSRVC.INVALID_CAMPAIGN_ITERATION
Invalid Campaign Iteration.
IGSRVC.INVALID_CAMPAIGN_MANAGER_ASSIGNEE
Campaign manager or assignee configured in stages are not valid.
IGSRVC.INVALID_CAMPAIGN_STATUS
Campaign execution in progress operation not allowed.
IGSRVC.USER_WITH_NO_VALID_APPLICATION
No valid assignments found aborted execution.
IGSRVC.CONNECTION_FAILED
Please check your internet connection.
IGSRVC.ALRAEDY_EXISTS
Record already exists.
IGSRVC.FORBIDDEN
Please contact system administrator.
IGSRVC.UNAUTHORIZED
Please contact system administrator.
IGPROCESS.UNKNOWN
Error. Please try again.
IGPROCESS.INVALID_ARGUMENTS
Error. Please correct input and try again.
IGPROCESS.CAMPAIGN_NOT_FOUND
Error. Campaign Not Found.
IGPROCESS.NO_ACTIVE_EXECUTION_FOUND
Error. No Active Execution Found.
IGPROCESS.CAMPAIGN_HISTORY_NOT_FOUND
Error. Campaign History Not Found.
IGPROCESS.INVALID_CAMPAIGN_ITERATION
Error. Invalid Campaign Iteration.
IGPROCESS.CAMPAIGN_EXECUTION_IN_PROGRESS
Error. Campaign Execution In Progress.
IGPROCESS.MATCHING_ASSIGNMENTS_NOT_FOUND
Error. Matching Assignments Not Found.
SCHEDULER.UNKNOWN
Error. Please try again.
SCHEDULER.TASK_NOT_FOUND
Error. Task Not Found.
SCHEDULER.TASK_NOT_ACTIVE
Error. Task Not Active.
SCHEDULER.INVALID_ARGUMENTS
Error. Please correct input and try again.
SCHEDULER.INVALID_START_DATE
Error. Invalid Start Date.
SCHEDULER.TENANT_NOT_FOUND
Error. Tenant Not Found.
SCHEDULER.UPDATE_NOT_SUPPORTED
Error. Update Is Not Supported.
SCHEDULER.CRON_REPETITION_BELOW_ALLOWED_LIMIT
Error. Cron Repetition Is Below Allowed Limit.
SCHEDULER.INVALID_CRON_EXPRESSION
Invalid Cron Expression.
SODSRVC.ALREADY_EXISTS
Error. Value Already Exists.
SODSRVC.INVALID_ARGUMENTS
Error. Please correct the input and try again.
SAMLEXTIDPCONFIGSRVC.UNKNOWN
Error. Please try again.
SAMLEXTIDPCONFIGSRVC.IDENTITY_PROVIDER_WITH_NAME_EXISTS
Idenity Provider with same name already exist. Please enter unique name.
SAMLEXTIDPCONFIGSRVC.SERVICE_PROVIDER_WITH_NAME_EXISTS
Service Provider with same name already exists.
SAMLEXTIDPCONFIGSRVC.NON_REMOVABLE_REFERENCED_ENTITY
Cannot modify or remove service provider till active under external identity policy or rule.
SAMLEXTIDPCONFIGSRVC.INVALID_ARGUMENTS
Please correct the input and try again.
SAMLEXTIDPCONFIGSRVC.CERTIFICATE_PARSING_ERROR
Error occurred while parsing certificate.
SAMLEXTIDPCONFIGSRVC.AUTH_TYPE_CANNOT_BE_UPDATED
Identity provider type cannot be updated.
SAMLEXTIDPCONFIGSRVC.CONNECTION_FAILED
Please check your internet connection.
SAMLEXTIDPCONFIGSRVC.IDP_CONFIGURATION_NOT_FOUND
Identity provider configuration not found.
SAMLEXTIDPCONFIGSRVC.MULTIPLE_IDP_CONFIGURATION_FOUND
Multiple identity provider configuration found.
SAMLEXTIDPCONFIGSRVC.NAME_ID_POLICY_NAME_ID_VALUE_MISMATCH
NameIdPolicy and NameIdValue does not match.
SAMLEXTIDPCONFIGSRVC.SP_CONFIGURATION_NOT_FOUND
Service provider configuration not found.
SAMLEXTIDPCONFIGSRVC.UNAUTHORIZED
Please contact system administrator.
SAMLEXTIDPCONFIGSRVC.SERVICE_PROVIDER_NOT_FOUND
Service provider not found.
SAMLEXTIDPCONFIGSRVC.CERTIFICATE_NOT_FOUND
Certificate not found.
SAMLEXTIDPCONFIGSRVC.EAMIL_EXISTS
Email already exists.
SAMLEXTIDPCONFIGSRVC.CUSTOM_IDENTITY_TYPE_MUST_HAVE_ID
Custom identity type must have ID.
SAMLEXTIDPCONFIGSRVC.INACTIVE_CONFIGURATION_FOUND
Inactive configuration found.
SAMLEXTIDPCONFIGSRVC.INVALID_IDP_CONFIGURED
Invalid IDP configured.
SAMLEXTIDPCONFIGSRVC.NO_MAPPING_FOUND
No mapping found.
SAMLEXTIDPCONFIGSRVC.INVALID_POLICY_MAPPING
Invalid policy mapping.
SAMLEXTIDPCONFIGSRVC.POLICY_MAP_REQUIRED_FIELD_NOT_FOUND
Policy map required field not found.
SAMLEXTIDPCONFIGSRVC.MANDATORY_FIELD_EXCEPTION
Mandatory field exception.
SAMLEXTIDPCONFIGSRVC.MAPPING_ALREADY_EXISTS
Mapping already exists.
SAMLEXTIDPCONFIGSRVC.JIT_CONFIGURATION_NOT_FOUND
JIT configuration not found.
USRSRVC.INVALID_EXTENSION_ENDDATE
Extended end date should be less than current access end date.
MFASRVC.SMS_OTP_EXPIRED
SMS OTP expired.
MFASRVC.SHORT_ANSWER_LENGTH
Answer length is short.
MFASRVC.DEVICE_INFO_NOT_FOUND
Please scan the QR code.
AUTHSRVC.USER_LOCKED
User locked. Please Unlock your Account.
AUTHSRVC.EMAIL_NOT_FOUND
Email not found.
AUTHSRVC.INVALID_USER_ACCOUNT_STATE
Your account is expired/inactive. Please contact Cymmetri Administrator
AUTHSRVC.INVALID_DATE
Start/End date should be greater than current date and time.
AUTHSRVC.DELEGATE_CONSENT_NOT_FOUND
Error. Delegate consent not found.
AUTHSRVC.DELEGATE_USER_NOT_FOUND
Error. User doesn't have delegation access.
AUTHSRVC.NO_OPTION_AVAILABLE
Please contact Cymmetri Administrator for Password Reset.
AUTHSRVC.DELEGATION_DEACTIVATE
Error. Delegation is inactive.
AUTHSRVC.PASSWORD_EXPIRED
Your password has expired Please reset your password.
PROVSRVC.UNSUPPORTED_DELEGETE_MFA_SETUP
Delegatee can't setup MFA for application having additional authentication
PAMSRVC.UNSUPPORTED_DELEGETE_MFA_SETUP
Delegatee can't setup MFA for application having additional authentication
SLFSRVC.EXISITNG_APP_IN_TAG_FOUND
Application already available in tag.
AD-ADAPTER.FAILED_TO_PWD_CHANGE
Password change failed.
AUTHSRVC.INVALID_CONFIG
Invalid config for authentication policy or rule
PROVSRVC.UNAUTHORIZED
Unauthorized access.
REGSRVC.UNAUTHORIZED
Unauthorized access.
MFASRVC.INVALID_MFA_OTP_CONFIG
Invalid Otp config please contact admin
MFASRVC.EMAIL_NOT_FOUND
Email not registered please contact admin
MFASRVC.MOBILE_NOT_FOUND
Mobile not registered please contact admin
MFASRVC.EMAIL_MOBILE_NOT_FOUND
Mobile or email not registered please contact admin
MFASRVC.LARGE_ANSWER_LENGTH
Maximum answer lenght exceeded try with shorter length answer
SLFSRVC.EXISITNG_USER_TAG_FOUND
Tag with same name already exists
SLFSRVC.IMAGE_MAXSIZE_EXCEEDED
Maximum limit for file size exceeded.
SLFSRVC.IMAGE_TYPE_NOTALLOWED
Image Type not allowed
SLFSRVC.INVALID_ARGUMENTS
Invalid Arguments
REPORT.EMAIL_NOT_EXISTS_EXCEPTION
User Email Not Found. Please contact cymmetri administrator.
REPORT.CONNECTION_FAILED
Failed to send report.
SOME_ERROR_OCCURRED_WORKING_ON_IT
Please contact cymmetri administrator.
INVALID_IDENTITY_PROVIDER_STATUS
Invalid Identity Provider Status. Please contact cymmetri administrator.
INVALID_ARGUMENTS
Please correct Input and try again. Please contact cymmetri administrator.
INVALID_SERVICE_PROVIDER_STATUS
Invalid Service Provider Status. Please contact cymmetri administrator.
MANDATORY_FIELD_EXCEPTION
Mandatory Field is Missing. Please contact cymmetri administrator.
TENANT_OR_HOST_NOT_RECEIVED_FROM_NGINX
Please contact cymmetri administrator.
TENANT_OR_HOST_PROTO_NOT_RECEIVED_FROM_NGINX
Please contact cymmetri administrator.
SOME_IMPERSONATE_ACCESS
Unauthorized Access. Please contact cymmetri administrator.
SERVICE_PROVIDER_INBOUND_MESSAGE_ERROR
Invalid SAML Message Received. Please contact cymmetri administrator.
INVALID_SAML_RESPONSE_ASSERTION_VERSION
Invalid SAML Response Assertion version. Please contact cymmetri administrator.
INVALID_SAML_RESPONSE_ISSUE_INSTANT
Invalid SAML Response Issue. Please contact cymmetri administrator.
INVALID_SAML_RESPONSE_STATUS
Invalid SAML Response Status. Please contact cymmetri administrator.
INVALID_SAML_RESPONSE_STATUS_REQUESTER_URI
Invalid SAML Response Status Requester URI. Please contact cymmetri administrator.
INVALID_SAML_RESPONSE_STATUS_RESPONDER_URI
Invalid SAML Response Status Response URI. Please contact cymmetri administrator.
INVALID_SAML_RESPONSE_STATUS_VERSION_MISMATCH_URL
Invalid SAML Response Status Version Mismatch URI. Please contact cymmetri administrator.
INVALID_SAML_RESPONSE
Invalid SAML Response. Please contact cymmetri administrator.
INVALID_SAML_RESPONSE_DESTINATION
Invalid SAML Response Destination. Please contact cymmetri administrator.
INVALID_SAML_RESPONSE_VERSION_OR_ASSERTION_VERSION
Invalid SAML Response Version or Assertion Version. Please contact cymmetri administrator.
INVALID_SAML_RESPONSE_ASSERTION_SUBJECT
Invalid SAML Response Assertion Subject. Please contact cymmetri administrator.
INVALID_SAML_RESPONSE_ASSERTION_SUBJECT_NAMEID
Invalid SAML Response Assertion Subject NameId. Please contact cymmetri administrator.
INVALID_SAML_RESPONSE_ASSERTION_ISSUER
Invalid SAML Response Assertion Issuer. Please contact cymmetri administrator.
INVALID_SAML_RESPONSE_ASSERTION_CONDITION_AUDIENCE
Invalid SAML Response Assertion Condition Audience. Please contact cymmetri administrator.
INVALID_SAML_RESPONSE_ASSERTION_AUTHNSTATEMENT
Invalid SAML Response Assertion AuthNStatement. Please contact cymmetri administrator.
INVALID_SAML_RESPONSE_ASSERTION_ATTRIBUTE
Invalid SAML Response Assertion Attribute. Please contact cymmetri administrator.
MULTIPLE_ASSERTIONS_IN_RESPONSE_NOT_SUPPORTED
Multiple Assertion in Response Not Supported. Please contact cymmetri administrator.
INVALID_SAML_RESPONSE_ASSERTION_SIGNATURE
Invalid SAML Response Assertion Signature. Please contact cymmetri administrator.
INVALID_SAML_RESPONSE_SIGNATURE
Invalid SAML Response Signature. Please contact cymmetri administrator.
INVALID_SAML_RESPONSE_ASSERTION_CONDITION
Invalid SAML Response Assertion Condition. Please contact cymmetri administrator.
INVALID_SAML_RESPONSE_ASSERTION
Invalid SAML Response Assertion. Please contact cymmetri administrator.
INVALID_SAML_RESPONSE_ISSUER
Invalid SAML Response Issuer. Please contact cymmetri administrator.
IDP_CONFIGURATION_NOT_FOUND
Idp Configuration Not Found. Please contact cymmetri administrator.
SP_ID_IDP_ID_LOGIN_EMPTY
Service provider or identity provider login not provided. Please contact cymmetri administrator.
SERVICE_PROVIDER_CONFIGURATION_NOT_FOUND
Service Provider Configuration Not Found. Please contact cymmetri administrator.
ERROR_BUILDING_SAML_AUTHN_REQUEST
Failed To Build SAML Authentication Request. Please contact cymmetri administrator.
ERROR_PERSISTING_SAML_AUTHN_REQUEST
Failed To Persist SAML Authentication Request. Please contact cymmetri administrator.
ERROR_SENDING_SAML_AUTHN_REQUEST
Failed to Send SAML Authentication Request. Please contact cymmetri administrator.
USER_EMAIL_ADDRESS_NOT_PRESENT
User Email Not Found. Please contact cymmetri administrator.
USER_LOGIN_NOT_PRESENT
User Login Not Found. Please contact cymmetri administrator.
EMAIL_ADDRESS_DOES_NOT_MATCH
Email Address does not matching. Please contact cymmetri administrator.
LOGIN_DOES_NOT_MATCH
Login does not match. Please contact cymmetri administrator.
USER_NOT_AVAILABLE
User is not present. Please contact cymmetri administrator.
SERVICE_PROVIDER_NOT_FOUND
Service provider is not found. Please contact cymmetri administrator.
UNAUTHORIZED_ACCESS
Unauthorized Access. Please contact cymmetri administrator.
UNAUTHORIZED
Unauthorized Access. Please contact cymmetri administrator.
USER_NOT_FOUND
User Not found. Please contact cymmetri administrator.
DATA_NOT_PRESENT
Application configuration does not exist. Please contact cymmetri administrator.
ARGUMENT_IS_REQUIRED
Please correct Input and try again. Please contact cymmetri administrator.
APPLICATION_CONFIG_EXISTS
Application Configuration already exists. Please contact cymmetri administrator.
APPLICATION_CONFIG_NOT_PRESENT
Application configuration does not exists. Please contact cymmetri administrator.
INVALID_TOKEN
Invalid token Please contact cymmetri administrator.
TENANT_NOT_FOUND
Tenant detail not availaible. Please contact cymmetri administrator.
INVALID_APPLICATION_ID
Invalid application id. Please contact cymmetri administrator.
APPLICATION_WITH_ISSUER_NOT_FOUND
Application configuration with issuer not found. Please contact cymmetri administrator.
EXCEPTION_OCCURED_WITH_TENANT_JKS
Please contact cymmetri administrator.
EXCEPTION_OCCURED_WITH_TENANT_JKS_KEY_GENERATE
Please contact cymmetri administrator.
APPLICATION_NOT_ASSIGNED_TO_USER
Application is not assigned to the user. Please contact cymmetri administrator.
USER_NOT_ASSIGNED_SERVICE_PROVIDER_ERROR
User is not assigned to the service provider. Please contact cymmetri administrator.
SOMETHING_WENT_WRONG
Please contact cymmetri administrator.
SERVICE_PROVIDER_NAMEIDVALUE_MISMATCH_ERROR
Service provider nameId value does not match with configured application. Please contact cymmetri administrator.
SERVICE_PROVIDER_NAMEID_MISMATCH_ERROR
Service provider nameId value does not match with configured application. Please contact cymmetri administrator.
TENANT_HOST_NOT_FOUND
Please contact cymmetri administrator.
APPLICATION_CONFIG_NOT_FOUND
Application Configuration not found. Please contact cymmetri administrator.
SAMLREQUEST_NOT_PRESENT_IN_REQUEST
SAML Request is not present in Request. Please contact cymmetri administrator.
CONFIGURED_REQUEST_ISSUER_AND_SAML_REQUEST_NOT_ISSUER_NOT_MATCH
Application issuer Configuration does not match. Please contact cymmetri administrator.
INVALID_REQUEST_ISSUER
Invalid Request Issuer. Please contact cymmetri administrator.
IDENTITY_TOKEN_SAML_REQUEST_NOT_FOUND
Invalid Identity SAML Request Token. Please contact cymmetri administrator.
IDENTITY_REFRESH_SAML_REQUEST_NOT_FOUND
Invalid Refresh SAML Request Token. Please contact cymmetri administrator.
USER_NOT_ASSIGNED_TO_APPLICATION
User is not associated with the application. Please contact cymmetri administrator.
SSO_ERROR_SENDING_SAML_RESPONSE
Error Sending SAML Response. Please contact cymmetri administrator.
SSO_CONFIG_NOT_FOUND_APPLICATION_ID
SSO configuration not found for application. Please contact cymmetri administrator.
SSO_USER_NOT_FOUND
SSO user found for application. Please contact cymmetri administrator.
INTERNAL_SERVER_ERROR
Please contact cymmetri administrator.
IDP_SSO_JKS_MANAGER_FAILED
Please contact cymmetri administrator.
IDP_SSO_CUSTOM_JKS_FAILED
Please contact cymmetri administrator.
IDP_SSO_FAILED
SSO failed for identity provider. Please contact cymmetri administrator.
SERVICE_PROVIDER_SESSION_NOT_FOUND
Service provider session not availaible. Please contact cymmetri administrator.
INVALID_SP_INITIATED_REQUEST
Invalid service provider request. Please contact cymmetri administrator.
ERROR_PARSING_SAML_SLO
Error validating saml slo request. Please contact cymmetri administrator.
SERVICE_PROVIDER_ERROR
Failed with service provider. Please contact cymmetri administrator.
EXPIRED_REFRESH_TOKEN
Refresh token is expired. Please contact cymmetri administrator.
INVALID_REFRESH_TOKEN
Invalid refresh token. Please contact cymmetri administrator.
EMPTY_REFRESH_TOKEN
Empty refresh token. Please contact cymmetri administrator.
REFRESH_TOKEN_COOKIE_NOT_PRESENT
Refresh token cookie not present. Please contact cymmetri administrator.
APPLICATION_ID_NOT_PRESENT_IN_CONFIG
Application id not present. Please contact cymmetri administrator.
APPLICATION_ID_NOT_PRESENT_IN_REQUEST
Application id is not present in request Please contact cymmetri administrator.
EXPIRED_SSO_IDENTITY_TOKEN
SSO identity token is expired. Please contact cymmetri administrator.
EMPTY_SSO_IDENTITY_TOKEN
SSO identity token is invalid. Please contact cymmetri administrator.
REQUEST_ISSUER_FROM_SAML_REQUEST_NOT_PRESNETTITY_TOKEN
Request issuer is not present in saml request. Please contact cymmetri administrator.
INVALID_SSO_IDENTITY_TOKEN
Invalid SSO identity token. Please contact cymmetri administrator.
IDP_SLO_FAILED
Identity provider single logout failed. Please contact cymmetri administrator.
BUILD_SLO_REQUEST_FAILED
Build to failed single logout request. Please contact cymmetri administrator.
SLO_REQUEST_SEND_FAILED
Failed to send single logout request. Please contact cymmetri administrator.
SLO_RESPONSE_SEND_FAILED
Failed to send single logout response. Please contact cymmetri administrator.
ERROR_PERSISTING_SLO_REQUEST
Failed to persist single logout request. Please contact cymmetri administrator.
SLO_RESPONSE_SAML_ATTRIBUTE_VALIDATION_FAILED
Failed to validate single logout response attribute. Please contact cymmetri administrator.
INVALID_SAML_SLO_RESPONSE
Invalid saml single logout response. Please contact cymmetri administrator.
INVALID_SAML_SLO_MESSAGE
Invalid saml single logout message. Please contact cymmetri administrator.
SLO_REQUEST_VALIDATION_FAILED
Failed to validate single logout request. Please contact cymmetri administrator.
SLO_RESPONSE_VALIDATION_FAILED
Failed to validate single logout response. Please contact cymmetri administrator.
REMOVE_USER_BEFORE_APPLICATION
Users should get removed before removing the application.
PROVSRVC.REMOVE_USER_BEFORE_APPLICATION
Users should get removed before removing the application.
PAMSRVC.INVALID_ARGUMENTS
AD Parameter not found
PAMSRVC.IMPORT_DATA_TO_CSV_FILE_FAILED
CSV file not generated
PAMSRVC.UPDATE_AD_USER_PASSWORD_FAILED
Password update fail
PAMSRVC.VAULT_USER_ALREADY_AVAILABLE
Vault user already exist
PAMSRVC.BREAK_GLASS_NOT_FOUND
Break Glass Configuration Not Found
PAMSRVC.SERVER_ALREADY_EXISTS
Device Already Exists
DORMANCY_DISABLE_DAYS_EXCEEDED
Config days exceeded
PAMSRVC.DORMANCY_DISABLE_DAYS_EXCEEDED
Config days exceeded
SAMLSPSRVC.SOME_ERROR_OCCURRED_WORKING_ON_IT
Please contact cymmetri administrator.
SAMLSPSRVC.INVALID_IDENTITY_PROVIDER_STATUS
Invalid Identity Provider Status. Please contact cymmetri administrator.
SAMLSPSRVC.INVALID_ARGUMENTS
Please correct Input and try again. Please contact cymmetri administrator.
SAMLSPSRVC.INVALID_SERVICE_PROVIDER_STATUS
Invalid Service Provider Status. Please contact cymmetri administrator.
SAMLSPSRVC.MANDATORY_FIELD_EXCEPTION
Mandatory Field is Missing. Please contact cymmetri administrator.
SAMLSPSRVC.TENANT_OR_HOST_NOT_RECEIVED_FROM_NGINX
Please contact cymmetri administrator.
SAMLSPSRVC.TENANT_OR_HOST_PROTO_NOT_RECEIVED_FROM_NGINX
Please contact cymmetri administrator.
SAMLSPSRVC.SOME_IMPERSONATE_ACCESS
Unauthorized Access. Please contact cymmetri administrator.
SAMLSPSRVC.SERVICE_PROVIDER_INBOUND_MESSAGE_ERROR
Invalid SAML Message Received. Please contact cymmetri administrator.
SAMLSPSRVC.INVALID_SAML_RESPONSE_ASSERTION_VERSION
Invalid SAML Response Assertion version. Please contact cymmetri administrator.
SAMLSPSRVC.INVALID_SAML_RESPONSE_ISSUE_INSTANT
Invalid SAML Response Issue. Please contact cymmetri administrator.
SAMLSPSRVC.INVALID_SAML_RESPONSE_STATUS
Invalid SAML Response Status. Please contact cymmetri administrator.
SAMLSPSRVC.INVALID_SAML_RESPONSE_STATUS_REQUESTER_URI
Invalid SAML Response Status Requester URI. Please contact cymmetri administrator.
SAMLSPSRVC.INVALID_SAML_RESPONSE_STATUS_RESPONDER_URI
Invalid SAML Response Status Response URI. Please contact cymmetri administrator.
SAMLSPSRVC.INVALID_SAML_RESPONSE_STATUS_VERSION_MISMATCH_URL
Invalid SAML Response Status Version Mismatch URI. Please contact cymmetri administrator.
SAMLSPSRVC.INVALID_SAML_RESPONSE
Invalid SAML Response. Please contact cymmetri administrator.
SAMLSPSRVC.INVALID_SAML_RESPONSE_DESTINATION
Invalid SAML Response Destination. Please contact cymmetri administrator.
SAMLSPSRVC.INVALID_SAML_RESPONSE_VERSION_OR_ASSERTION_VERSION
Invalid SAML Response Version or Assertion Version. Please contact cymmetri administrator.
SAMLSPSRVC.INVALID_SAML_RESPONSE_ASSERTION_SUBJECT
Invalid SAML Response Assertion Subject. Please contact cymmetri administrator.
SAMLSPSRVC.INVALID_SAML_RESPONSE_ASSERTION_SUBJECT_NAMEID
Invalid SAML Response Assertion Subject NameId. Please contact cymmetri administrator.
SAMLSPSRVC.INVALID_SAML_RESPONSE_ASSERTION_ISSUER
Invalid SAML Response Assertion Issuer. Please contact cymmetri administrator.
SAMLSPSRVC.INVALID_SAML_RESPONSE_ASSERTION_CONDITION_AUDIENCE
Invalid SAML Response Assertion Condition Audience. Please contact cymmetri administrator.
SAMLSPSRVC.INVALID_SAML_RESPONSE_ASSERTION_AUTHNSTATEMENT
Invalid SAML Response Assertion AuthNStatement. Please contact cymmetri administrator.
SAMLSPSRVC.INVALID_SAML_RESPONSE_ASSERTION_ATTRIBUTE
Invalid SAML Response Assertion Attribute. Please contact cymmetri administrator.
SAMLSPSRVC.MULTIPLE_ASSERTIONS_IN_RESPONSE_NOT_SUPPORTED
Multiple Assertion in Response Not Supported. Please contact cymmetri administrator.
SAMLSPSRVC.INVALID_SAML_RESPONSE_ASSERTION_SIGNATURE
Invalid SAML Response Assertion Signature. Please contact cymmetri administrator.
SAMLSPSRVC.INVALID_SAML_RESPONSE_SIGNATURE
Invalid SAML Response Signature. Please contact cymmetri administrator.
SAMLSPSRVC.INVALID_SAML_RESPONSE_ASSERTION_CONDITION
Invalid SAML Response Assertion Condition. Please contact cymmetri administrator.
SAMLSPSRVC.INVALID_SAML_RESPONSE_ASSERTION
Invalid SAML Response Assertion. Please contact cymmetri administrator.
SAMLSPSRVC.INVALID_SAML_RESPONSE_ISSUER
Invalid SAML Response Issuer. Please contact cymmetri administrator.
SAMLSPSRVC.IDP_CONFIGURATION_NOT_FOUND
Idp Configuration Not Found. Please contact cymmetri administrator.
SAMLSPSRVC.SP_ID_IDP_ID_LOGIN_EMPTY
Service provider or identity provider login not provided. Please contact cymmetri administrator.
SAMLSPSRVC.SERVICE_PROVIDER_CONFIGURATION_NOT_FOUND
Service Provider Configuration Not Found. Please contact cymmetri administrator.
SAMLSPSRVC.ERROR_BUILDING_SAML_AUTHN_REQUEST
Failed To Build SAML Authentication Request. Please contact cymmetri administrator.
SAMLSPSRVC.ERROR_PERSISTING_SAML_AUTHN_REQUEST
Failed To Persist SAML Authentication Request. Please contact cymmetri administrator.
SAMLSPSRVC.ERROR_SENDING_SAML_AUTHN_REQUEST
Failed to Send SAML Authentication Request. Please contact cymmetri administrator.
SAMLSPSRVC.USER_EMAIL_ADDRESS_NOT_PRESENT
User Email Not Found. Please contact cymmetri administrator.
SAMLSPSRVC.USER_LOGIN_NOT_PRESENT
User Login Not Found. Please contact cymmetri administrator.
SAMLSPSRVC.EMAIL_ADDRESS_DOES_NOT_MATCH
Email Address does not matching. Please contact cymmetri administrator.
SAMLSPSRVC.LOGIN_DOES_NOT_MATCH
Login does not match. Please contact cymmetri administrator.
SAMLSPSRVC.USER_NOT_AVAILABLE
User is not present. Please contact cymmetri administrator.
SAMLSPSRVC.SERVICE_PROVIDER_NOT_FOUND
Service provider is not found. Please contact cymmetri administrator.
SAMLSPSRVC.UNAUTHORIZED_ACCESS
Unauthorized Access. Please contact cymmetri administrator.
SAMLSPSRVC.UNAUTHORIZED
Unauthorized Access. Please contact cymmetri administrator.
SAMLSPSRVC.USER_NOT_FOUND
User Not found. Please contact cymmetri administrator.
SAMLSRVC.SOME_ERROR_OCCURRED_WORKING_ON_IT
Please contact cymmetri administrator.
SAMLSRVC.DATA_NOT_PRESENT
Application configuration does not exist. Please contact cymmetri administrator.
SAMLSRVC.ARGUMENT_IS_REQUIRED
Please correct Input and try again. Please contact cymmetri administrator.
SAMLSRVC.APPLICATION_CONFIG_EXISTS
Application Configuration already exists. Please contact cymmetri administrator.
SAMLSRVC.APPLICATION_CONFIG_NOT_PRESENT
Application configuration does not exists. Please contact cymmetri administrator.
SAMLSRVC.INVALID_TOKEN
Invalid token Please contact cymmetri administrator.
SAMLSRVC.TENANT_NOT_FOUND
Tenant detail not availaible. Please contact cymmetri administrator.
SAMLSRVC.INVALID_APPLICATION_ID
Invalid application id. Please contact cymmetri administrator.
SAMLSRVC.APPLICATION_WITH_ISSUER_NOT_FOUND
Application configuration with issuer not found. Please contact cymmetri administrator.
SAMLSRVC.EXCEPTION_OCCURED_WITH_TENANT_JKS
Please contact cymmetri administrator.
SAMLSRVC.EXCEPTION_OCCURED_WITH_TENANT_JKS_KEY_GENERATE
Please contact cymmetri administrator.
SAMLSRVC.APPLICATION_NOT_ASSIGNED_TO_USER
Application is not assigned to the user. Please contact cymmetri administrator.
SAMLSRVC.TENANT_OR_HOST_PROTO_NOT_RECEIVED_FROM_NGINX
Please contact cymmetri administrator.
SAMLSRVC.USER_NOT_ASSIGNED_SERVICE_PROVIDER_ERROR
User is not assigned to the service provider. Please contact cymmetri administrator.
SAMLSRVC.SOMETHING_WENT_WRONG
Please contact cymmetri administrator.
SAMLSRVC.SERVICE_PROVIDER_NAMEIDVALUE_MISMATCH_ERROR
Service provider nameId value does not match with configured application. Please contact cymmetri administrator.
SAMLSRVC.SERVICE_PROVIDER_NAMEID_MISMATCH_ERROR
Service provider nameId value does not match with configured application. Please contact cymmetri administrator.
SAMLSRVC.TENANT_HOST_NOT_FOUND
Please contact cymmetri administrator.
SAMLSRVC.TENANT_OR_HOST_NOT_RECEIVED_FROM_NGINX
Please contact cymmetri administrator.
SAMLSRVC.APPLICATION_CONFIG_NOT_FOUND
Application Configuration not found. Please contact cymmetri administrator.
SAMLSRVC.SAMLREQUEST_NOT_PRESENT_IN_REQUEST
SAML Request is not present in Request. Please contact cymmetri administrator.
SAMLSRVC.CONFIGURED_REQUEST_ISSUER_AND_SAML_REQUEST_NOT_ISSUER_NOT_MATCH
Application issuer Configuration does not match. Please contact cymmetri administrator.
SAMLSRVC.INVALID_REQUEST_ISSUER
Invalid Request Issuer. Please contact cymmetri administrator.
SAMLSRVC.IDENTITY_TOKEN_SAML_REQUEST_NOT_FOUND
Invalid Identity SAML Request Token. Please contact cymmetri administrator.
SAMLSRVC.IDENTITY_REFRESH_SAML_REQUEST_NOT_FOUND
Invalid Refresh SAML Request Token. Please contact cymmetri administrator.
SAMLSRVC.USER_NOT_ASSIGNED_TO_APPLICATION
User is not associated with the application. Please contact cymmetri administrator.
SAMLSRVC.SSO_ERROR_SENDING_SAML_RESPONSE
Error Sending SAML Response. Please contact cymmetri administrator.
SAMLSRVC.SSO_CONFIG_NOT_FOUND_APPLICATION_ID
SSO configuration not found for application. Please contact cymmetri administrator.
SAMLSRVC.SSO_USER_NOT_FOUND
SSO user found for application. Please contact cymmetri administrator.
SAMLSRVC.INTERNAL_SERVER_ERROR
Please contact cymmetri administrator.
SAMLSRVC.IDP_SSO_JKS_MANAGER_FAILED
Please contact cymmetri administrator.
SAMLSRVC.IDP_SSO_CUSTOM_JKS_FAILED
Please contact cymmetri administrator.
SAMLSRVC.IDP_SSO_FAILED
SSO failed for identity provider. Please contact cymmetri administrator.
SAMLSRVC.SERVICE_PROVIDER_SESSION_NOT_FOUND
Service provider session not availaible. Please contact cymmetri administrator.
SAMLSRVC.INVALID_ARGUMENTS
Please correct input and try again. Please contact cymmetri administrator.
SAMLSRVC.INVALID_SP_INITIATED_REQUEST
Invalid service provider request. Please contact cymmetri administrator.
SAMLSRVC.ERROR_PARSING_SAML_SLO
Error validating saml slo request. Please contact cymmetri administrator.
SAMLSRVC.SERVICE_PROVIDER_ERROR
Failed with service provider. Please contact cymmetri administrator.
SAMLSRVC.EXPIRED_REFRESH_TOKEN
Refresh token is expired. Please contact cymmetri administrator.
SAMLSRVC.INVALID_REFRESH_TOKEN
Invalid refresh token. Please contact cymmetri administrator.
SAMLSRVC.EMPTY_REFRESH_TOKEN
Empty refresh token. Please contact cymmetri administrator.
SAMLSRVC.REFRESH_TOKEN_COOKIE_NOT_PRESENT
Refresh token cookie not present. Please contact cymmetri administrator.
SAMLSRVC.APPLICATION_ID_NOT_PRESENT_IN_CONFIG
Application id not present. Please contact cymmetri administrator.
SAMLSRVC.APPLICATION_ID_NOT_PRESENT_IN_REQUEST
Application id is not present in request Please contact cymmetri administrator.
SAMLSRVC.EXPIRED_SSO_IDENTITY_TOKEN
SSO identity token is expired. Please contact cymmetri administrator.
SAMLSRVC.EMPTY_SSO_IDENTITY_TOKEN
SSO identity token is invalid. Please contact cymmetri administrator.
SAMLSRVC.REQUEST_ISSUER_FROM_SAML_REQUEST_NOT_PRESNETTITY_TOKEN
Request issuer is not present in saml request. Please contact cymmetri administrator.
SAMLSRVC.INVALID_SSO_IDENTITY_TOKEN
Invalid SSO identity token. Please contact cymmetri administrator.
SAMLSRVC.IDP_SLO_FAILED
Identity provider single logout failed. Please contact cymmetri administrator.
SAMLSRVC.BUILD_SLO_REQUEST_FAILED
Build to failed single logout request. Please contact cymmetri administrator.
SAMLSRVC.SLO_REQUEST_SEND_FAILED
Failed to send single logout request. Please contact cymmetri administrator.
SAMLSRVC.SLO_RESPONSE_SEND_FAILED
Failed to send single logout response. Please contact cymmetri administrator.
SAMLSRVC.ERROR_PERSISTING_SLO_REQUEST
Failed to persist single logout request. Please contact cymmetri administrator.
SAMLSRVC.SLO_RESPONSE_SAML_ATTRIBUTE_VALIDATION_FAILED
Failed to validate single logout response attribute. Please contact cymmetri administrator.
SAMLSRVC.INVALID_SAML_SLO_RESPONSE
Invalid saml single logout response. Please contact cymmetri administrator.
SAMLSRVC.INVALID_SAML_SLO_MESSAGE
Invalid saml single logout message. Please contact cymmetri administrator.
SAMLSRVC.SLO_REQUEST_VALIDATION_FAILED
Failed to validate single logout request. Please contact cymmetri administrator.
SAMLSRVC.SLO_RESPONSE_VALIDATION_FAILED
Failed to validate single logout response. Please contact cymmetri administrator.
SAMLSRVC.UNAUTHORIZED
Unauthorized. Please contact cymmetri administrator.
INVALID_USER_SESSION
User login session is invalid
USER_NOT_CONFIGURED_FOR_EXTERNAL_LOGOUT
User is not configured for external identity provider logout
USER_DOES_NOT_HAVE_ANY_ACTIVE_SSO_SESSION
User does not have any active sso login session
ISSUE_INSTANT_EXCEPTION
Invalid user issue instant exception
NOT_ON_OR_AFTER_EXCEPTION
Saml attribute is not valid before and after timestamp
NAME_ID_FORMAT_EXCEPTION
Invalid user name id is not valid
SESSION_INDEX_EXCEPTION
User login session index is invalid
DESTINATION_EXCEPTION
Saml attribute destination is invalid
IDENTITY_PROVIDER_EXCEPTION
External identity provider is invalid
IN_RESPONSE_TO
Saml attribute in response attribute is invalid
ISSUER_EXCEPTION
Saml attribute issuer is invalid
DATALOGGER.ALREADY_ACTIVATED
Already activated
DATALOGGER.ALREADY_DEACTIVATED
Already deactivated
DATALOGGER.SYSLOG_CONFIG_TEST_FAILED
Syslog configuration test failed
DATALOGGER.SYSLOG_CONFIG_NOT_FOUND
Syslog configuration not found
PAM_CONFIG_DATA_NOT_FOUND
Pam Configuration data not found
PAM_INVALID_CONFIG
Invalid Pam Configuration found
PAMSRVC.INTERNAL_ERROR
Invalid password. Please try again
PAMSRVC.PAM_CONNECTION_FAIL
Connection Fail
PAMSRVC.CONNECTION_FAILED
Connection Fail
REPORT.INVALID_ARGUMENTS
Please correct the input and try again
PROVSRVC.PASSWORDFILTER_AND_APPLICATION_DOES_NOT_SAME
Filtered application and included/excluded cannot be the same
PROVSRVC.PASSWORDFILTER_ALREADY_CONFIGURED
Application is already configured for password filter
dagsrvc.INVALID_ARGUMENTS
Invalid argument.
dagsrvc.INVALID_ARGUMENTS
Invalid argument.
dagsrvc.SERVER_NAME_ALREADY_EXIST_EXCEPTION
Server name already exit.
dagsrvc.ROOT_LOCATION_NOT_FOUND
Server details not found.
DAGSRVC.DAG_SHARED_SERVER_ALREADY_EXISTS
Server Configuration already exist
DAGSRVC.DAG_SHARED_SERVER_NOT_FOUND
One or more shared servers not found
PROVSRVC.APPLICATION_ROLE_NOT_FOUND
Application Role not found
PORTAL.EXPIRY_DATA_NOT_FOUND
Expiry data not found
PORTAL.EXPIRED_LINK
Link has been expired
REGSRVC.ACCOUNT_NOT_ACTIVE
Tenant account inactive. Please contact support
USRSRVC.IMPORT_SCHEMA_NOT_FOUND
Import template not found
SLFSRVC.OPERATION_NOT_ACTIVE
Operation not configured
WKFLSRVC.WORKFLOW_PREFERENCE_CONFIG_NOT_FOUND
Workflow Preference Config not found
USRSRVC.GROUP_ALREADY_ASSIGN_TO_USER
Group Already Assigned to User.
USRSRVC.USER_INACTIVE_CONFIG_NOT_FOUND
Inactive User Config not found
UTILSRVC.TEAMS_CONFIG_ALREADY_EXIST
Teams Config already exist
UTILSRVC.TEAMS_CONFIG_NOT_FOUND
Teams Config Not Found
PAMSRVC.RULE_CONFIGURE_ALREADY_EXIST
Configuration already exists
PAMSRVC.EMPTY_CONDITION_EXCEPTION
Empty Condition exception
SLFSRVC.INVALID_MANAGER_EXCEPTION
Invalid Manager
SLFSRVC.INVALID_MANAGER
Invalid Manager
SLFSRVC.USER_NOT_FOUND
User not found. Please try again.
WKFLSRVC.SELF_APPROVAL_CONFIG_EXIST
Self Approval config already exists
WKFLSRVC.SELF_APPROVAL_CONFIG_NOT_FOUND
Self Approval config not found
MFASRVC.RESEND_PERIOD_NOT_ALLOWED
Please wait we are enabling resend operation
MFASRVC.RESEND_TIME_EXCEED
Allowed resend attempt exceed please try after some time
ANALYTICS.INVALID_LOG_ARGUMENTS
Invalid arguments
ANALYTICS.UNAUTHORIZED
Unauthorized. Please contact cymmetri administrator.
ANALYTICS.ALREADY_ACTIVATED
Already activated
ANALYTICS.ALREADY_DEACTIVATED
Already deactivated
DATALOGGER.ALREADY_EXISTS
Already exists
DATALOGGER.CONNECTION_FAILED
Connection Fail
DATALOGGER.FORBIDDEN
Please contact system administrator.
DATALOGGER.INVALID_ARGUMENTS
Invalid arguments
DATALOGGER.SYNC_NOT_SUPPORTED
Sync not supported
ANALYTICS.SYSLOG_CONFIG_NOT_FOUND
Syslog configuration not found
ANALYTICS.SYSLOG_CONFIG_TEST_FAILED
Syslog configuration test failed
DATALOGGER.UNAUTHORIZED
Unauthorized. Please contact cymmetri administrator.
REPORT.ALREADY_ACTIVATED
Already activated
REPORT.ALREADY_DEACTIVATED
Already deactivated
REPORT.ALREADY_EXISTS
Already exists
ANALYTICS.CONNECTION_FAILED
Failed to send report.
REPORT.CONTENT_NOT_FOUND
Content not found
REPORT.EMAIL_EXISTS
Email already exists
ANALYTICS.EMAIL_NOT_EXISTS_EXCEPTION
User Email Not Found. Please contact cymmetri administrator.
REPORT.FORBIDDEN
Please contact system administrator.
ANALYTICS.INVALID_ARGUMENTS
Please correct the input and try again
REPORT.INVALID_CRON_EXPRESSION
Invalid cron expression
REPORT.INVALID_FREQUENCY_CONFIG
Invalid frequency config
REPORT.INVALID_REPORT_CONFIG
Invalid report config
REPORT.INVALID_SCHEDULER_TASK_EXECUTION_ID
Invalid schedular task execution ID
REPORT.REPORT_BATCH_TASK_NOT_FOUND
Batch task not found
REPORT.REPORT_EXISTS_EXCEPTION
Report already exists
REPORT.REPORT_NOT_FOUND
Report not found
REPORT.SEND_EMAIL_FAILED_EXCEPTION
Email Sending failed
REPORT.UNAUTHORIZED
Please contact cymmetri administrator.
RISKENGINE.ALREADY_ACTIVATED
Already activated
RISKENGINE.ALREADY_DEACTIVATED
Already deactivated
RISKENGINE.ALREADY_EXISTS
Already exists
RISKENGINE.CONNECTION_FAILED
Connection Fail
RISKENGINE.CONNECTOR_NOT_AVAILABLE
Connector not available
RISKENGINE.FORBIDDEN
Please contact cymmetri administrator.
RISKENGINE.INVALID_ARGUMENTS
Invalid arguments
RISKENGINE.INVALID_RISK_SYNC_TASK_STATUS
Invalid risk sync task status
RISKENGINE.NO_MAPPING_FOUND
No mapping found
RISKENGINE.RISK_CONFIG_NOT_FOUND
Risk config not found
RISKENGINE.RISK_NOT_FOUND
Risk not found
RISKENGINE.RISK_SYNC_TASK_IN_PROGRESS
Risk sync task in progress
RISKENGINE.RISK_SYNC_TASK_NOT_IN_PROGRESS
Risk sync task not in progress
RISKENGINE.UNAUTHORIZED
Please contact cymmetri administrator.
RISKENGINE.UNSUPPORTED_FIELD
Field not supported
RISKENGINE.UNKNOWN
Please contact cymmetri administrator.


In this section, we will provide you with detailed information about the types of applications and connectors supported by Cymmetri
Cymmetri seamlessly integrates with various cloud-based applications to help you efficiently manage user access and entitlements. The following are the pre-configured cloud-based applications that Cymmetri supports:
Azure: Manage user access and entitlements within your Microsoft Azure environment effortlessly.
Google Workplace: Simplify access management for Google Workspace applications, including Gmail, Google Drive, and more.
ServiceNow: Effectively control access to your ServiceNow instance to enhance security and compliance.
Salesforce: Streamline Salesforce user access management for better control and auditing.
SCIM v2.0 (Salesforce): Utilize the System for Cross-domain Identity Management (SCIM) 2.0 protocol specifically for Salesforce integration.
Github (Using SCIM 2.0 connector): Manage user access to GitHub repositories efficiently through our SCIM 2.0 connector.
Cymmetri extends its support beyond cloud-based applications to include various on-premises applications. Here are the on-premises applications supported by Cymmetri:
Active Directory: Efficiently manage user access to your Windows Active Directory resources.
OpenLDAP: Simplify access control for your LDAP directory services with Cymmetri's integration.
Lotus Notes: Streamline user access management for Lotus Notes applications.
Powershell: Integrate and manage access to PowerShell scripts and resources seamlessly.
CSV Directory: Effectively manage user access within CSV-based directory services.
Cymmetri offers versatile connector support to ensure seamless integration with a wide range of applications. Here are the supported connectors categorized by deployment type:
Cymmetri's Cloud Connectors are designed to simplify access management for various cloud-based applications. Supported cloud connectors include:
Azure: Easily manage access to Microsoft Azure resources with our cloud connector.
Google Workplace: Streamline access management for Google Workspace applications using our cloud connector.
ServiceNow: Control access to your ServiceNow instance efficiently with our cloud connector.
Salesforce: Seamlessly manage user access to Salesforce through our cloud connector.
SCIM 1.1: Leverage the SCIM 1.1 protocol for connector support, ensuring compatibility with various cloud services.
SCIM 2.0 (Basic, Bearer, Fixed Bearer): Our platform supports multiple SCIM 2.0 authentication methods to accommodate diverse integration needs.
For on-premises applications and custom integration scenarios, Cymmetri offers locally deployed connectors, providing flexibility and control. Supported locally deployed connectors include:
Active Directory: Manage access to Windows Active Directory resources seamlessly using our connector.
Custom Script for Databases: Custom Script based connectors using groovy scripts for database applications, tailored to your specific requirements.
LDAP: Integrate and manage access to LDAP-based directory services through our connector.
Lotus Notes: Simplify user access management for Lotus Notes applications with our connector.
Powershell: Seamlessly integrate and manage access to PowerShell resources using our connector.
REST API: Extend your integration capabilities with Cymmetri's support for RESTful API connectors leveraging the flexibility of Groovy and UI based scripts.
Cymmetri's comprehensive support for both pre-configured applications and versatile connectors ensures that you have the tools needed to efficiently manage user access and entitlements across a diverse range of applications and environments. For detailed setup instructions and configuration guidelines, please refer to the specific documentation for each application and connector.
A password policy is a set of rules and requirements established by an organization or system to govern how users create and manage their passwords.
The purpose of a password policy is to enhance security by promoting the use of strong, unique passwords and minimizing the risk of unauthorized access.
In Cymmetri, only the admin can create a password policy bby navigating to the authentication section and then in password policy.
Upon landing the user can view a default Cymmetri password policy which cant be deleted or deactivated.
To create a new password policy, the admin clicks on the add new button on the top right corner of the page.
The user has to fill in the password policy form with the below details
Policy Name - Name of the policy
Description
Conditional attribute type - Default - User (Non modifiable)
Conditional attribute Name - Default - User Type (Non modifiable)
Conditional attribute value - ( Consultant, Employee, Vendor)
After saving the detail, a new password policy is created. The next step is to define the password policy. This is done by clicking on the edit button in front of the record.
The admin can define the composition of the password. By rejecting
Password equals Password
Password which equals to LoginID
Password which equals to first or Last Name
Blacklisted Password
The admin can also establish the following parameters
Numeric characters minimum count
Password Length
Special characters count
Password History versions
Alpha characters
Uppercase characters
Lowercase characters
Characters not allowed in the password
In the "change" subsection the admin can also define:
Password expiration days
Password expiration warning from (no of days)
Whether to change password on reset
The administrator also has the capability to set prohibited passwords, preventing users from using those specific passwords.
In Cymmetri, the Attribute Setting is a tool for user attribute management.
It provides administrators with granular control over attribute visibility during user creation or updation processes. This feature empowers administrators to enable or disable both predefined and custom attributes effortlessly.
When an attribute is disabled, that associated field doesn't appear anywhere in the user creation or updation pages, streamlining the user management experience.
The "Import History" tab in Cymmetri provides a comprehensive record of all data imports, ensuring transparency and accountability in managing user and system information. This feature is designed to offer administrators insights into the history of data imports, facilitating effective tracking and auditing.
To check the import history in Cymmetri, go to the "Import History" tab within the Logs section. This area keeps track of all bulk import events, including imports for user and application assignments.
In this section, administrators can find a detailed history of import events, including:
File Name: The name of the file that was imported.
Status: The status of the import activity, indicating whether it was successful or if there were any issues.
Import Type: Specifies the type of import, such as user or application assignment import.
Created By: Shows who initiated or performed the import.
Created At: Indicates the timestamp of when the import occurred.
For a closer look at the import history, administrators can click on the eye icon next to a specific record. This detailed view provides insights into the imported record statuses, including:
Created Successfully in Cymmetri: Indicates records that were successfully created within the Cymmetri system during the import.
Duplicated in the System While Importing: Highlights instances where records already existed in the system, preventing duplication during the import process.
Error Occurrence During Import with Remarks: Flags any errors that occurred during the import, accompanied by remarks detailing the nature of the issue.
The Cymmetri Architecture without the password filter utility allows for one-way synchronization of passwords from Cymmetri to managed applications like Active Directory. Active Directory passwords may therefore be updated, once the user password is updated in Cymmetri.
However, to keep both the Cymmetri database and Active Directory user passwords in synchronization, there is a need for Cymmetri database to receive password change notification from the Active Directory, when the password is directly updated in Active Directory.
Active Directory provides for the use of Password Filter which can intercept the request for password change and can make an API call to Cymmetri to update the password in Cymmetri database as well.
Cymmetri Password Filter dll will be deployed in the Active directory environment and system variables (environment variables) are configured to allow the password filter to connect to the Cymmetri deployment.
Active Directory server needs to be restarted once the configuration is performed.
Once the user changes the password on a domain-connected computer using Ctrl+Alt+Delete utility OR if the Active Directory administrator resets the user's password using Active Directory tools, the password filter will be triggered.
The password filter DLL will receive the username and the plaintext password from the Active Directory, once the password change has been applied on the Active Directory.
The password filter DLL will encrypt the password using RSA encryption with a public key and will send the encrypted password and the username to the Cymmetri deployment using a REST API call over HTTPS.
The Cymmetri deployment receives the username and encrypted password, it decrypts the password using private key.
Once the password is decrypted, the Cymmetri deployment updates the password in Cymmetri database for the given user.
If the user is assigned multiple applications for provisioning, the action of updating user's password in Cymmetri database will trigger password update for the user in other provisioned applications. However, Active directory application will not receive this password update, to avoid loops.
CYMMETRI_APP_ID
<application-id-of-active-directory-in-Cymmetri>
CYMMETRI_CLIENT_TOKEN
Authorization: Bearer <token-from-api-client>
CYMMETRI_ENDPOINT_URL
https://<cymmetri-domain>/apiext/api/password/filter/updateUserPassword
CYMMETRI_PUBLIC_KEY_FILE
<path of public key file in Active Directory Server>
Download the dll file and the public key file from here - CPFv308.dll - https://drive.google.com/file/d/15uPQYnJr7HUWnxHLPSpYtsWGKkm5HnLC/view?usp=share_link public.pem - https://drive.google.com/file/d/1OdBLal4RTA5bMqABJEq3zQeLxNzSOE0R/view?usp=share_link
Place the CPFv308.dll file in the C:\Windows\System32 folder.
Run regedit and go to the following path: HKEY_LOCAL_MACHINE\SYSTEM\CurrentControlSet\Control\Lsa
You must now see a page similar to this:
Select the element Notification Packages and double click it
Add the line “CPFv308” and Click on OK to save the registry entry.
Exit the registry editor.
Save the public.pem file to any directory and note the name of the directory. Ex - C:\Users\Administrator\Desktop\public.pem
For testing the deployment, Login into the Cymmetri portal as an administrator and note the application ID of the Active Directory application configured for provisioning. Ex - 69125912519fb123
Also, create a new API client.
Click on renew secret and note the bearer token generated.
Ex - eyJhbGciOiJIUzI1NiJ9.eyJzdWIiOiJOZXcgQVBJIENsaWVudCIsInRlbmFudCI6IjI3NyJ9.L_q7I4MFcZSFXetdSvzD7hxvfcSrUUaJEkwhUTfHgus
Go to Control Panel > System > Advanced System Settings and click on environment variables.
Add the following System variables.
Key = CYMMETRI_APP_ID; Value = <application-id-of-active-directory>; Example = 6015991fdfeab12c
Key = CYMMETRI_CLIENT_TOKEN; Value = Authorization Bearer <token-from-api-client>; Example = Authorization: Bearer eyJhbGciOiJIUzI1NiJ9.eyJzdWIiOiJOZXcgQVBJIENsaWVudCIsInRlbmFudCI6IjI3NyJ9.L_q7I4MFcZSFXetdSvzD7hxvfcSrUUaJEkwhUTfHgus
Key = CYMMETRI_PUBLIC_KEY_FILE; Value = <path of public.pem file>; Example = C:\Users\Administrator\Desktop\public.pem
Save the environment variables.
Create a folder as C:\passfilter_logs to store the logs.
Take a restart of the Active Directory Server.
Navigate to the Configuration Menu.
Look for the Password Filter option in the Configuration Menu.
Once on the page click on "+Add New" button
This will open the configuration page, You should find a toggle button to enable the Password Filter. Turn it on to enable the filter.
Once the Password Filter is enabled, you'll need to choose the filter type.There are two options: "Include" and "Exclude."
"Include" means that only the applications selected in the included applications dropdown will receive synced passwords and have their passwords changed correspondingly.
"Exclude" means that all applications except the ones selected in the excluded applications dropdown will receive synced passwords and have their passwords changed correspondingly.
Next you select the Filtered Application this is usually the managed application where the password changed has happened which in this case is Active Directory
Next, determine which type of authenticator you want to use for password synchronization.
You typically have three options: Cymmetri Authenticator, AD (Active Directory) Authenticator, or LDAP (Lightweight Directory Access Protocol) Authenticator.
Choose the appropriate authenticator based on your requirements and configuration.
After completing the above steps, make sure to save your configuration settings.Click on the "Save" button to save your changes.
In Cymmetri, the Audit Logs serve as a vital tool to maintain transparency, accountability, and security in your identity and access setup. This feature meticulously records a detailed account of various activities, ensuring a comprehensive overview of critical events and system changes.
For administrators looking to review system-related logs in Cymmetri, the process is simple. Just head to the "Audit Logs" tab within the Logs section. Here, you'll find a wealth of information, covering everything from user logins to requests for accessing applications.
Cymmetri goes the extra mile by capturing each and every system event, offering administrators a thorough understanding of what's happening within the platform.
For a closer look at a specific log entry, administrators can click on the eye icon next to it. This action provides a detailed response, offering insights into the exact activities that took place.
The admin can also filter the logs based on:
The actor who performed the event
The performed event
Start and end date of the events
Target and target type
Status of the event - all, success, and failed
In essence, Cymmetri's Audit Logs empower administrators with the tools they need to keep a close eye on system activities, ensuring a secure and well-documented identity and access management environment.
Once the managed application has been added to your Cymmetri Identity platform tenant, you will be able to assign applications to your end-users.
There are three ways in which applications can be assigned to users:
Admin may assign an application directly to a user.
Admin may map an application to a group; and the user is added to the group or is already part of the group.
End User may request an application and is granted access to the application.
Let us understand the flow for each of the above mentioned scenarios:
Users with admin roles such as Organization Admin, Domain Admin, or Application Admin on the Cymmetri platform can assign managed applications to end-users .
First, we need to add the application to the Cymmetri platform
Next, we move to configure the application to assign it to an end user.
Click on the application tile to configure it.
The flow for assignment goes as follows -
Description:
Admin clicks on the application tile, and starts the configuration.
Click on the Assignments tab on the left hand side menu.
Click on the “Assign New” button on the Users menu.
Here we need to decide whether we want to provide a Lifetime Access or a Time Based Access
Lifetime Access: Users have access to the application without any time restrictions.
Time Based Access: Users have access to the application only for the specified range of time. We need to provide a Start Date & Time and an End Date & Time for Time Based Access.
Now click on Save to register a request for the application assignment. If no Workflow is configured for the said application the application is immediately assigned to the user.
If a workflow for application provisioning is configured then the workflow is been initiated.
The workflow approver will then receive a request to approve the user assignment in their inbox.
Now the approver may approve or reject the user assignment
The approver may change the start and end date, if required; refer to the dynamic form attributes passed during the application assignment.
To continue the flow click on Accept button.
Now the next level of approver will be able to see the previous levels of approval, and similar to the previous level of approval, the approver may change the start and end date, if required; refer to the dynamic form attributes passed during the application assignment.
Click “Accept” to proceed.
After the last level approver has also approved the assignment, the backend processes will run the application provisioning flow.
Once the user has been provisioned in the application, they will be able to see it in their list of applications.
Users with admin roles, such as Organization Admin, Domain Admin, or Application Admin, in a Cymmetri Identity platform deployment, will have the ability to assign entire groups of users to managed applications.
First, we need to add the application to the Cymmetri platform
Next, we move to configure the application to assign it to a group.
Click on the application tile to configure it.
The flow for assigning a group to an application goes as follows:
Click on the application tile, and start the configuration.
Click on the Assignments tab on the left hand side menu.
3. Click on the “Assign New” button in the Groups section.
4. Search for the group you wish to assign the application to and click on the assign button.
5. Checking for the users who belong to the group, we can see that the application has been assigned.
6. Viewing the application tiles, we can see if the user was directly assigned the application or received access by the virtue of being part of a group.
Users on the Cymmetri platform can request access to a managed applications as a Self-Service feature.
The flow for an end-user to request for an application is as follows:
Visit the “My Workspace” menu.
Click on the “My Access” left-hand side menu.
3. Now Click on the “+ Request” button on the top-right button.
Here we need to decide whether we want to provide a Lifetime Access or a Time Based Access
Lifetime Access: Users have access to the application without any time restrictions.
Time Based Access: Users have access to the application only for the specified range of time. We need to provide a Start Date & Time and an End Date & Time for Time Based Access.
Now click on Save to register a request for the application assignment. If no Workflow is configured for the said application the application is immediately assigned to the user.
If a workflow for application provisioning is configured then the workflow is been initiated.
The workflow approver will then receive a request to approve the user assignment in their inbox.
Now the approver may approve or reject the user assignment
The approver may change the start and end date, if required; refer to the dynamic form attributes passed during the application assignment.
To continue the flow click on Accept button.
Now the next level of approver will be able to see the previous levels of approval, and similar to the previous level of approval, the approver may change the start and end date, if required; refer to the dynamic form attributes passed during the application assignment.
Click “Accept” to proceed.
After the last level approver has also approved the assignment, the backend processes will run the application provisioning flow.
Once the user has been provisioned in the application, they will be able to see it in their list of applications.
In Cymmetri the "Scheduler History" feature plays a crucial role in maintaining visibility and control over scheduled tasks and operations. This functionality is designed to offer administrators insights into the history of scheduled events, providing transparency, accountability, and efficient management of routine processes.
In the "Scheduler History" tab, accessible within the Logs section of Cymmetri, administrators can delve into the details of scheduled tasks, gaining insights into various aspects of the scheduler's operation. The information presented includes:
Event of the Scheduler: Specifies the type of scheduler event that took place.
Event of the Scheduler: Specifies the type of scheduler event that took place.
Description: Provides a brief description of the scheduled task or operation.
Operation Performed on the Scheduled Period: Outlines the specific action executed during the scheduled period.
Planned At: Indicates when the scheduler was initially planned or scheduled.
Sub Event: Offers details about any sub-events associated with the scheduler operation.
Executed At: Specifies the timestamp when the scheduler was executed.
Execution Status: Highlights the status of the scheduler execution, indicating whether it was successful or encountered issues.
Remarks (If Any): Includes any additional remarks or notes related to the scheduler operation, offering insights into the execution process.
Applications menu in the administration page displays the various options pertaining to the Application Management Process.
Applications menu can be accessed in two ways:
Identity Hub
Login as either an Organization Administrator, Domain Administrator, or Application Administrator.
Click on the Identity Hub icon on the left side bar.
Click on the Applications text on the slide out bar.
Single Sign On Module
Login as either an Organization Administrator, Domain Administrator, or Application Administrator.
Click on the Products menu icon on the left side bar.
Click on the Single SignOn Module icon in the popup list.
4. Click on the Applications text on the slide out bar.
Applications supported by the Cymmetri platform fall majorly into three categories -
Pre-configured Applications These are the applications that have already been configured by the Cymmetri platform for provisioning on cloud or on-premises.
Custom Applications for Provisioning These are the applications that you wish to manage through Cymmetri and support the generic connectors that the Cymmetri platform provides.
Custom Applications for Single SignOn only When you need to add an application for the sole purpose of enabling Single Sign-On (SSO), Cymmetri offers the capability to add a custom application that can be configured for SSO using the supported mechanisms.
Once you have chosen the application to be added from the above categories, you are ready to add a new application.
1. Click on the “Add New” button on the top-right corner in the Applications page.
2. In the Add New Application screen, you may search for your desired application (e.g., Active Directory), or your desired connector (e.g., REST) or choose the “Custom” application type from the available application catalogue.
3. Now click on the tile shown in the list below to open the right slide out menu for renaming application as shown below.
4. Add your custom label (if you wish) in the text box and click on the “Add Application” button.
Application has been successfully added to your listing now. You may click on the configure now button to start configuring the application.
Key = CYMMETRI_ENDPOINT_URL; Value = <domain>/apiext/api/password/filter/updateUserPassword; Example =
Search for a user in the search text box, and once the user is found, click on the “Assign” button.
4. Click on the Application Icon to start the request process


Google Apps is a software-as-a-service platform (SAAS) that provides email, calendar, documents and other services. This connector uses the Google Apps provisioning APIs to create, add, delete and modify user accounts and email aliases.
Note: 1. Only the Premium (paid) or Educational versions of Google Apps provide access to the provisioning APIs. 2. Connector will not work on the free Google Apps Domain
First obtain the client_secret.json file from your Google Apps instance -
Create New Project
Click on Enabled API & Services
Search for Admin SDK API
Click on Admin SDK API and then click on the Enable button
Once enabled, Click on CREDENTIALS tab
Now click on Create Credentials
And select OAuth client ID option
Select Desktop app as Application type, provide a name for the OAuth 2.0 client and then click on the CREATE button
A response screen is visible that shows that the "OAuth client created" It also displays Your Client ID and Your Client Secret. You may download the JSON here using the DOWNLOAD JSON option.
Click on OAuth consent screen and then Click on edit app
Enter the required details and Click on save and update
Select Internal as User Type if you want to restrict access only to the users of your organization.
Click on SAVE AND CONTINUE button on the Scopes screen
Search for Admin SDK API and select
Select for group
Click on credential
Download OAuth client
Change to the directory where you have downloaded the bundle and run the following command on the client_secrets.json file that you obtained earlier in this procedure:
This command opens the default browser, and loads a screen on which you authorize consent to access the Google Apps account.
When you have authorized consent, the browser returns a code. Copy and paste the code into the terminal from which you ran the original command
A response similar to the following is returned.
Once the above information is obtained we need to configure the Google App in Cymmetri with Server Configuration and User Configuration as shown below:
Cymmetri Platform allows for pre-configured provisioning settings for Azure Portal.
For Azure integration we need an azure enterprise account with its own domain configured in the Azure AD.
Refer following document to configure azure application
Create a new OAuth2 Application and provide the following configuration in Azure OAuth2 application.
Application will be created and now we will be able to configure.
Let us now click on Authentication tab on the left-hand side menu. We can choose account either in a single Organization Directory or multiple directory.
Further we can allow the Public Client flows.
Create a new Secret by first, clicking on Certificate and Secrets on the left-hand side menu, and then click on the “+ New Client secret” link, Enter Description and select the Expires option.
Provide the right permissions for the Connector to work by clicking on API Permissions tab on the left-hand side menu, then click on Add, then click on Microsoft Graph and then click on Application Permission and Delegated.
Search and select the following permissions/scopes in OpenID
APIConnectors.Read.All
Directory.ReadWrite.All
OpenID
PrivilegedAccess.Read.AzureAD
User.ReadWrite.All
We need to take consent from admin for getting access to Microsoft Graph API, Click on add permission, Click on “Grant Admin content for Unotech Software”, and finally Click on Yes.
Click on Expose an API and Click on Set to expose the API to be used by the Azure API client on the connector.
Configure Azure user and server config as follows:
Configure the User Configurations
Copy the application authority from the User Configure.
Configure the Client ID.
Configure the Client Secret.
Configure the Domain from Azure Active Directory.
Configure the Redirect URI exposed from the Azure AD.
Graph API base endpoint (User Config Resource URI)
Add the Azure Tenant ID
Choose the base username.
Click on Save, and test the connection.
For LDAP connector integration we need an LDAP server with the following detail sample.
Host/IP
LDAP Base Context
service user (Manager Username)
password (Manager User password)
After configure LDAP server we need to configure the Ldap application into the Cymmetri.
Check policy map to add proper attributes as needed by LDAP schema.
For active directory configuration we need AD server with 636 port (ldaps protocol should be enabled).
Ensure that all your object classes are included here in the Entry object classes.
Configure the root suffix, which is the base DC and configure the Principal password.
Base Contexts for group entry searches is the base DN for searching for groups in the AD. Change the server hostname and use the domain name instead of IP address.
Enter the principal as the manager’s principal name, the principal is the user account that will be used for making LDAP queries to the Active Directory. SSL must always be true.
Test AD configuration before assigning an application to any user.
After testing AD configuration, Active Directory account will created for the user being provisioned into the Active Directory.
The Cymmetri Identity platform Active Directory provisioning supports the following functions -
Create user
Update user
Delete user
Server hostname needs to be configured for public access
Any application which supports SCIM v2.0 with bearer token is workable for application.
Following are configuration which is used for SCIM with bearer.
Base address - It is the endpoint of the target system which supports SCIM v2 API’s.
Username - Username to authenticate SCIM API endpoint.
Password - Password to authenticate SCIM API endpoint.
Security Token - It is a token which is used to authenticate.
Grant Type - It is grant type which is used to grant access for API’s.
Client Id - client id for authentication
Client Secret - client secret for authentication
Authentication type - It is Fixed Bearer compulsory.
Update method - Patch or Put method.
Accept - Http header which accepts (application/json etc).
Content Type - Http header which accepts (application/json etc).
Access Token Base Address - base address for access token
Access Token Node Id - node id for access token
Access Token Content Type - content type for access token.
Github Enterprise provides provisioning using SCIM 2.0
Pre-requisites
Create an account in Github (Enterprise).
Enable SAML for the Github tenant to be used with Cymmetri.
Step 1. Configure SSO in Cymmetri
Note the application URL received from the Git SAML configuration
Continue the configuration by logging into Cymmetri using at least Application Administrator role
Note: Public certificate gets from SSO metadata(cymmetri) and format it using following
Note: Make sure when you test SAML then in cymmetri login with github admin users loginid which is added in cymmetri.
Configure Profile Mapping
Create User in Cymmetri and make sure login id of Cymmetri is same as gitHub Admin user login id.
Test SSO with the Cymmetri user.
Configure SCIM v2.0 (Github) application from master (cymmetri).
Basic provisioning policy attribute and policy map already aaded in default schema.
Github Application is run using Fixed Bearer token.
To get Fixed bearer token following steps used.
Step 1: Go to user settings in github
Step 2: Go to developer settings
Step 3: Go to personal access token and generate new token
Step4: Click on Configure SSO
Step 5: Click on Authorize
Use following cymmetri provision configuration and change according to github account.
Fixed Bearer Value copy from personal access token
Click on save
Click on Test Configuration with success message.
Check Policy map
Disable default for the respective attribute
Any application which supports SCIM v2.0 with fixed bearer is workable for application.
Following are configuration which is used for SCIM with fixed bearer
Base address - It is the endpoint of the target system which supports SCIM v2 API’s.
Username - Username to authenticate SCIM API endpoint.
Password - Password to authenticate SCIM API endpoint.
Authentication type - It is Fixed Bearer compulsory.
Fixed Bearer Value - The value for fixed bearer.
Update method - Patch or Put method.
Accept - Http header which accepts (application/json etc).
Content Type - Http header which accepts (application/json etc).
Integration SCIM v2.0 with Basic
Any application which supports SCIM v2.0 with basic authentication is workable for application.
Following are configuration which is used for SCIM with basic authenticator.
Base address - It is the endpoint of the target system which supports SCIM v2 API’s.
Username - Username to authenticate SCIM API endpoint.
Password - Password to authenticate SCIM API endpoint.
Authentication type - It is Fixed Bearer compulsory.
Update method - Patch or Put method.
Accept - Http header which accepts (application/json etc).
Content Type - Http header which accepts (application/json etc).
Cymmetri provides administrators with a robust Custom Workflow feature, allowing for the creation and customization of workflows to streamline and optimize lifecycle management processes.
Navigate to Products -> Lifecycle Management -> Workflow -> Configurations -> Custom Configuration.
Click on the Add Workflow button to initiate the workflow creation process.
Configure the custom workflow by defining up to 4 stages of approvers, choosing from User, Group, or Reporting Manager.
Click on the Add New Stage button to add more stages(upto 4)
Log in to your Google Apps Admin Console (at ) and verify that Security > Enable API access is checked (For more information on these APIs, navigate to the Google Developers interface, and search for these APIs).
In the OAuth 2.0 application of choice (at ), create credential of type Oauth Client ID / Other, then download the related client_secrets.json file.
Enter
Azure Document [ConnID]
Click on Add a platform and we can add a new Redirect URI as “.


The Pending Workflows List page provides a consolidated view of all ongoing workflows awaiting approval or rejection.
The comprehensive snapshot enables administrators to quickly identify pending tasks, their current status, and the associated contextual details.This tool provides at-a-glance insights into each workflow's essential information, including Topic,Workflow Level, Status, Group Name, Requestor, and Current Assignee.
By providing a centralized location for pending workflows, this page allows Administrators to effortlessly track the progression of tasks, ensuring timely reviews and approvals.
Custom workflows can be configured and customized further by creating workflow rules.
To create Workflow Rules Navigate to Products -> Lifecycle Management -> Workflow -> Rules and click on the +Add New button
Following details need to be provided whenever a new rule is added: Name: (Mandatory)Name of the Worflow Rule
Workflow: (Mandatory) Need to select the custom workflow for which the rule will be applicable
Event: (Mandatory) Select event triggering the workflow, such as Application Provisioning, Deprovisioning, User Creation, Workflow Setup, Application Role, Application Update, Decommission Device, and more.
Description: (Optional) General description of the rule
Conditions:
Conditions and filters can be added for country, department, designation, login pattern, user type, application, application role, and workflow depending upon the event selected
Multiple conditions can be combined using AND/ OR operators
Conditions can also be grouped to evaluate to true or false as a group
Meta conditions can be added for application events if meta values are added for applications
Once the applications have been configured to allow that the end-users have been provisioned into the managed application. We may now start configuring the reconciliation process for an application. The reconciliation process involves identifying the user attributes as stored in the Identity hub (Cymmetri platform) and their attributes as a user or a group account in the managed application; and the ensuring that the synchronization of the user and group accounts takes place either one-way or both ways between the managed application and the Identity hub, to ensure that there no discrepancies in the accounts stored by both the systems.
The reconciliation process may follow two strategies -
Full Reconciliation Full reconciliation is typically carried out when the managed application is first introduced into an organization’s Cymmetri platform. This involves ensuring all user accounts (and group accounts, wherever applicable) from the Cymmetri platform, are synchronized with the account information on the managed application. This type of reconciliation often takes a longer time, and is often only used as a one-time activity.
Filtered Reconciliation The Cymmetri platform and the managed application might lose synchronization due to a number of reasons, including backend changes to the user or group account information on the managed application or failure of communication between the identity platform and the managed application. In such cases, filtered reconciliation is employed on a regular, scheduled basis. This includes filters for a particular set of users, or to choose only the users that have been modified on either platforms, this is known as filtered reconciliation.
Cymmetri platform allows for both types of reconciliation phases, by allowing administrator to define an optional user filter during the reconciliation process.
The reconciliation process involves two major processes:
Pull In this mechanism, the Cymmetri platform allows for user and group account information to be pulled from the managed application.
Push In this mechanism, the Cymmetri platform pushes the user and group account information to be pushed to the managed application.
Regardless of the process employed, the configuration for the most part remains the same. Let us explore the reconciliation configurations on the Cymmetri Platform:
You may access the reconciliation menu by clicking on the application tile, and then clicking on the “Reconciliation” left-hand side menu.
Proceed to configure by clicking on the “+ Add New” button.
Name: Refers to the name of the Reconciliation process
Modes: FILTERED_RECONCILIATION (Currently the only mode supported by Cymmetri)
Sync Fields: The field from the user/group’s account information as available on the Cymmetri platform that must be used as a basis to identify the corresponding account on the managed application database.
Source Attributes: The field from the user/group’s account information as available on the managed application database that must be used as a basis to match with the “Sync fields”.
Status: Whether to run the reconciliation for Active/Inactive users.
Type: Some applications allow GROUP reconciliation, but most will have USER reconciliation only.
Filled Reconciliation basic configuration looks as above.
Let us assume we are synchronizing the Cymmetri Platform with a cloud provider using email or mail attribute as the Sync field. As such users on both platforms having the same email address will be matched/un-matched.
User does not exist in Target system & exists in Cymmetri: This indicates a situation during a pull phase or a push phase, where the user account exists on the Cymmetri platform, but not in the managed application. This typically occurs when the users have been pulled into the Cymmetri platform, but the managed application is yet to be synchronized with these users.
User exists in Cymmetri & Target system: This indicates a situation during a pull phase or a push phase, where the user account exists on the Cymmetri platform and in the managed application, but they may or may not have the same attributes or the same values of the attributes.
User exists in Target system & does not exist in Cymmetri: This indicates a situation during a pull phase or a push phase, where the user account exists in the managed application database but not on the Cymmetri Identity platform. This typically occurs when the users have been pulled into the managed application through its backend and the users have not been centrally managed through the Cymmetri platform.
User does not exist in Target system & exists in Cymmetri:
PROVISION: User is created in the target system with the attributes as present in their Cymmetri user profile.
IGNORE: User is not modified in either system.
UPDATE: Not relevant for this scenario.
DEPROVISION: User is removed from the Cymmetri platform to be consistent with the managed application user database.
UNASSIGN: Not relevant for this scenario.
ASSIGN: User is assigned access to this system in Cymmetri, this option may be used in the case of options like JIT being available to generate user profile in the managed application.
UNLINK: Not relevant for this scenario.
LINK: Not relevant for this scenario.
User exists in Cymmetri & Target system:
PROVISION: User is created in the target system with the attributes as present in their Cymmetri user profile.
IGNORE: User is not modified in either system.
UPDATE: User information from the Cymmetri Identity platform is updated using the account information from the managed application and vice versa.
DEPROVISION: Not relevant for this scenario.
UNASSIGN: Not relevant for this scenario.
ASSIGN: User is assigned the managed application on the Cymmetri platform in case they are already not assigned.
UNLINK: Not relevant for this scenario.
LINK: Not relevant for this scenario.
User exists in Target system & does not exist in Cymmetri:
PROVISION: User is created in the Cymmetri Identity platform deployment using the account information from the managed application.
IGNORE: User is not modified in either system.
UPDATE: Not relevant for this scenario.
DEPROVISION: User is removed from the managed application user database.
UNASSIGN: Not relevant for this scenario.
ASSIGN: Not relevant for this scenario.
UNLINK: Not relevant for this scenario.
LINK: Not relevant for this scenario.
Scheduling the reconciliation process:
Next Execution Date: This indicates the base date to start the execution date and time of the reconciliation process.
Cron Expression: This indicates the frequency with which the further reconciliation events will be run. There are 6 fields here - * * * * * * (e.g., 5 15 0 1 8 *) ; they refer to seconds, minutes, hours, days, months, and year after the first execution date.
Workflows may be configured for a number of use cases in the Cymmetri Platform, primary among them being for assigning application to a user (provisioning), unassigning application to a user (deprovisioning), user creation,application update and role assignment, workflow setup, and running campaigns.
Workflows can be categorized in two categories viz., Global Workflows and Custom Workflows.
In Cymmetri, workflows exhibit a versatile approval structure, accommodating upto 4 stages of approvals. Approvers can be designated as specific users, groups, or the reporting manager, offering a flexible and scalable solution.
This multi-stage approval capability ensures that critical tasks undergo a thorough and comprehensive review process.
Cymmetri allows the configuration of global provisioning workflows on a per-application basis.
The administrator selects the application for which the workflow needs to be configured and the selects the workflow menu option
Then enable the Application Provisioning radio button and select the number of approver level(s)
The administrator may select upto 4 approvers. Once selected the administrator can designate an approver at each level
For each stage, the administrator may select one of the three options -
User: A particular user may approve workflow request at this stage.
Group: A user belonging to the selected Group may approve Workflow request at this stage.
Reporting Manager: The reporting manager of the user for which the approval is to be provided may approve the workflow request at this stage. Click on save to save the workflow.
Cymmetri also allows to configure a Global User Creation Workflow. Here a workflow is triggered everytime a user is created from any source.
To access Global User Creation Workflow Configuration the administrator needs to go to Products->Lifecycle Management -> Workflow-> Configurations-> Global Configuration->User Creation
The administrator need to ensure that it is enabled and then click on the "Setup Workflow" button to configure the approvers
For User Creation Workflow as well the administrator can configure upto 4 stages of workflow and needs to click on the Add Stage button shown below to add a new stage.
To observe how to workflow runs in action, refer Inbox
To use this mechanism ensure that the managed application supports authentication using OpenID Connect 1.0 protocol.
OpenID Connect 1.0 is a simple authentication layer protocol built on top of OAuth 2.0 protocol. It acts as a Single Sign On mechanism and authentication mechanism for not only the Web based applications, as SAML 2.0 does, but also for applications requiring access to APIs protected by this protocol as an authorization mechanism, and for mobile-native or Single page Applications (SPA) to verify user’s identity.
For understanding the core concepts of the OpenID Connect 1.0 protocol, it is important to grab the basics of the underlying OAuth 2.0 protocol.
Client (RP): Client refers to the managed application to which the end-user wishes to perform Single SignOn into. The client in the context of the OAuth 2.0 and OpenID Connect 1.0, is also referred to as the Relying Party (RP), since it relies on the Authorization Server
Client ID: Client ID is the unique identifier assigned to each managed application while configuring the application for OpenID Connect 1.0 or OAuth 2.0 flow.
Client Secret: This is a secret value that is shared between the relying party and the Authorization server, so that they may communicate and be always assured that the communication shared was actually sent by the other node in the communication.
Cymmetri Platform: Cymmetri platform in the context of OpenID Connect 1.0 Single SignOn mechanism acts as two components in the OAuth 2.0 and OpenID Connect 1.0 flows. These component roles are explained below.
OpenID module (Authorization Server): Since Cymmetri platform acts as an Identity platform, it holds the capability to ensure that user session is valid, the user is authorized to access the managed application, among other authorization decisions, it plays the role of Authorization server in the OpenID Connect 1.0 process.
User Management Module (Resource server): Since the Cymmetri platform acts as a User Identity Hub, it holds the capability to store and provide user information to a managed application for the purpose of authentication and Single Sign On, it plays the role of Resource Server (Resource, being the user information) in the OpenID Connect 1.0 process.
User (Resource Owner) - The user information to be shared for a successful authentication is the resource in the OpenID Connect 1.0 flow, therefore, in the OAuth 2.0 terms, the user information is the resource, and the end-user is the resource owner.
OpenID Authorisation Endpoint - Authorization endpoint is used for accepting authentication/authorization requests in the form of redirected requests with the OpenID request query parameters added to it.
OpenID Token Endpoint - Token endpoint is used for generating Access and ID tokens by using the authorisation code received by the managed application (Relying Party).
User Information Endpoint - User information endpoint may be invoked by using the token shared to the managed application from the Cymmetri Identity platform, it will provide a list of all the user information that the user has consented to share with the end-application.
Token Introspection Endpoint - Token introspection endpoint is used when the relying party is an API client that requires access to the APIs protected by the OpenID Connect deployment. It will verify whether the access token is still valid and well-formed.
Redirect URIs - These are callback resources on the managed application, that can receive the messages sent from the Authorisation provider (Cymmetri Identity platform).
Scope - These are parameters used to indicate what information related to the user can be shared to the managed application.
State - This is a random string generated by the Relying party (managed application) to ensure that the message sent back by the Cymmetri platform is a response for the request raised by it for Single SignOn.
Nonce - This is a random string generated by Relying party (managed application) to ensure that the message sent back by the Cymmetri platform is a response for the request raised by it for Single SignOn and to prevent replay attacks.
Access Token - Access token is generated by the Cymmetri Identity platform for the purpose of authorising a client (whether an end-user OR an application using OpenID Connect). This may be verified for the purpose of ensuring the validity of the access token by the client requesting the token.
ID Token - The ID token is generated by the Cymmetri Identity platform for the purpose of authenticating an end-user using OpenID Connect protocol. Typically, the subject name and the email Address are shared as a part of this ID token along with any nonces or states used in the protocol are shared. This ID token may be used to get more information using the User Information Endpoint.
Authorisation Code - This is a string generated by the Cymmetri Identity platform for the purpose of server-to-server communication between the Relying party (managed application) and the Authorisation provider (Cymmetri Identity Platform). It may be exchanged by the relying party for the purpose of obtaining access and ID tokens.
For performing Single SignOn with managed applications that have a backend (Typical Web Application SSO)
For performing Single SignOn with managed applications that do not have a backend (Single Page Applications and mobile-native applications)
For authorising access to REST APIs by verifying that the client making the calls has the requisite access.
1. Authorisation Code Grant Type Flow
Typically used in the same scenario as the SAML 2.0 flow, it is used when the Identity provider and the Managed application are both capable of having a separate frontend and backend. These backends can have back-channel communication that is secure and cannot be modified or viewed in transit. This is therefore typically used when full-blown web applications are available.
2. Implicit Grant Type Flow
Typically used when the managed application is a simple Single Page application or a mobile native application that may not be able to use back-channel secure communication and a shared secret may not be used for authenticating the managed application to the Identity provider.
3. Client Credentials Type Flow
Typically used when a user is not involved and there is no need for ID tokens. The managed application handles its own authentication or is operating as a backend service only and needs to access a resource protected by the Identity provider.
Flow Diagram
Flow Explained
User requests to access the application.
The managed application generates a random string each for state and nonce for starting the OpenID flow; and set these as the cookies for the user browser.
The Cymmetri Identity platform frontend will generate authorization request with the client_id, state, nonce, redirect_uri, response_type expected, and the scopes requested by the application.
The request will be verified by the OpenID service in the Cymmetri Identity platform backend.
Redirect the user to the login flow page, and initiate the login challenge-response flow.
Login Challenge sent by the OpenID service to the frontend.
Login session of the end-user is verified by the user service.
Once the login session is verified, the frontend service responds back to the OpenID service with the challenge sent to it, to complete the login challenge-response flow.
The openID service sets a login_verifier nonce as a cookie.
The frontend replays the authorization request to the openID service with the login_verifier nonce to initiate the consent flow.
The OpenID service validates the login_verifier nonce. If successful, then the OpenID service will redirect the end-user to the consent flow page.
The frontend would then load the consent page with the scopes expected by the managed application, as reflected in the configuration.
The end user must then provide the consent for the scopes to share the relevant data to the managed application.
The challenge-response for consent flow is sent to the OpenID service with the scopes accepted by the end-user.
The OpenID service will set a cookie on the user’s browser with a consent verifier nonce.
The frontend replays the authorization request to the openID service with the consent_verifier nonce.
If the response was accepted by the Consent flow, then an authorization code will be sent to the frontend.
The Cymmetri frontend will then redirect the user to the “redirect_uri” of the managed application with the authorization code, state, and the nonce will be sent as query parameters.
The managed application will verify the state and the nonce shared in step 2.
The managed application will then make a POST API request to the Token API of the Cymmetri OpenID service to exchange the authorization_code with the ID token and the Access token.
If this authorization_code is validated by the OpenID service, the managed application will receive the ID token and the Access token.
The managed application may simply use the ID token to get the username and email address of the user and attempt to generate a session.
If more user information is needed and the profile scope was consented by the user, then the managed application may make a call to the User Information endpoint of the OpenID service using the “access token” received in step 21.
This user information may also be used by managed application to generate a user session.
Once the user session is created, the managed application sets the session cookie on the user browser, and redirects the user to the managed application landing page.
First, we need to add the managed application into the Cymmetri Identity platform deployment.
Enable the Single SignOn by -
Clicking on the SignOn link on the left side menu
Clicking the toggle button on the right side.
The application URL text box may be left empty OR an endpoint from the managed application may be added that can initiate the OpenID flow by making a call to the OpenID service of the Cymmetri Identity platform deployment.
Select the OpenId/OAuth radio button to start configuring OpenID flow
Click on the dropdown for Advanced Settings (OpenID)
Main Dropdown Settings
Client ID - Refers to the client_id to be sent to the managed application.
Client Name - User friendly name for the client.
Client Secret - Can be left blank. After saving the configuration, a popup will show the generated client secret.
Redirect URLs - Refers to the endpoint on the managed application, that acts as a callback URL.
Access Dropdown Settings
Scope Settings
Scopes are used to track the consents of the end-users. This is used to determine what information the end-user wishes to share with the managed application.
Let us understand the scopes in play here -
openid - As we wish to support OAuth 2.0 flows as well, the openid scope is optional. However, since we are dealing with OpenID Connect flow here, openid scope is mandatory for this flow.
email - User’s email address is shared with the managed application.
address - User’s address fields are shared with the managed application.
phone - User’s phone number and mobile number fields are shared with the managed application.
profile - Shares the entire list of user attributes with the managed application.
offline_access - <added for future-proofness, not yet implemented>
The ‘openid’ scope is mandatory for this flow.
The ‘offline_access’ scope is not currently used by the Cymmetri Identity platform deployment.
Other profiles are optional.
Providing ‘profile’ scope overrides the settings for the ‘email', ‘address’ and ‘phone’ scopes.
Grant Type setting lets the Cymmetri Identity platform know which flow you wish to opt for -
Authorization Code refers to the current flow.
Refresh Token has not been implemented currently for the Cymmetri Identity platform.
Since this flow requires sharing the authorization code, and NOT the ID token, we may choose “code” as a response type.
The managed application is expected to mention using query parameters while starting the OpenID Connect flow to mention which response type it is expecting from the Cymmetri Identity platform.
While, we have chosen code as our return type, we could choose any other response type that also includes code return type.
Public subject type setting is used, since it is the most common mechanism for OpenID connect flows.
Pairwise Mechanism may be supported upon request. Please contact Cymmetri Support team in case your application needs support for pairwise subject type.
This indicates the manner in which the response (access token or ID token) is shared back by the Cymmetri Identity platform to the managed application.
Client Secret over HTTP basic - Shared as a query parameter or a fragment to the managed application through an HTTP redirect.
Client Secret over HTTP POST - Shared as a part of the response body to a REST endpoint exposed by the managed application through a POST Request.
Private key JWT - Share JWT instead of opaque access tokens. This is no longer considered safe and other options are preferred.
No Authentication as a response type is not to be used in the OpenID Connect flow.
The current flow uses redirections to share credentials and involves user interaction. So we choose to use “Client Secret over HTTP Basic” as the response type setting for this flow.
Flow Diagram
Flow Explained
User requests to access the application.
The managed application generates a random string each for state and nonce for starting the OpenID flow; and set these as the cookies for the user browser.
The Cymmetri Identity platform frontend will generate authorization request with the client_id, state, nonce, redirect_uri, response_type expected, and the scopes requested by the application.
The request will be verified by the OpenID service in the Cymmetri Identity platform backend.
Redirect the user to the login flow page, and initiate the login challenge-response flow.
Login Challenge sent by the OpenID service to the frontend.
Login session of the end-user is verified by the user service.
Once the login session is verified, the frontend service responds back to the OpenID service with the challenge sent to it, to complete the login challenge-response flow.
The openID service sets a login_verifier nonce as a cookie.
The frontend replays the authorization request to the openID service with the login_verifier nonce to initiate the consent flow.
The OpenID service validates the login_verifier nonce. If successful, then the OpenID service will redirect the end-user to the consent flow page.
The frontend would then load the consent page with the scopes expected by the managed application, as reflected in the configuration.
The end user must then provide the consent for the scopes to share the relevant data to the managed application.
The challenge-response for consent flow is sent to the OpenID service with the scopes accepted by the end-user.
The OpenID service will set a cookie on the user’s browser with a consent verifier nonce.
The frontend replays the authorization request to the openID service with the consent_verifier nonce.
If the response was accepted by the Consent flow, then an authorization code will be sent to the frontend.
The Cymmetri frontend will then redirect the user to the “redirect_uri” of the managed application with the access token, ID token, state, and the nonce will be sent as query parameters.
The managed application may simply use the ID token to get the username and email address of the user and attempt to generate a session.
If more user information is needed and the profile scope was consented by the user, then the managed application may make a call to the User Information endpoint of the OpenID service using the “access token” received in step 21.
This user information may also be used by managed application to generate a user session.
Once the user session is created, the managed application sets the session cookie on the user browser, and redirects the user to the managed application landing page.
First, we need to add the managed application into the Cymmetri Identity platform deployment.
Enable the Single SignOn by -
Clicking on the SignOn link on the left side menu
Clicking the toggle button on the right side.
The application URL text box may be left empty OR an endpoint from the managed application may be added that can initiate the OpenID flow by making a call to the OpenID service of the Cymmetri Identity platform deployment.
Select the OpenId/OAuth radio button to start configuring OpenID flow -
Click on the dropdown for Advanced Settings (OpenID)
Main Dropdown Settings
Client ID - Refers to the client_id to be sent to the managed application.
Client Name - User friendly name for the client.
Client Secret - Can be left blank. After saving the configuration, a popup will show the generated client secret.
Redirect URLs - Refers to the endpoint on the managed application, that acts as a callback URL.
Access Dropdown Settings
Scope Settings
Scopes are used to track the consents of the end-users. This is used to determine what information the end-user wishes to share with the managed application.
Let us understand the scopes in play here -
openid - As we wish to support OAuth 2.0 flows as well, the openid scope is optional. However, since we are dealing with OpenID Connect flow here, openid scope is mandatory for this flow.
email - User’s email address is shared with the managed application.
address - User’s address fields are shared with the managed application.
phone - User’s phone number and mobile number fields are shared with the managed application.
profile - Shares the entire list of user attributes with the managed application.
offline_access - <added for future-proofness, not yet implemented>
Grant Type setting lets the Cymmetri Identity platform know which flow you wish to opt for -
Implicit refers to the current flow.
Refresh Token has not been implemented currently for the Cymmetri Identity platform.
Since this flow requires sharing the ID token directly along with access token, we may choose “id_token” or “id_token token” as a response type.
The managed application is expected to mention using query parameters while starting the OpenID Connect flow to mention which response type it is expecting from the Cymmetri Identity platform.
While, we have chosen 'id_token token' as our return type, we could choose any other response type that also includes both of these return types.
Public subject type setting is used, since it is the most common mechanism for OpenID connect flows.
Pairwise Mechanism may be supported upon request. Please contact Cymmetri Support team in case your application needs support for pairwise subject type.
Credential Dropdown Settings
Client Secret over HTTP basic - Shared as a query parameter or a fragment to the managed application through an HTTP redirect.
Client Secret over HTTP POST - Shared as a part of the response body to a REST endpoint exposed by the managed application through a POST Request.
Private key JWT - Share JWT instead of opaque access tokens. This is no longer considered safe and other options are preferred.
No Authentication as a response type is not to be used in the OpenID Connect flow.
The current flow uses redirections to share credentials and involves user interaction. So we choose to use “Client Secret over HTTP Basic” as the response type setting for this flow.
Flow Diagram
Flow Explained
Generating Access Token for the Managed Application
OpenID service shares client ID, client secret, and audience to the managed application during the configuration phase.
The managed application makes a POST request to the token API of the OpenID service with the previously shared clientID, client secret, the audience string, and the grant_type as “client_credentials”.
The OpenID service validates the combination of (client_id, client_secret, and audience) and generates an access token to be shared to the managed application with an expiry time (in seconds).
The managed application should then verify the access token received by calling the token introspection endpoint.
Using the Access token to access protected API resource
The managed application should first request an access token as discussed above.
The managed application may then attempt to access the protected resource by sharing the client_id and authenticate the request using Bearer token as the access_token.
The protected resource may then validate the access token shared by calling the token introspection and validate that the client_id shared by the managed application in step 2 matches the client_id for which the access_token was generated, and that the token has not expired.
If the validation in step 3 is successful, the protected resource will be shared to the managed application.
First, we need to add the managed application into the Cymmetri Identity platform deployment.
Enable the Single SignOn by -
Clicking on the SignOn link on the left side menu
Clicking the toggle button on the right side.
The application URL text box may be left empty for this flow, since the user does not need to be involved with this flow.
Select the OpenId/OAuth radio button to start configuring OpenID flow -
Click on the dropdown for Advanced Settings (OpenID)
Main Dropdown Settings
Client ID - Refers to the client_id to be sent to the managed application.
Client Name - User friendly name for the client.
Client Secret - Can be left blank. After saving the configuration, a popup will show the generated client secret.
Redirect URLs - Refers to the endpoint on the managed application, that acts as a callback URL.
Audience - This audience needs to be shared by the managed application, and the Cymmetri Identity platform will validate it for providing access token.
Access Dropdown Settings
Scope Settings
Scopes are used to track the consents of the end-users. This is used to determine what information the end-user wishes to share with the managed application.
Let us understand the scopes in play here -
openid - As we wish to support OAuth 2.0 flows as well, the openid scope is optional. However, since we are dealing with OpenID Connect flow here, openid scope is mandatory for this flow.
email - User’s email address is shared with the managed application.
address - User’s address fields are shared with the managed application.
phone - User’s phone number and mobile number fields are shared with the managed application.
profile - Shares the entire list of user attributes with the managed application.
offline_access - <added for future-proofness, not yet implemented>
Grant Type setting lets the Cymmetri Identity platform know which flow you wish to opt for -
Authorization Code refers to the current flow.
Refresh Token has not been implemented currently for the Cymmetri Identity platform.
Since this flow requires sharing the access token, and NOT the ID token, we may choose “code” as a response type.
The managed application is expected to mention using query parameters while starting the OpenID Connect flow to mention which response type it is expecting from the Cymmetri Identity platform.
While, we have chosen code as our return type, we could choose any other response type that also includes code return type.
Public subject type setting is used, since it is the most common mechanism for OpenID connect flows.
Pairwise Mechanism may be supported upon request. Please contact Cymmetri Support team in case your application needs support for pairwise subject type.
Credential Dropdown Settings
Client Secret over HTTP basic - Shared as a query parameter or a fragment to the managed application through an HTTP redirect.
Client Secret over HTTP POST - Shared as a part of the response body to a REST endpoint exposed by the managed application through a POST Request.
Private key JWT - Share JWT instead of opaque access tokens. This is no longer considered safe and other options are preferred.
No Authentication as a response type is not to be used in the OpenID Connect flow.
The current flow has API exchange of tokens and validations. So we choose to use “Client Secret over HTTP POST” as the response type setting for this flow.
Cymmetri platform highly recommends adding support to either SAML 2.0 or OpenID Connect protocols owing to their well-accepted standards and to avoid vendor lock-in.
In the absence of the ability of the managed application to adopt either the SAML 2.0 or the OpenID Connect 1.0 standard, the Cymmetri platform provides with the ability to integrate simple REST API based mechanism to allow an end-user to perform Single SignOn from the Cymmetri Identity Portal
User is assigned the application and clicks on the application tile.
The end user session is captured as the client IP address as received from the user’s browser.
The user session is validated and the Cymmetri platform checks if the end user is authorized to perform Single SignOn into the managed application.
In case, such a session token is created and the end-user is redirected as a query parameter to an endpoint on the managed application.
The endpoint on the managed application also captures the end-user’s client IP address, and sends the received token to its backend.
The managed application backend already holds the Application ID and Application password assigned to it when the API-based SSO is configured on the Cymmetri Identity platform.
The managed application backend now makes a POST call to the validate token API endpoint exposed by the Cymmetri Identity platform with the form parameters as follows -
app_id - Previously shared application ID
app_pass - Previously shared application password
user_ip - End-user’s client IP address as captured from the end-user’s browser
auth_token - the token sent to the endpoint of the managed application.
The Cymmetri platform responds back with a success message in case the application ID, application password, client IP address and the user session string match with the corresponding records in its backend.
In case of success, the managed application is expected to generate a user session for the prescribed user Id as shared in the success response message.
The Cymmetri platform responds back with a failure message in case of even one parameter mismatches from among - application ID, application password, client IP address or the user session string (shared token).
In case of failure, the managed application is expected to cancel the login attempt and show the error message shared by the Cymmetri Identity platform.
For configuring the REST API based SSO mechanism, first select the application already added into your Cymmetri platform.
Then proceed to the SSO configuration using the “SignOn” link in the left-hand side menu bar.
Enable the Single SignOn by clicking the toggle button on the right-hand side of the page.
Now enter the application URL as below -
Application URL = <base url of the deployment>/apiSSO?applicationId=<applicationId>
Let us first copy the URL from the address bar -
The corresponding URL in my case is -
We evaluate the following values from the URL -
applicationId - 6241c3b604c15417a91c7030
Let us enter this value in the Application URL text bar and click the “Save” button.
Let us proceed by selecting the radio button “API-based SSO”
Click on the dropdown “Advanced Settings (API)” to configure the API-based SSO and enter the information:
Source app token param name - Refers to the key of the query parameter used to share the randomly generated token from the Cymmetri backend.
Application Secret - Refers to the parameter app_pass that must be sent back by the managed application to validate the token.
Target App Redirect URL - Refers to the endpoint exposed by the managed application to receive the token as a query parameter.
Token Validity - number of seconds for which the generated token is valid. The managed application must send back the token for validation within these many seconds.
Target app token param name - This is the field that the managed application must use to send back the token for validation.
External Application ID - Refers to the parameter app_id that must be sent back by the managed application to validate the token.
On clicking the application tile, the user is redirected to the URL below as per the configuration above.
Once the token is received by the application, the application makes a POST call as indicated by the CURL request below -
Mentioned below is a sample getToken method implemented in the managed application that wishes to use API SSO implementation. The url in the api call and the app_id and app_pass may vary from tenant to tenant
In case of this error, “User not verified” message must be shown by the managed application. The user must not be allowed to login.
In case of this error, “Application not verified” message must be shown by the managed application. The user must not be allowed to login. The application configuration on the Cymmetri Identity platform and the managed application must be validation and cross-verified.
This indicates the manner in which the response (access token or ID token) is shared back by the Cymmetri Identity platform to the managed application.
This indicates the manner in which the response (access token or ID token) is shared back by the Cymmetri Identity platform to the managed application.
Base URL of the deployment -
Now we generate the Application URL as -
<random token>
curl --location --request POST '' \ --header 'Content-Type: application/x-www-form-urlencoded' \ --data-urlencode 'app_id=demoapps' \ --data-urlencode 'app_pass=Pras@4i1m$' \ --data-urlencode 'auth_token=<random token>' \ --data-urlencode 'user_ip=<client IP address>'


The Cymmetri Authenticator is a robust multi-factor authentication (MFA) mechanism. This mechanism enhances digital security by adding an additional layer of authentication to verify user identity, using a time based OTP (TOTP)
The Cymmetri Authenticator uses the Cymmetri Verifier App that generates time-based one-time passwords (TOTPs) that expire after a short time window. Users must enter these constantly changing codes along with their regular passwords to gain access to their accounts, ensuring that even if a malicious actor obtains their password, access remains highly restricted.
The Cymmetri Authenticator App is user-friendly and easy to set up, often by scanning QR codes provided by the service requiring authentication. It's a valuable tool for businesses and individuals looking to protect their sensitive data effectively.
For configuring the Cymmetri Authenticator, select the Cymmetri Authenticator (Time based OTP) toggle button and click confirm to setup Cymmetri Authenticator as an MFA option
Next we move to configure the rules for Multi-factor authentication policy for login
Click on the pencil icon to start editing the rule.
To enable this rule click on the pencil icon in the upper box to toggle on this rule.
Change the dropdown of the Cymmetri Authenticator factor to indicate that it is mandatory (required).
The options available for each factor are:
Required: This setting means that the corresponding factor is required to be enabled for each user, and every user must set up this factor in their next login.
Optional: This setting means that the corresponding factor is not required to be enabled for each user, and they may configure this option from their "My Workspace". Once the user configures it, they may use it for the purpose of second level of authentication during authentication. Disabled: This settings means that the corresponding factor is not required or enabled for each user, and the user may not configure or use it for authentication into the Cymmetri platform.
An administrator can further customize to whom the rule would be applicable by selecting user(s) or group of users in the "Assigned to" Tab, If the rule is to be applied to all the users then the "All Users" option need to be selected
All subsequent logins of any user on the Cymmetri platform will now require the use of the Cymmetri Authenticator Code.
The user needs to setup the Cymmetri Authenticator, for which the user needs to download the Cymmetri Verifier app. The links below can be used to download the Cymmetri Verifier App on Android or IOS:
Once downloaded we need to scan the QR Code as shown below in the Cymmetri Verifier App and obtain a 6 digit code which needs to be entered in the space provided below and verify the user login.
Once successfully verified the user is redirected to the Dashboard
Cymmetri also allow you to customize the Cymmetri Authenticator parameters using the Configuration section. Here you may configure the values as shown below:
OTP Type: Select the OTP Type to be implemented.Time Based is the default value here.
OTP Hash Algorithm: Select the appropriate cryptographic algorithm to generate the OTP. Default option is HmacSHA1.
Number of Digits: The length of the generated OTPs, which can be 6-9 numbers. The default is 6.
OTP Token Period: This number determines how long a one-time password is active before the next one-time password generates. The default is 30 seconds.
Look Ahead Window: The Look Ahead Window considers any possible synchronization delay between the server and the client that generates the one-time password. Default value is 2.
Supported Applications: Two-Factor Authentication apps that can be used by users to secure their Cymmetri IAM accounts.
In our increasingly digitized world, safeguarding personal and sensitive information is of paramount importance. With cyber threats on the rise, traditional passwords alone are no longer sufficient to protect our digital identities and assets. This is where Multi-Factor Authentication (MFA) comes into play. MFA is a robust security measure that enhances online protection by requiring users to provide multiple forms of authentication before granting access to an account or system.
MFA typically involves three factors:
Something You Know: This is the traditional password or PIN that users have to enter. While passwords alone are susceptible to brute-force attacks or phishing, the combination with other factors adds an extra layer of security.
Something You Have: Users are also required to possess something physical, like a smartphone, smart card, or a security token. This device generates a one-time code, further authenticating the user.
Something You Are: This factor is based on biometric data, such as fingerprints, facial recognition, or retina scans. Biometrics add a high level of security as they are unique to each individual.
MFA offers several advantages:
Enhanced Security: By combining multiple authentication factors, MFA makes it significantly more challenging for cybercriminals to gain unauthorized access. Even if they have a password, they would still need physical access to a user's second-factor device or their biometric data.
Mitigation of Password Vulnerabilities: Since passwords are vulnerable to theft or hacking, MFA helps reduce the risks associated with compromised passwords.
Improved Compliance: In various industries, compliance standards require the implementation of MFA to protect sensitive data, reinforcing its importance in data protection and privacy.
User-Friendly: Modern MFA solutions are designed to be user-friendly, offering a seamless authentication experience through mobile apps or SMS verification.
Multi-Factor Authentication is a critical tool in our arsenal against the growing threats in the digital realm. By combining what we know, have, and are, MFA offers a robust defense, ensuring that only authorized individuals gain access to sensitive information and systems. It's a key element in the ongoing battle to safeguard our digital identities and data.
Multi-Factor Authentication is a mechanism used across the Cymmetri platform to deal with second level authentication.Typically employed using off-band mechanisms, Cymmetri allows flexibility by introducing both modern and traditional mechanisms, such as:
Cymmetri Authenticator
Push Authenticator
Google Authenticator
SMS Authenticator
Secret Questions
Access Multi-factor authentication by going to Products > Multifactor
Next, we select Factor sub-menu
In the upcoming sections we will explore each of these mechanisms.
Push Authenticator is a modern and highly convenient multi-factor authentication (MFA) mechanism of Cymmetri's Multi-factor Authentication mechanisms designed to bolster security while offering a user-friendly experience. This authentication method simplifies the process of verifying one's identity, reducing the reliance on traditional methods like SMS codes or hardware tokens.
With Push Authenticator, users receive authentication requests directly on their registered mobile devices. A push notification is sent to the user's device in the Cymmetri Authenticator App, prompting them to approve or deny the login attempt. This approval process occurs with a simple tap.
The advantages of Push Authenticator are twofold. First, it enhances security by reducing the risk of intercepted codes or phishing attacks. Second, it streamlines the user experience, making MFA more accessible and less intrusive.
For configuring the Push Authenticator, select the "Enable Push Notification" checkbox provided in the Cymmetri Authenticator mechanism
And click confirm to setup Push Authenticator as an MFA option
Next we move to configure the rules for Multi-factor authentication policy for login
Click on the pencil icon to start editing the rule.Optionally you may also add a new rule by clicking on the "+ Add New" button.
For adding a New Rule enter Name of the Rule and Description also Enable the rule; you may optionally select whether you want to enable Adaptive MFA and the click on the Save button to add the rule
Once added you need to configure the rule to select the Push Authenticator mechanism as Required and enable it.
The other options that can be selected are as explained below:
Required: This setting means that the corresponding factor is required to be enabled for each user, and every user must set up this factor in their next login.
Optional: This setting means that the corresponding factor is not required to be enabled for each user, and they may configure this option from their "My Workspace". Once the user configures it, they may use it for the purpose of second level of authentication during authentication. Disabled: This settings means that the corresponding factor is not required or enabled for each user, and the user may not configure or use it for authentication into the Cymmetri platform.
An administrator can further customize to whom the rule would be applicable by selecting user(s) or group of users in the "Assigned to" Tab, If the rule is to be applied to all the users then the "All Users" option need to be selected
All subsequent logins of any user on the Cymmetri Identity platform will now require the use of the Push Authenticator mechanism.
The user needs to setup the Cymmetri Authenticator for receiving the push notification on the device, for which the user needs to download the Cymmetri Verifier app. The links below can be used to download the Cymmetri Verifier App on Android or IOS:
Once downloaded we need to scan the QR Code in the Cymmetri Verifier App to register the device
Once the device is registered successfully a notification is show on the dashboard
Now when the user selects Push Authenticator as an MFA mechanism and consent notification is sent to the mobile device and the user needs to accept the consent in the stipulated time to be allowed to login.
A notification like as shown below appears on the mobile device where the user needs to click on Yes button to allow login
Once successfully verified the user is redirected to the Dashboard
Google Authenticator is a widely used two-factor authentication app developed by Google. It generates time-based one-time passcodes (TOTPs) on users' mobile devices, providing an additional layer of security beyond passwords. Users typically scan QR codes presented by online services to set up two-factor authentication.
For configuring the Google Authenticator, select the Google Authenticator toggle button and click confirm to setup Google Authenticator as an MFA option
Next we move to configure the rules for Multi-factor authentication policy for login
You may either click on the pencil icon to start editing the rule, or create a new rule
Once you have either created a new rule or edited an existing one, change the dropdown of the Google Authenticator factor to indicate that it is mandatory (required).
The options available for each factor are:
Required: This setting means that the corresponding factor is required to be enabled for each user, and every user must set up this factor in their next login.
Optional: This setting means that the corresponding factor is not required to be enabled for each user, and they may configure this option from their "My Workspace". Once the user configures it, they may use it for the purpose of second level of authentication during authentication. Disabled: This settings means that the corresponding factor is not required or enabled for each user, and the user may not configure or use it for authentication into the Cymmetri platform.
An administrator can further customize to whom the rule would be applicable by selecting user(s) or group of users in the "Assigned to" Tab, If the rule is to be applied to all the users then the "All Users" option need to be selected
Once the changes are saved this is how the rule appears:
All subsequent logins of any user on the Cymmetri platform will now require the use of the Google Authenticator Code.
The user needs to setup the Google Authenticator, for which the user needs to download the Google Authenticator App. The links below can be used to download the Google Authenticator App on Android or IOS:
Once downloaded we need to scan the QR Code as shown below in the Google Authenticator App and obtain a 6 digit code which needs to be entered in the space provided below and verify the user login.
Once successfully verified the user is redirected to the Dashboard
Cymmetri also allow you to customize the Cymmetri Authenticator parameters using the Configuration section. Here you may configure the values as shown below:
OTP Type: Select the OTP Type to be implemented.Time Based is the default value here.
OTP Hash Algorithm: Select the appropriate cryptographic algorithm to generate the OTP. Default option is HmacSHA1.
Number of Digits: The length of the generated OTPs, which can be 6-9 numbers. The default is 6.
OTP Token Period: This number determines how long a one-time password is active before the next one-time password generates. The default is 30 seconds.
Look Ahead Window: The Look Ahead Window considers any possible synchronization delay between the server and the client that generates the one-time password. Default value is 2.
Supported Applications: Two-Factor Authentication apps that can be used by users to secure their Cymmetri IAM accounts.
Webhooks are a way for external systems to receive events from the Cymmetri Identity Platform.
Requires the tenant organization to run a web server that is exposed to the Internet or at least accessible from the Cymmetri Cloud 2.0 deployment on the cloud
Events may be received for the following events -
Testing Webhook - Generates a POST request to the /test endpoint of the web server hosted by the tenant. It provides an authorization token that can be used for making any API calls to the Cymmetri Cloud 2.0 APIs. Is generated after this configuration. Go to the Configuration Menu and Select the webhooks menu -
Click on the save & test button.
Pre Create User - Generates a POST request, before the user is created, to the /preCreateUser endpoint of the web server hosted by the tenant.
Pre Update User - Generates a POST request, before the user is updated, to the /preUpdateUser endpoint of the web server hosted by the tenant.
Post Update User - Generates a POST request, after the user is updated, to the /postUpdateUser endpoint of the web server hosted by the tenant.
Validate User - Generates a POST request, before the user is created and validation is to be run, to the /validateUser endpoint of the web server hosted by the tenant.
Validate Update User - Generates a POST request, before the user is created and validation is to be run, to the /validateUpdateUser endpoint of the web server hosted by the tenant.
Change password - Generates a POST request, upon the change of password for a user, to the /changePassword endpoint of the web server hosted by the tenant.
Pre Provision - Generates a POST request, before the provisioning of the user to an application, to the /preProvision endpoint of the web server hosted by the tenant.
Post Provision - Generates a POST request, after the provisioning of the user to an application, to the /postProvision endpoint of the web server hosted by the tenant.
Policy Map - Generates a POST request, while assigning the application to a user, to the /policyMap endpoint of the web server hosted by the tenant.
Deprovision Run - Generates a POST request, upon the update of a user to deprovision a user, to the /runDeprovision endpoint of the web server hosted by the tenant.
While other webhooks operate on a principle of fire-and-forget, the validateUser and the validateUpdateUser expect the response from the tenant as the same or modified body as sent to it for validation.
Test web hook
Purpose : This api is used to test web hook api.
Input Needed: NA
Curl Request:
--header 'Authorization: Bearer eyJhbGciOiJIUzI1NiJ9.eyJzdWIiOiJhZG1pbiIsImRlbGVnYXRlZSI6bnVsbCwiZGVsZWdhdGVlSWQiOm51bGwsImZpcnN0TG9naW4iOmZhbHNlLCJyb2xlcyI6WyJPUkdfQURNSU4iLCJVU0VSIl0sInRlbmFudElkIjoiYXMxMDAiLCJleHAiOjE2NDYzOTYzMDgsInVzZXJJZCI6IjYyMTRkYjdiZDY2MWE1NzM4NmE3MWYxMCIsImlhdCI6MTY0NjM5MDMwOH0.bdKZ3UBCedT91bJAWLCo2AOahIs5ClFMAhnj36f_ecQ' \
--header 'Content-Type: application/json' \
--data-raw '{
}'
Response:
{ "response": {} }
Pre Create User
Purpose : This web hook api is used to do some events before creating a user in the target system.
Input needed :
{
"request": {
"user": {
"assignedGroups": [],
"provisionedApps": {},
"securityQuestion": {},
"country": "India",
"firstName": "Shreyash2",
"lastName": "Pande2",
"login": "shreyash2",
"userType": "Employee"
}
}
}
Curl request:
--header 'Authorization: Bearer eyJhbGciOiJIUzI1NiJ9.eyJzdWIiOiJhZG1pbiIsImRlbGVnYXRlZSI6bnVsbCwiZGVsZWdhdGVlSWQiOm51bGwsImZpcnN0TG9naW4iOmZhbHNlLCJyb2xlcyI6WyJPUkdfQURNSU4iLCJVU0VSIl0sInRlbmFudElkIjoiYXMxMDAiLCJleHAiOjE2NDYzOTYzMDgsInVzZXJJZCI6IjYyMTRkYjdiZDY2MWE1NzM4NmE3MWYxMCIsImlhdCI6MTY0NjM5MDMwOH0.bdKZ3UBCedT91bJAWLCo2AOahIs5ClFMAhnj36f_ecQ' \
--header 'Content-Type: application/json' \
--data-raw '{
"request": {
"user": {
"assignedGroups": [],
"provisionedApps": {},
"securityQuestion": {},
"country": "India",
"firstName": "Shreyash2",
"lastName": "Pande2",
"login": "shreyash2",
"userType": "Employee"
}
}
}'
Response: {
"response": {
"data": {
"assignedGroups": [],
"provisionedApps": {},
"securityQuestion": {},
"country": "India",
"firstName": "Shreyash2",
"lastName": "Pande2",
"login": "shreyash2",
"userType": "Employee"
}
}
}
Post create User
Purpose : This web hook is used to do some events after creating a user in the target system.
--header 'Authorization: Bearer eyJhbGciOiJIUzI1NiJ9.eyJzdWIiOiJhZG1pbiIsImRlbGVnYXRlZSI6bnVsbCwiZGVsZWdhdGVlSWQiOm51bGwsImZpcnN0TG9naW4iOmZhbHNlLCJyb2xlcyI6WyJPUkdfQURNSU4iLCJVU0VSIl0sInRlbmFudElkIjoiYXMxMDAiLCJleHAiOjE2NDYzOTYzMDgsInVzZXJJZCI6IjYyMTRkYjdiZDY2MWE1NzM4NmE3MWYxMCIsImlhdCI6MTY0NjM5MDMwOH0.bdKZ3UBCedT91bJAWLCo2AOahIs5ClFMAhnj36f_ecQ' \
--header 'Content-Type: application/json' \
--data-raw '{
"request": {
"user": {
"assignedGroups": [],
"provisionedApps": {},
"securityQuestion": {},
"country": "India",
"firstName": "Shreyash2",
"lastName": "Pande2",
"login": "shreyash2",
"userType": "Employee"
}
}
}'
Response : NA
Restful API - Pre update user
Purpose : This web hook is used to do some events before updating a user in the target system.
Input needed:
{
"request": {
"user": {
"assignedGroups": [],
"provisionedApps": {},
"securityQuestion": {},
"country": "India",
"firstName": "Shreyash2",
"lastName": "Pande2",
"login": "shreyash2",
"userType": "Employee"
}
}
}
Curl request:
--header 'Authorization: Bearer eyJhbGciOiJIUzI1NiJ9.eyJzdWIiOiJhZG1pbiIsImRlbGVnYXRlZSI6bnVsbCwiZGVsZWdhdGVlSWQiOm51bGwsImZpcnN0TG9naW4iOmZhbHNlLCJyb2xlcyI6WyJPUkdfQURNSU4iLCJVU0VSIl0sInRlbmFudElkIjoiYXMxMDAiLCJleHAiOjE2NDYzOTYzMDgsInVzZXJJZCI6IjYyMTRkYjdiZDY2MWE1NzM4NmE3MWYxMCIsImlhdCI6MTY0NjM5MDMwOH0.bdKZ3UBCedT91bJAWLCo2AOahIs5ClFMAhnj36f_ecQ' \
--header 'Content-Type: application/json' \
--data-raw '{
"request": {
"user": {
"assignedGroups": [],
"provisionedApps": {},
"securityQuestion": {},
"country": "India",
"firstName": "Shreyash2",
"lastName": "Pande2",
"login": "shreyash2",
"userType": "Employee"
}
}
}'
Response
{
"response": {
"data": {
"assignedGroups": [],
"provisionedApps": {},
"securityQuestion": {},
"country": "India",
"firstName": "Shreyash2",
"lastName": "Pande2",
"login": "shreyash2",
"userType": "Employee"
}
}
}
Post update user
Purpose : This web hook is used to do some events after updating a user in the target system.
Input needed :
{
"request": {
"user": {
"assignedGroups": [],
"provisionedApps": {},
"securityQuestion": {},
"country": "India",
"firstName": "Shreyash2",
"lastName": "Pande2",
"login": "shreyash2",
"userType": "Employee"
}
}
}
Curl request:
--header 'Authorization: Bearer eyJhbGciOiJIUzI1NiJ9.eyJzdWIiOiJhZG1pbiIsImRlbGVnYXRlZSI6bnVsbCwiZGVsZWdhdGVlSWQiOm51bGwsImZpcnN0TG9naW4iOmZhbHNlLCJyb2xlcyI6WyJPUkdfQURNSU4iLCJVU0VSIl0sInRlbmFudElkIjoiYXMxMDAiLCJleHAiOjE2NDYzOTYzMDgsInVzZXJJZCI6IjYyMTRkYjdiZDY2MWE1NzM4NmE3MWYxMCIsImlhdCI6MTY0NjM5MDMwOH0.bdKZ3UBCedT91bJAWLCo2AOahIs5ClFMAhnj36f_ecQ' \
--header 'Content-Type: application/json' \
--data-raw '{
"request": {
"user": {
"assignedGroups": [],
"provisionedApps": {},
"securityQuestion": {},
"country": "India",
"firstName": "Shreyash2",
"lastName": "Pande2",
"login": "shreyash2",
"userType": "Employee"
}
}
}'
Response: NA
Validate User
Purpose : This web hook is used to validate users before creating a user in the target system.
Input Needed :
{
"request": {
"user": {
"assignedGroups": [],
"provisionedApps": {},
"securityQuestion": {},
"country": "India",
"firstName": "Shreyash2",
"lastName": "Pande2",
"login": "shreyash2",
"userType": "Employee"
}
}
}
--header 'Authorization: Bearer eyJhbGciOiJIUzI1NiJ9.eyJzdWIiOiJhZG1pbiIsImRlbGVnYXRlZSI6bnVsbCwiZGVsZWdhdGVlSWQiOm51bGwsImZpcnN0TG9naW4iOmZhbHNlLCJyb2xlcyI6WyJPUkdfQURNSU4iLCJVU0VSIl0sInRlbmFudElkIjoiYXMxMDAiLCJleHAiOjE2NDYzOTYzMDgsInVzZXJJZCI6IjYyMTRkYjdiZDY2MWE1NzM4NmE3MWYxMCIsImlhdCI6MTY0NjM5MDMwOH0.bdKZ3UBCedT91bJAWLCo2AOahIs5ClFMAhnj36f_ecQ' \
--header 'Content-Type: application/json' \
--data-raw '{
"request": {
"user": {
"assignedGroups": [],
"provisionedApps": {},
"securityQuestion": {},
"country": "India",
"firstName": "Shreyash2",
"lastName": "Pande2",
"login": "shreyash2",
"userType": "Employee"
}
}
}'
Response: {
"response": {
"error": true,
"message": "MobileAlreadyExist"
}
}
Validate update user
Purpose : This web hook is used to validate users before updating a user in the target system.
Input needed:
"request": {
"user": {
"assignedGroups": [],
"provisionedApps": {},
"securityQuestion": {},
"country": "India",
"firstName": "Shreyash2",
"lastName": "Pande2",
"login": "shreyash2",
"userType": "Employee"
}
}
}
Curl request:
--header 'Authorization: Bearer eyJhbGciOiJIUzI1NiJ9.eyJzdWIiOiJhZG1pbiIsImRlbGVnYXRlZSI6bnVsbCwiZGVsZWdhdGVlSWQiOm51bGwsImZpcnN0TG9naW4iOmZhbHNlLCJyb2xlcyI6WyJPUkdfQURNSU4iLCJVU0VSIl0sInRlbmFudElkIjoiYXMxMDAiLCJleHAiOjE2NDYzOTYzMDgsInVzZXJJZCI6IjYyMTRkYjdiZDY2MWE1NzM4NmE3MWYxMCIsImlhdCI6MTY0NjM5MDMwOH0.bdKZ3UBCedT91bJAWLCo2AOahIs5ClFMAhnj36f_ecQ' \
--header 'Content-Type: application/json' \
--data-raw '{
"request": {
"user": {
"assignedGroups": [],
"provisionedApps": {},
"securityQuestion": {},
"country": "India",
"firstName": "Shreyash2",
"lastName": "Pande2",
"login": "shreyash2",
"userType": "Employee"
}
}
}'
Response:
{
"response": {
"error": true,
"message": "EmailAlreadyExist"
}
}
Change password
Purpose : This web hook is used to do some events on password change.
Input Needed :
{
"request": {
"user": {
"assignedGroups": [],
"provisionedApps": {},
"securityQuestion": {},
"country": "India",
"firstName": "Shreyash2",
"lastName": "Pande2",
"login": "shreyash2",
"userType": "Employee"
},
"passwordText" : "Welcome@123"
}
}
--header 'Authorization: Bearer eyJhbGciOiJIUzI1NiJ9.eyJzdWIiOiJhZG1pbiIsImRlbGVnYXRlZSI6bnVsbCwiZGVsZWdhdGVlSWQiOm51bGwsImZpcnN0TG9naW4iOmZhbHNlLCJyb2xlcyI6WyJPUkdfQURNSU4iLCJVU0VSIl0sInRlbmFudElkIjoiYXMxMDAiLCJleHAiOjE2NDYzOTYzMDgsInVzZXJJZCI6IjYyMTRkYjdiZDY2MWE1NzM4NmE3MWYxMCIsImlhdCI6MTY0NjM5MDMwOH0.bdKZ3UBCedT91bJAWLCo2AOahIs5ClFMAhnj36f_ecQ' \
--header 'Content-Type: application/json' \
--data-raw '{
"request": {
"user": {
"assignedGroups": [],
"provisionedApps": {},
"securityQuestion": {},
"country": "India",
"firstName": "Shreyash2",
"lastName": "Pande2",
"login": "shreyash2",
"userType": "Employee"
},
"passwordText" : "Welcome@123"
}
}'
Response: NA
Pre provision
Purpose : This web hook is used to do some events before assigning applications to a user.
Input Needed :
{
"request": {
"policyMap" : "email",
"form" : "",
"applicationId" : "620231fee789224ec1cec3dd",
"roleList" : [],
"action" : "Application Create",
"user": {
"assignedGroups": [],
"provisionedApps": {},
"securityQuestion": {},
"country": "India",
"firstName": "Shreyash2",
"lastName": "Pande2",
"login": "shreyash2",
"userType": "Employee"
}
}
}
Curl Request:
--header 'Authorization: Bearer eyJhbGciOiJIUzI1NiJ9.eyJzdWIiOiJhZG1pbiIsImRlbGVnYXRlZSI6bnVsbCwiZGVsZWdhdGVlSWQiOm51bGwsImZpcnN0TG9naW4iOmZhbHNlLCJyb2xlcyI6WyJPUkdfQURNSU4iLCJVU0VSIl0sInRlbmFudElkIjoiYXMxMDAiLCJleHAiOjE2NDYzOTYzMDgsInVzZXJJZCI6IjYyMTRkYjdiZDY2MWE1NzM4NmE3MWYxMCIsImlhdCI6MTY0NjM5MDMwOH0.bdKZ3UBCedT91bJAWLCo2AOahIs5ClFMAhnj36f_ecQ' \
--header 'Content-Type: application/json' \
--data-raw '{
"request": {
"policyMap" : "email",
"form" : "",
"applicationId" : "620231fee789224ec1cec3dd",
"roleList" : [],
"action" : "Application Create",
"user": {
"assignedGroups": [],
"provisionedApps": {},
"securityQuestion": {},
"country": "India",
"firstName": "Shreyash2",
"lastName": "Pande2",
"login": "shreyash2",
"userType": "Employee"
}
}
}'
Response : NA
Post provision
Purpose : This web hook is used to do some events after assigning applications to a user.
Input Needed :
{
"request": {
"policyMap" : "email",
"form" : "",
"applicationId" : "620231fee789224ec1cec3dd",
"roleList" : [],
"action" : "Application Create",
"user": {
"assignedGroups": [],
"provisionedApps": {},
"securityQuestion": {},
"country": "India",
"firstName": "Shreyash2",
"lastName": "Pande2",
"login": "shreyash2",
"userType": "Employee"
},
"isSuccess" : true,
"uid" : "5f36283bc193991db0990d3e"
}
}
Curl response :
--header 'Authorization: Bearer eyJhbGciOiJIUzI1NiJ9.eyJzdWIiOiJhZG1pbiIsImRlbGVnYXRlZSI6bnVsbCwiZGVsZWdhdGVlSWQiOm51bGwsImZpcnN0TG9naW4iOmZhbHNlLCJyb2xlcyI6WyJPUkdfQURNSU4iLCJVU0VSIl0sInRlbmFudElkIjoiYXMxMDAiLCJleHAiOjE2NDYzOTYzMDgsInVzZXJJZCI6IjYyMTRkYjdiZDY2MWE1NzM4NmE3MWYxMCIsImlhdCI6MTY0NjM5MDMwOH0.bdKZ3UBCedT91bJAWLCo2AOahIs5ClFMAhnj36f_ecQ' \
--header 'Content-Type: application/json' \
--data-raw '{
"request": {
"policyMap" : "email",
"form" : "",
"applicationId" : "620231fee789224ec1cec3dd",
"roleList" : [],
"action" : "Application Create",
"user": {
"assignedGroups": [],
"provisionedApps": {},
"securityQuestion": {},
"country": "India",
"firstName": "Shreyash2",
"lastName": "Pande2",
"login": "shreyash2",
"userType": "Employee"
},
"isSuccess" : true,
"uid" : "5f36283bc193991db0990d3e"
}
}'
Response : NA
Policy map
Purpose : This web hook is used to do some events on policy map while assigning the application to a user.
Input needed :
"request": {
"targetAttribute" : "email",
"cymmetrifield" : "email",
"formVeriable" : "",
"user": {
"assignedGroups": [],
"provisionedApps": {},
"securityQuestion": {},
"country": "India",
"firstName": "Shreyash2",
"lastName": "Pande2",
"login": "shreyash2",
"userType": "Employee"
}
}
}
Curl request :
--header 'Authorization: Bearer eyJhbGciOiJIUzI1NiJ9.eyJzdWIiOiJhZG1pbiIsImRlbGVnYXRlZSI6bnVsbCwiZGVsZWdhdGVlSWQiOm51bGwsImZpcnN0TG9naW4iOmZhbHNlLCJyb2xlcyI6WyJPUkdfQURNSU4iLCJVU0VSIl0sInRlbmFudElkIjoiYXMxMDAiLCJleHAiOjE2NDYzOTYzMDgsInVzZXJJZCI6IjYyMTRkYjdiZDY2MWE1NzM4NmE3MWYxMCIsImlhdCI6MTY0NjM5MDMwOH0.bdKZ3UBCedT91bJAWLCo2AOahIs5ClFMAhnj36f_ecQ' \
--header 'Content-Type: application/json' \
--data-raw '{
"request": {
"targetAttribute" : "email",
"cymmetrifield" : "email",
"formVeriable" : "",
"user": {
"assignedGroups": [],
"provisionedApps": {},
"securityQuestion": {},
"country": "India",
"firstName": "Shreyash2",
"lastName": "Pande2",
"login": "shreyash2",
"userType": "Employee"
}
}
}'
Response :
{
"response": {
"mappedValue": "valid"
}
}
Run deprovisioning
Purpose : This web hook is used for deprovisioning applications when users get updated .
Input needed :
{
"request": {
"user": {
"assignedGroups": [],
"provisionedApps": {},
"securityQuestion": {},
"country": "India",
"firstName": "Shreyash2",
"lastName": "Pande2",
"login": "shreyash2",
"userType": "Employee"
}
}
}
Curl request:
--header 'Authorization: Bearer eyJhbGciOiJIUzI1NiJ9.eyJzdWIiOiJhZG1pbiIsImRlbGVnYXRlZSI6bnVsbCwiZGVsZWdhdGVlSWQiOm51bGwsImZpcnN0TG9naW4iOmZhbHNlLCJyb2xlcyI6WyJPUkdfQURNSU4iLCJVU0VSIl0sInRlbmFudElkIjoiYXMxMDAiLCJleHAiOjE2NDYzOTYzMDgsInVzZXJJZCI6IjYyMTRkYjdiZDY2MWE1NzM4NmE3MWYxMCIsImlhdCI6MTY0NjM5MDMwOH0.bdKZ3UBCedT91bJAWLCo2AOahIs5ClFMAhnj36f_ecQ' \
--header 'Content-Type: application/json' \
--data-raw '{
"request": {
"user": {
"assignedGroups": [],
"provisionedApps": {},
"securityQuestion": {},
"country": "India",
"firstName": "Shreyash2",
"lastName": "Pande2",
"login": "shreyash2",
"userType": "Employee"
}
}
}'
Response:
{
"response": {
"data": true
}
}
Secret questions are a form of knowledge-based authentication where users set up personalized questions and provide answers during the account setup. These questions might serve as an additional layer of identity verification. Users are prompted to answer these questions during login or account recovery processes, supplementing other authentication methods.
For configuring the Secret Questions Authenticator, select the Secret Questions Authenticator toggle button and click confirm to setup Secret Questions Authenticator as an MFA option
Next we move to configure the rules for Multi-factor authentication policy for login
You may either click on the pencil icon to start editing the rule, or create a new rule
Once you have either created a new rule or edited an existing one, change the dropdown of the Secret Questions Authenticator factor to indicate that it is mandatory (required).
The options available for each factor are:
Required: This setting means that the corresponding factor is required to be enabled for each user, and every user must set up this factor in their next login.
Optional: This setting means that the corresponding factor is not required to be enabled for each user, and they may configure this option from their "My Workspace". Once the user configures it, they may use it for the purpose of second level of authentication during authentication. Disabled: This settings means that the corresponding factor is not required or enabled for each user, and the user may not configure or use it for authentication into the Cymmetri platform.
An administrator can further customize to whom the rule would be applicable by selecting user(s) or group of users in the "Assigned to" Tab, If the rule is to be applied to all the users then the "All Users" option need to be selected
Once the changes are saved this is how the rule appears:
All subsequent logins of any user on the Cymmetri platform will now require the use of the Secret Questions Authenticator and answer the configured questions.
The user needs to setup the Secret Questions, for which the user needs to select the questions from a predefined set of questions and provide their relevant answers which the user can answer later when logging into the system.
When the user logs in the next time user needs to answer these questions to be able to successfully login into Cymmetri
Once successfully verified the user is redirected to the Dashboard
Cymmetri also allow you to customize the Secret Questions parameters using the Configuration section. Here you may configure the values as shown below:
Required Questions To Configure: Select the number of Secret Questions that users need to configure to set up for verifying the account. Default is 3.
Minimum Correct Questions: Choose the minimum number of questions that users need to answer correctly to gain access to their accounts or retrieve passwords. Default is 3.
Minimum Answer Length: Choose the minimum number of characters for the answer to these questions. Default is 2.
Administrators can create a predefined set of Secret Questions that users can choose from while setting up their Secret Question/Answer combinations as an added layer of protection for their Cymmetri accounts.
To a new question Administrator needs to click on the "Add New" button and enter the following details:
Question: The question that the administrator wants to add
Status: needs to be enabled for the question to appear in the list
Administrators can easily edit, delete, activate or deactivate Secret Questions in use.
Note: To use this mechanism, please ensure that your managed application supports authentication using SAML 2.0 protocol acting as the Service Provider (SP).
SAML 2.0 is a primarily web-based Single Sign On mechanism that uses XML based messages exchanged between the authenticating party, referred to as the Identity Provider (IdP) in the SAML 2.0 terms, and the relying party, referred to as the Service Provider (SP) in the SAML 2.0 terms.
In the context of Cymmetri SAML 2.0 implementation, your Cymmetri platform acts as the Identity Provider (IdP) and the managed application that the end-user wishes to access through Single Sign On acts as the Service Provider (SP).
The mechanisms within the SAML 2.0 protocol used for sharing Single Sign On messages are referred to as the SAML 2.0 bindings.
While the SAML 2.0 and its predecessor SAML 1.1 support various bindings, the Cymmetri platform supports the two most commonly used bindings for web applications - viz., HTTP POST Binding and HTTP Redirect Binding. These reflect the manner in which the requests and responses are shared between the Identity provider (Cymmetri platform) and the Service Provider (managed application).
HTTP Redirect Binding: The SAML assertion messages (request and response XML messages) are shared as GET query parameters.
HTTP POST Binding: The SAML assertion messages (request and response XML messages) are shared as POST body messages.
Additionally, there are two flows in which SAML 2.0 Request-Response cycle may be accomplished.
Service Provider initiated flow (SP initiated flow)
Identity Provider initiated flow (IdP initiated flow)
To start the configuration of the managed application for SAML 2.0 based SignOn mechanism, we must identify the flow supported by the managed application.
Let us explore what both these flows mean and how to configure your managed application to use them.
The SAML 2.0 Service Provider Initiated flow indicates that the Service Provider (in our case, the managed application which the end-user wishes to access via Single Sign On) has started the SAML 2.0 Single Sign On process by sending a SAML 2.0 request XML to the Cymmetri platform. This is achieved by the user landing on the Single Sign On URL of the managed application.
In practice, however, since the user is typically on the Cymmetri platform, we have enabled mechanisms to redirect the user to the Single SignOn URL of the managed application, when the user clicks on the application tile.
Flow Description
User lands on the SSO URL page of the managed application. This may be either through clicking on the application tile on the Cymmetri platform or by the user actually entering the SSO URL of the managed application in the browser address bar.
Managed application generates the SAML 2.0 request XML which holds the following important parameters - Request Id, Assertion Consumer Service URL (ACS), the expected Protocol Binding, and the Issuer of the Request.
A redirect is made to the page handling Single Sign On requests on the Cymmetri platform (<baseurl-of-cymmetri-tenant/samlsrvc/SingleSignOnService>) with the request in base64 format as a query parameter.
This page sends the SAML request body to the backend services of the Cymmetri platform to validate the request and to verify whether a session exists for a Cymmetri user in the current browser instance.
If a session does not exist for any user, the user is asked to login into the Cymmetri Identity platform.
If a session exists for the user, then the backend validates whether the user is authorized to access the application for which the SSO request has been initiated. (by checking whether the user is assigned the application.)
The backend services of the Cymmetri platform generates a SAML response XML body and send it as GET request query parameter (if the protocol binding in the SAML request is HTTP Redirect) or as a POST request body (if the protocol binding in the SAML request is HTTP POST binding) to the Assertion Consumer Service URL mentioned in the SAML Request body, with the SAML Response audience as the Issuer mentioned in the SAML request body, and a field “InResponseTo” as the Request ID from the SAML request body.
The managed application would then validate the SAML response (and the signature, if was requested in the SAML request body).
If the SAML Response body is not a valid SAML Response, then the user is redirected to the managed application’s error page.
If the SAML response body is a valid SAML response, then the SAML assertion is extracted to obtain the user information sent by the Cymmetri platform.
If the user information is not valid, for any reason, then the corresponding error is displayed to the user by redirecting the user to the managed application’s error page.
If all the user information is valid, the managed application initiates the user’s session in the managed application web portal, and corresponding session cookies are generated.
Finally, the user is redirected from the application’s Assertion Consumer Service URL to the landing page of the managed application.
Note: In case of any validation errors, please refer to the section explaining the error scenarios below and change the configuration in either the managed application or the Cymmetri Application Sign On configuration page.
The configuration parameters mentioned below are required to configure an application for Single Sign On using the Service Provider Initiated flow in the Cymmetri platform.
Prerequisites from the Managed Application
Entity ID/ Request Issuer - This is the request issuer that would have been sent by the managed application in case this were a Service Provider Initiated flow.
Assertion Consumer Service URL - This is the URL to which the SAML response must be sent by the Cymmetri platform.
Expected NameID Policy - This indicates whether the managed application expects the user subject name to be sent as the email address, username, or some other unspecified value.
Expected Signature Algorithm - The expected algorithm to be used for signing the responses and assertions.
Let us see an example demonstrating SP Initiated flow. We will be using a Service Now Instance for this example.
First we create an application in Cymmetri platform as discussed in previous articles. Let us use this application example below. We have already enabled SignOn as discussed and selected the SAML 2.0 option.
Let us now click on the dropdown for “Advanced Settings (SAML 2.0)”.
Click on the “Download Metadata” button, it is to be used in future steps.
Now go back to Service Now instance and Navigate to Multi-Provider SSO > Identity Providers. Choose any existing IdP and click the Generate Metadata button. The integration automatically generates the instance's SP metadata from the system property settings.
Let us come back to the SAML 2.0 settings for our managed application in Cymmetri platform and start entering the fields one by one.
SAML Type - We select the “SP_INITIATED” from the dropdown.
Since the metadata downloaded from ServiceNow does not indicate the use of a particular signature algorithm, let us simply use “RSA_SHA256”.
Further, we need to select NameID Format. Referring to the highlighted portion in the metadata downloaded from the sample application, we find only 1 supported NameID format
emailAddress: This indicates to the managed application, that the Identity Provider (Cymmetri Platform) will be sending the end-user’s email address, and that the managed application must handle it accordingly.
We see four other NameID formats in the dropdown, let us understand them one-by-one.
NameID Formats:
unspecified: This is a generic and default selection of NameID format, typically this would mean that the Cymmetri platform may send any user attribute, which can be selected further. The managed application must handle it accordingly. This will be used whenever some custom or unusual user attribute is to be passed to the managed application.
transient: This is used as a NameID format when we wish to indicate to the managed application, that the end-user’s details sent during the SAML 2.0 process is in fact not permanent, but may change for the period of the end-user’s identity lifecycle.
persistent: This is used as a NameID format when we wish to indicate to the managed application, that the end-user’s details sent during the SAML 2.0 process is permanent, and will remain the same for the period of the end-user’s identity lifecycle.
username: This is used as a NameID format when we wish to indicate to the managed application, that we will be sharing the end-user’s username from Cymmetri Identity Provider to the managed application during the SAML 2.0 process.
Let us select email as the NameID format.
Let us now discuss NameID Values
There are two scenarios here -
Choosing NameID format as “username” and “email” - The value of the NameID Value will not matter, the end-user’s username or email address will be shared to the managed application.
Choosing NameID format as “unspecified”, “transient”, and “persistent” - The value of the NameID value will allow for a particular value of the User object to be shared to the managed application.
Possible Values of NameID Value are - email, mobile, firstName, lastName, displayName, loginId.
Let us select email as a NameID value, however, it will not affect the configuration.
For configuring the “Request Issuer”, let us refer back to the downloaded metadata.xml from the Service Now application.
We use the entityID from the downloaded metadata as the Entity ID
Please note that the Entity ID field is how the Cymmetri platform identifies the managed application from the SAML Request sent by the managed application. Please ensure that the Entity ID is unique across the deployment.
For the Assertion Consumer Service URL, we once again refer to the downloaded XML,
Let us enter the Assertion Consumer URL as "https://dev165684.service-now.com/navpage.do"
Finally, we refer to the downloaded XML one last time, for deciding upon the toggle buttons:
Here we see the managed application, requires only the Assertions to be signed and not the Authentication requests, we define the toggle switches accordingly.
Let us return back to Service Now application for completing the configuration on the Service rovider side.
Once the above 3 steps are successfully completed we can create a new IDP
Click on the New button to create a new IDP
Then select SAML
Then upload the metadata from the file downloaded in a previous step. and Hit Import button to store the Identity provider metadata in the application.
Once imported provide the Signing/ Encryption Key Alias and Signing/ Encryption Key Password as saml2sp and in the Advanced Tab tick the CreateAuthnContextClass checkbox. The Signing/ Encryption Key Alias and Signing/ Encryption Key Password are used for encryption of data and the CreateAuthnContextClass is used to tell the IDP that Service Now requires that they present a specific login mechanism such as form, Kerberos etc.
Note: Also make sure both the logout urls present here are removed temporarily for testing purposes, else you would logout completely from ServiceNow
Then enter the instance url in the SignOn configuration of the managed application on the Cymmetri portal.
Click the “Save” button.
Next Create a New User in Service Now. Go to Organization->Users->New and provide the credentials of the user logged into Cymmetri as show below and Submit:
Now that both sides are configured, let us test the flow by assigning the application to the current user.
Then to activate the externa IDP in Service Now we need to test the connection on the Service Now side by clicking on the Test Connection button.
Once successfully tested you should see the below screen with successful test results. Click on the Activate button to activate the IDP.
Once activated Click on the Set as Auto Redirect IdP link to automatically redirect to IDP when using a SP Initiated process
Once it is enabled we can come to the currently logged in user's My Workspace-> My Access page and click on the Service Now application tile
We will now be redirected to the ServiceNow home page using the logged in users crendentials as shown below:
The SAML 2.0 Identity Provider Initiated flow indicates that the Identity Provider (in our case, the Cymmetri platform) has started the SAML 2.0 Single SignOn process by sending an unsolicited SAML 2.0 response XML to the Cymmetri Identity platform. This is achieved by the user clicking on the managed application tile in their workspace.
Flow Description
The user clicks on the application tile, which sends a request to the Cymmetri platform backend to initiate the SAML 2.0 SignOn process.
The backend validates whether the user is authorised to access the application for which the SSO request has been initiated. (by checking whether the user is assigned the application.)
The backend services of the Cymmetri platform generates a SAML response XML body and send it as GET request query parameter (if the protocol binding expected in the SAML request is HTTP Redirect) or as a POST request body (if the protocol binding expected in the SAML request is HTTP POST binding) to the Assertion Consumer Service URL mentioned in the SAML Request body, with the SAML Response audience as the Issuer mentioned in the SAML request body, and a field “InResponseTo” as the Request ID from the SAML request body.
The managed application would then validate the SAML response (and the signature, if was requested in the SAML request body).
If the SAML Response body is not a valid SAML Response, then the user is redirected to the managed application’s error page.
If the SAML response body is a valid SAML response, then the SAML assertion is extracted to obtain the user information sent by the Cymmetri platform.
If the user information is not valid, for any reason, then the corresponding error is displayed to the user by redirecting the user to the managed application’s error page.
If all the user information is valid, the managed application initiates the user’s session in the managed application web portal, and corresponding session cookies are generated.
Finally, the user is redirected from the application’s Assertion Consumer Service URL to the landing page of the managed application.
The configuration parameters mentioned in the information panel below are required to configure an application for Single SignOn using the Identity provider initiated flow in the Cymmetri Identity portal.
Prerequisites from the managed Application
Entity ID/ Request Issuer: This is the entity id/ request issuer that would have been sent by the managed application in case this were a Service Provider initiated flow.
Assertion Consumer Service URL - This is the URL to which the SAML response must be sent by the Cymmetri Identity platform.
Expected NameID Policy - This indicates whether the managed application expects the user subject name to be sent as the email address, username, or some other unspecified value.
Expected Signature Algorithm - The expected algorithm to be used for signing the responses and assertions.
Note: Identity Provider initiated flow is a subset of the Service Provider initiated flow. Some steps are similar if you have already configured the Service Provider initiated flow.
First we create an application in the Cymmetri platform as discussed in previous article. Let us use Service Now application as an example below. We have already enabled SignOn and enabled SAML 2.0 option.
Let us now click on the dropdown for “Advanced Settings (SAML 2.0)”.
Let us start entering the fields one by one.
SAML Type - We select the “IDP_INITIATED” from the dropdown.
All the remaining steps for configuring IdP Initiated SAML 2.0 flow are same as shown above in the SP Initiated flow.
Now that both sides are configured, let us test the flow by assigning the application to the current user.
Click on the currently logged in user's My Workspace-> My Access page and click on the Service Now application tile
We will now be redirected to the ServiceNow home page using the logged in users crendentials as shown below:
Scenario 1: SAML request body does not meet the validation requirements for the SAML request.
Cause: Incorrect implementation of the SAML protocol by the managed application.
Fix: Verify that the SAML protocol is accurately implemented by the managed application.
Scenario 2: SAML request body does not have the same issuer as the configuration in the Cymmetri platform.
Cause: Incorrect configuration of SignOn on the Cymmetri platform for the managed application.
Fix: Change the request Issuer in the managed application configuration on the Cymmetri platform according to the Issuer field in the SAML request.
Scenario 3: SAML response body does not meet the validation requirements for the SAML response.
Cause: Incompatible expectations of the SAML 2.0 response body between the managed application and the Cymmetri Identity platform.
Fix: Connect with the Cymmetri Identity platform support team.
Scenario 4: SAML Response assertion has the incorrect audience.
Cause: Incorrect configuration of the entity id/request issuer field in the Cymmetri Identity platform for the managed application.
Fix: Verify and change the entity id/ request issuer field in the managed application configuration on the Cymmetri platform according to the Issuer field in the SAML request.
Scenario 5a: User from the SAML Assertion is not valid.
Cause: Incorrect name ID format.
Fix: Verify and change the NameID format as expected by the managed application.
Scenario 5b: User from the SAML Assertion is not valid.
Cause: Incorrect user field in the assertion.
Fix: Verify that the right user field is selected as the “NameID Value” in the managed application configuration and Verify that the user information has the correct information as expected by the managed application in the field selected as the “NameID Value” in the managed application configuration on the Cymmetri platform.
Scenario 5c: User from the SAML Assertion is not valid.
Cause: User information is as expected but scenario 5b is not the cause.
Fix: Verify that the user information is present in the user database of the managed application. In case the managed application has JIT feature, ensure that the SAML attributes are correctly configured.
A SAML Attribute Mapper is a component or feature in a Single Sign-On (SSO) or identity federation system that helps map user attributes between different identity providers (IdPs) and service providers (SPs) during the SAML (Security Assertion Markup Language) authentication process.
Here's how it works:
Authentication: When a user tries to access a service or application that requires authentication, they are redirected to an identity provider (IdP) for authentication. The IdP verifies the user's identity and generates a SAML assertion containing information about the user.
SAML Assertion: The SAML assertion typically contains various attributes about the user, such as their username, email address, roles, or other user-related information. These attributes are represented as name-value pairs.
Attribute Mapping: Before the SAML assertion is sent to the service provider (SP), which is the application or service the user is trying to access, there may be a need to map or transform these attributes. This is where the SAML Attribute Mapper comes into play.
Attribute Transformation: Sometimes, the IdP may use different attribute names or formats than what the SP expects. The SAML Attribute Mapper can transform the attributes in the SAML assertion to match the expectations of the SP.
Filtering: The mapper can also be used to filter or select specific attributes from the SAML assertion. For example, if the IdP provides a wide range of attributes, but the SP only needs a subset of them, the mapper can be configured to include only the required attributes in the assertion sent to the SP.
Value Mapping: It can map attribute values as well. For instance, if the IdP uses "userType=employee" and the SP expects "role=employee," the mapper can perform this value mapping.
Forwarding to SP: Once the attributes in the SAML assertion are mapped or transformed as necessary, the SAML assertion is forwarded to the service provider. The SP can then use these attributes for authorization and access control decisions.
In case of default attributes, the user object already has the attributes, we just need to ensure that the right values are assigned to these attributes. In case of custom attributes, custom attributes must be added to your Cymmetri Identity platform deployment.
Cymmetri Attribute
Default / Custom
user.eduPersonPrincipalName
Custom
user.eduPersonTargetedID
Custom
user.displayName
Default
user.cn
Custom
user.givenName
Custom
user.sn
Custom
user.mail
Default
user.schacHomeOrganization
Custom
user.schacHomeOrganizationType
Custom
user.schacPersonalUniqueCode
Custom
user.eduPersonAffiliation
Custom
user.eduPersonScopedAffiliation
Custom
user.eduPersonEntitlement
Custom
user.eduPersonOrcid
Custom
user.isMemberOf
Custom
user.preferredLanguage
Custom
user.eckid
Custom
user.surfCrmId
Custom
user.uid
Default
user.login
Default
user.firstName
Default
user.lastName
Default
user.country
Default
user.countryCode
Default
user.city
Default
user.mobile
Default
user.address1
Default
user.address2
Default
user.managerId
Default
user.userType
Default
user.orgUnitId
Default
user.employeeId
Default
user.department
Default
user.designation
Default
user.status
Default
user.associatedPartner
Default
user.dateOfBirth
Default
user.landline
Default
Let us click on the “configure SAML attributes” link in the configuration page
On clicking the following should pop up
Let us add an attribute mapper as per the table defined above
We have added the First Name of the user from the Cymmetri Identity Platform to the managed Application as the key “First Name”.
Click on the save icon next to the delete icon (trash can icon).
Click on the “X” icon to close the attribute mapper.
Now once again go back to the “My Access” page and click the application tile.
Service Now can use this data for auto provisioning of users via jit provisioning provided Auto Provisioning User is enabled under the User Provisioning tab in the Identity Provider Configuration page.
Passwordless authentication is a verification method in which a user gains access to a network, application, or system without a knowledge-based factor such as a password, security question, or PIN.
Rather than using a set of information for authentication, the user would provide something they possess, such as biometric evidence or a piece of hardware.
Passwordless authentication works by using something the user “has” or something the user “is” to verify their identity and give them system access to a website, application, or network. This would be in contrast to a traditional password login, which would be something the user “knows.”
Typically, a Passwordless login starts with the user going onto a device, entering a session, or opening an application and entering some type of identifiable information like their name, phone number, email address, or designated username. From there, they need to verify their identity by inserting something they “have” such as a hardware token, smart card, fob, or clicking a link sent to a mobile device. If the identifiable information or registered device matches a given factor’s information in the authenticating database, they are given access permission.
Alternatively, they could use something the user “is,” which would be the equivalent of a biometric factor. So, when they try to enter a device or account on an application, they could be prompted to insert identifiable information in addition to voice recognition or a fingerprint, eye, or facial scan.
To set up Passwordless authentication in Cymmetri, the administrator needs to follow these steps: Go to the "Products" section and select "Passwordless."
This action will direct the administrator to the Passwordless configuration page, where they will find the various Passwordless authentication factors listed below.
TOTP Based
OTP Based
Consent Based
FIDO Based
We will go in details of these factors one by one on the next page.
A one-time password (OTP) is an identity verification tool for authenticating users logging into an account, network, or system. A user is sent a password containing a unique string of numbers or letters that can only be used once to log in. Used or not, these password codes expire after a short period of time.
In Cymmetri, if OTP is enabled for passwordless login, the user is prompted for an OTP which is sent to the user's registered mobile number and email address during login.
After OTP verification, the user is verified and logged in into the system
Consent based authentication allows users to verify their identities with explicit consent from their registered devices.
If it has been enabled in the passwordless configuration, the user will be displayed consent based authentication on passwordless login attempt, where the user will be asked for approval.
The user has to "accept" the authentication request received on the user's mobile device as a push notification. Post approval the user is verified and logged in the system
Admin MFA settings has been specifically designed to enhance security of administrative users by requiring a mandatory second-level authentication like Cymmetri Authenticator, Google Authenticator, Push Authenticator, SMS Authenticator, or Secret Questions. This extra layer of protection helps safeguard sensitive administrative logins, reducing the risk of unauthorized access and potential security breaches.
When configuring Admin MFA Setting administrators can choose the MFA Type from one of the following: Cymmetri Authenticator, Google Authenticator, Push Authenticator, SMS Authenticator, or Secret Questions and ensure that status is set to enabled.
Enabling Admin MFA ensures that administrators are always asked for a second level of authentication when they login into Cymmetri.
Time-based One-Time Password (TOTP) authentication is a two-factor authentication mechanism that uses a time-based algorithm to generate a unique one-time password for user authentication. TOTP is commonly used in security systems, including various two-factor authentication (2FA) applications and services.
In Cymmetri the totp is received on the users mobile device during the login attempt after having it been configured during first login.
During login the user is shown the option of Passwordless if it has been enabled by the admin user.
The user clicks on "Login without password" to proceed with Passwordless authentication.
The user clicks on TOTP based option.
A TOTP for the user has been configured on the users Cymmetri mobile application. The user inputs the totp and is logged in into the system
Google Play Store - iOS App Store -
Google Play Store - iOS App Store -
Android:
IOS:
curl --location --request POST '' \
curl --location --request POST '' \
Curl request: curl --location --request POST '' \
curl --location --request POST '' \
curl --location --request POST '' \
Curl request: curl --location --request POST '' \
curl --location --request POST '' \
Curl request: curl --location --request POST '' \
curl --location --request POST '' \
curl --location --request POST '' \
"defaultValue" : "",
curl --location --request POST '' \
"defaultValue" : "",
curl --location --request POST '' \
Let us select “Exclusive” as the Canonicalization Method. Reasons may be explained in the SAML reference document.
Before starting the IDP Configuration the Multi Provider SSO Plugin needs to be enabled. Steps for the same are provided here:
Also the plugin is activated, we need to Configure Multi-Provider SSO properties, Steps for the same are provided here:
For successfully enable SSO properties you might have to configure an account recovery user, Steps for the same are provided here:
Let us investigate how this works out in the SAML 2.0 process and how the data is received from the Cymmetri Identity platform.


In this section within Cymmetri a range of general or broad configuration settings and options are managed. These settings encompass various foundational configurations that affect the overall behavior of Cymmetri.
There are different system configurations in Cymmetri mentioned below:
On Behalf
Time Based
In the Time-Based configuration, system administrators have the capability to determine whether the system will send repeated notifications to users based on the number of days remaining, as specified in the 'Send Notifications before' field. This occurs when an application is assigned to the user as a time-based application and is about to expire.
Email Config
These settings and configurations within Cymmetri are specifically related to the management and customization of email-related functionalities. This configuration area allows administrators to set up, manage, and customize the email communications as per the organization's needs.
Users may be imported into the Cymmetri platform using the bulk Import Users feature.
For Importing Users in Cymmetri platform administrator need to click on Identity Hub > User menu and then click on the Bulk Import > Import Users button.
A screen pops up that lets you select the csv file you want to upload to import the users, Upload the csv file, you may also use the sample data file available and modify it to match your user details.
Click on the Upload File button and select the file you wish to import
Once the file is selected ensure that the default parameters select match your rewuirement else you may change these parameters as per your requirement and click on Next button.
Match the Column names from the CSV file with the Cymmetri User Attributes using this File Info dialog box.
Scroll down and click on the Import button. Note: A "Skip user workflow" check box is available to skip execution of any user workflow configured for creation of users, if not selected it may trigger user creation workflow and the process of importing users may slow down due to the numerous approvals that the approver might have to do.
Once Imported results of successfully Imported Users, Duplicate Users or any error that occurred during import can be see in Logs > Import History page
Cymmetri's Internal Identity Provider (IDP) is a powerful authentication solution that supports seamless integration with various Identity Providers (IDPs).
We will explore the configuration options for three types of IDPs:
Cymmetri,
Active Directory, and
LDAP.
The flexibility of the Cymmetri Internal IDP allows you to manage multiple IDPs of the same type, making it easy to adapt to diverse environments with different Active Directory/ LDAP instances.Cymmetri's Internal IDP aims to provide a centralized and adaptable authentication solution for your environment, supporting various IDP types.
To access Internal Identity Providers navigate to Authentication-> Identity Provider->Internal IDP
Navigate to External IDP in Identity Provider.
Select Azure-IDP.
Configure Azure AD for Creating Identity provider configuration
Now Login to Azure portal and select Azure Active Directory.
Navigate to Enterprise applications and select New application.
Create your own application and enter the name of the application.
Set up Single Sign On after creating the application using SAML.
Click on Edit basic SAML configuration.
Add Identifier (Entity ID) and Assertion Consumer Service URL from the xml file downloaded in step 3 (For Azure, Sign on and ACS URL is the same) and save the configuration.
Download the Certificate (Base64) from SAML Certificates.
Continue configuration of Identity Provider In Cymmetri Administration Console
Copy Azure AD Identifier from Set up, navigate to azure-idp in Cymmetri and paste it in Entity ID. Similarly, copy login URL and paste it in Single Sign On Service URL in Cymmetri.
Open the Base64 certificate downloaded in step 12, copy it and then paste it in x509Certifcate field in Cymmetri.
Select the created service provider in the Service provider Id field dropdown and save the changes.
Assigning user to application in Azure Administration Console for allowing users to use Azure as External Identity provider
Navigate to Enterprise applications and select the application you created in step 8.
Go to Users and groups and select Add user/group and add the user.
If JIT provisioning needs to be enabled for Azure AD as external Identity provider, we may set it up using the steps below.
Navigate to JIT in external identity provider and enable JIT Configuration.
The following fields are mandatory in Cymmetri - firstName, lastName, login, userType, displayName, and email.
For Azure JIT configuration, the following mapping needs to be done -
First Name -
Application Field - http://schemas.xmlsoap.org/ws/2005/05/identity/claims/givenname
Cymmetri Field - firstName
Last Name -
Application Field - http://schemas.xmlsoap.org/ws/2005/05/identity/claims/surname
Cymmetri Field - lastName
Login (Username) -
Application Field - http://schemas.xmlsoap.org/ws/2005/05/identity/claims/name
Cymmetri Field - login
User Type -
Application Field - any string
Cymmetri Field - userType
Default Value - <will be one of Employee, Vendor, Consultant>
Display Name -
Application Field - http://schemas.microsoft.com/identity/claims/displayname
Cymmetri Field - displayName
Email Address -
Application Field - http://schemas.xmlsoap.org/ws/2005/05/identity/claims/name
Cymmetri Field - email
Login to cymmetri using Azure Email Address
The user will be redirected to the Azure portal to enter the Azure credentials.
Once the credentials have been entered properly in Azure portal, the user will be redirected back to Cymmetri and will be logged in successfully.
It refers to a setting within Cymmetri that enables a user to raise an application access request on behalf of another user. An administrator can enable this feature and then the user can raise a request for any other user. The page shows how the users get an access to the On Behalf feature and use it to raise application requests
To customize the applicability of different IDPs, administrators need to configure . These rules enable the configuration of various conditions. When these conditions are met, the corresponding authentication mechanism or IDP is used for user authentication.
The page shows how to configure a Service Provider.
Replace the text "<host-name>" as the URL of the Cymmetri deployment (e.g., ) "aktestidp.ux.cymmetri.in" in the destination field - "https://<hostName>/spsamlsrvc/samlSP/SingleSignOnService" as "spsamlsrvc/samlSP/SingleSignOnService".
For enabling Azure IDP to be used as an IDP for specific set of users an Authentication Rule needs to be configured. you can see the steps on how to configure Authentication Rules.
Chrome
66
Edge
16
Firefox
57
Opera
57
Safari
53
Chrome Android
12.1
Firefox Android
66
Opera Android
57
Safari iOS
47
Samsung Browser
12.2


Understand how to add and manage your cloud and on-premise applications through your Cymmetri Identity platform deployment. Your Cymmetri Identity deployment allows you to manage your cloud-based applications and on-premise applications from a single administration console.
Understand how to add the applications used by your organization, to be managed your Cymmetri Identity platform deployment. Use the FAQ to learn how to add applications to be managed in the deployment.
Single Sign On is the process of ensuring that once an end user is logged onto the Cymmetri Identity platform, they should be able to seamlessly move their session to any of your applications managed by your Cymmetri Identity platform deployment. Use the FAQ to learn how to configure Single Sign On for your application.
Modern IAM deployments wishing to have progressive authentication may require some critical application integrations within your deployment to perform additional authentication while performing Single Sign On for the end user. Use the FAQ to learn how to configure the Application Sign On Policy.
Provisioning refers to the process of creating, modifying, and in general pushing the user account information stored on the Cymmetri Identity platform to the applications managed by your Cymmetri Identity platform deployment. Use the FAQ to learn how to configure User Account Provisioning.
Reconciliation of User accounts is a primary activity in Identity Governance, which allows for synchronisation between the user account information on the managed application and the Cymmetri Identity platform deployments, including provisioning, modifying, deprovisioning, and modifying user account attributes based on various synchronisation states. Use the FAQ to learn how to configure the Identity Reconciliation Process.
Once an application has been added to the Cymmetri Identity platform deployment and the necessary configurations for Single Sign On, Provisioning and Reconciliation have been performed, an application may be assigned to an individual user or to a group of users. Use the FAQ to learn how to assign application to a user.
Android
NA
iOS
NA
Mac OS
NA
Windows
Dynamic Forms enable administrators to request additional fields from either administrators or end-users when assigning applications. These additional user fields are then collected and used for provisioning the user into the managed application.
Creating a dynamic form involves the administrator configuring the managed application by clicking on the left-hand side menu item “Forms”.
Load the default form by clicking on the “Load Sample Data” button
Edit the default form, a preview of the form is shown on the right hand side.
Let us create a simple form that can capture
“Preferred Username” [text field] and
“Request Additional Modules” [Radio] with two options “Administrator” and “Read Only”.
Click on the Save button.
Click on the “Confirm” button in the popup to enable the form for the application.
Administrator needs to go to Authentication->Service Provider
Then click on +Add New button, On the screen that appears most of the data is prefilled. Yet if the administrator needs the data can be changed as per need. Once done click on Save. The prepopulated data appears as below:
Once saved the Service Provider(Cymmetri) appears as below:
The service provider is created at this step, download the metadata(xml file) of the same.
Here below the same steps are demostrated to use Salesforce as and Identity Provider and Cymmetri as a Service Provider.
For configuring Salesforce to be used as an IDP the Salesforce Administrator needs to login in Salesforce as shown below:
Once logged in the administrator needs to click on Setup on top right and then in the search bar on the right side search for Identity Providers. Once found click on Security Controls -> Identity Provider menu
When the Identity Provider page opens click on Enable Identity Provider button to enable Salesforce as and Identity Provider so that it can be used for authentication in Cymmetri.
When the Enable Identity Provider button is clicked it opens a page that asks you to choose a certificate. Select the default certificate here and click Save.
When saved it shows a warning message as below just click OK button and continue.
Once confirmed the screen as show below appears you may download the certificate and the metadata file here using the Download Certificate and Download Metadata buttons. These files can be downloaded later during the end the process which can be seen later in the documentation below.
The metadata file appears as below, this data is used later to configure the External IDP in Cymmetri.
The certificate file appears as below this is also needed when configuring the External IDP in Cymmetri.
Once the files are downloaded next to add the Service Provider the salesforce administrator needs to click on Service Providers are now created via Connected Apps. Click here link. The mentioned link allows to create a Connected App for Cymmetri which acts as a service provider in Salesforce.
The link above leads to the page below where a new connected app can be added. Following details need to mentioned to add a connected app:
Connected App Name: App Name (Cymmetri in this case)
API Name: Auto-populated based on Connected App Name field, can be changed
Contact Email: a valid contact email
Note: Other fields shown in the image below are optional and hence can be skipped.
Next on the same page there is a section called Web App Settings here click on Enable SAML to enable the SAML settings. Once enabled all the below mentioned details need to be provided.
Entity Id: A unique identifier for a SAML entity, such as a Service Provider (SP) or Identity Provider (IDP), within a federated authentication environment.
ACS URL (Assertion Consumer Service URL): The endpoint where a service provider expects to receive SAML assertions from an identity provider, facilitating single sign-on (SSO) in a federated system.
Enable Single Logout: A configuration option indicating whether the system supports single logout functionality, allowing users to log out of all connected services in a federated environment with one action.
Single Logout URL: The endpoint to which a SAML entity sends logout requests as part of the single logout process when a user logs out of the federated system.
Single Logout Binding: The protocol or method used to transmit single logout requests and responses between SAML entities, often specified as either HTTP Redirect or HTTP POST.
Subject Type: Specifies the type of subject identifier used in SAML assertions, such as transient, persistent, or bearer, indicating how the identity of the user is communicated between the identity provider and the service provider.
Name ID Format: Defines the format of the NameID element in SAML assertions, determining how the user's identity is represented, such as email address, X.509 certificate, or unspecified.
Issuer: Identifies the entity that issues a SAML assertion, typically the identity provider, and is included in the SAML assertion to establish trust between the entities in a federated system.
IDP Certificate: The public key certificate associated with the identity provider, used by the service provider to verify the authenticity and integrity of SAML assertions and messages.
Signing Algorithm for SAML Messages: Specifies the cryptographic algorithm used to sign SAML messages, ensuring the integrity and authenticity of the information exchanged between identity providers and service providers in a federated
Once all details are successfully added and saved the screen as below appears which shows the configuration details.
Administrator can click on Manage button (as shown above) to view SAML Service Provider Settings and SAML Login Information. Administator can also download metadata file here.
The downladed metadata file appears as below. The details mentioned in the metadata file are used to configure an External IDP in Cymmetri.
Based on the diverse profiles of users in Salesforce, the administrator needs to enable Connected App Access for these profiles. Here in this example access has been enabled for the System Administrator; similarly, it should be enabled for all profiles of various users who are intended to access Cymmetri.
For enabling the connected app administrator needs to go to Setup->Manage Users-> Profiles, then select the profile for which the connected app needs to be enabled
Once the profile is selected click on Edit button and look for Connected App Access section.
In the Connected App Access section look for the custom app you created(Cymmetri in this case) and click the checkbox to enable the access.
Once all the configurations on Salesforce end are done, the administrator must proceed with the configuration on the Cymmetri side. To achieve this, the administrator needs to go to Authentication->Identity Provider->External IDP. Here you may either configure the already created salesforce-idp instance or +Add New
In either cases a screen opens where you need to provide the below mentioned details
Name: salesforce-idp
IDP Type: Salesforce
Entity ID: Need to mention the EntityID from the metadata file downloaded from Salesforce
SSO Service URL: Need to mention the SingleSignonService url from the metadata file downloaded from Salesforce
Destination: https://<hostname>/spsamlsrvc/samlSP/SingleSignOn
Protocol Binding: HTTP Post (can also be set to HTTP Redirect if it is set so in Salesforce)
Name ID Policy:
Policy: Unspecified(This may change based on what is configured in Salesforce)
Value: Login(This may change based on what is configured in Salesforce)
Certificate: Certificate downloaded from Salesforce
Logout Request URL: Need to mention the SingleLogoutService url from the metadata file downloaded from Salesforce
Logout Protocol Binding:HTTP Post (can also be set to HTTP Redirect if it is set so in Salesforce)
Service Provider Id: cymmetri (Need to the select the configured Service Provider as shown above)
Now the user can login into Cymmetri using Salesforce. The user needs to provide his/her username and click on Next.
The user is then redirected to Salesforce login page where the user needs to enter their Salesforce credentials and click on Log in
Once the salesforce credentials are successfully validated the user is redirected to Cymmetri home page.
Connectors can be deployed in two ways:
Local connectors are deployed to a Cymmetri instance. This is the usual way how connectors are used. The connector is executed inside a Cymmetri instance, has the same lifecycle (start/stop), etc. Cymmetri can detect local connectors automatically and overall the connector management is easier.
Remote connectors are executed in a different process or on a different node than Cymmetri instance. Remote connectors are deployed to a connector server. There may be need to use a remote connector e.g. to access a file on a remote system (e.g. in case of CSV connector) or because of platform incompatibilities (e.g. .NET connectors)
Connector is not developed as local or remote. The placement of the connector is a deployment-time decision. There is just one connector package that can be deployed locally or remotely.
A connector server is required when a connector bundle is not directly executed within your application. By using one or more connector servers, the connector architecture thus permits your application to communicate with externally deployed bundles.
Connector servers are available for both Java and .NET.
A Java connector server is useful when you do not wish to execute a Java connector bundle in the same VM as your application. It may be beneficial to run a Java connector on a different host for performance improvements if the bundle works faster when deployed on the same host as the native managed resource. Additionally, one may wish to use a Java connector server under a Java remote connector server in order to eliminate the possibility of an application VM crash due to a fault in a JNI-based connector.
The use of .NET connector server is especially useful when an application is written in Java, but a connector bundle is written using C#. Since a Java application (e.g. J2EE application) cannot load C# classes, it is necessary to instead deploy the C# bundles under a .NET connector server. The Java application can communicate with the C# connector server over the network, and the C# connector server serves as a proxy to provide to any authenticated application access to the C# bundles deployed within the C# connector server.
Minimum Requirements:
Java 1.6 or later for 1.4.X.Y / Java 1.8 for 1.5.X.Y
Refer to your Java connectors to determine if there are any additional requirements
Download the Connector Server package
Unzip it in a directory of your choice (e.g. /usr/jconnserv) on the host where you wish to run the Java connector server
From the directory created above, run the Java connector server with no arguments to see the list of command-line options:
Linux / MacOS: ./bin/ConnectorServer.sh
Windows: \bin\ConnectorServer.bat
You should see the following output:
Run the connector server with the setkey option as described below to set your desired key into your properties file
Linux/ MacOS: ./bin/ConnectorServer.sh -setkey <key> -properties conf/ConnectorServer.properties
Windows: bin\ConnectorServer.bat /setkey <key> /properties conf\ConnectorServer.properties
For all other properties (e.g. port), edit the conf/connectorserver.properties manually. The available properties are described in the connectorserver.properties file.
Run the server by launching with the -run option:
Linux / MacOS: ./bin/ConnectorServer.sh -run -properties conf/ConnectorServer.properties
Windows: bin\ConnectorServer.bat /run -properties conf\ConnectorServer.properties
To deploy a Java connector:
Copy the Java connector bundle jar file into the bundles directory in your Java connector server directory
If necessary, add to the classpath any 3rd party jars required by any Java connector
Restart the Java connector server
The following steps are necessary to successfully communicate with a connector server using SSL:
Deploy an SSL certificate to the connector server's system.
Configure your connector server to provide SSL sockets.
Configure your application to communicate with the communicate with the connector server via SSL.
Refer to your application manual for specific notes on how to configure connections to connector servers. You will need to indicate to your application that an SSL connection is required when establishing a connection for each SSL-enabled connector server.
Additionally, if any of the SSL certificates used by your connector servers is issued by a non-standard certificate authority, your application must be configured to respect the additional authorities. Refer to your application manual for notes regarding certificate authorities.
Java applications may solve the non-standard certificate authority issue by expecting that the following Java system properties are passed when launching the application:
javax.net.ssl.trustStorePassword
For example, -Djavax.net.ssl.trustStorePassword=changeit
javax.net.ssl.trustStore
For example, -Djavax.net.ssl.trustStore=/usr/myApp_cacerts
Or, instead, the non-standard certificate authorities may be imported to the standard ${JAVA_HOME}/lib/security/cacerts.
Minimum Requirements:
Windows Server 2003 or 2008
.NET Framework 3.5 or higher
Refer to your .NET connector to determine if there are any additional requirements
Execute ServiceInstall.msi. Just follow the wizard. It will walk you through the whole process step by step. Upon completion, the Connector Server will be installed as a windows service.
Start the Microsoft Services Console. Check to see if the Connector Server is currently running. If so, stop it. From a command prompt, set the key for the connector Server. This is done by changing to the directory where the connector server was installed (by default: \Program Files\Identity Connectors\Connector Server) and executing the following command:
where <newkey> is the value for the new key. This key is required by any client that connects to this Connector Server.
Look through the configuration file and inspect all settings. The most common things to change would be the port, trace, and ssl settings.
The port, address, and SSL settings are in the tag called AppSettings, and look like this:
The port can be set by changing the value of connectorserver.port. The listening socket can be bound to a particular address, or can be left as 0.0.0.0. To setup to use SSL, you must set the value of connectorserver.usessl to true, and then set the value ofconnectorserver.certifacatestorename to your the certificate store name.
You will need to record for use later the following information regarding your connector server installation:
Host name or IP address
Connector server port
Connector server key
Whether SSL is enabled
Trace settings are in the configuration file. The settings look like this:
The Connector Server uses the the standard .NET trace mechanism. For more information about the tracing options, see Microsoft's .NET documentation for System.Diagnostics.
The default settings are a good starting point, but for less tracing, you can change the EventTypeFilter's initializeData to "Warning" or "Error". For very verbose logging you can set the value to "Verbose" or "All". The amount of logging performed has a direct effect on the performance of the Connector Servers, so be careful of the setting.
Any configuration changes will require the connector server to be stopped and restarted.
The best way to run the Connector Server is as a Windows service. When installing, the Connector Server is installed as a Windows service. This should be fine for most installations.
If for some reason, this is not adequate, the connector server may be installed or uninstalled as a Windows service by using the /install or /uninstall arguments on the command line. To run the Connector Server interactively, issue the command:
To install new connectors, change to the directory where the Connector Server was installed, and unzip the zip file containing the connector there. Restart the Connector Server.
To install additional Connector Servers on the same machine, download the Connector Server zip file from the downloads section. Create a directory to install to, and unzip the file there. Edit the configuration file as described above ensuring that you have a unique port. You may also want to make sure that the trace file is different as well. You can then run the additional Connector Server interactively or as a service.
The Workflow List page serves as a comprehensive repository, showcasing a detailed overview of completed workflows, whether approved or rejected.
This tool provides at-a-glance insights into each workflow's essential information, including Topic,Workflow Level, Status, Group Name, Requestor, and Current Assignee. Users can efficiently navigate and assess the historical progression of tasks, gaining clarity on the completion of each workflow.
With a user-friendly interface, administrators can quickly get a view of all the completed workflows for managing and analyzing completed workflows
The Actions button allows to view further details about the workflow stage and details about approval and/ or rejection
SMS Authenticator involves sending a unique verification code to the user's mobile device via SMS and/ or to the user's email. The user then enters this code along with their password to complete the login process.
For configuring the SMS Authenticator, select the SMS Authenticator toggle button and click confirm to setup SMS Authenticator as an MFA option
Next we move to configure the rules for Multi-factor authentication policy for login
You may either click on the pencil icon to start editing the rule, or create a new rule
Once you have either created a new rule or edited an existing one, change the dropdown of the SMS Authenticator factor to indicate that it is mandatory (required).
The options available for each factor are:
Required: This setting means that the corresponding factor is required to be enabled for each user, and every user must set up this factor in their next login.
Optional: This setting means that the corresponding factor is not required to be enabled for each user, and they may configure this option from their "My Workspace". Once the user configures it, they may use it for the purpose of second level of authentication during authentication. Disabled: This settings means that the corresponding factor is not required or enabled for each user, and the user may not configure or use it for authentication into the Cymmetri platform.
An administrator can further customize to whom the rule would be applicable by selecting user(s) or group of users in the "Assigned to" Tab, If the rule is to be applied to all the users then the "All Users" option need to be selected
Once the changes are saved this is how the rule appears:
All subsequent logins of any user on the Cymmetri platform will now require the use of sms received on the mobile device as an SMS or email.
Once successfully verified the user is redirected to the Dashboard
Cymmetri also allow you to customize the SMS Authenticator parameters using the Configuration section. Here you may configure the values as shown below:
Number of Digits: The length of the generated OTPs, which can be 4-6 numbers. Default is 6.
OTP Expiry (Minutes): This number determines how long a one-time password is active before it expires and a new OTP needs to be generated. Default is 10 minutes.
OTP Resent Time: The number of OTP resend requests allowed by the server in the case of SMS lost in transmission. Default is 2.
OTP on Email: when enabled OTP is sent on email.
OTP on SMS: when enabled OTP is sent as an SMS on user's mobile device
Note: The link below shows steps as suggested by Salesforce to configure Salesforce as an Identity Provider:
The above mentioned details can be obtained by adding a service provider in Cymmetri as shown below. To know more about how to add a service provider in Cymmetri click . Once created these details can be used in Salesforce as shown above.
Once the external IDP is configured next we need to configure Authentication Rules as explained and as shown below. Conditions mentioned here may vary based on actual scenario in which the IDP needs to be applicable.
Reference:


Cymmetri's Single Sign-On (SSO) module is designed to simplify user authentication within the Cymmetri platform's web portal. With SSO, end-users authenticate just once, gaining seamless access to all their assigned applications without the hassle of repeated logins.
This article provides step-by-step guidance on configuring applications for SSO within your Cymmetri platform.
Note: Before proceeding with the configuration, ensure that the Single Sign-On Module is enabled for your tenant to activate and utilize SSO effectively.
1. SAML 2.0: SAML 2.0 (Security Assertion Markup Language) serves as a primary mechanism for web applications to exchange messages, facilitating Single Sign-On for end-users.
2. OpenID Connect: Derived from the OpenID family of SSO mechanisms, OpenID Connect offers versatile SSO capabilities across a wide range of application types, including web, mobile native, and desktop-based applications. It is therefore more versatile than SAML 2.0, and particularly well-suited for mobile applications and social logins.
Note: For either SAML 2.0 or OpenID Connect to function, the managed application must support the corresponding mechanism.
3. REST API-Based SSO: While SAML 2.0 and OpenID Connect adhere to established standards, certain legacy applications within your organization may face integration challenges with these protocols. To address this, we have introduced Custom API-Based SSO as an alternative SSO mechanism. This involves making specific code modifications to the managed application, as elaborated in the following section.
Note: While the Cymmetri Identity platform supports Custom API-Based SSO, we strongly recommend transitioning to the aforementioned SAML 2.0 and OpenID Connect mechanisms for enhanced security and compatibility.
To allow your end-users to access applications managed by your Cymmetri Identity platform deployment, the applications must be configured for Single SignOn, and then assigned the application.
To enable end-users to access applications managed through your Cymmetri platform, applications must configure Single Sign-On for the desired applicationsa
While it is not recommended for obvious reasons, as an administrator you may configure an application to be used simply for provisioning and redirection, without performing Single SignOn.
Note: The following section is to be used for configure only applications for which you do not need to perform Single SignOn. In case you need to configure any of the following Single SignOn mechanisms, you may skip this section and refer to the corresponding configuration in your chosen method of Single SignOn.
Configuring the Application URL
For configuring an application to simply redirect the enduser to the landing page of the managed application -
Once in the applications menu, click on the application tile for which you need to configure the landing page URL and then on the left side menu, select the SignOn menu item.
Toggle the “Enable Single Sign-On (SSO)” switch to open the corresponding configuration options.
Enter the landing page URL in the “Application URL” text box and click the adjoining “Save” button.
The popup indicating “SSO Updated Successfully” will indicate that the Application URL has been configured successfully for your application.
Conclusion
Assigning the application to an end user will show an application tile as shown below:
Clicking on the application tile, will redirect the user to the assigned landing page URL.
Integration REST Application
The REST connector is designed to manage provisioning by relying on RESTful service.
For REST applications we need target applications which support REST API’s.
Following configuration is tested for felicity application.
We need REST API’s to integrate with cymmetri.
Following are the cymmetri configuration which need to configure in user configuration in cymmetri.
It is Basic REST configuration which need to configure in application.
We need to provide Groovy code to run create user, update user, delete user and also recon pull and push (for recon pull we need to add sync script and for recon push we need to add search script)
For sample script please validate following link
Note: Please Configure script step by step
Configure test script at initial step and then test configuration for provided script (If configure successfully then only go for step b).
Configure create script and test configuration (If successfully configured then only go for step c).
Configure update script and test configuration (If successfully configured then only go for step d).
Configure delete script and test configuration (If successfully configured then only go for step e).
Configure sync(pull) script and test configuration (If successfully configured then only go for step f).
Configure search(push) script and test configuration (If successfully configured then only go to the next step).