Understand how to add and manage your cloud and on-premise applications through your Cymmetri Identity platform deployment. Your Cymmetri Identity deployment allows you to manage your cloud-based applications and on-premise applications from a single administration console.
Understand how to add the applications used by your organization, to be managed your Cymmetri Identity platform deployment. Use the FAQ to learn how to add applications to be managed in the deployment.
Single Sign On is the process of ensuring that once an end user is logged onto the Cymmetri Identity platform, they should be able to seamlessly move their session to any of your applications managed by your Cymmetri Identity platform deployment. Use the FAQ to learn how to configure Single Sign On for your application.
Modern IAM deployments wishing to have progressive authentication may require some critical application integrations within your deployment to perform additional authentication while performing Single Sign On for the end user. Use the FAQ to learn how to configure the Application Sign On Policy.
Provisioning refers to the process of creating, modifying, and in general pushing the user account information stored on the Cymmetri Identity platform to the applications managed by your Cymmetri Identity platform deployment. Use the FAQ to learn how to configure User Account Provisioning.
Reconciliation of User accounts is a primary activity in Identity Governance, which allows for synchronisation between the user account information on the managed application and the Cymmetri Identity platform deployments, including provisioning, modifying, deprovisioning, and modifying user account attributes based on various synchronisation states. Use the FAQ to learn how to configure the Identity Reconciliation Process.
Once an application has been added to the Cymmetri Identity platform deployment and the necessary configurations for Single Sign On, Provisioning and Reconciliation have been performed, an application may be assigned to an individual user or to a group of users. Use the FAQ to learn how to assign application to a user.
Connectors can be deployed in two ways:
Local connectors are deployed to a Cymmetri instance. This is the usual way how connectors are used. The connector is executed inside a Cymmetri instance, has the same lifecycle (start/stop), etc. Cymmetri can detect local connectors automatically and overall the connector management is easier.
Remote connectors are executed in a different process or on a different node than Cymmetri instance. Remote connectors are deployed to a connector server. There may be need to use a remote connector e.g. to access a file on a remote system (e.g. in case of CSV connector) or because of platform incompatibilities (e.g. .NET connectors)
Connector is not developed as local or remote. The placement of the connector is a deployment-time decision. There is just one connector package that can be deployed locally or remotely.
A connector server is required when a connector bundle is not directly executed within your application. By using one or more connector servers, the connector architecture thus permits your application to communicate with externally deployed bundles.
Connector servers are available for both Java and .NET.
A Java connector server is useful when you do not wish to execute a Java connector bundle in the same VM as your application. It may be beneficial to run a Java connector on a different host for performance improvements if the bundle works faster when deployed on the same host as the native managed resource. Additionally, one may wish to use a Java connector server under a Java remote connector server in order to eliminate the possibility of an application VM crash due to a fault in a JNI-based connector.
The use of .NET connector server is especially useful when an application is written in Java, but a connector bundle is written using C#. Since a Java application (e.g. J2EE application) cannot load C# classes, it is necessary to instead deploy the C# bundles under a .NET connector server. The Java application can communicate with the C# connector server over the network, and the C# connector server serves as a proxy to provide to any authenticated application access to the C# bundles deployed within the C# connector server.
Minimum Requirements:
Java 1.6 or later for 1.4.X.Y / Java 1.8 for 1.5.X.Y
Refer to your Java connectors to determine if there are any additional requirements
Unzip it in a directory of your choice (e.g. /usr/jconnserv) on the host where you wish to run the Java connector server
From the directory created above, run the Java connector server with no arguments to see the list of command-line options:
Linux / MacOS: ./bin/ConnectorServer.sh
Windows: \bin\ConnectorServer.bat
You should see the following output:
Run the connector server with the setkey option as described below to set your desired key into your properties file
Linux/ MacOS: ./bin/ConnectorServer.sh -setkey <key> -properties conf/ConnectorServer.properties
Windows: bin\ConnectorServer.bat /setkey <key> /properties conf\ConnectorServer.properties
For all other properties (e.g. port), edit the conf/connectorserver.properties manually. The available properties are described in the connectorserver.properties file.
Run the server by launching with the -run option:
Linux / MacOS: ./bin/ConnectorServer.sh -run -properties conf/ConnectorServer.properties
Windows: bin\ConnectorServer.bat /run -properties conf\ConnectorServer.properties
To deploy a Java connector:
Copy the Java connector bundle jar file into the bundles directory in your Java connector server directory
If necessary, add to the classpath any 3rd party jars required by any Java connector
Restart the Java connector server
The following steps are necessary to successfully communicate with a connector server using SSL:
Deploy an SSL certificate to the connector server's system.
Configure your connector server to provide SSL sockets.
Configure your application to communicate with the communicate with the connector server via SSL.
Refer to your application manual for specific notes on how to configure connections to connector servers. You will need to indicate to your application that an SSL connection is required when establishing a connection for each SSL-enabled connector server.
Additionally, if any of the SSL certificates used by your connector servers is issued by a non-standard certificate authority, your application must be configured to respect the additional authorities. Refer to your application manual for notes regarding certificate authorities.
Java applications may solve the non-standard certificate authority issue by expecting that the following Java system properties are passed when launching the application:
javax.net.ssl.trustStorePassword
For example, -Djavax.net.ssl.trustStorePassword=changeit
javax.net.ssl.trustStore
For example, -Djavax.net.ssl.trustStore=/usr/myApp_cacerts
Or, instead, the non-standard certificate authorities may be imported to the standard ${JAVA_HOME}/lib/security/cacerts.
Minimum Requirements:
Windows Server 2003 or 2008
.NET Framework 3.5 or higher
Refer to your .NET connector to determine if there are any additional requirements
Execute ServiceInstall.msi. Just follow the wizard. It will walk you through the whole process step by step. Upon completion, the Connector Server will be installed as a windows service.
Start the Microsoft Services Console. Check to see if the Connector Server is currently running. If so, stop it. From a command prompt, set the key for the connector Server. This is done by changing to the directory where the connector server was installed (by default: \Program Files\Identity Connectors\Connector Server) and executing the following command:
where <newkey> is the value for the new key. This key is required by any client that connects to this Connector Server.
Look through the configuration file and inspect all settings. The most common things to change would be the port, trace, and ssl settings.
The port, address, and SSL settings are in the tag called AppSettings, and look like this:
The port can be set by changing the value of connectorserver.port. The listening socket can be bound to a particular address, or can be left as 0.0.0.0. To setup to use SSL, you must set the value of connectorserver.usessl to true, and then set the value ofconnectorserver.certifacatestorename to your the certificate store name.
You will need to record for use later the following information regarding your connector server installation:
Host name or IP address
Connector server port
Connector server key
Whether SSL is enabled
Trace settings are in the configuration file. The settings look like this:
The Connector Server uses the the standard .NET trace mechanism. For more information about the tracing options, see Microsoft's .NET documentation for System.Diagnostics.
The default settings are a good starting point, but for less tracing, you can change the EventTypeFilter's initializeData to "Warning" or "Error". For very verbose logging you can set the value to "Verbose" or "All". The amount of logging performed has a direct effect on the performance of the Connector Servers, so be careful of the setting.
Any configuration changes will require the connector server to be stopped and restarted.
The best way to run the Connector Server is as a Windows service. When installing, the Connector Server is installed as a Windows service. This should be fine for most installations.
If for some reason, this is not adequate, the connector server may be installed or uninstalled as a Windows service by using the /install or /uninstall arguments on the command line. To run the Connector Server interactively, issue the command:
To install new connectors, change to the directory where the Connector Server was installed, and unzip the zip file containing the connector there. Restart the Connector Server.
To install additional Connector Servers on the same machine, download the Connector Server zip file from the downloads section. Create a directory to install to, and unzip the file there. Edit the configuration file as described above ensuring that you have a unique port. You may also want to make sure that the trace file is different as well. You can then run the additional Connector Server interactively or as a service.
Once the managed application has been added to your Cymmetri Identity platform tenant, you will be able to assign applications to your end-users.
There are four ways in which applications can be assigned to users:
Admin may assign an application directly to a user.
Admin may map an application to a group; and the user is added to the group or is already part of the group.
End User may request an application and is granted access to the application.
Bulk Assignment of application to a set of users
Let us understand the flow for each of the above mentioned scenarios:
Users with admin roles such as Organization Admin, Domain Admin, or Application Admin on the Cymmetri platform can assign managed applications to end-users .
First, we need to add the application to the Cymmetri platform
Next, we move to configure the application to assign it to an end user.
Click on the application tile to configure it.
The flow for assignment goes as follows -
Description:
Admin clicks on the application tile, and starts the configuration.
Click on the Assignments tab on the left hand side menu.
Click on the “Assign New” button on the Users menu.
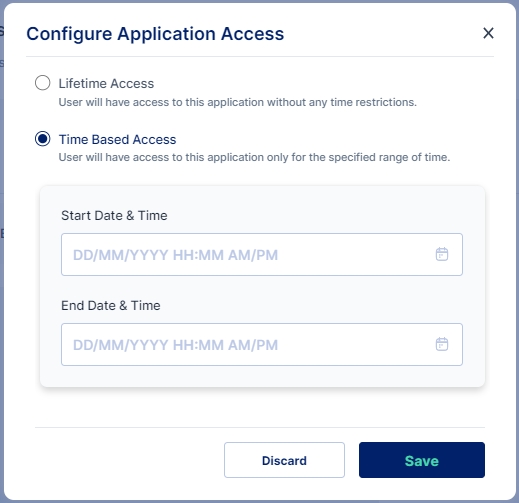
Here we need to decide whether we want to provide a Lifetime Access or a Time Based Access
Lifetime Access: Users have access to the application without any time restrictions.
Time Based Access: Users have access to the application only for the specified range of time. We need to provide a Start Date & Time and an End Date & Time for Time Based Access.
Now click on Save to register a request for the application assignment. If no Workflow is configured for the said application the application is immediately assigned to the user.
If a workflow for application provisioning is configured then the workflow is been initiated.
The workflow approver will then receive a request to approve the user assignment in their inbox.
Now the approver may approve or reject the user assignment
The approver may change the start and end date, if required; refer to the dynamic form attributes passed during the application assignment.
To continue the flow click on Accept button.
Now the next level of approver will be able to see the previous levels of approval, and similar to the previous level of approval, the approver may change the start and end date, if required; refer to the dynamic form attributes passed during the application assignment.
Click “Accept” to proceed.
After the last level approver has also approved the assignment, the backend processes will run the application provisioning flow.
Once the user has been provisioned in the application, they will be able to see it in their list of applications.
Users with admin roles, such as Organization Admin, Domain Admin, or Application Admin, in a Cymmetri Identity platform deployment, will have the ability to assign entire groups of users to managed applications.
First, we need to add the application to the Cymmetri platform
Next, we move to configure the application to assign it to a group.
Click on the application tile to configure it.
The flow for assigning a group to an application goes as follows:
Click on the application tile, and start the configuration.
Click on the Assignments tab on the left hand side menu.
3. Click on the “Assign New” button in the Groups section.
4. Search for the group you wish to assign the application to and click on the assign button.
5. Checking for the users who belong to the group, we can see that the application has been assigned.
6. Viewing the application tiles, we can see if the user was directly assigned the application or received access by the virtue of being part of a group.
Users on the Cymmetri platform can request access to a managed applications as a Self-Service feature.
The flow for an end-user to request for an application is as follows:
Visit the “My Workspace” menu.
Click on the “My Access” left-hand side menu.
3. Now Click on the “+ Request” button on the top-right button.
Here we need to decide whether we want to provide a Lifetime Access or a Time Based Access
Lifetime Access: Users have access to the application without any time restrictions.
Time Based Access: Users have access to the application only for the specified range of time. We need to provide a Start Date & Time and an End Date & Time for Time Based Access.
Now click on Save to register a request for the application assignment. If no Workflow is configured for the said application the application is immediately assigned to the user.
If a workflow for application provisioning is configured then the workflow is been initiated.
The workflow approver will then receive a request to approve the user assignment in their inbox.
Now the approver may approve or reject the user assignment
The approver may change the start and end date, if required; refer to the dynamic form attributes passed during the application assignment.
To continue the flow click on Accept button.
Now the next level of approver will be able to see the previous levels of approval, and similar to the previous level of approval, the approver may change the start and end date, if required; refer to the dynamic form attributes passed during the application assignment.
Click “Accept” to proceed.
After the last level approver has also approved the assignment, the backend processes will run the application provisioning flow.
Once the user has been provisioned in the application, they will be able to see it in their list of applications.
An administrator can bulk assign an application to a set of users. This an be achieved by uploading a .csv file which contains user information like., loginId, appUserId and roleId. For bulk assigning applications to users in Cymmetri platform administrator needs to
Click on Identity Hub > Applications menu and then click on the Applications Assignments button.
A screen pops up that lets you select the csv file you want to upload that contains the list of users to whom the application needs to be assigned, Upload the csv file, you may also use the sample data file available and modify it to match your user details.
Click on the Upload File button and select the file you wish to import
Once the file is selected ensure that the default parameters select match your requirement else you may change these parameters as per your requirement.
Once you have ensured the parameters are correct next select the application that needs to be assigned and click on Next button.
Match the Column names from the CSV file with the corresponding attributes using this File Info dialog box and click on the Import button.
Note: The "Link Application" check box is available to provision the user in the target application
Once Imported results of successfully Imported Users, Duplicate Users or any error that occurred during import can be see in Logs > Import History page
If any workflow is configured on the application provisioning then the corresponding workflow is triggered after the successful completeion of assignment as shown below:
Search for a user in the search text box, and once the user is found, click on the “Assign” button.
4. Click on the Application Icon to start the request process
Dynamic Forms enable administrators to request additional fields from either administrators or end-users when assigning applications. These additional user fields are then collected and used for provisioning the user into the managed application. It is a feature in Cymmetri's application details sections which enables administrators to ask necessary questions at time of application assignment. The form filled will be saved and reviewed by the approver.
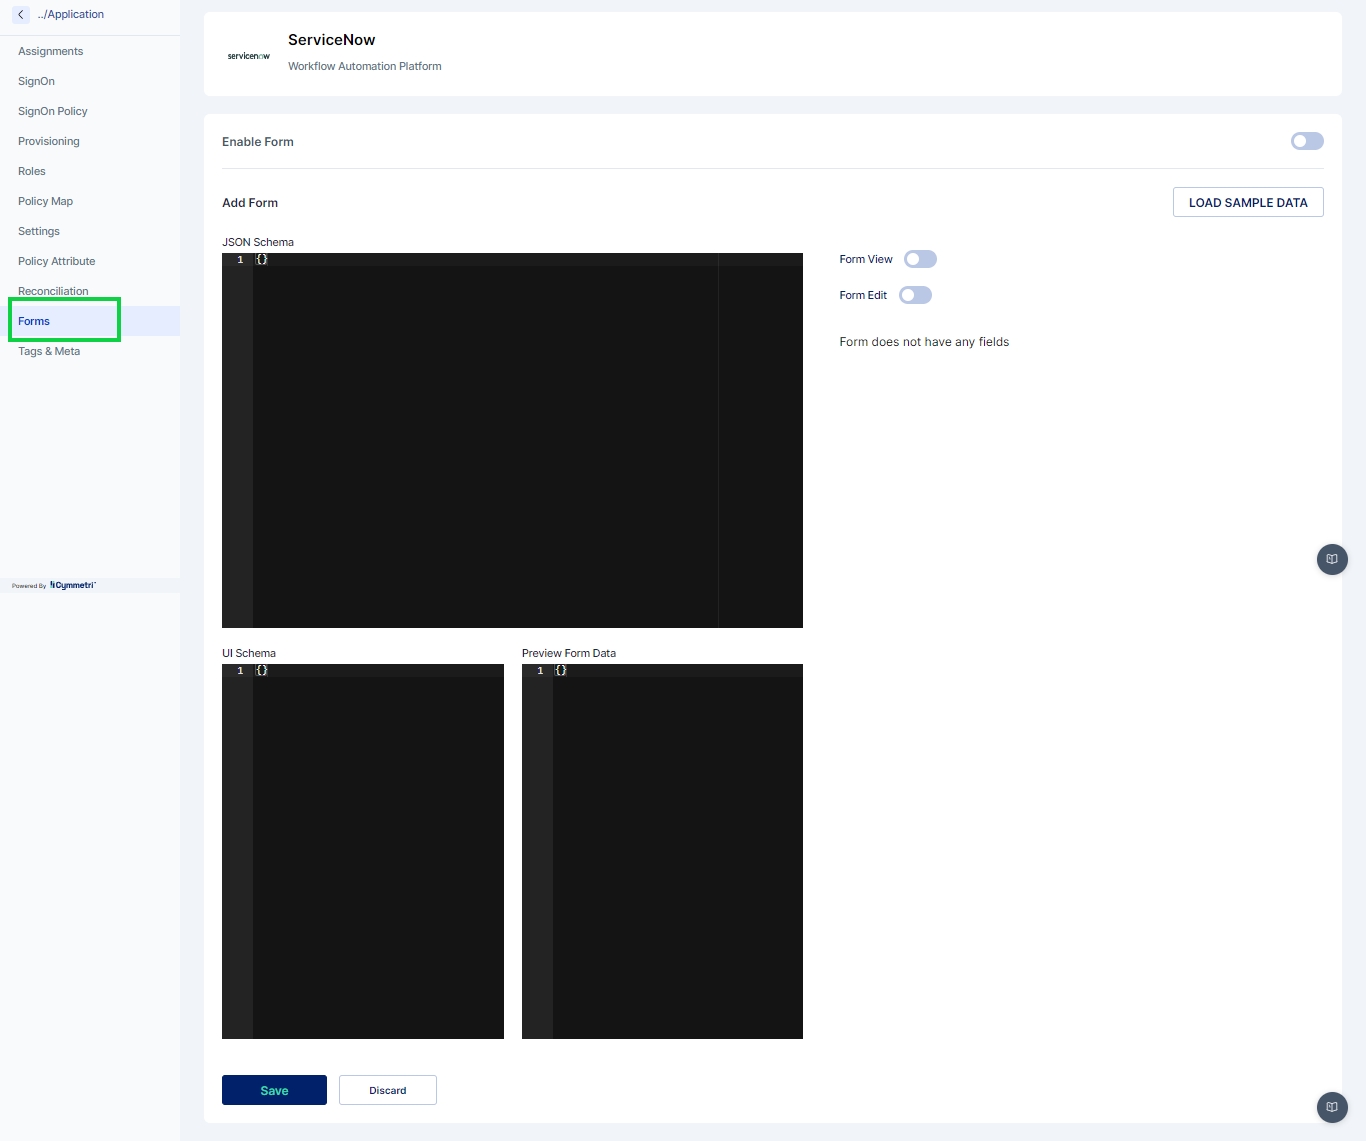
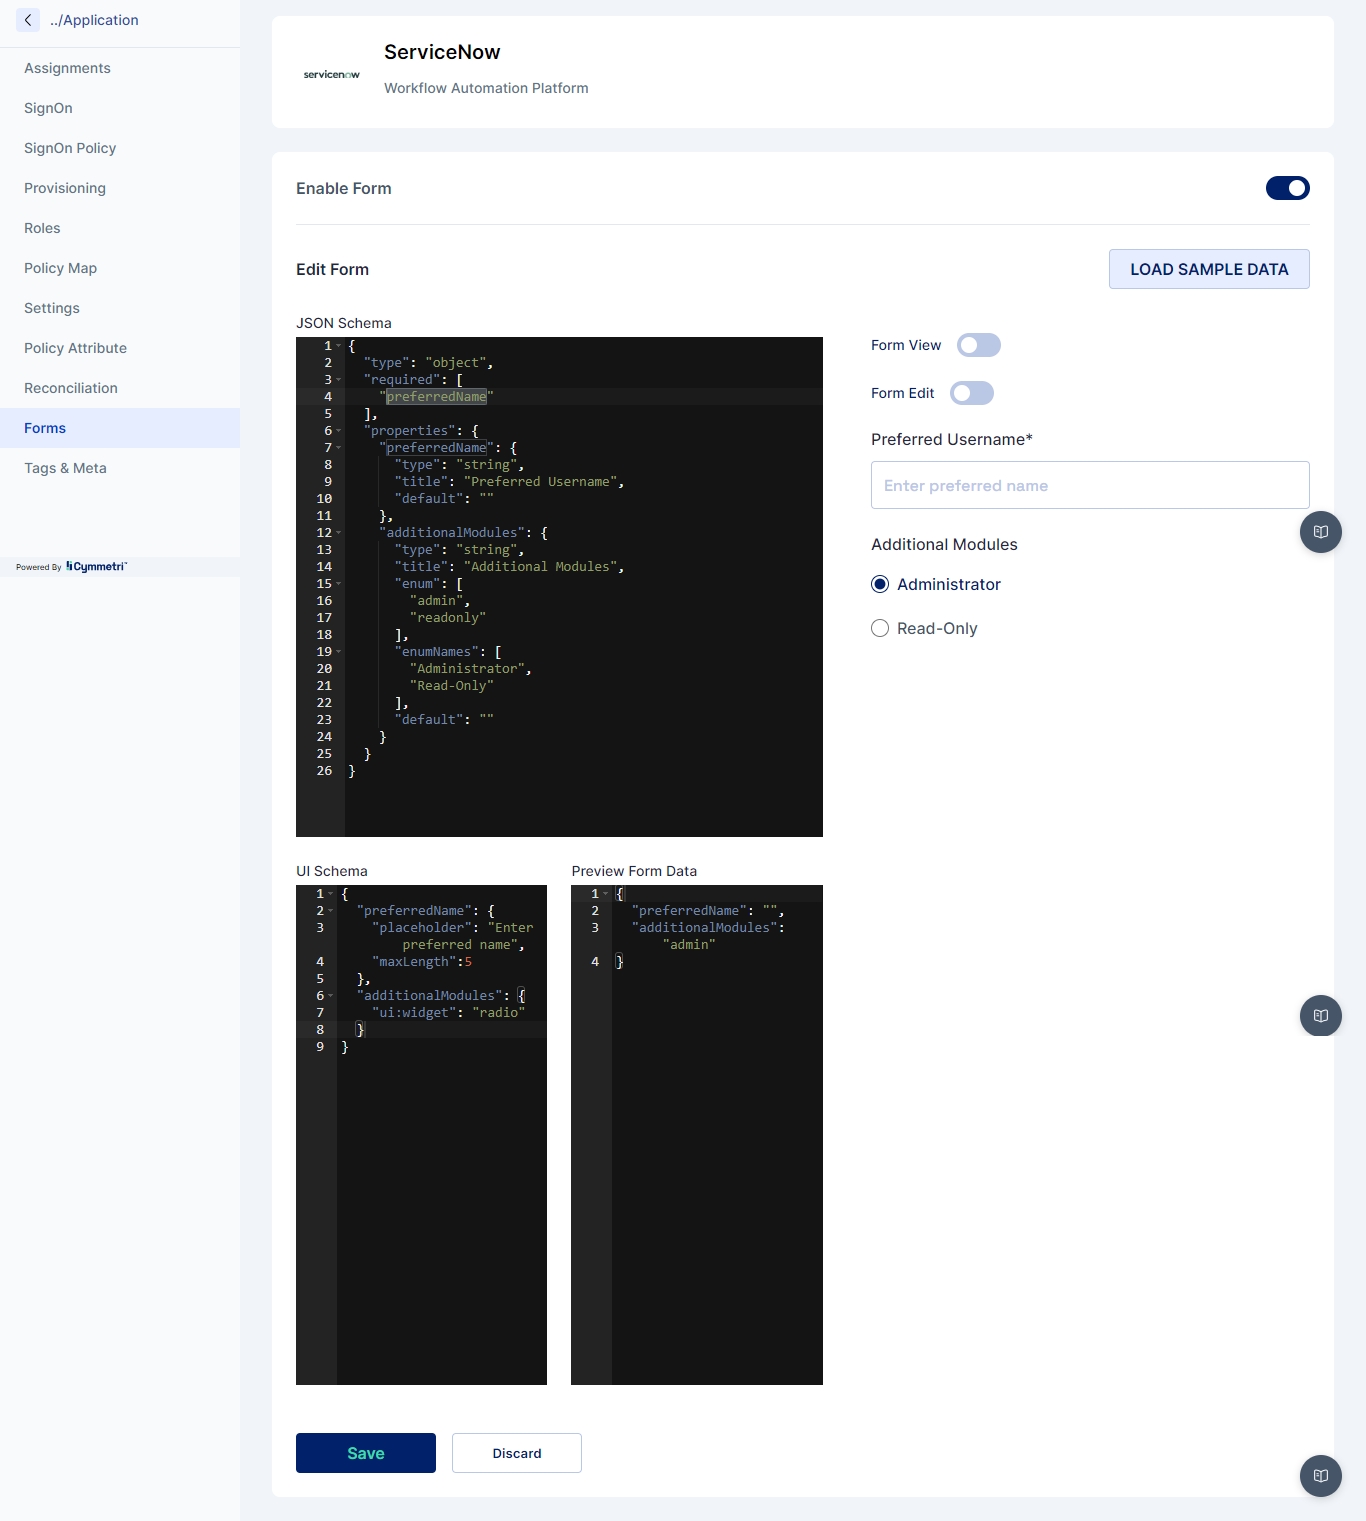
For creating a dynamic form the administrator needs to configure the managed application. For eg. Identity Hub->Applications->Service Now(Application may change )->Forms
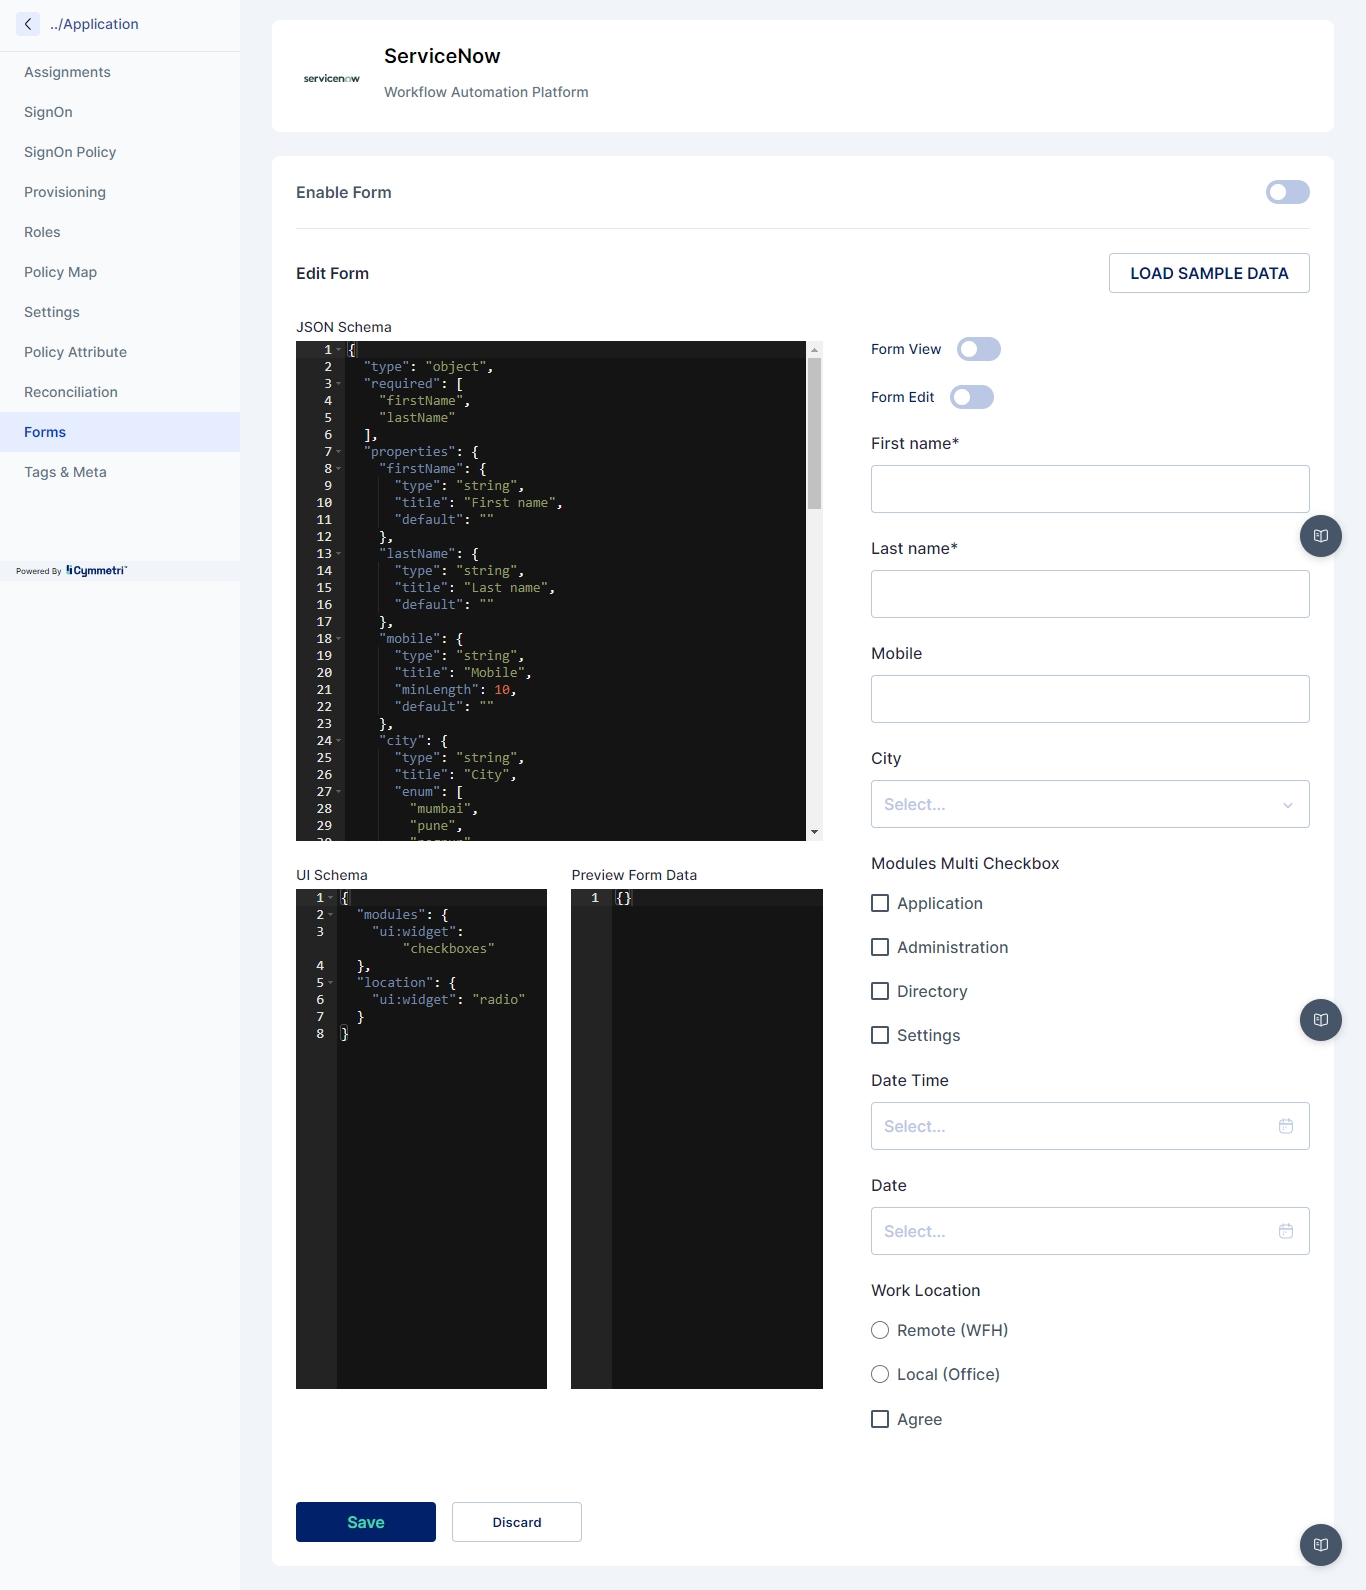
Load the default form by clicking on the “Load Sample Data” button
Edit the default form in the JSON Schema section, In the JSON Schema section the administrator can define the form structure with the type of element, and its various properties like type, title, default value etc, a preview of the form is shown on the right hand side.
Let us create a simple form that can capture
“Preferred Username” [text field] and
“Request Additional Modules” [Radio] with two options “Administrator” and “Read Only”.
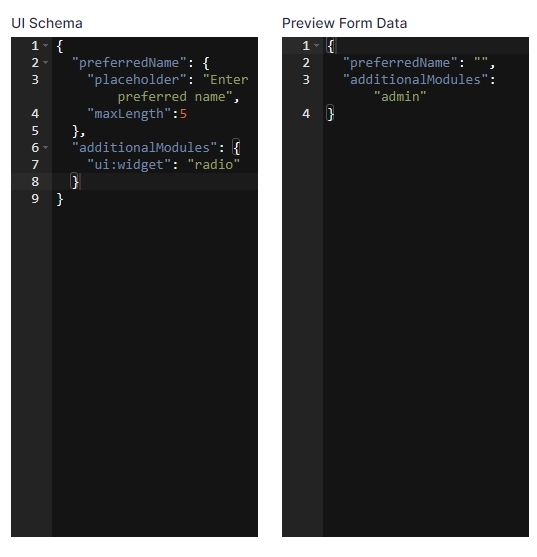
The code below shows how to create a simple form described above:
The UI Schema is like a set of json properties that are used to configure how the form should look and behave. It lets you tweak things like the length of a text box or whether a choice should be shown as radio buttons or checkboxes. In the example code, we're using the UI Schema to make the "preferredName" field have a placeholder and also set a maximum length. For "additionalModules," we're using widget property to make it show up as a radio button.
The Preview Form Data displays how the data entered in the UI will be gathered and shows the structure in which the data will be sent to the API.
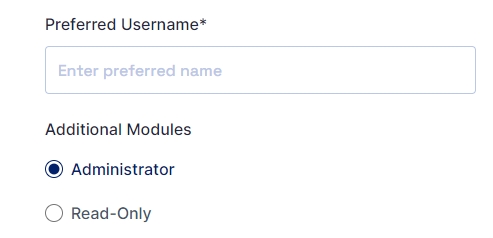
The preview of the form looks as below after making the changes:
Once configured the administrator can Click on the Save button.
Once saved a confirm box appears to enable the form; the administrator needs to click on the Confirm button in the popup to enable the form for the application.
The Form View and Form Edit options allow the administrator and user to view and edit the form
When the Form View button is enabled it allows the administrator to view the form in the user's Application Page
On clicking the View Form button the form appears as below:
Similarly when the Form Edit button is enabled it allows the administrator to edit the form in the user's Application Page
On clicking the Edit Form button the form appears as below, The administrator may change the details mentioned in the form.
The user to whom the application is assigned can also view or edit the form based on whether the form edit is enabled or not. The figure below shows the Edit Form option for a user in the MyAccess -> Applications section:
If the user clicks on Edit Form it shows the form to edit:
Applications menu in the administration page displays the various options pertaining to the Application Management Process.
Applications menu can be accessed in two ways:
Identity Hub
Login as either an Organization Administrator, Domain Administrator, or Application Administrator.
Click on the Identity Hub icon on the left side bar.
Click on the Applications text on the slide out bar.
Single Sign On Module
Login as either an Organization Administrator, Domain Administrator, or Application Administrator.
Click on the Products menu icon on the left side bar.
Click on the Single SignOn Module icon in the popup list.
4. Click on the Applications text on the slide out bar.
Applications supported by the Cymmetri platform fall majorly into three categories -
Pre-configured Applications These are the applications that have already been configured by the Cymmetri platform for provisioning on cloud or on-premises.
Custom Applications for Provisioning These are the applications that you wish to manage through Cymmetri and support the generic connectors that the Cymmetri platform provides.
Custom Applications for Single SignOn only When you need to add an application for the sole purpose of enabling Single Sign-On (SSO), Cymmetri offers the capability to add a custom application that can be configured for SSO using the supported mechanisms.
Once you have chosen the application to be added from the above categories, you are ready to add a new application.
1. Click on the “Add New” button on the top-right corner in the Applications page.
2. In the Add New Application screen, you may search for your desired application (e.g., Active Directory), or your desired connector (e.g., REST) or choose the “Custom” application type from the available application catalogue.
3. Now click on the tile shown in the list below to open the right slide out menu for renaming application as shown below.
4. Add your custom label (if you wish) in the text box and click on the “Add Application” button.
Application has been successfully added to your listing now. You may click on the configure now button to start configuring the application.


