Loading...
Loading...
Loading...
Loading...
Loading...
Loading...
Loading...
Loading...
Loading...
Loading...
Loading...
Loading...
Loading...
Loading...
Loading...
Loading...
Loading...
Loading...
Loading...
Loading...
Loading...
Loading...
Loading...
Loading...
Loading...
Loading...
Loading...
Loading...
Loading...
Loading...
Loading...
Loading...
Loading...
Loading...
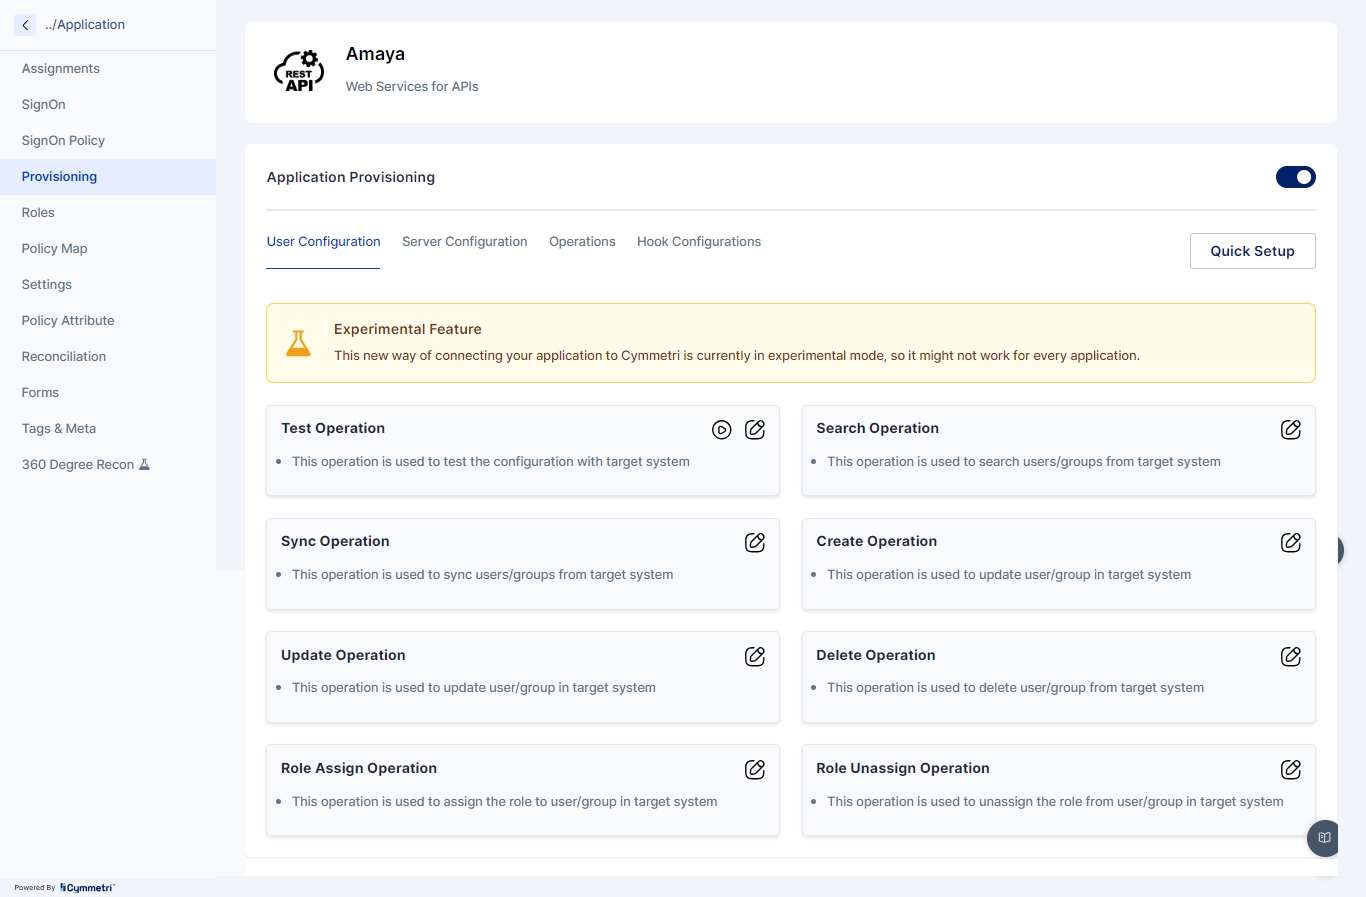
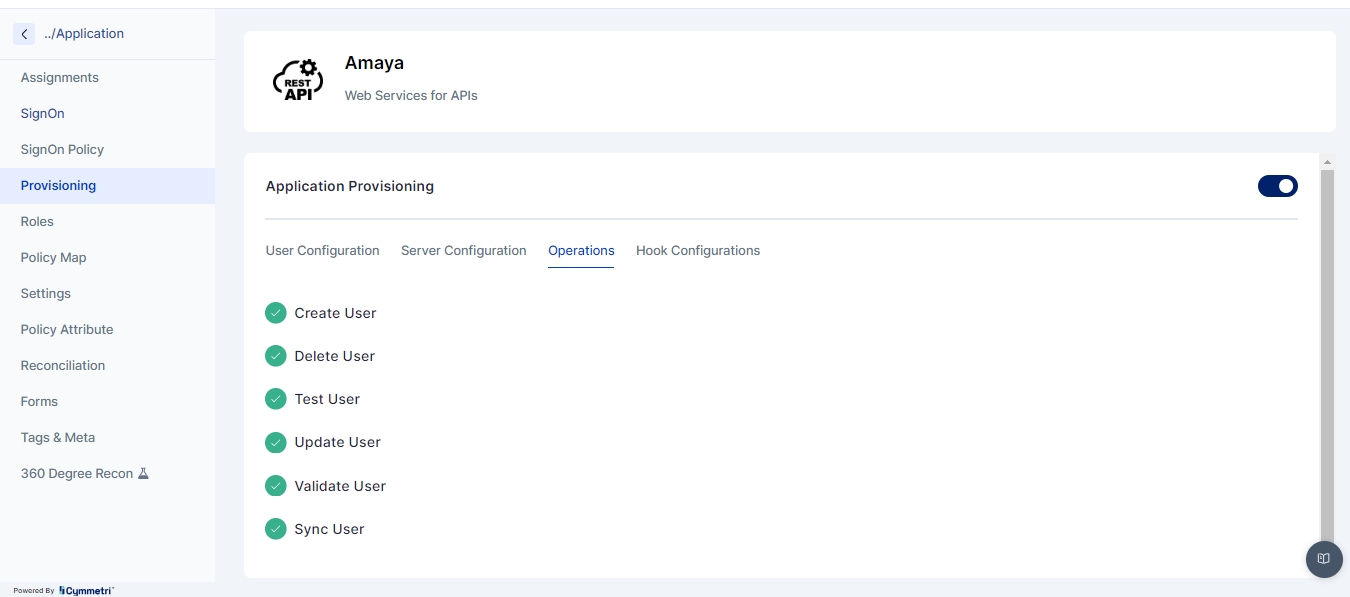
Cymmetri provides a robust suite of provisioning operations that enable seamless identity and access management across various applications. Below is a detailed overview of the provisioning operations supported by Cymmetri.
1. Test Operation
Purpose: The Test Operation is used to validate the connectivity and configuration settings between Cymmetri and the target application or directory service. This operation ensures that all necessary parameters, such as API endpoints, credentials, and schema mappings, are correctly configured.
Usage Scenario: Before initiating any provisioning tasks, administrators can use the Test Operation to verify that the integration between Cymmetri and the target system is functioning as expected.
2. Sync Operation
Purpose: The Sync Operation synchronizes user and group data between Cymmetri and the connected applications. This operation ensures that the identity information in Cymmetri is in sync with the data in external systems.
Usage Scenario: The Sync Operation is typically scheduled to run at regular intervals or triggered manually to ensure that changes in the external system (e.g., new users, updated roles) are reflected in Cymmetri.
3. Search Operation
Purpose: The Search Operation allows administrators to query the target application or directory for specific users or groups. This operation is essential for identifying and managing specific identities in the external system.
Usage Scenario: Administrators can use the Search Operation to find users based on attributes such as username, email, or group membership, facilitating targeted management tasks like updates or deletions.
4. Create Operation
Purpose: The Create Operation is used to provision new user accounts or groups in the target application or directory based on the identity data maintained in Cymmetri.
Usage Scenario: When a new employee joins an organization, the Create Operation can be triggered to automatically provision their account in various applications, ensuring immediate access to necessary resources.
5. Update Operation
Purpose: The Update Operation allows administrators to modify existing user or group attributes in the target system. This operation is crucial for maintaining accurate and up-to-date identity information across systems.
Usage Scenario: If an employee's role changes, the Update Operation can be used to modify their access privileges or update their profile information in connected applications.
6. Delete Operation
Purpose: The Delete Operation is used to de-provision user accounts or groups from the target application or directory. This operation is essential for removing access when users leave the organization or no longer require certain resources.
Usage Scenario: Upon the termination of an employee, the Delete Operation can be triggered to remove their accounts from all connected applications, ensuring security and compliance.
7. Role Assign Operation
Purpose: The Role Assign Operation assigns specific roles to users in the target system, granting them access to particular resources or permissions.
Usage Scenario: When an employee is promoted to a managerial position, the Role Assign Operation can be used to grant them additional access rights aligned with their new responsibilities.
8. Role Unassign Operation
Purpose: The Role Unassign Operation removes previously assigned roles from users, revoking their access to certain resources or permissions.
Usage Scenario: If an employee is reassigned to a different department, the Role Unassign Operation can be utilized to revoke roles that are no longer relevant to their new position.
Understand how to add and manage your cloud and on-premise applications through your Cymmetri Identity platform deployment. Your Cymmetri Identity deployment allows you to manage your cloud-based applications and on-premise applications from a single administration console.
Understand how to add the applications used by your organization, to be managed your Cymmetri Identity platform deployment. Use the FAQ to learn how to add applications to be managed in the deployment.
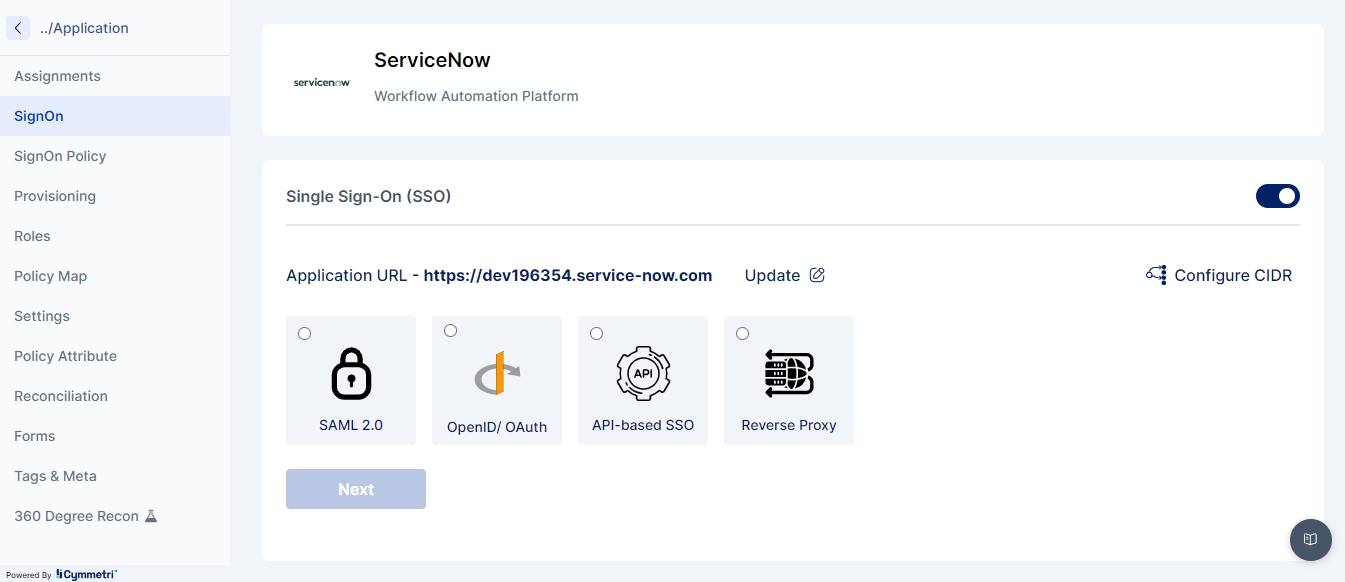
Single Sign On is the process of ensuring that once an end user is logged onto the Cymmetri Identity platform, they should be able to seamlessly move their session to any of your applications managed by your Cymmetri Identity platform deployment. Use the FAQ to learn how to configure Single Sign On for your application.
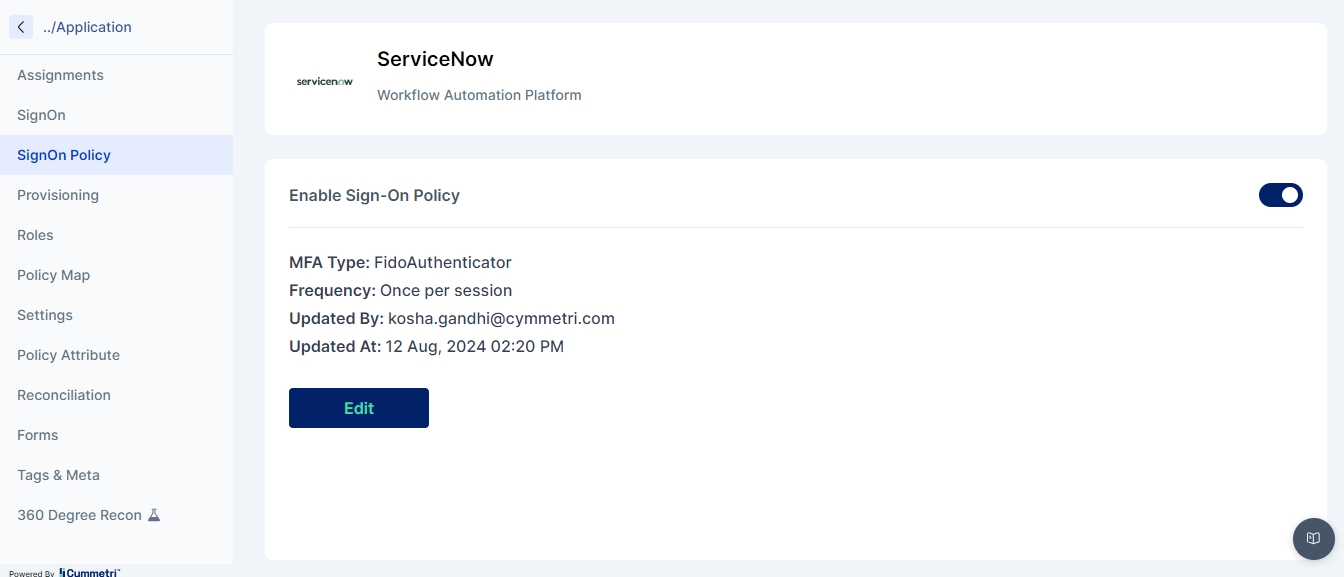
Modern IAM deployments wishing to have progressive authentication may require some critical application integrations within your deployment to perform additional authentication while performing Single Sign On for the end user. Use the FAQ to learn how to configure the Application Sign On Policy.
Provisioning refers to the process of creating, modifying, and in general pushing the user account information stored on the Cymmetri Identity platform to the applications managed by your Cymmetri Identity platform deployment. Use the FAQ to learn how to configure User Account Provisioning.
Reconciliation of User accounts is a primary activity in Identity Governance, which allows for synchronisation between the user account information on the managed application and the Cymmetri Identity platform deployments, including provisioning, modifying, deprovisioning, and modifying user account attributes based on various synchronisation states. Use the FAQ to learn how to configure the Identity Reconciliation Process.
Once an application has been added to the Cymmetri Identity platform deployment and the necessary configurations for Single Sign On, Provisioning and Reconciliation have been performed, an application may be assigned to an individual user or to a group of users. Use the FAQ to learn how to assign application to a user.
Pre-requisites:
Make sure you have the following information before you proceed further:
Cymmetri login credentials
Access to IIS (Internet Information Services) to install certificates.
Access to Windows Certificate Services
Active Directory Essentials:
Server hostname and password
OU (Organisation Unit) name, if any
SSL ports need to be enabled on your side
Export the CA Certificate from Active Directory and import it into the Connector Server.
Make sure the certificate is installed on the Connector Server
Exporting your Active Directory certificate to the Connector Server is a necessary and crucial step. This ensures that the Active Directory and Cymmetri Identity Server can communicate over LDAPS (LDAP over SSL). For this to happen, LDAPS requires a properly formatted certificate installed in your Active Directory Domain Controllers. Please refer to this link and follow the same steps: https://www.manageengine.com/products/active-directory-audit/kb/how-to/how-to-install-ssl-certificates-in-active-directory.html
Once the certificate has been imported per the above instructions, you must restart the application to apply the changes made.
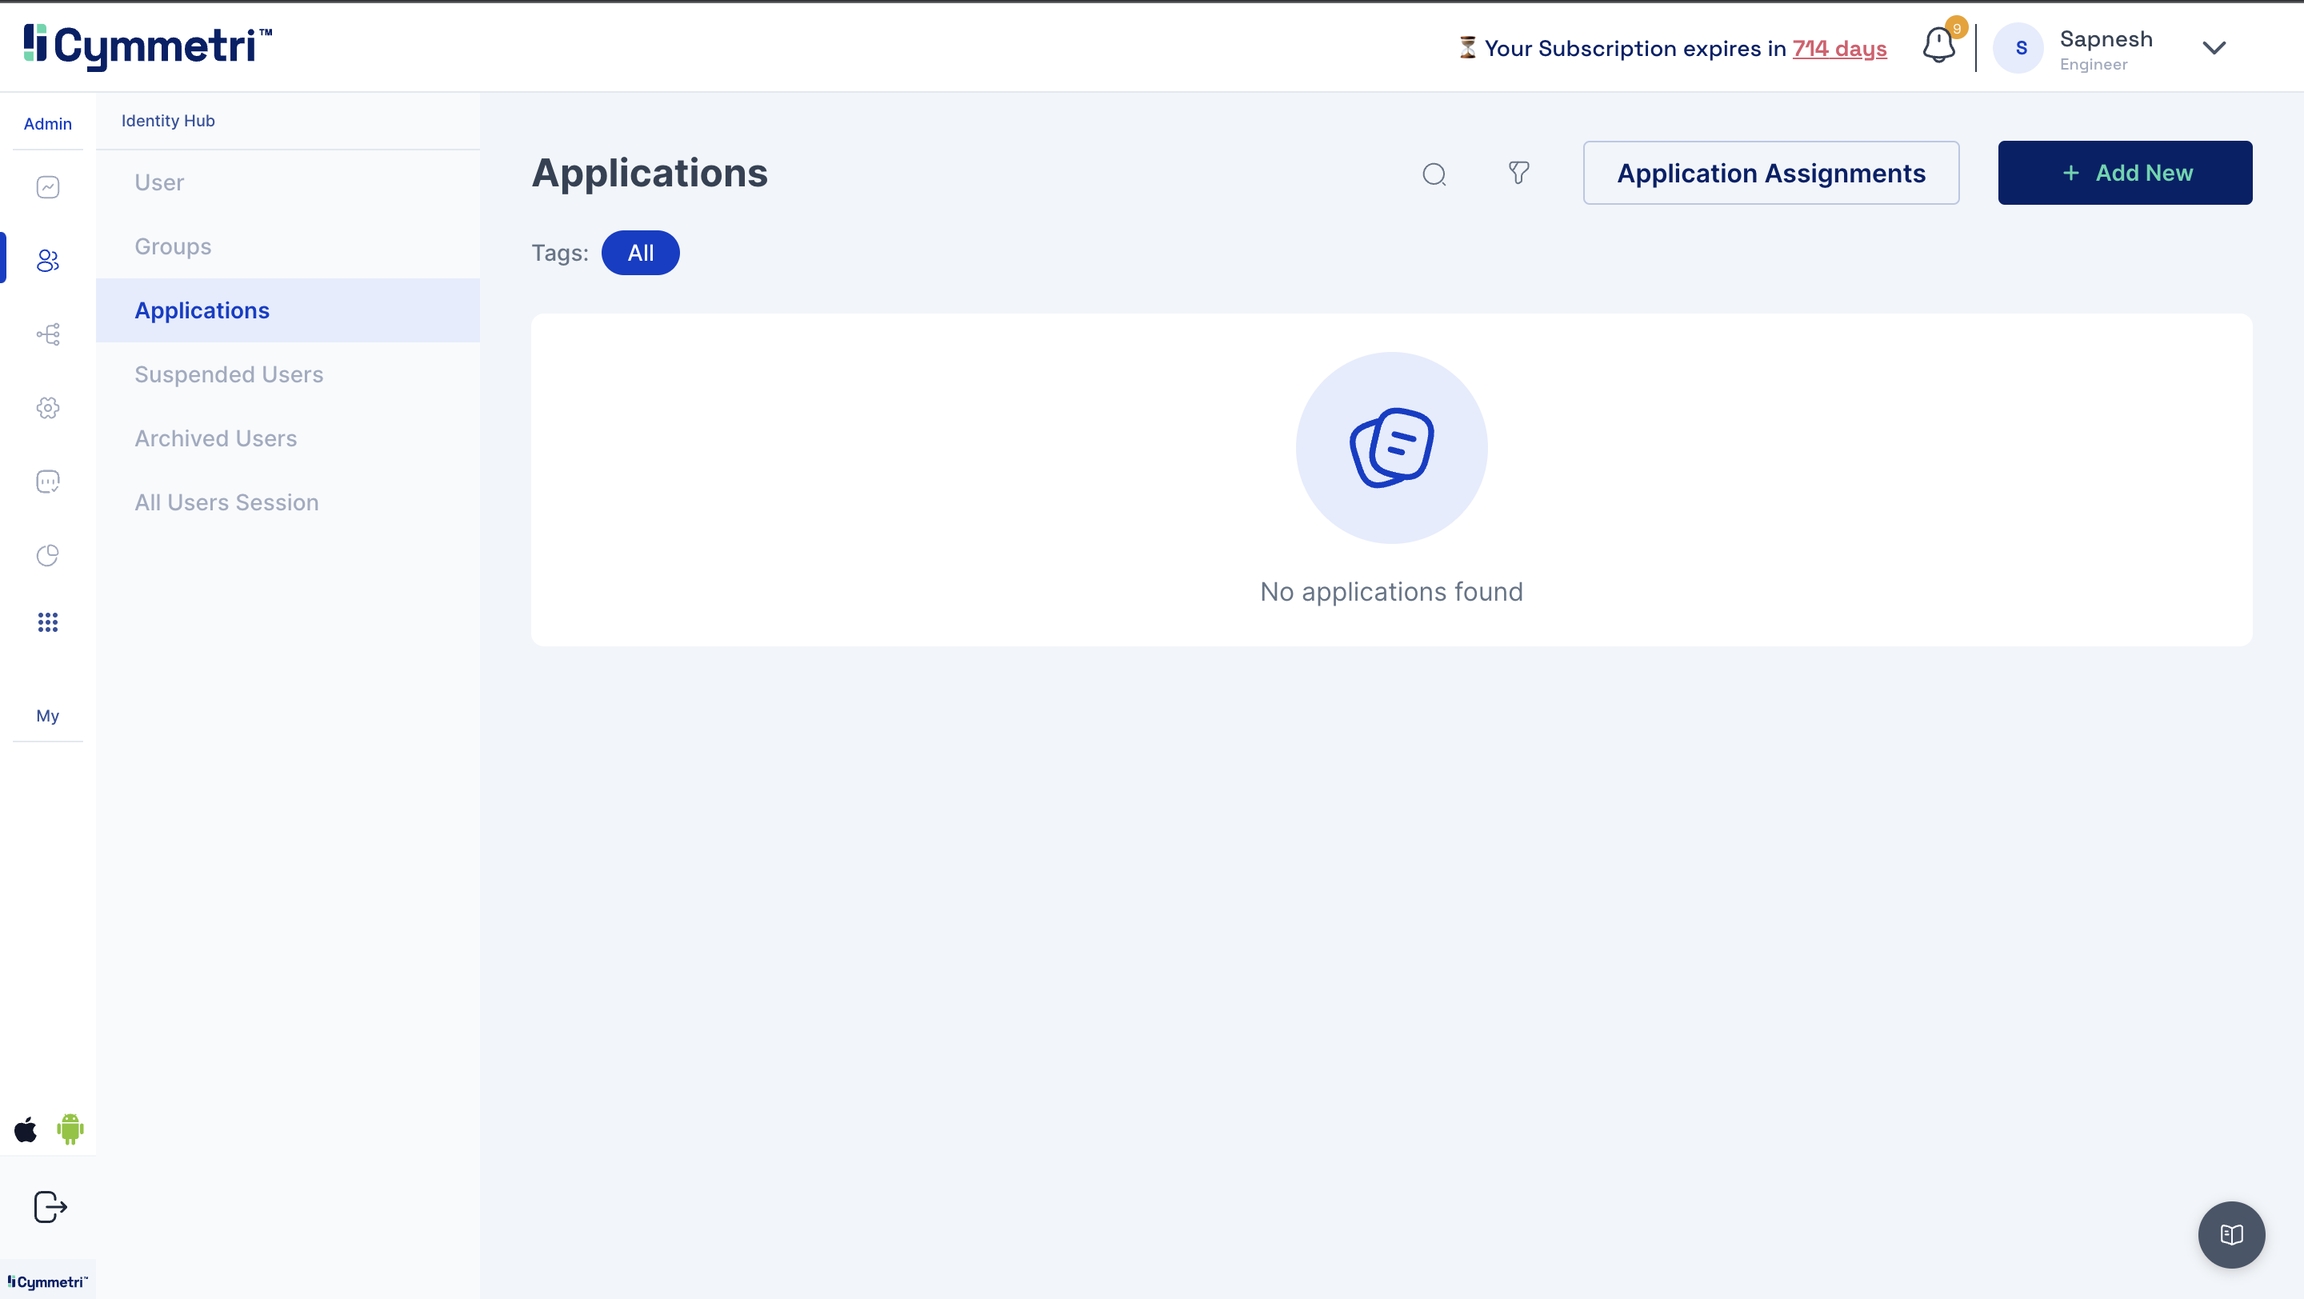
Navigate to the Identity Hub on the left navigation bar and click the Applications tab. You will see a list of existing applications.
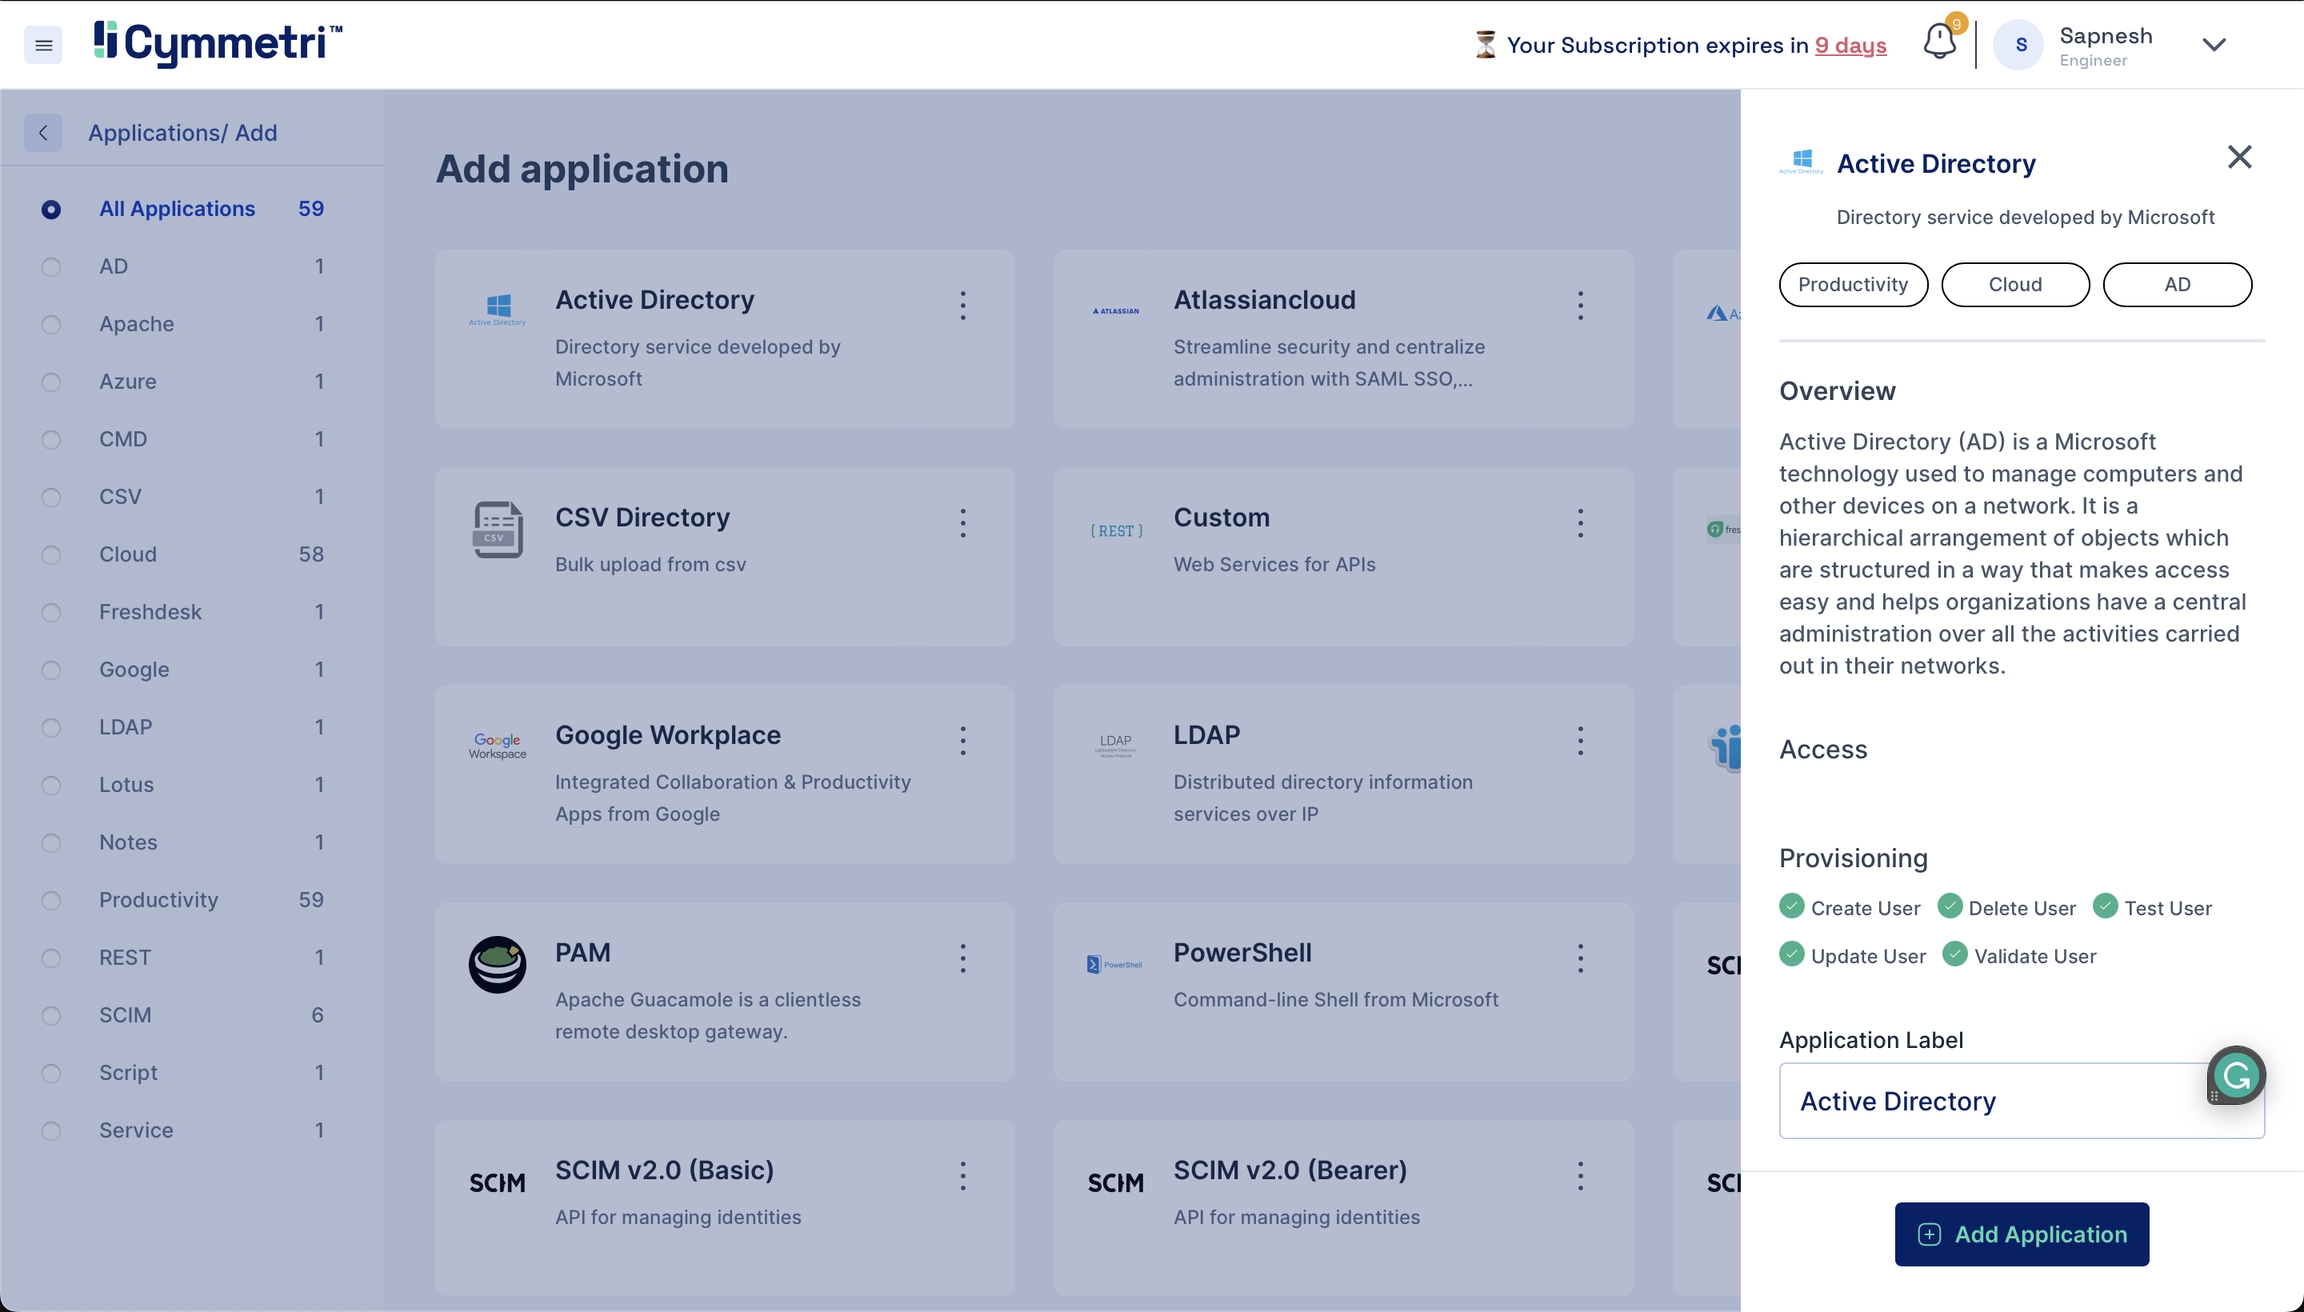
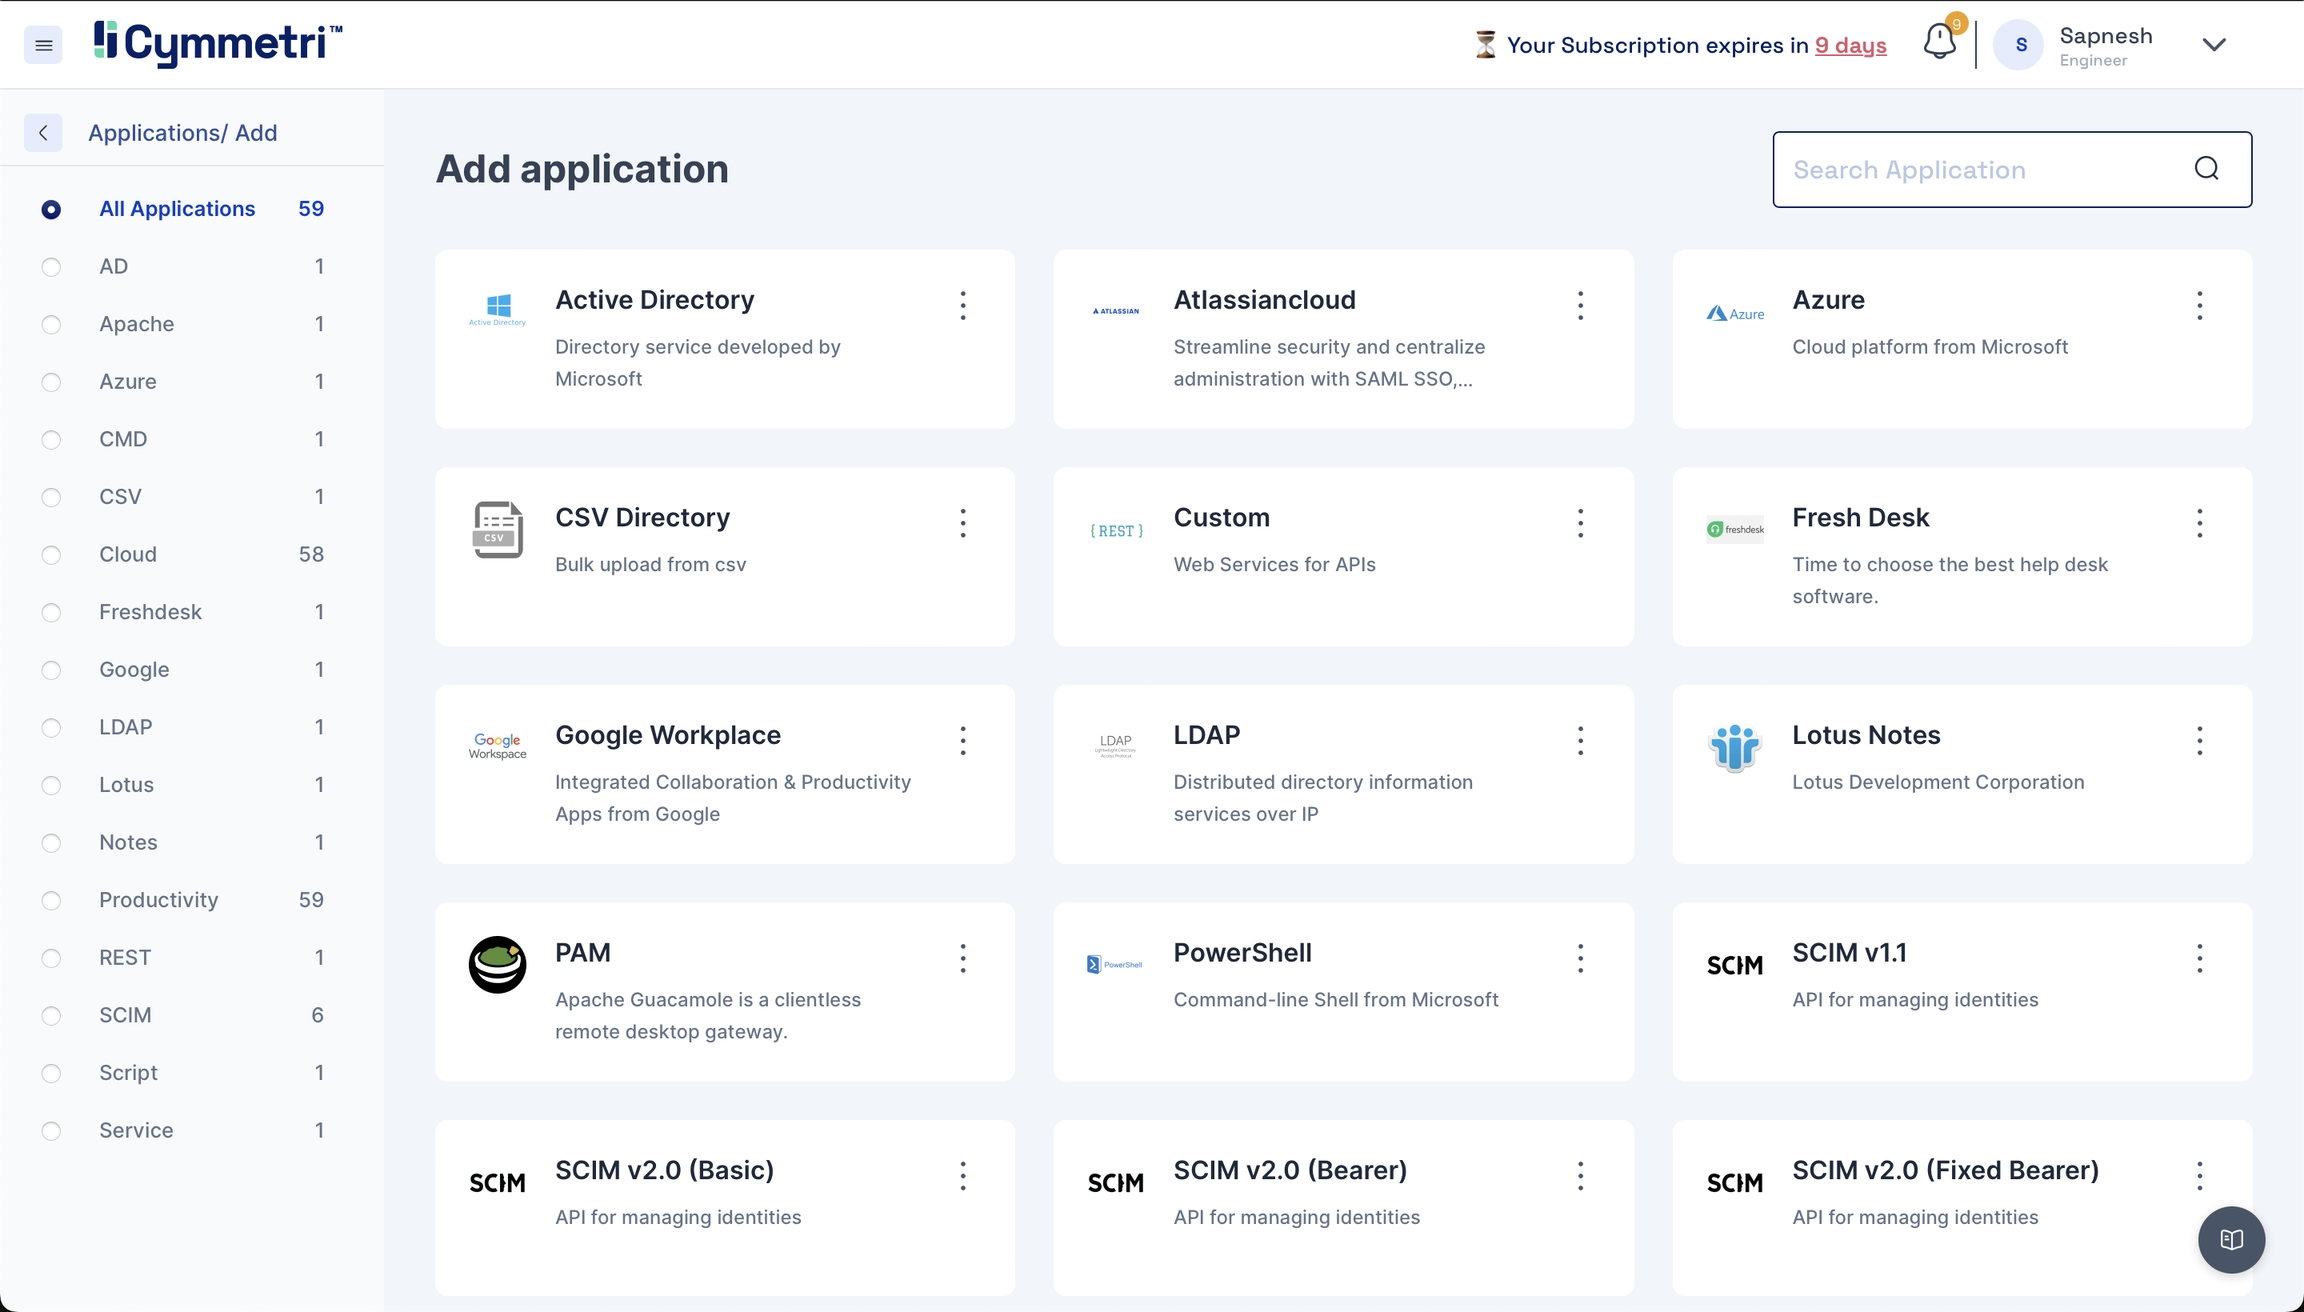
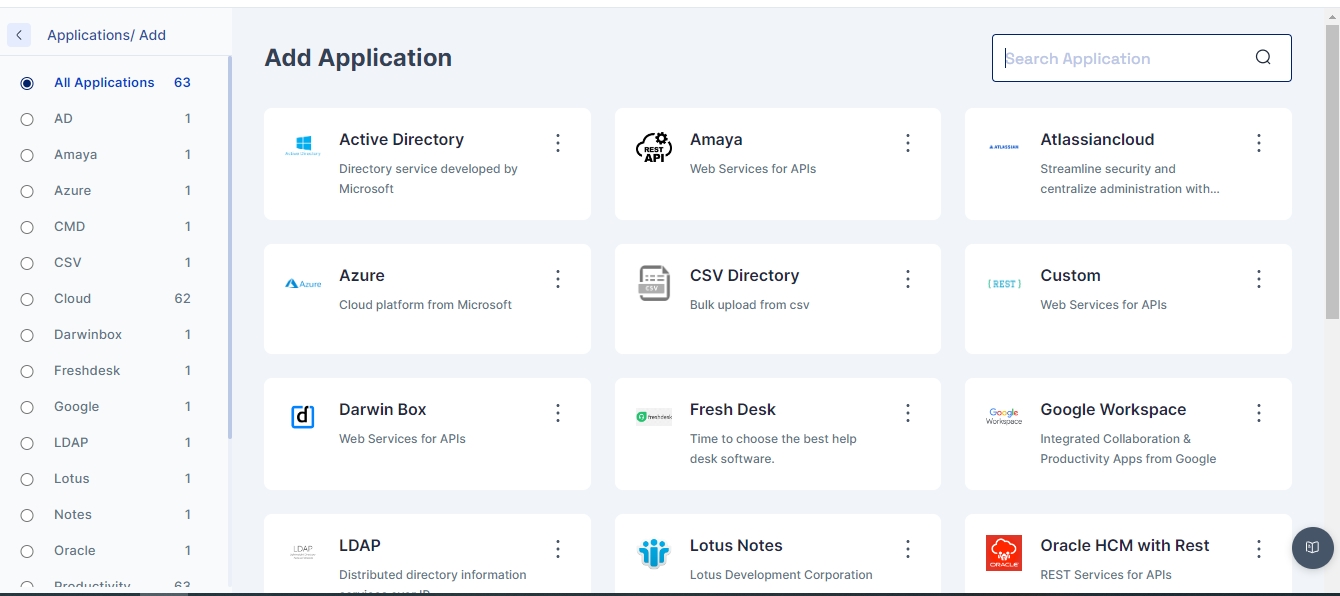
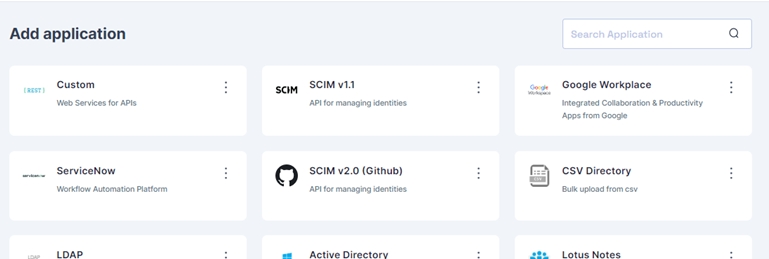
Click 'Add New', and you will find the entire list of all available applications.
Search for Active Directory on the top right and click on it. You should see the Active Directory application sidebar on the right.
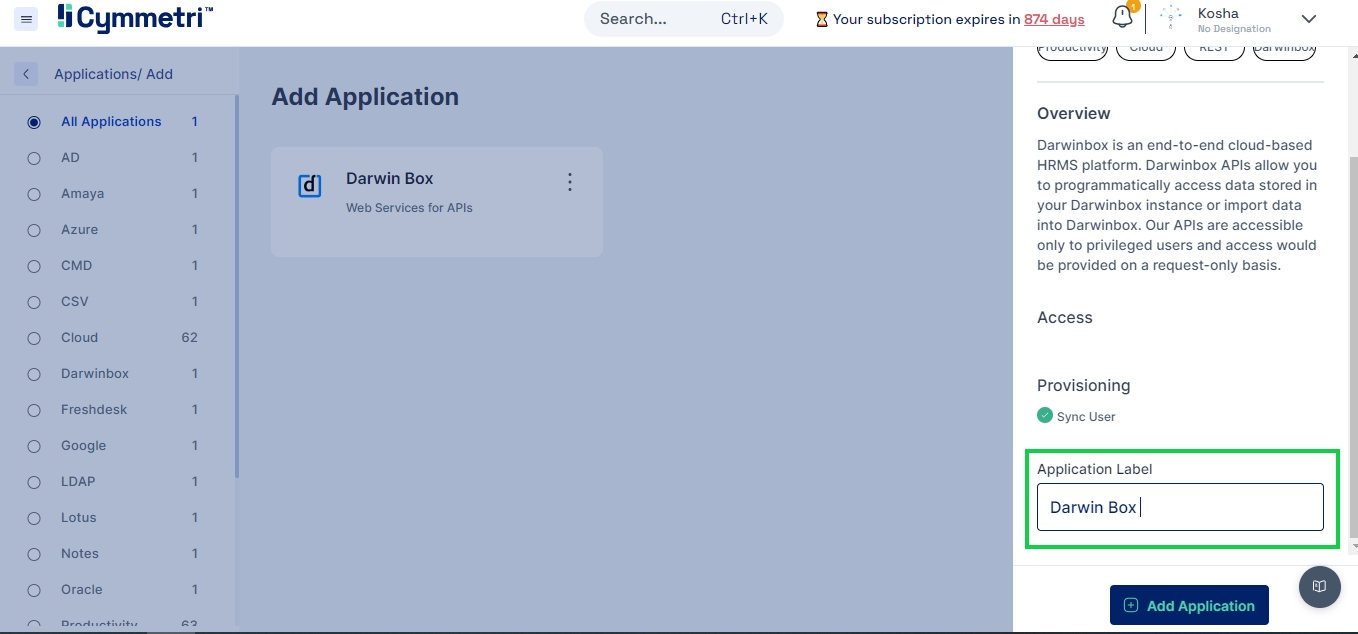
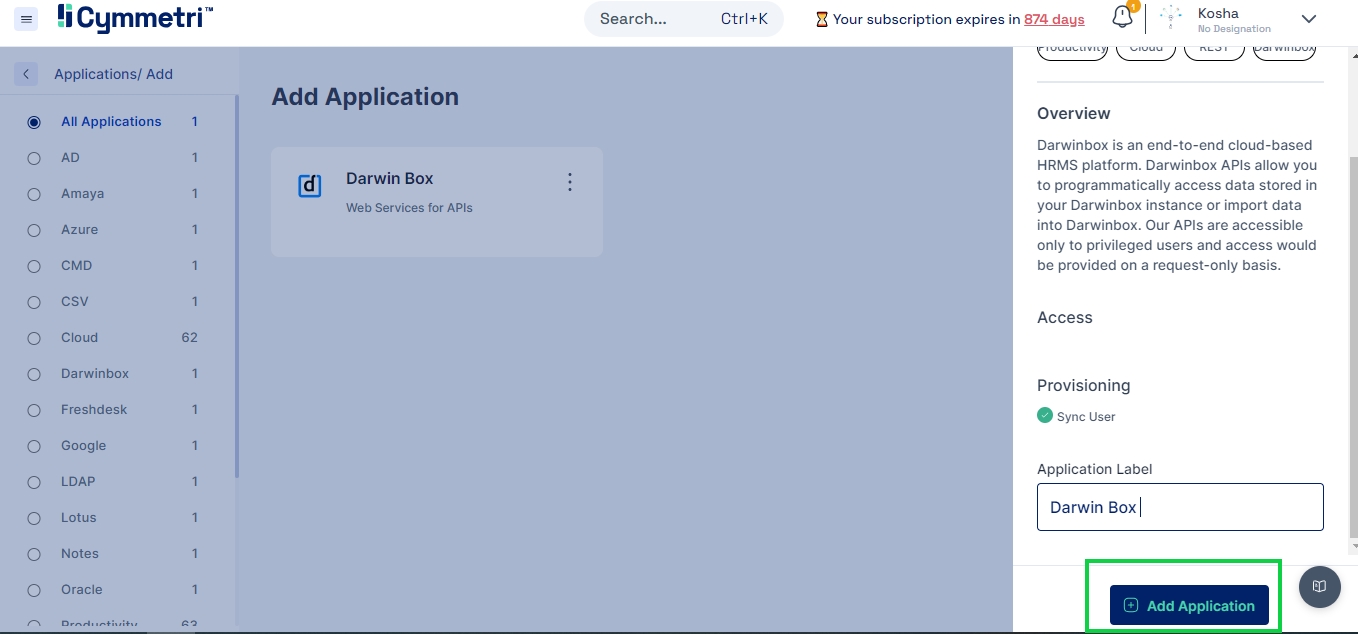
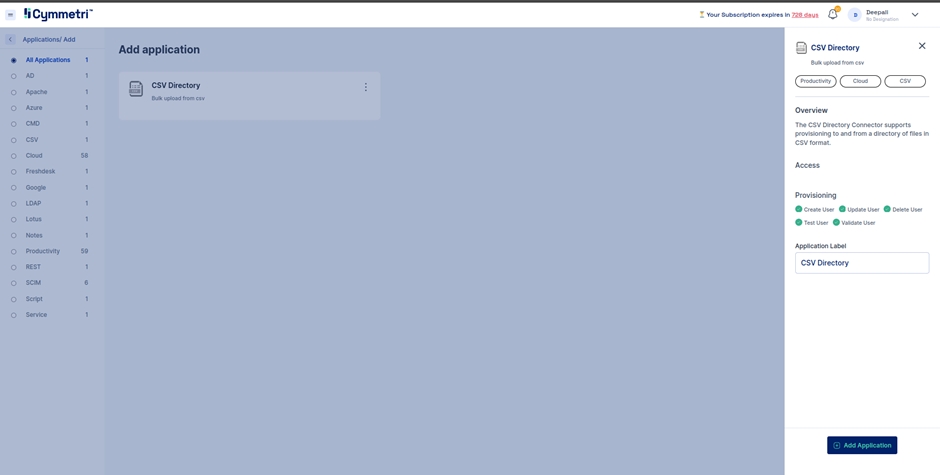
The Application Label has a default name for the Active Directory application and can be changed according to your choice. Click 'Add Application' from the bottom right to add the Active Directory application to your Cymmetri profile.
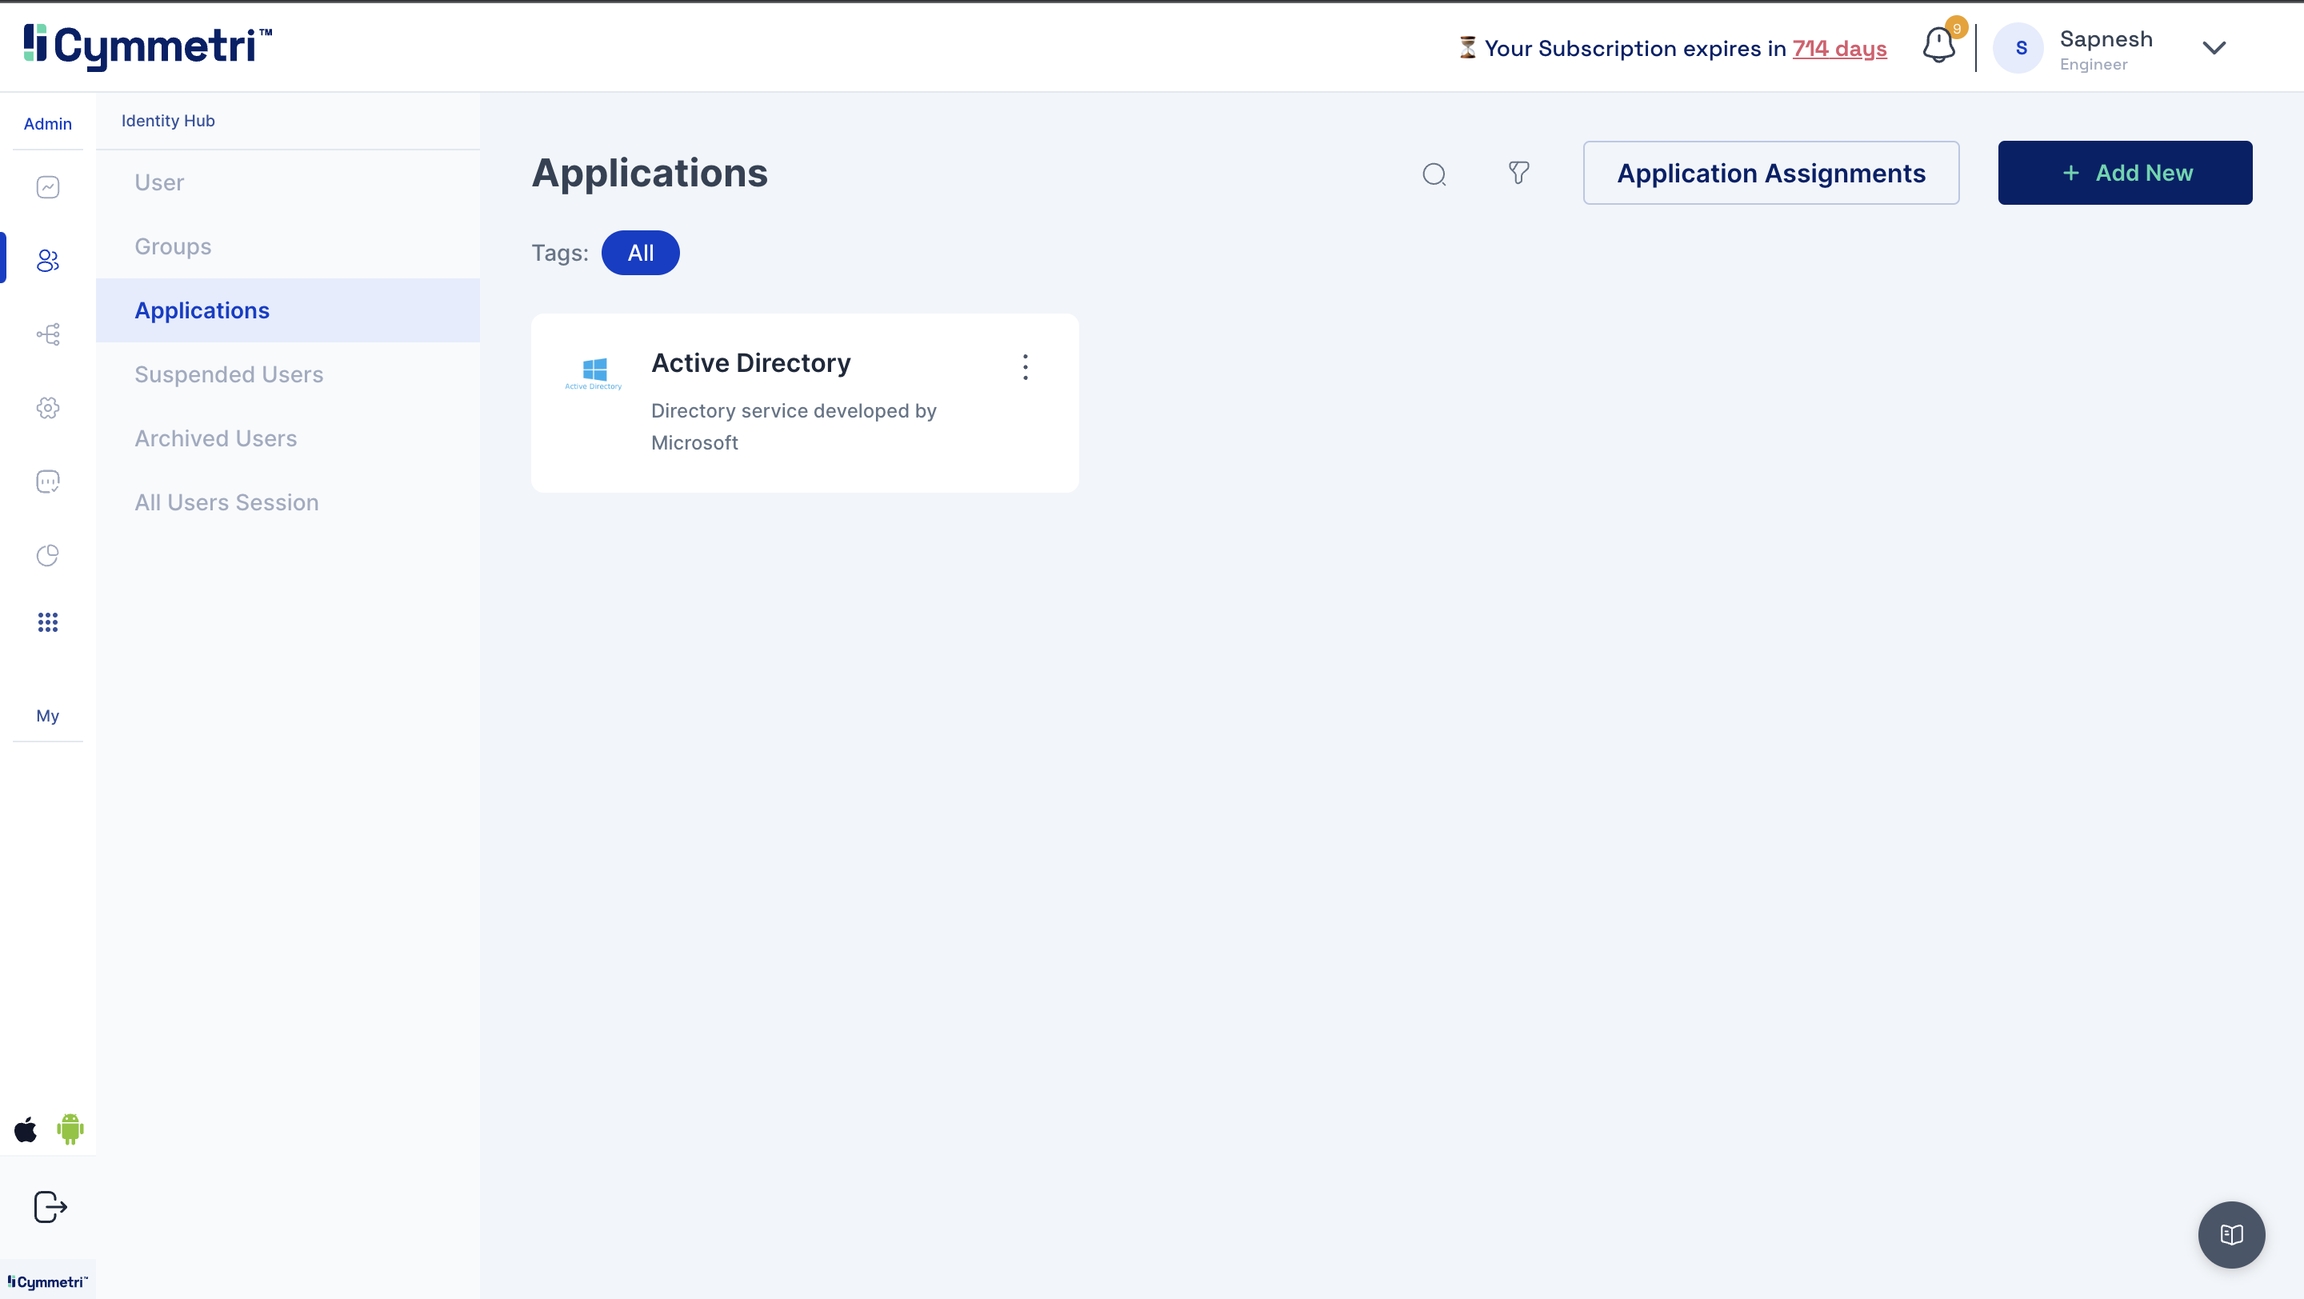
You have now added an Active Directory application to Cymmetri.
After adding the Active Directory, the 'Configure Now' button is enabled. Click this button to start setting up your Active Directory application.
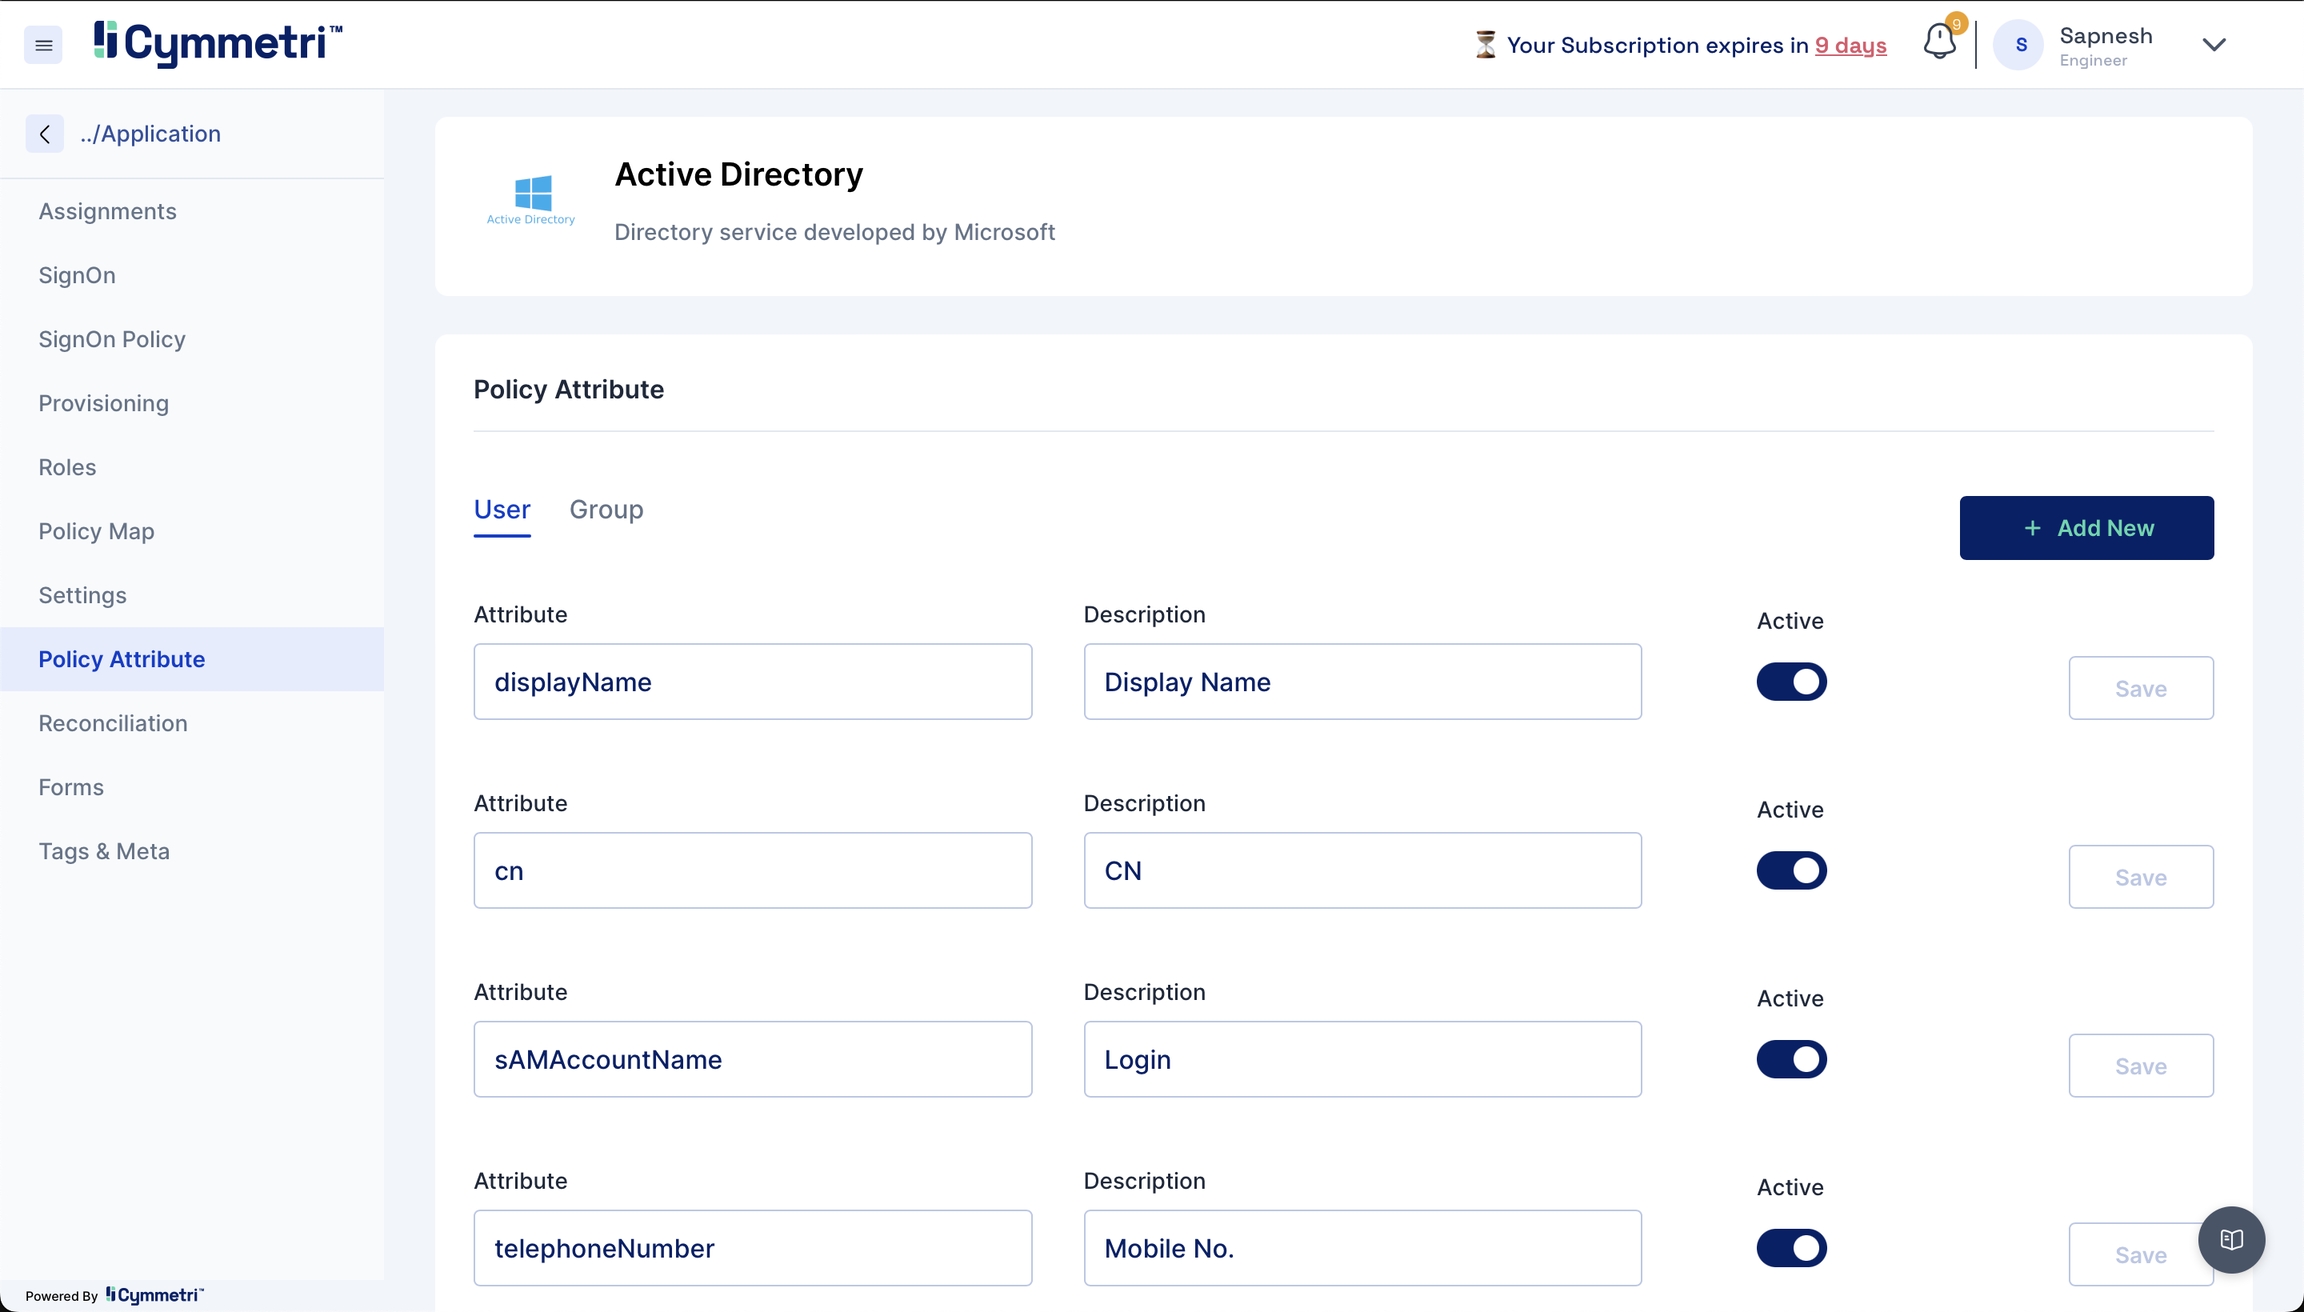
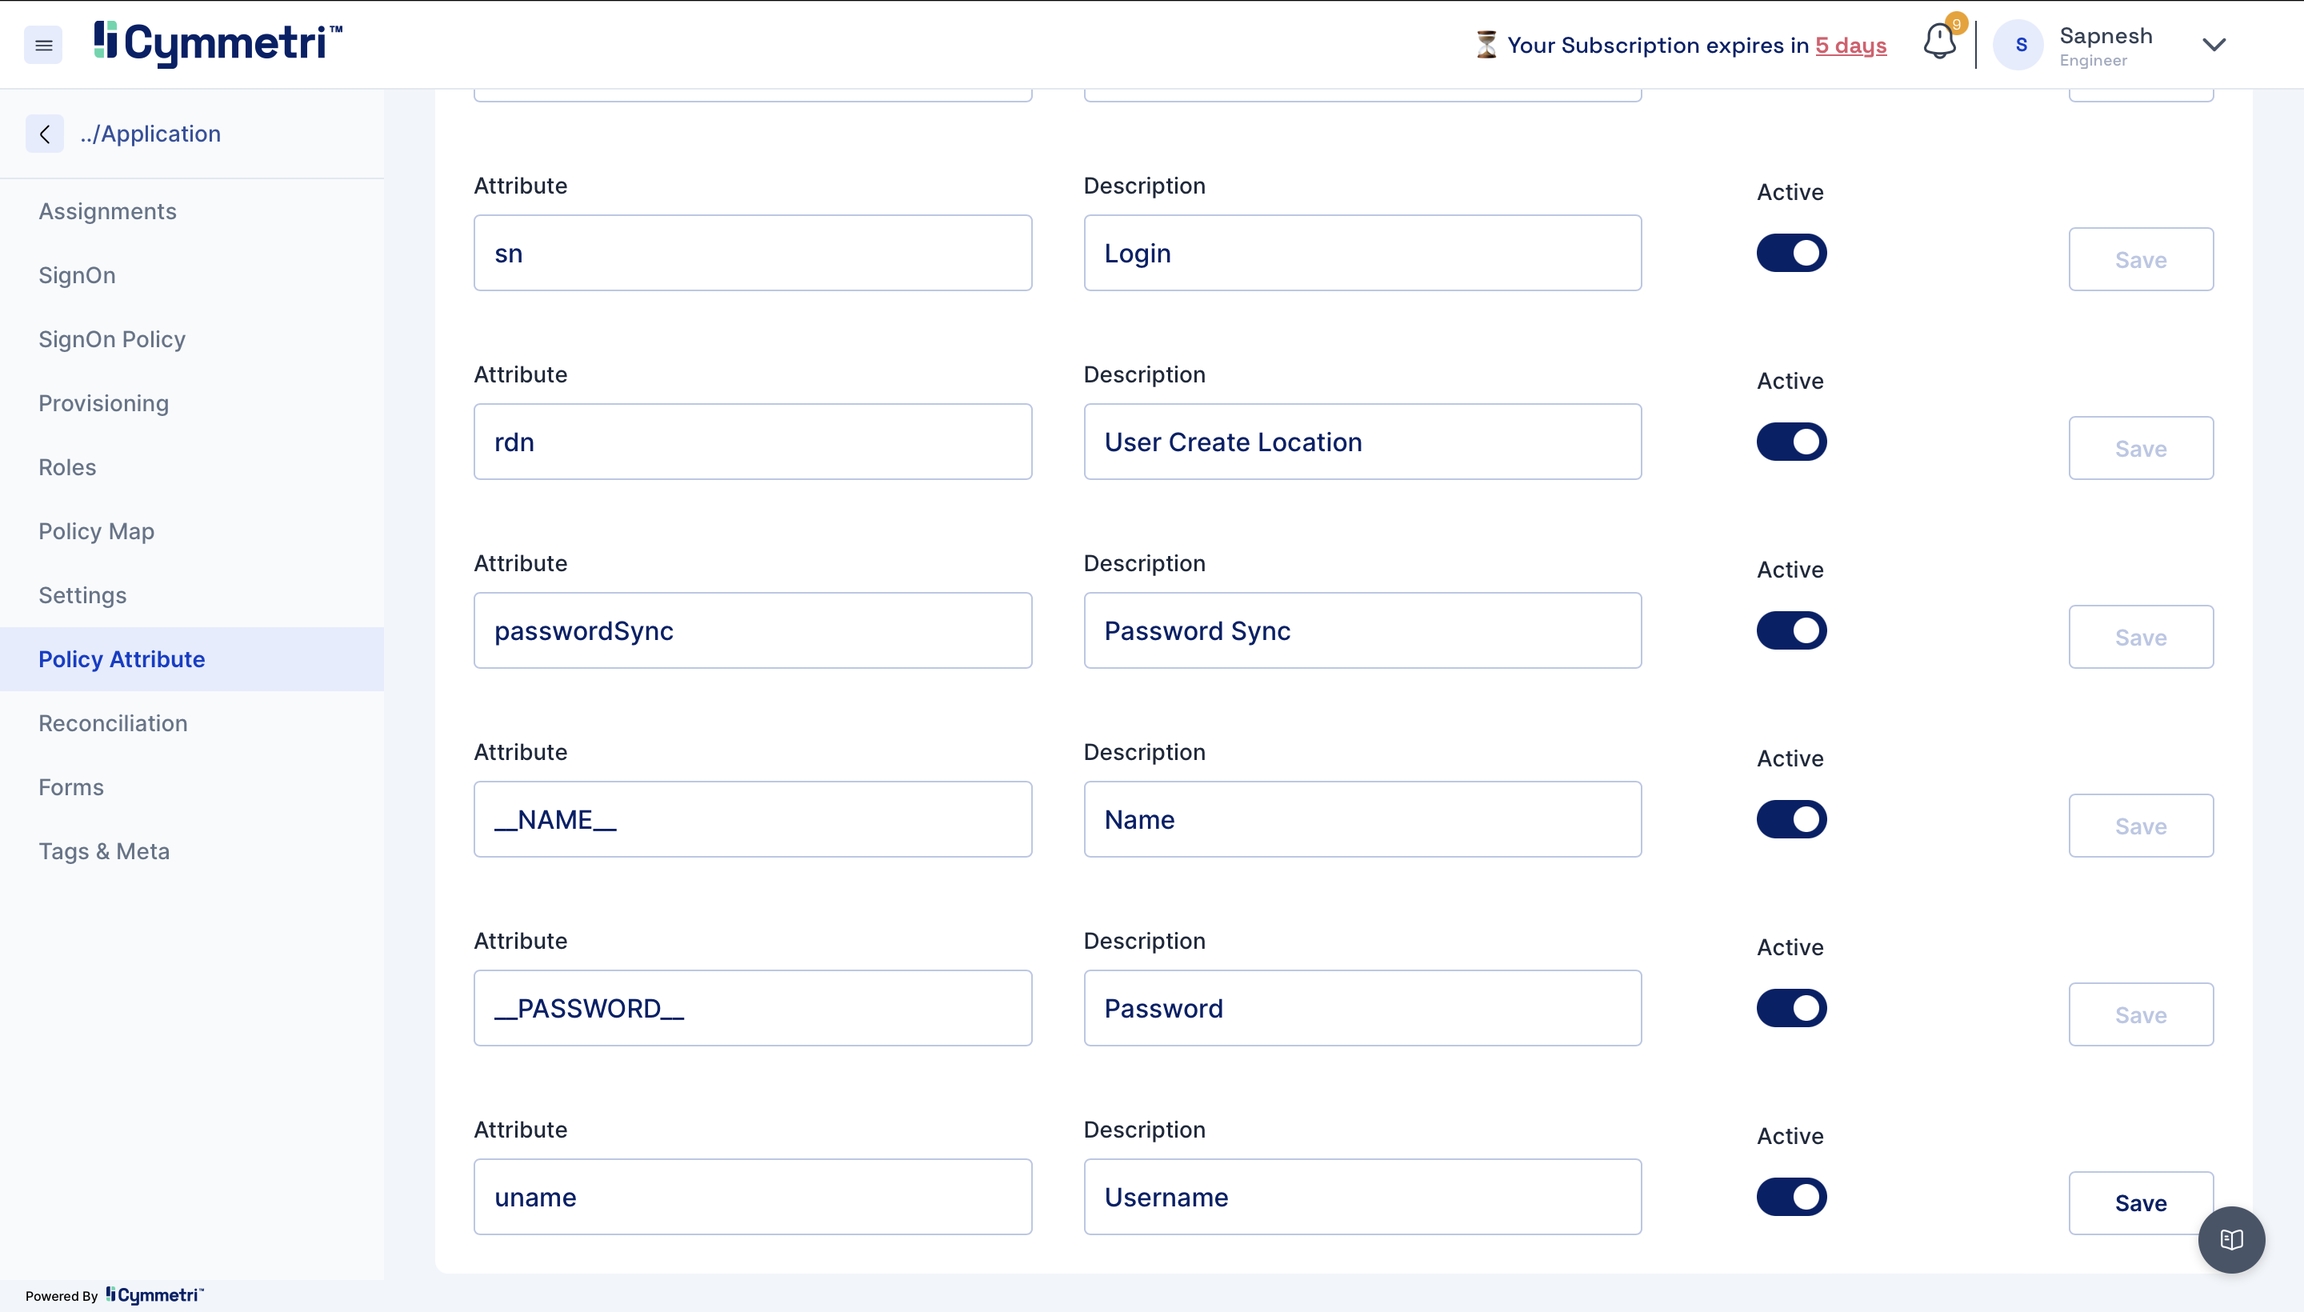
Define which attributes should be fetched from your Active Directory. You can do that by going to the Policy Attribute section.
Here below are shown some Active Directory attribute descriptions
CN
Common Name/ Display Name
RDN
Relative Distinguished Name - An RDN is the relative portion of a Display Name (DN).
SN
Surname
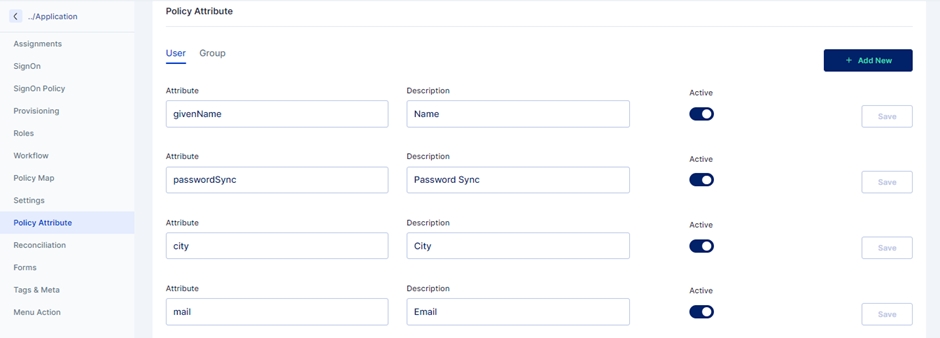
Policy Attributes - Policy attributes are user attributes (field names) in the Active Directory.
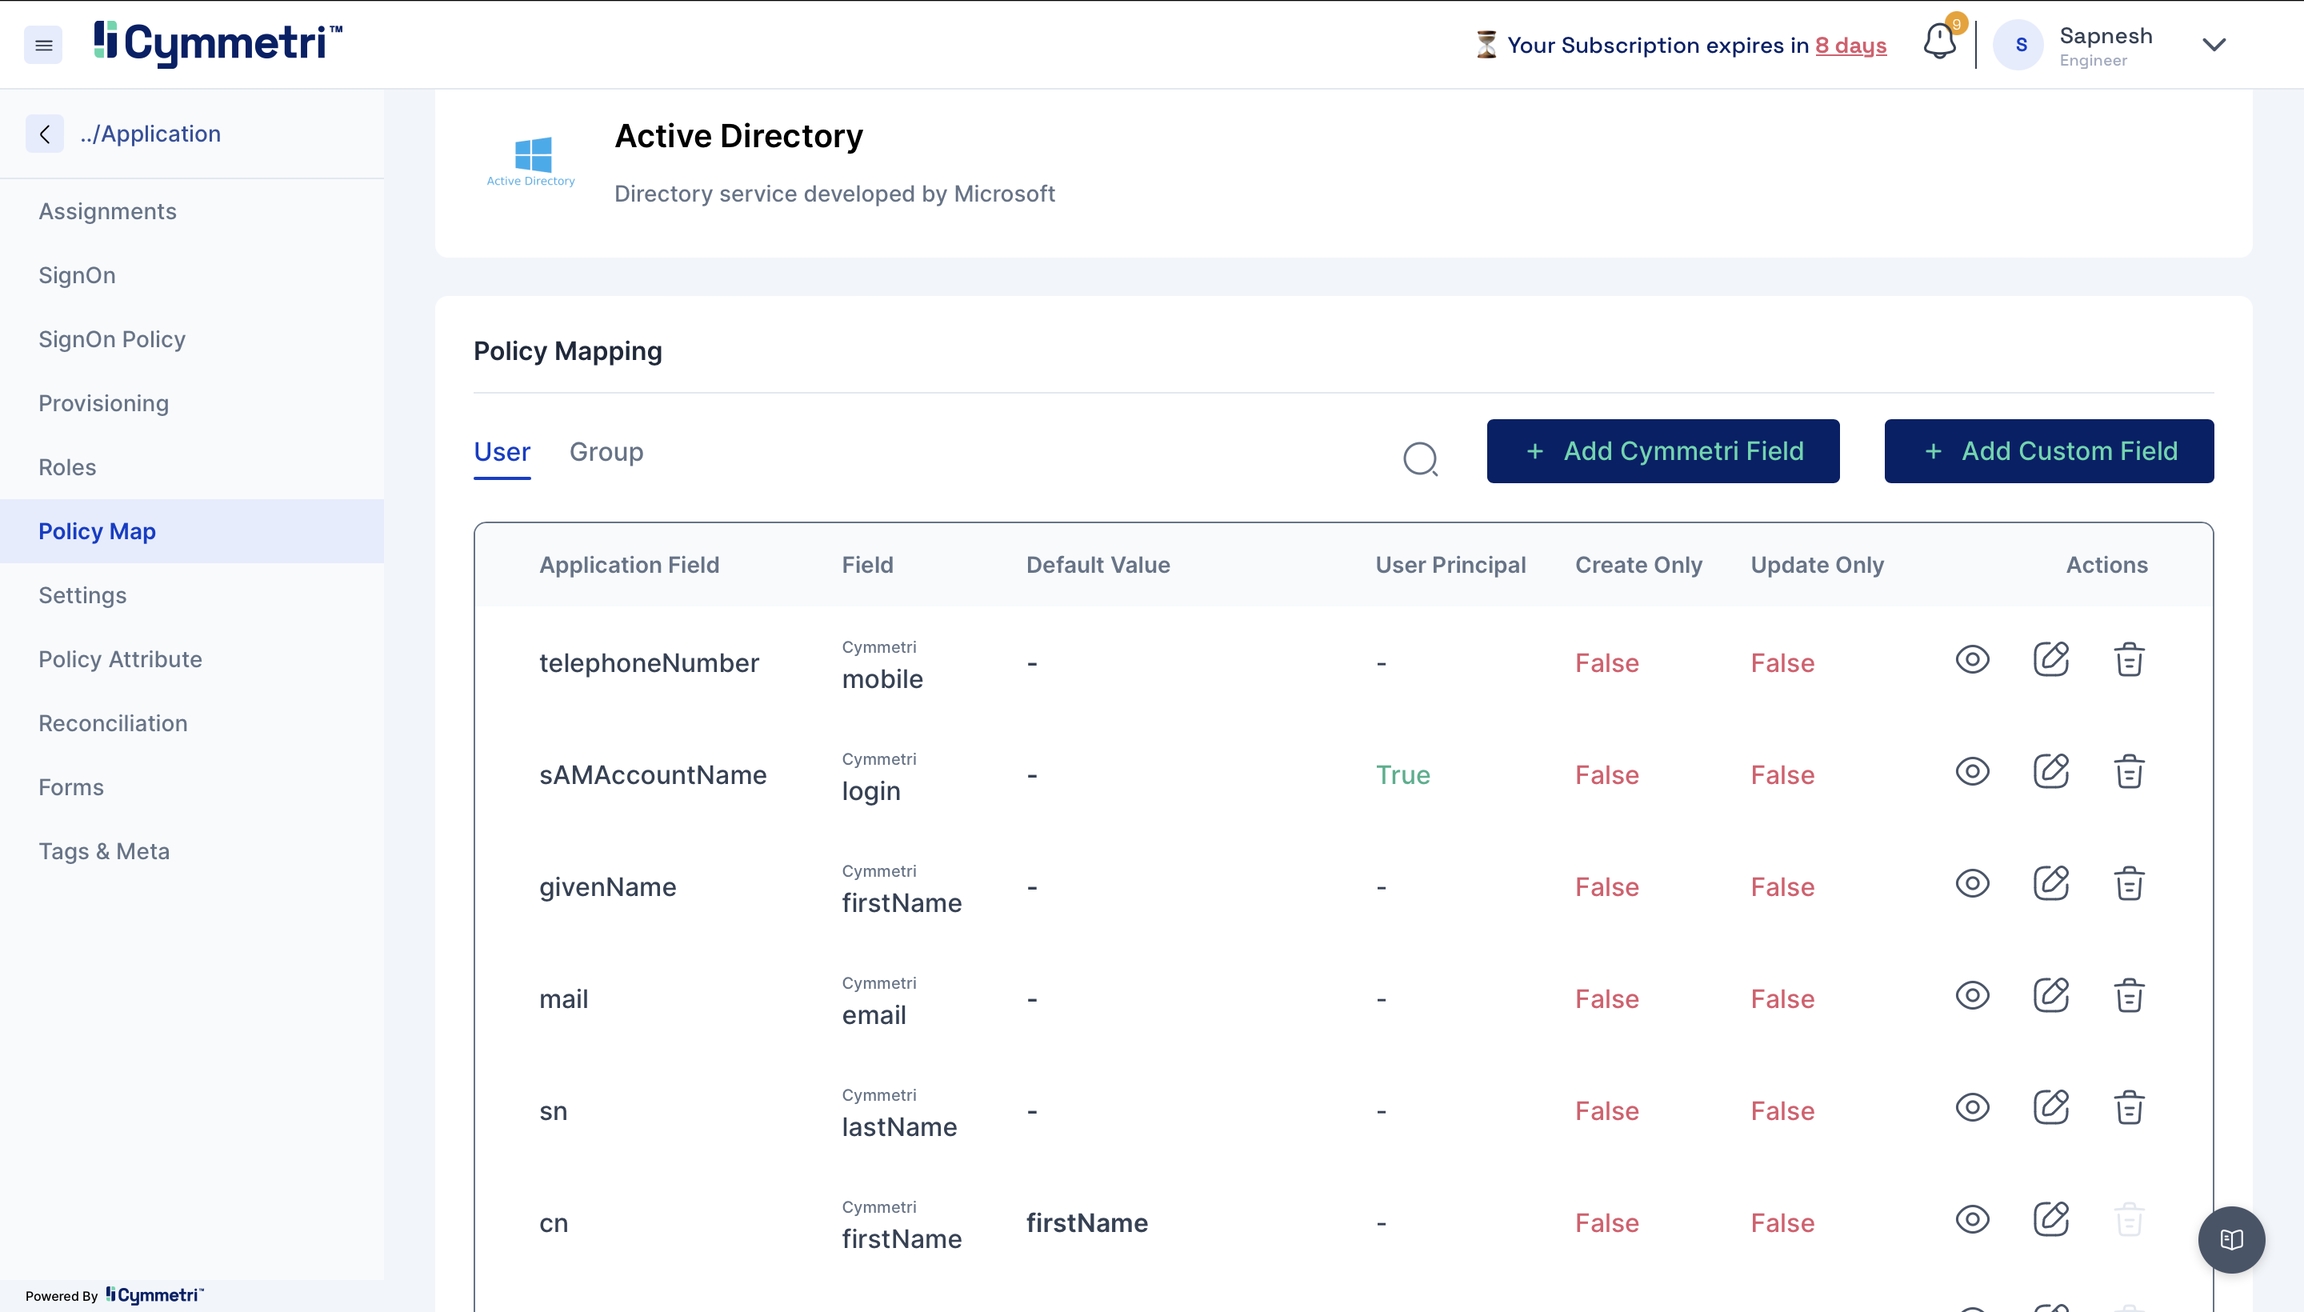
The policy attribute table is prefilled with standard Active Directory Attributes by default. Please verify if it works for you. If not, follow the below mappings for the provisioning to work.
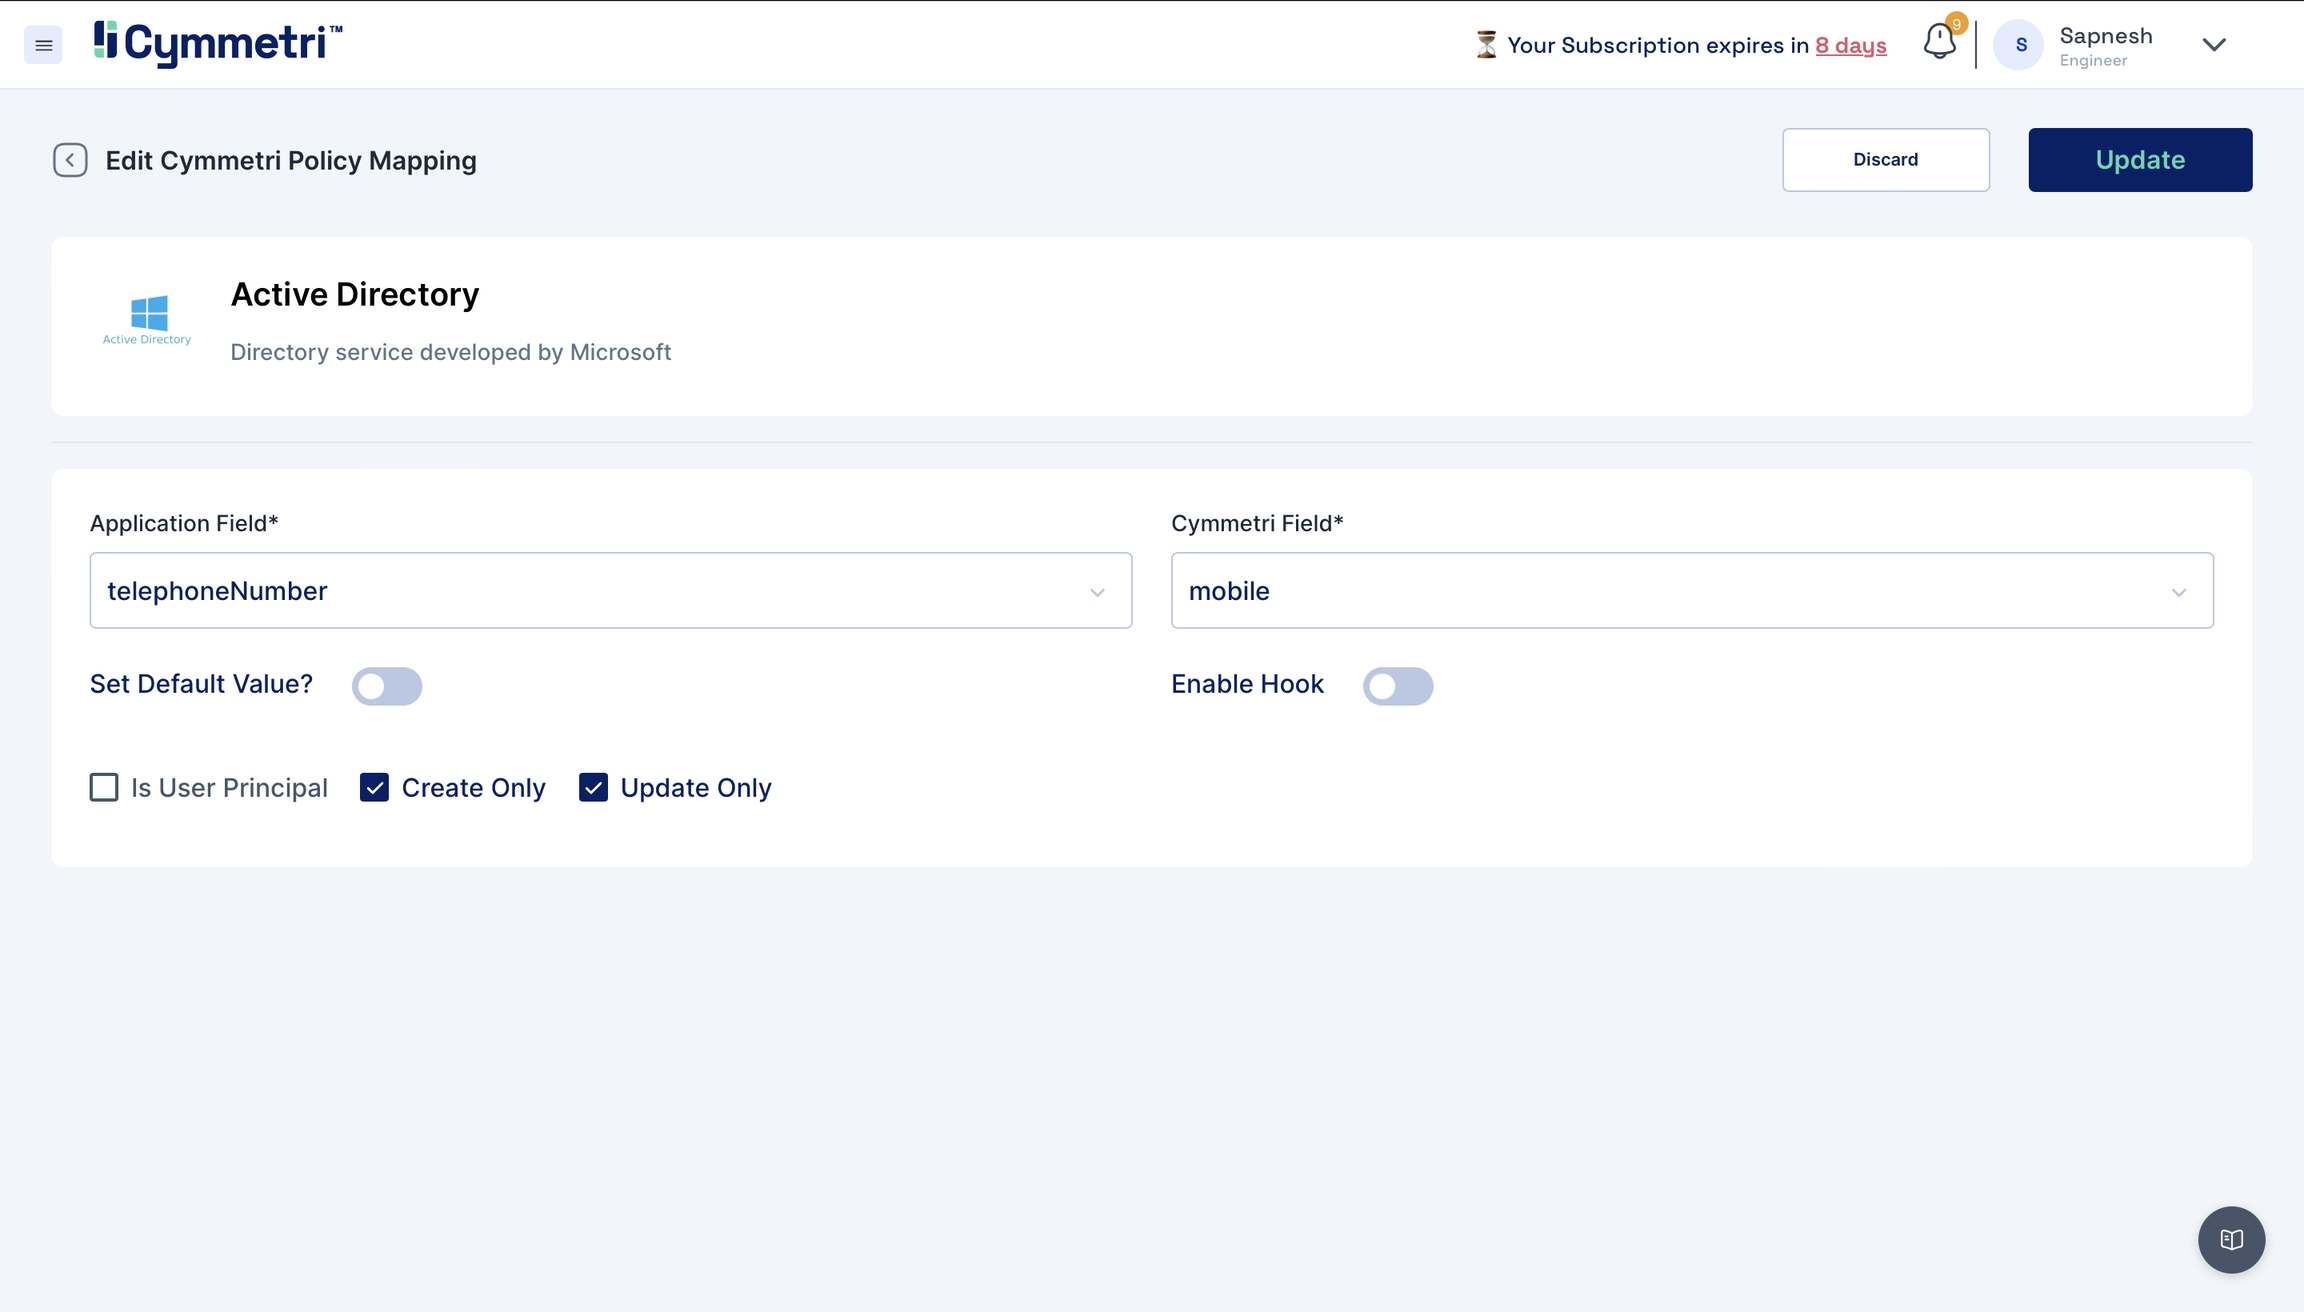
telephoneNumber - mobile
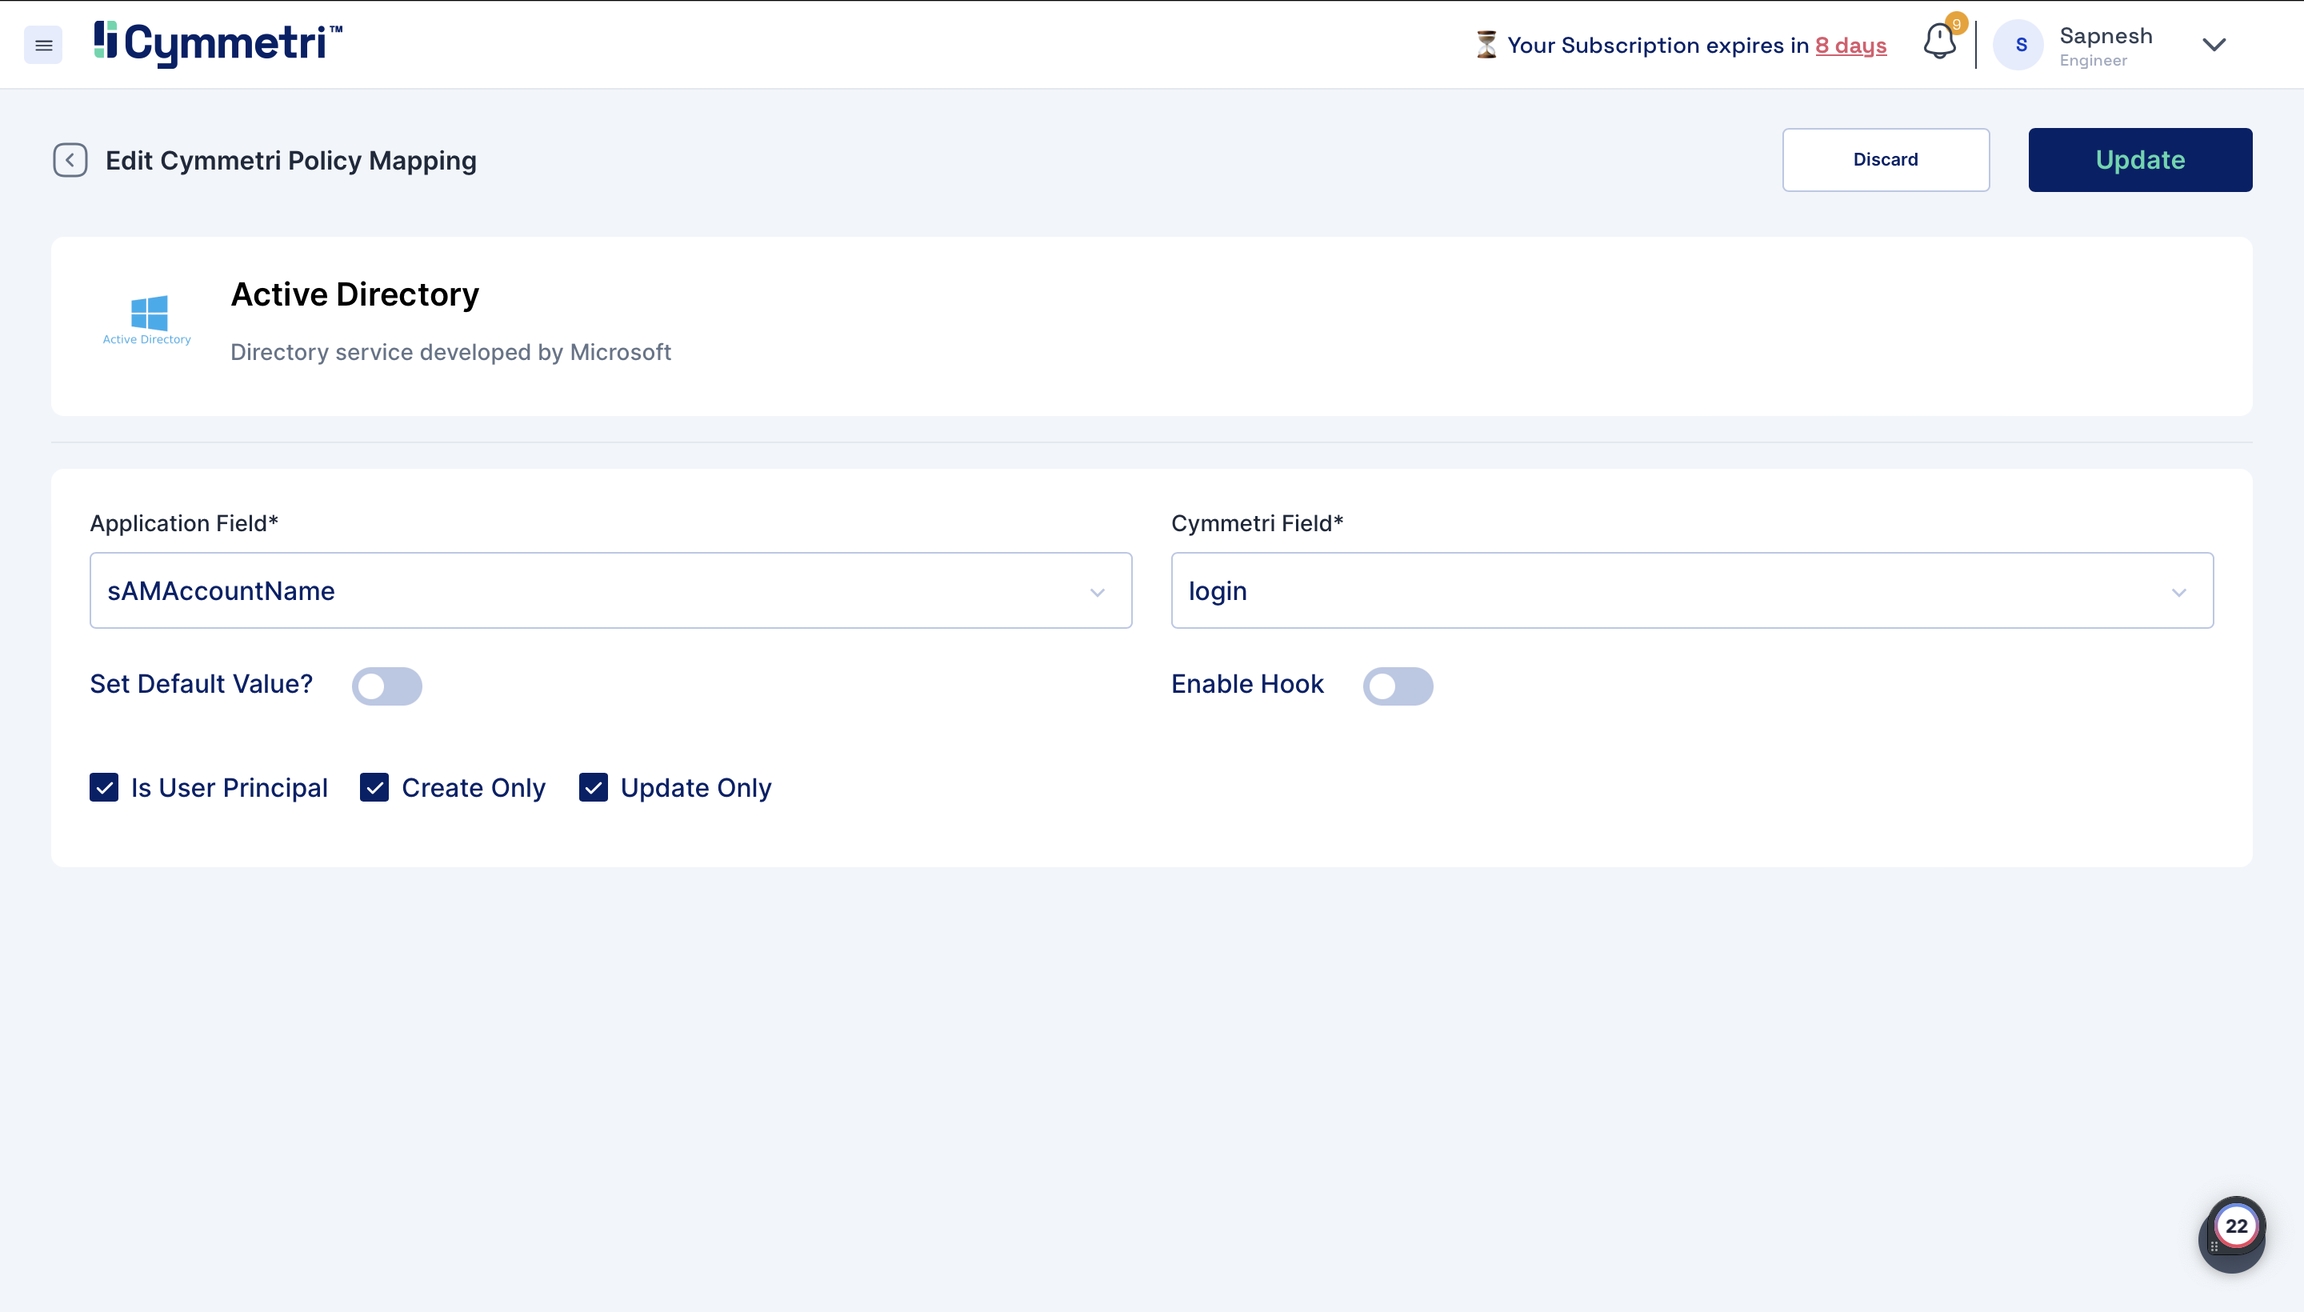
sAMAccountName - login
givenName - firstName
mail - email
sn- lastName
cn - firstName
2.1 Adding new attributes
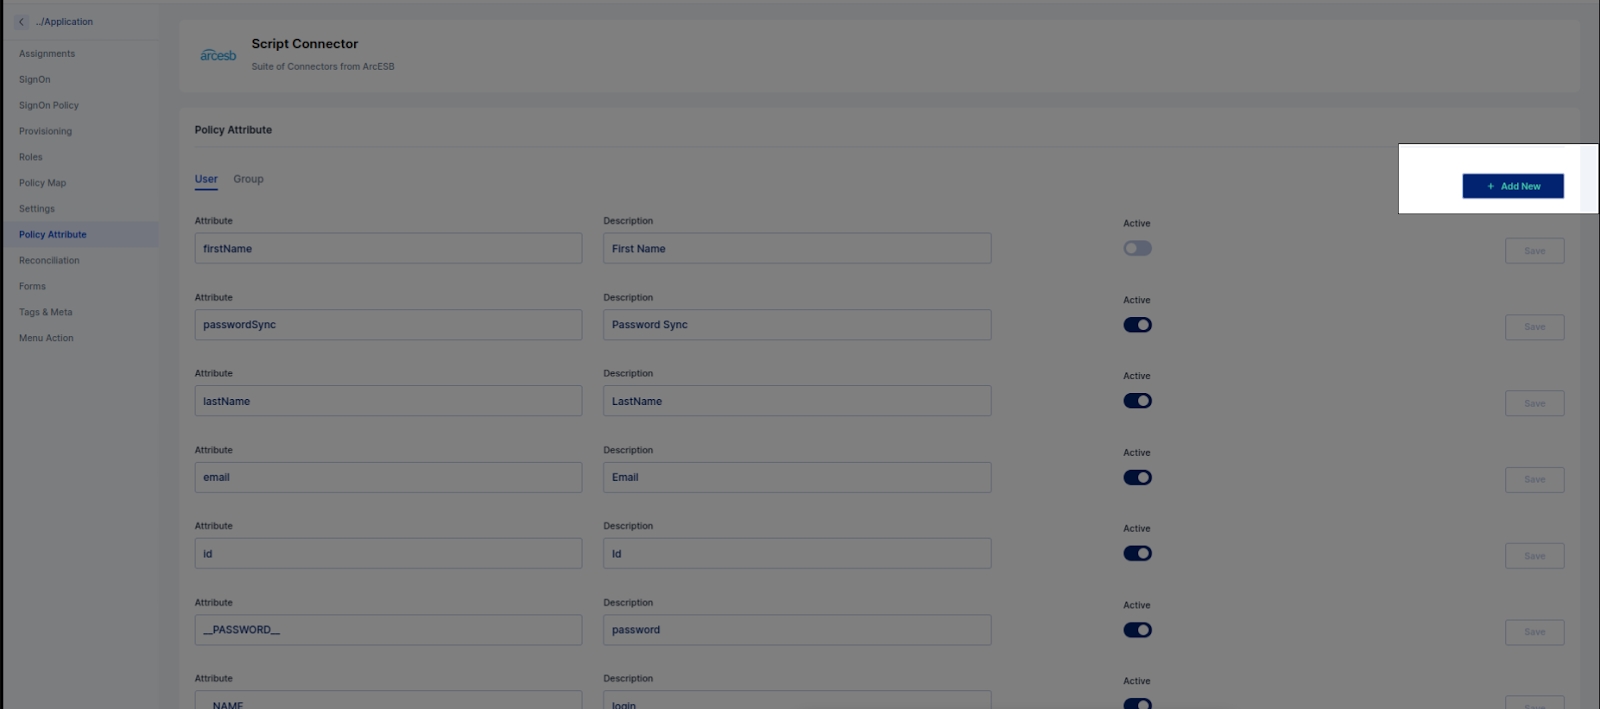
If the standard list does not contain the attributes you want to include, you can add new attributes by clicking the 'Add new' button on the right.
Fill in the attribute name, and description and click Save.
Also, toggle the Active switch to enable this new attribute.
Besides the present policy attributes, you need to add a custom attribute in case you're going for group provisioning, i.e. memberOf attribute.
Now that you've defined what attributes to fetch from Active Directory, you will map these to Cymmetri user attributes.
On the same window, navigate to the policy map in the left navigation bar.
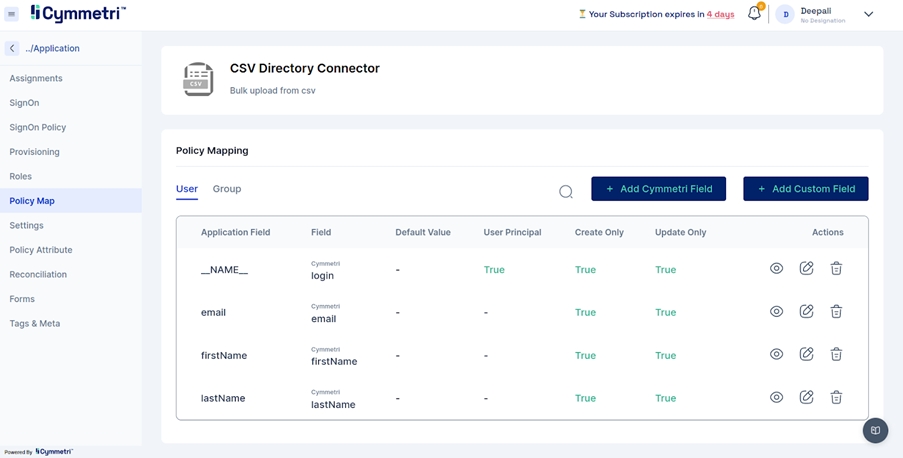
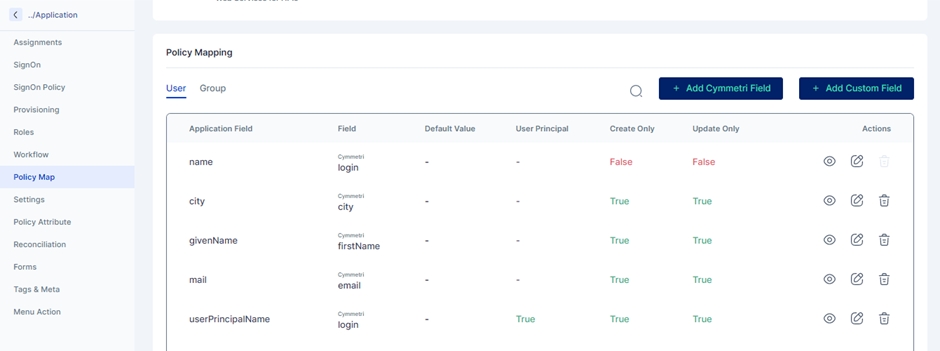
Policy Map - Mapping of Cymmetri and Active Directory attributes.
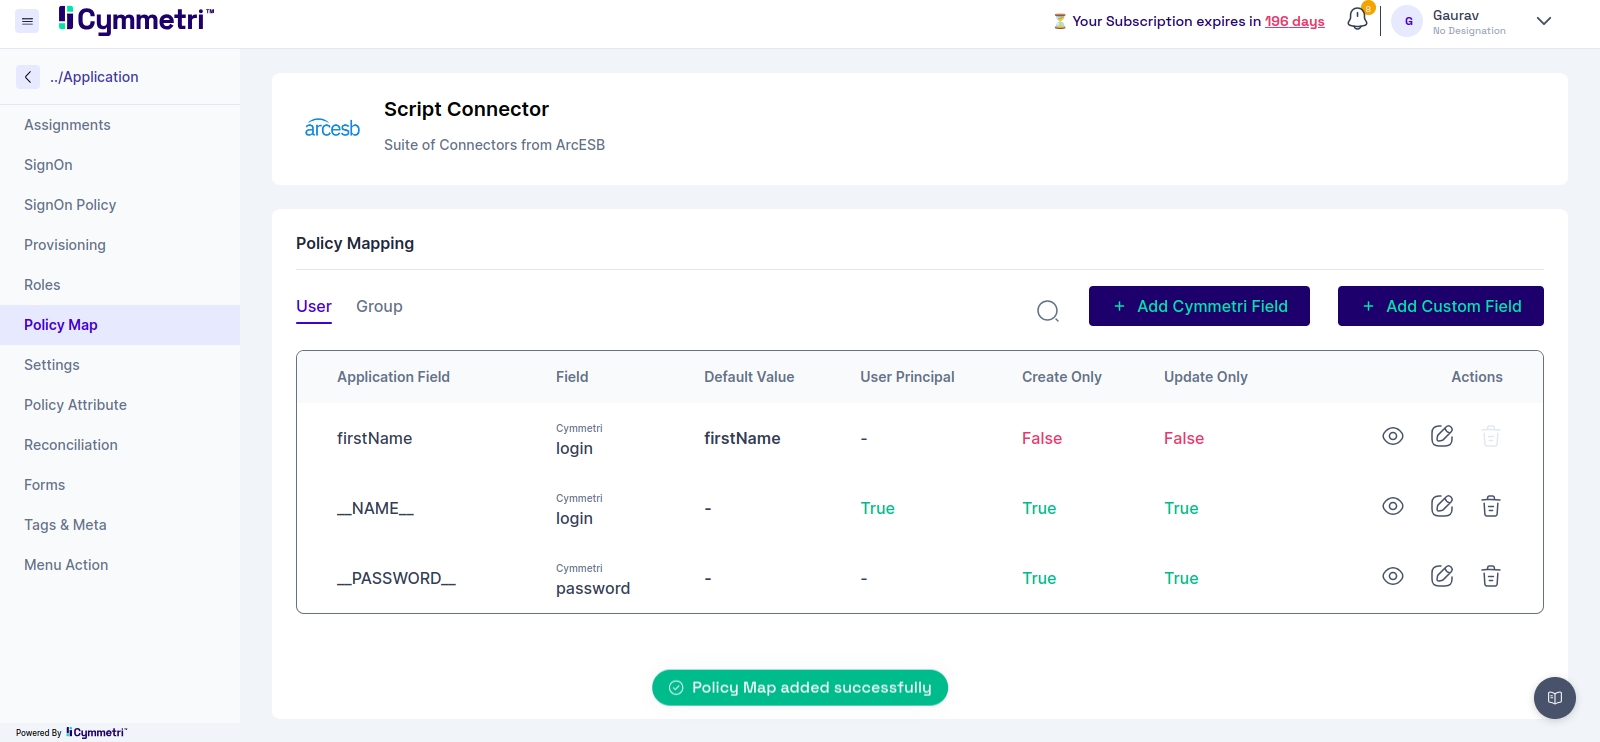
You will see that the attributes are set to False by default. Our first step in the mapping process is to enable the attributes for syncing.
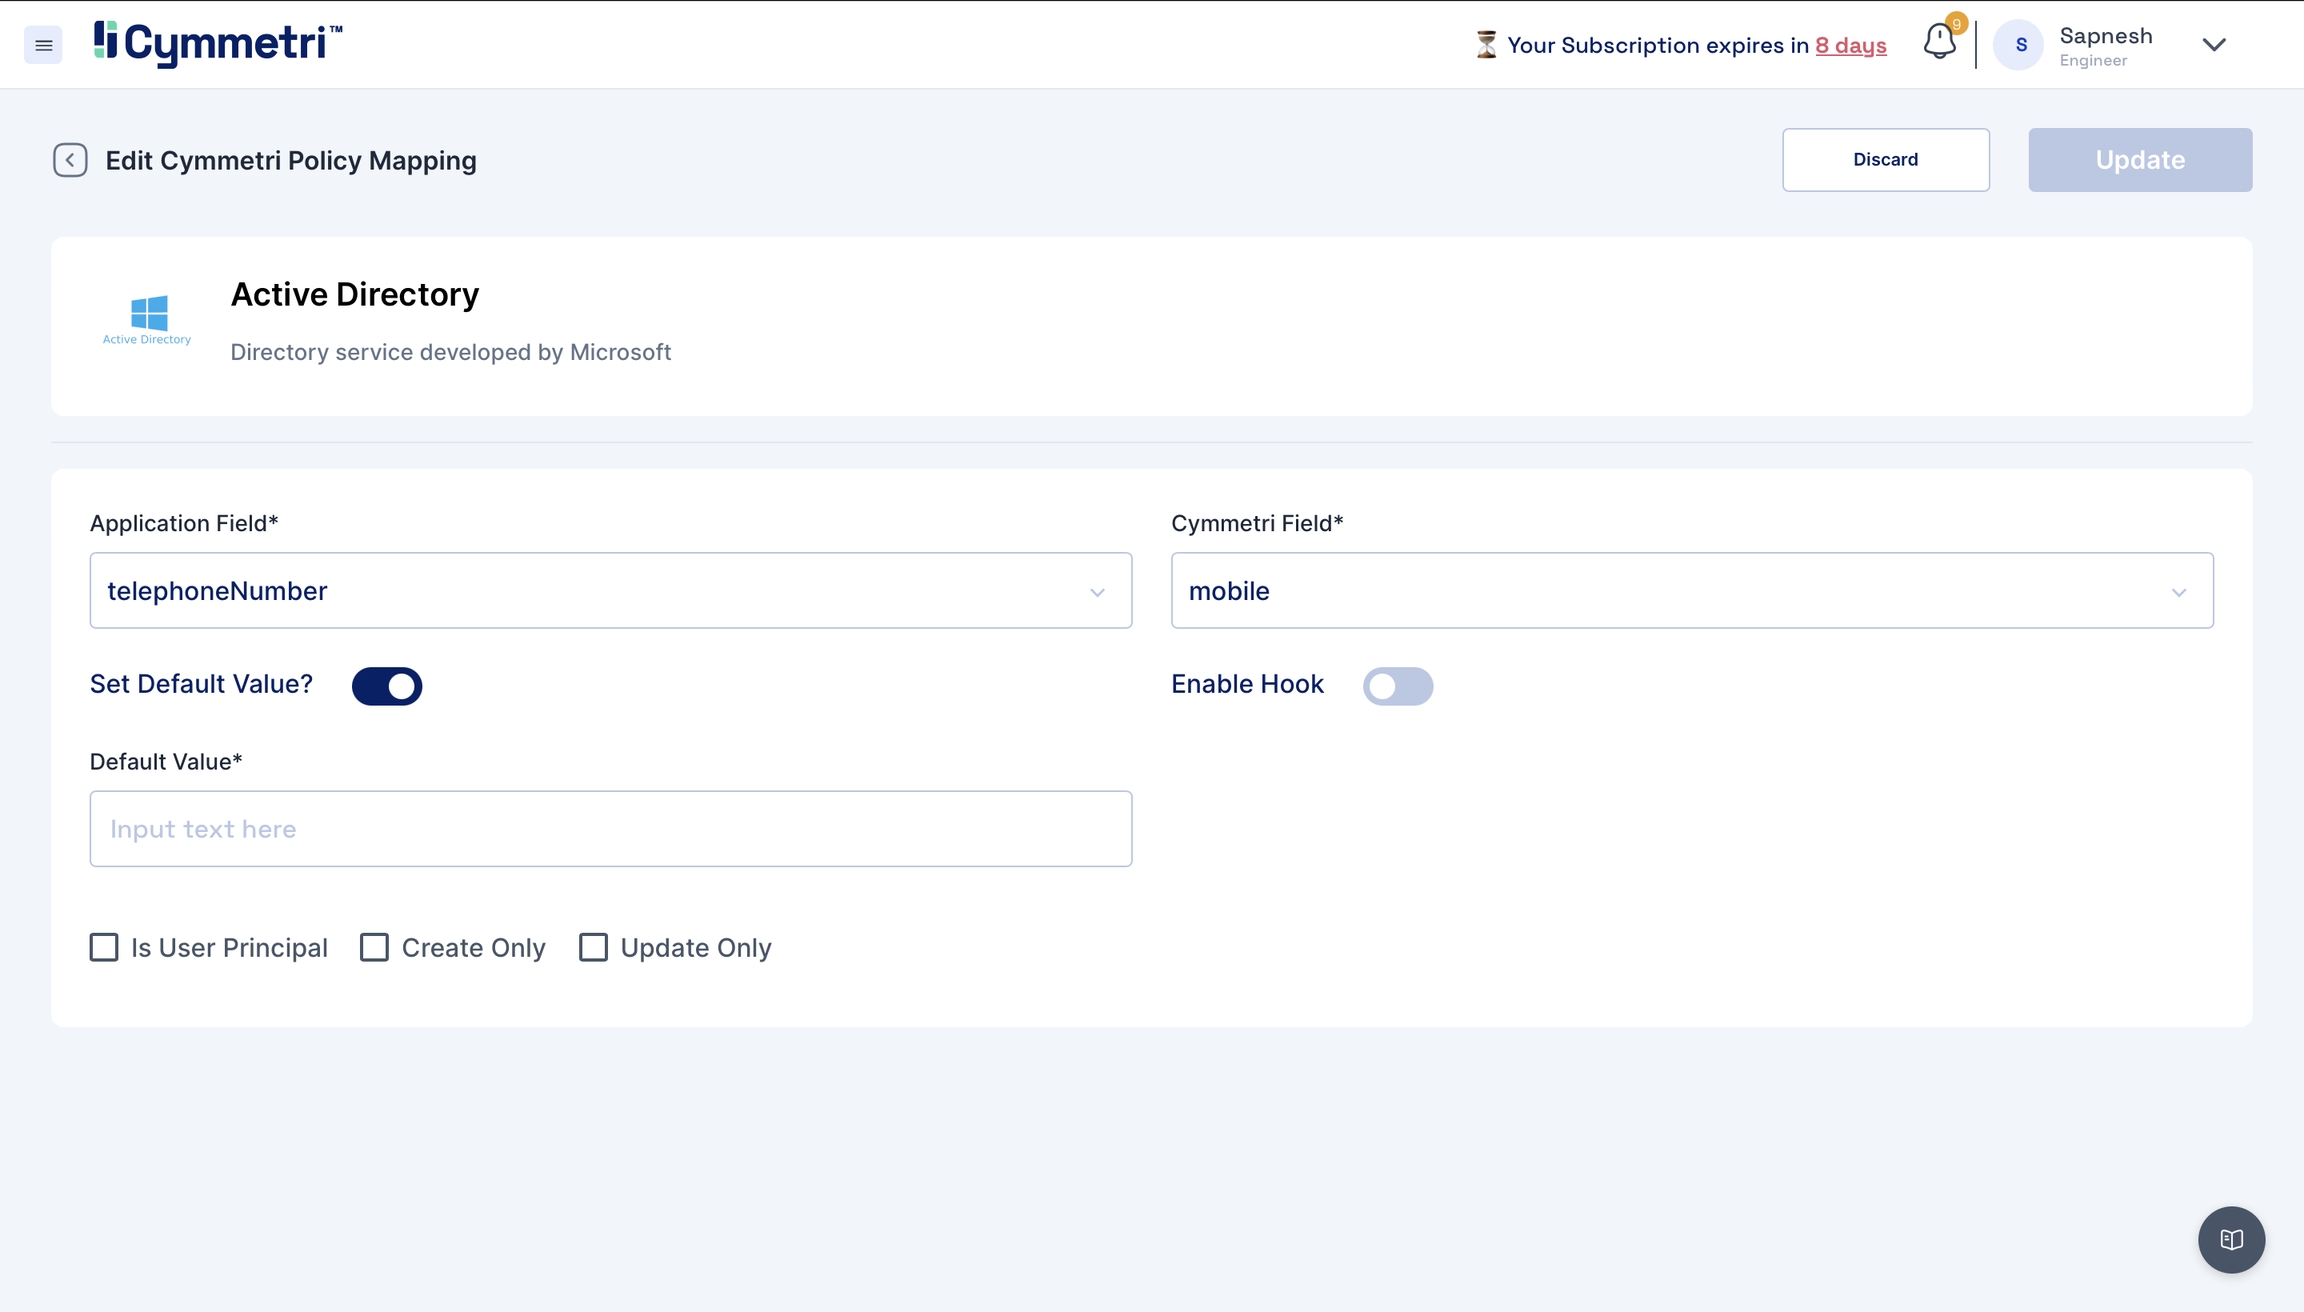
Click on the edit button next to the 'Application Field' name.
The 'Application Field' indicates the Active Directory field name, and the 'Cymmetri Field' indicates the Cymmetri field name.
To map the attributes, we need to sync the attributes on create and update only. Hence, these checkboxes need to be checked.
The 'Set default value' field accepts the default value you enter here if the field is empty in Active Directory.
Next, click on the 'Update' button.
Similarly, repeat this for all attributes.
One exception is the sAMAccountName field. The 'Is User Principal' checkbox is enabled by default because it is the primary key (unique data) on the Active Directory side, and login is the primary key on Cymmetri side; leave it checked.
Some important policy map fields which need to be declared in the policy map are as follows.
__NAME__
Users Display Name
__PASSWORD__
Users password
sAMAccountName
Unique login attribute
cn
Unique login attribute (specific to user)
rdn
Used to pass the OU (Organization Unit) path
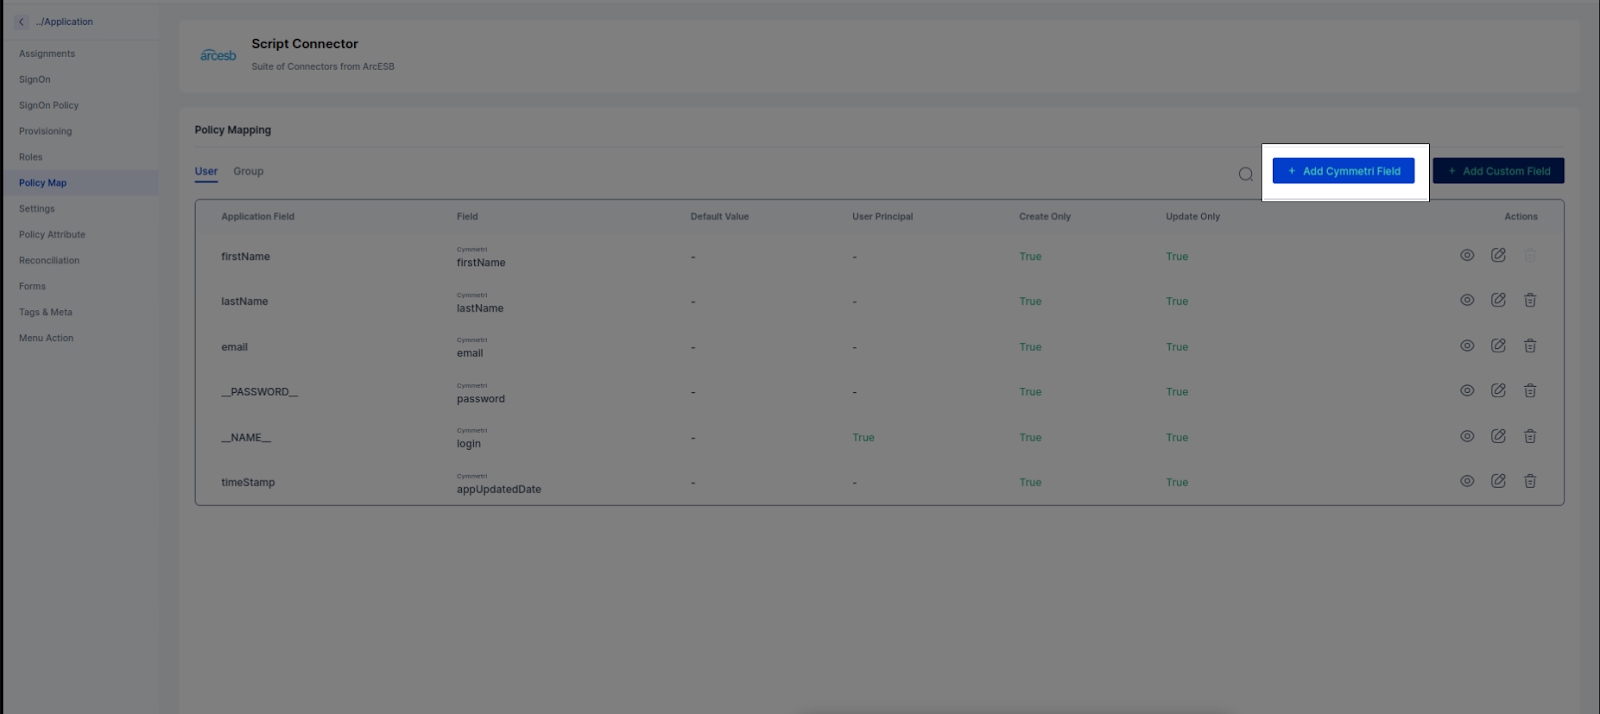
If any attribute is missing from the policy map but present in your policy attribute. Add it by clicking the 'Add Cymmetri Field' and follow the same steps to map it to the appropriate field.
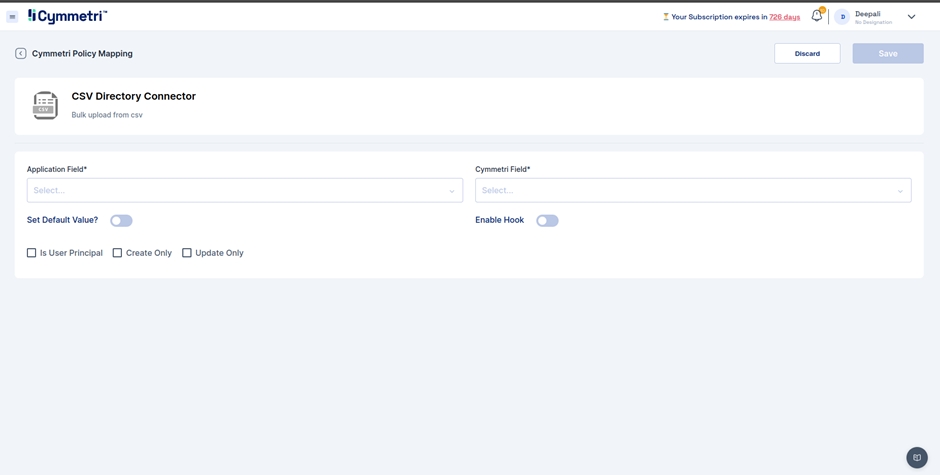
If you want to add a new field that is not present even in Cymmetri, click on the 'Add Custom Field' button. For group provisioning, the memberOf attribute must be configured with the memberOf attribute from the custom attribute.
Every organization has its own custom implementation scenarios such as duplicate checks for login id, emails and displaynames; similarly provisioning to specific AD OUs based on various conditions. Hooks allow to transform the data and execute the validation rules as per the custom implementation scenarios.
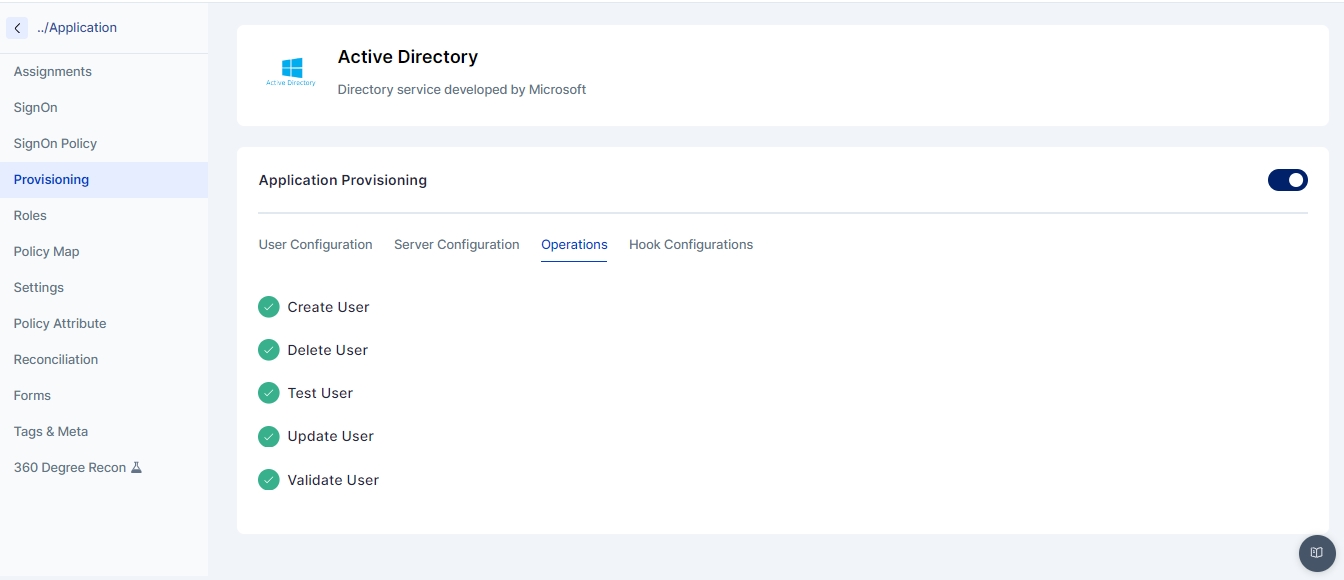
The connector server is a tool that provides different connectors that enable various provisioning operations from different sources to Cymmetri. Below you may see that Cymmetri supports all the various lifecycle operations needed to seamlessly perform various user operations.
In our case, we will prepare the connector server to work with the Active Directory source.
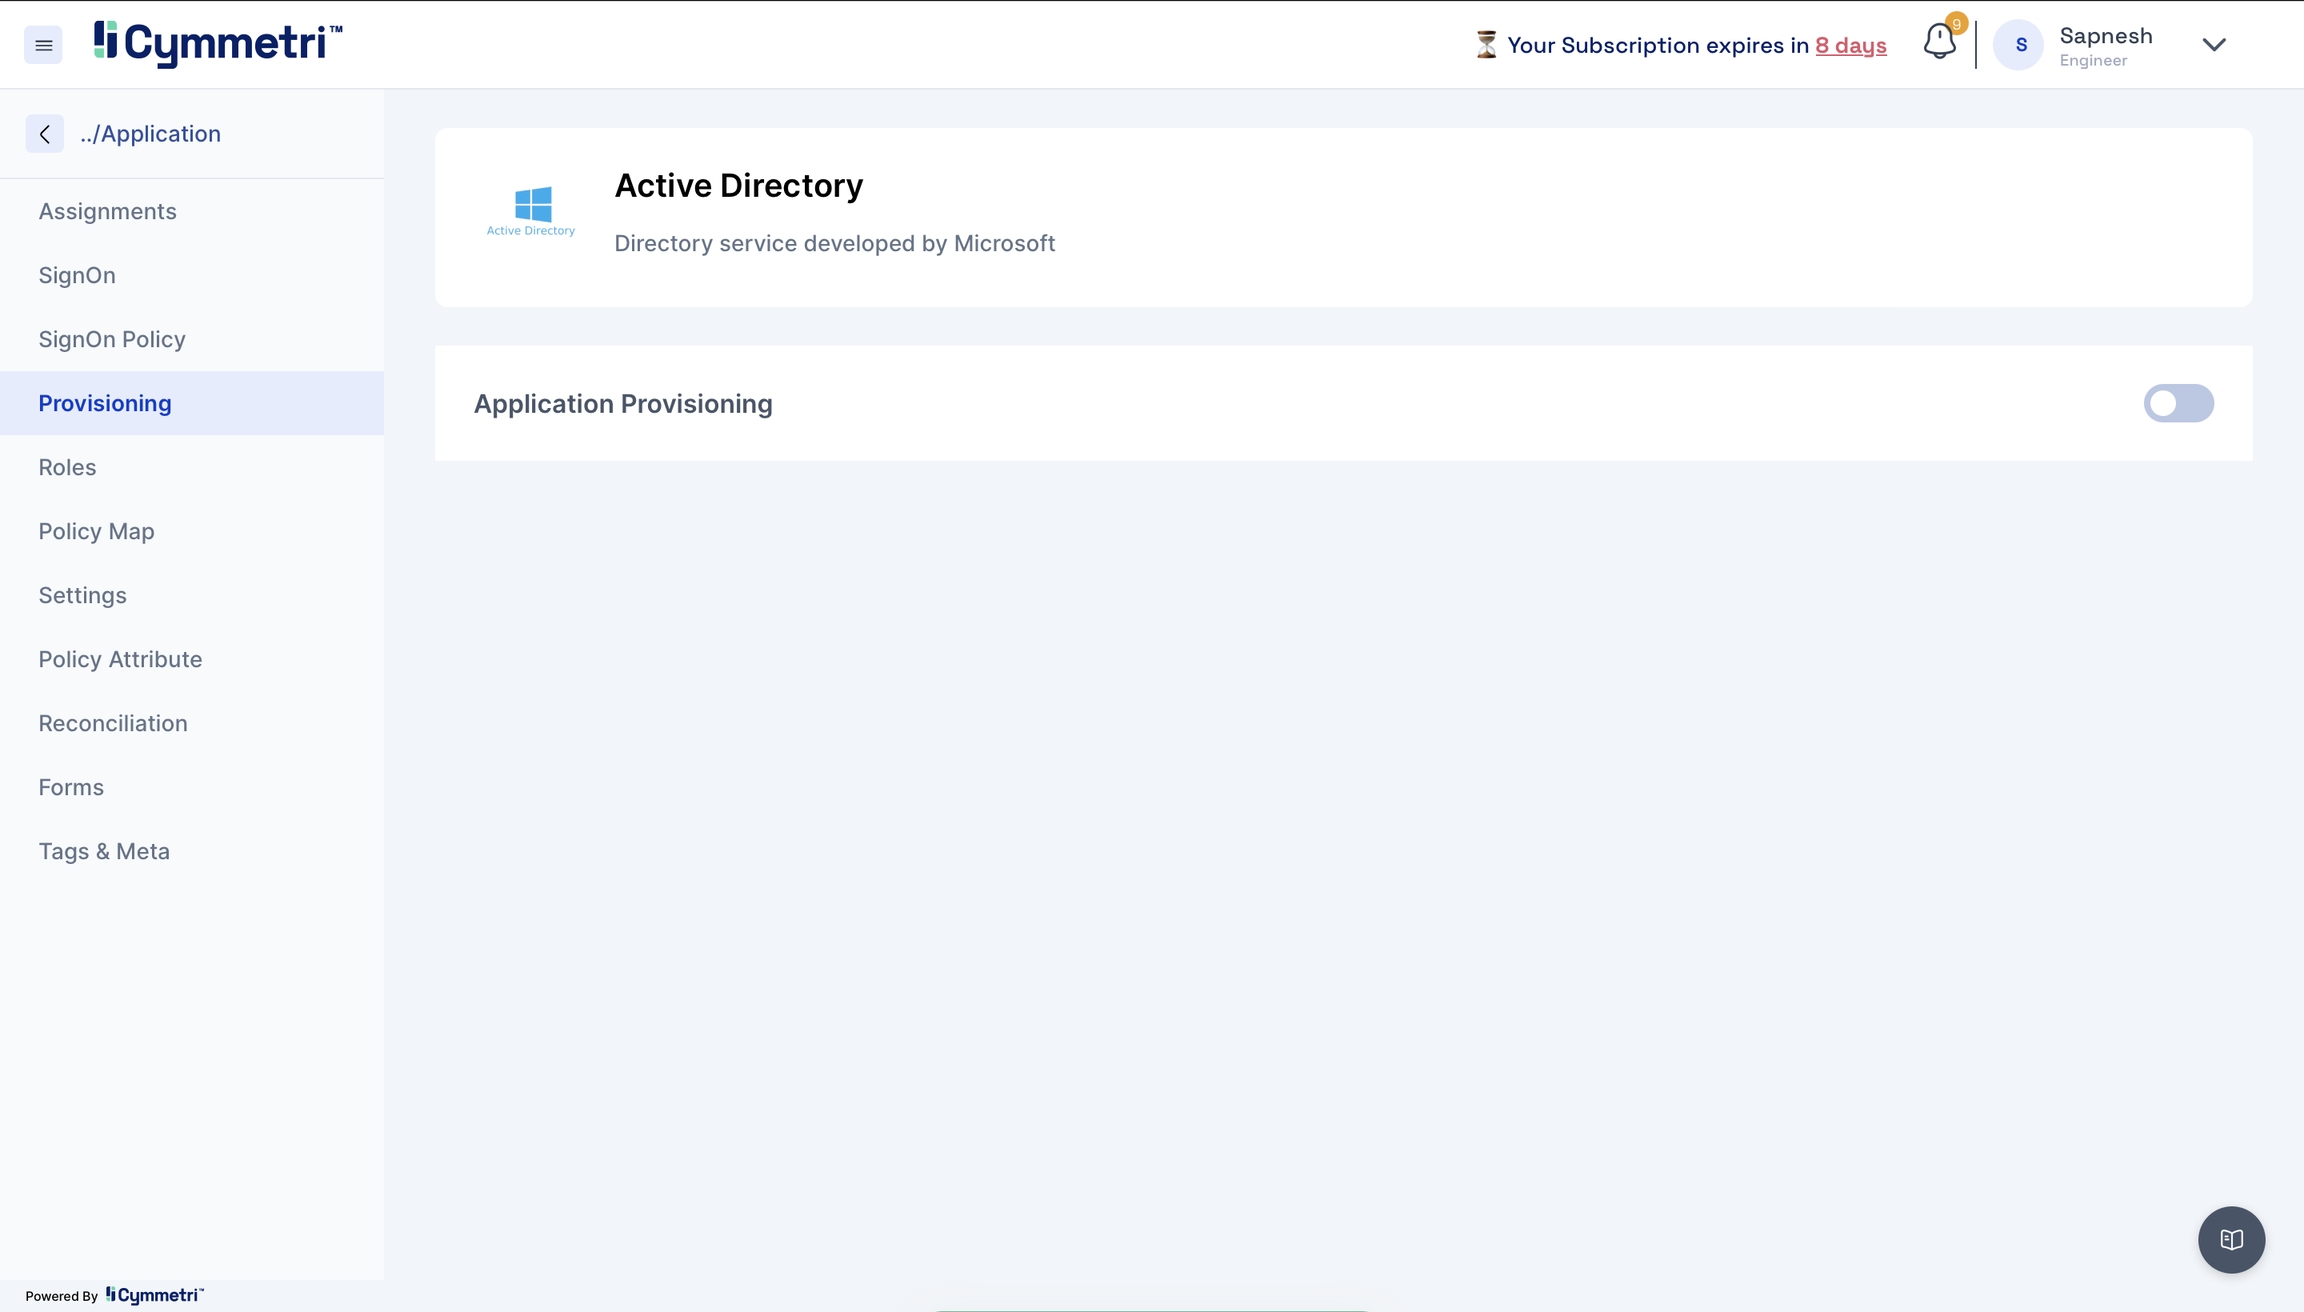
Click Provisioning from the left navigation bar and enable application provisioning by sliding the slider button.
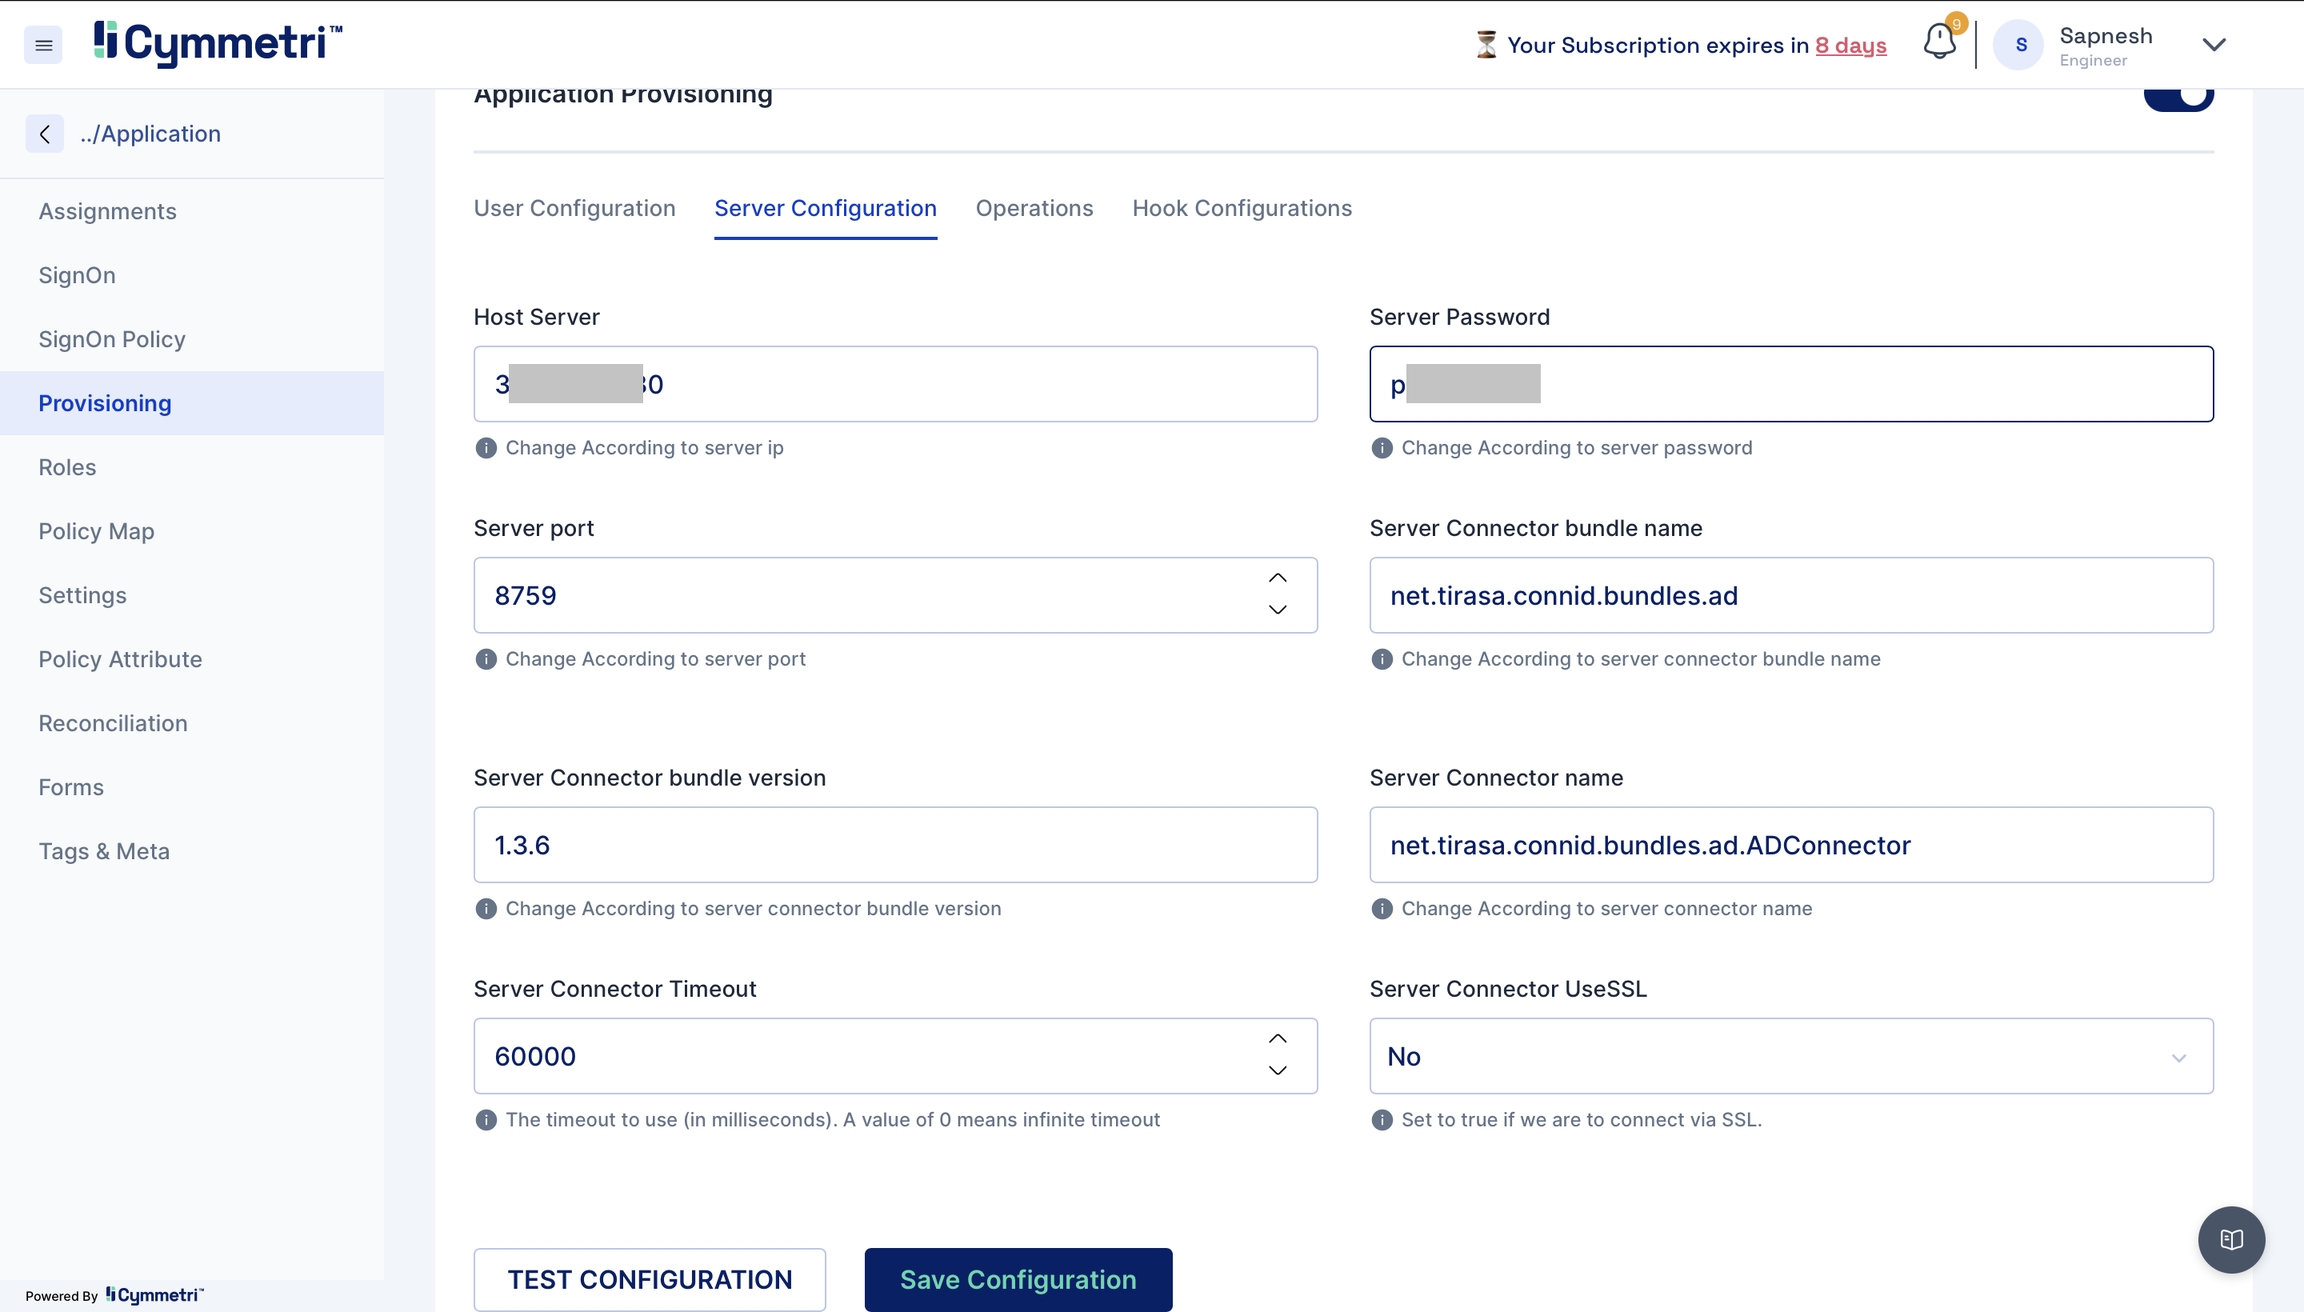
Once you enable the application provisioning, you must take care of two configurations to successfully provision Active Directory data to Cymmetri.
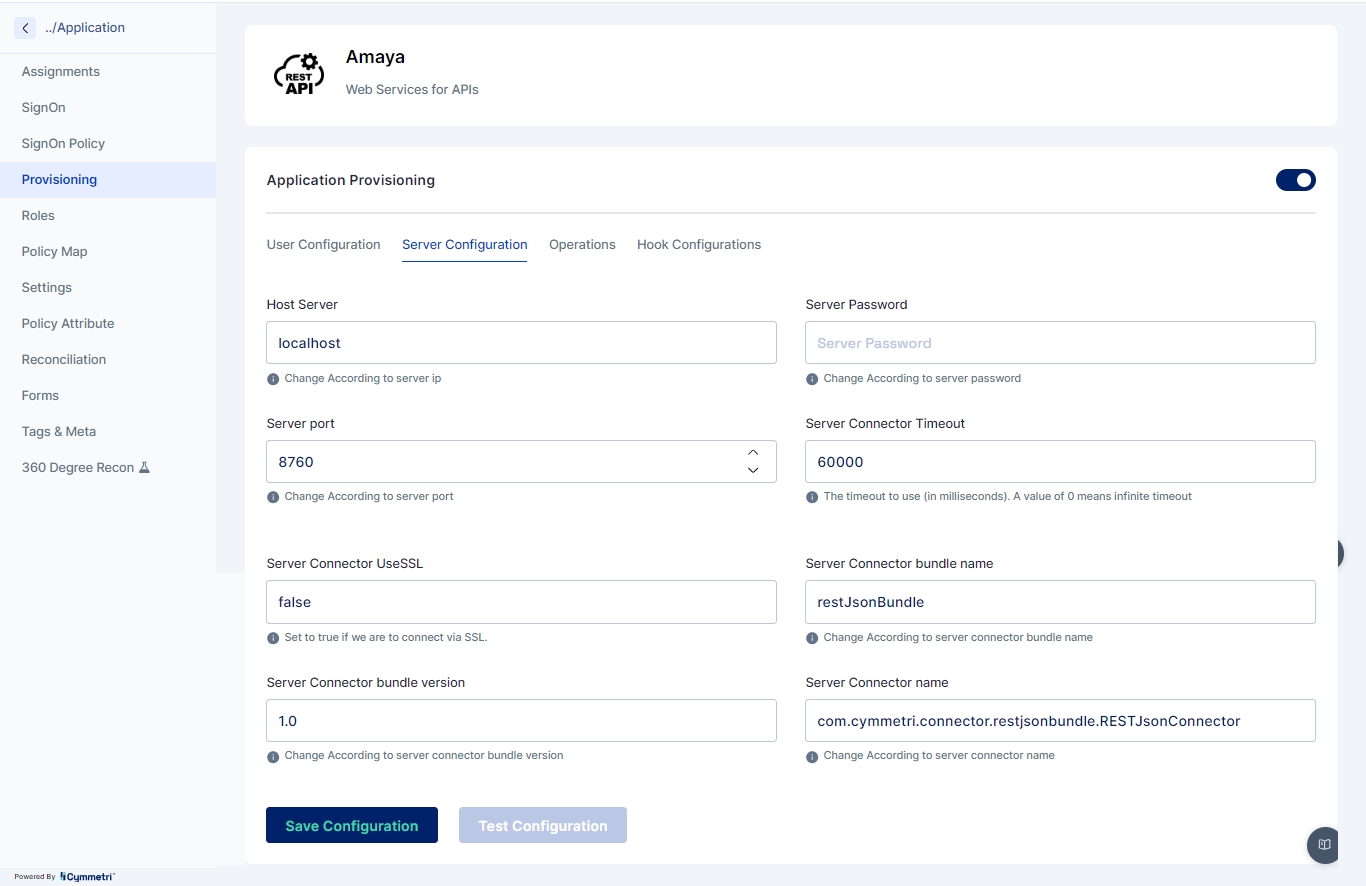
Server Configuration - Consists of configuring the connector server.
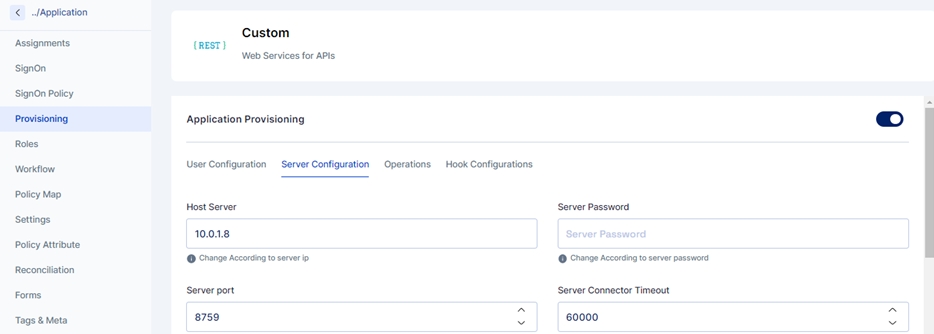
Enter the IP address of the host server and its password. The rest of the fields come pre-filled with default values; you can change them according to your use case. Next, click on the save configuration button.
Host server
The IP address of the host server
Server port
Port of the host server
Server Password
Host Server password
Server connector bundle version
Version number of the connector server bundle
Server connector bundle name
Name of the connector server bundle
Server connector name
Given name of the connector server
Server Connector Timeout
Timeout of the connector server in milliseconds
Server Connector UseSSL
Connector server SSL configuration
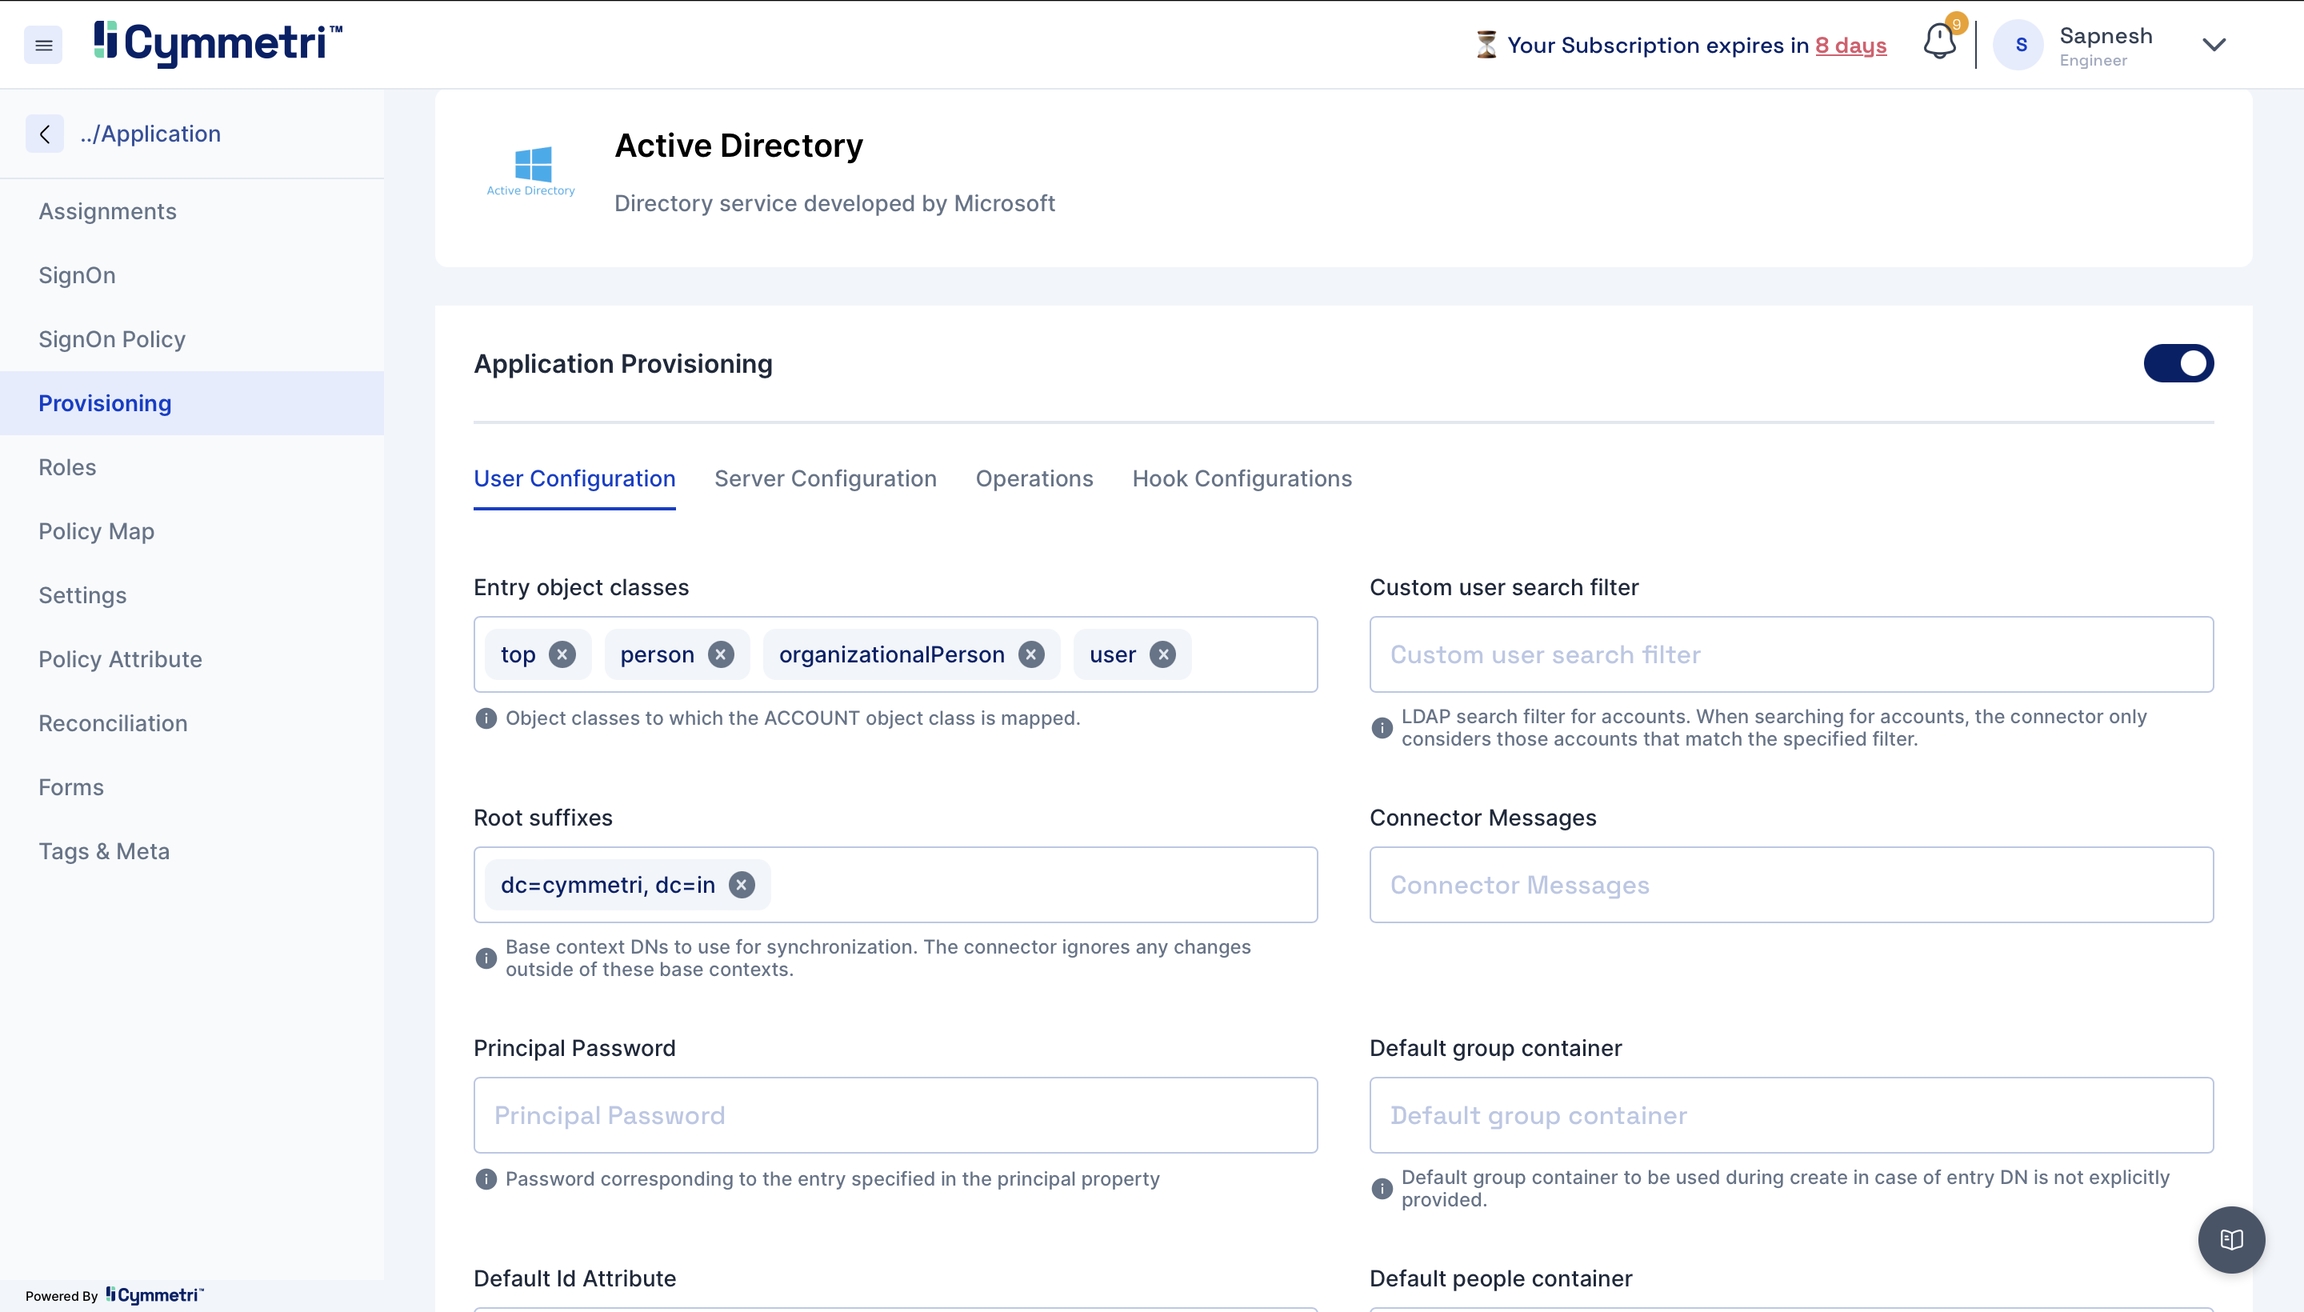
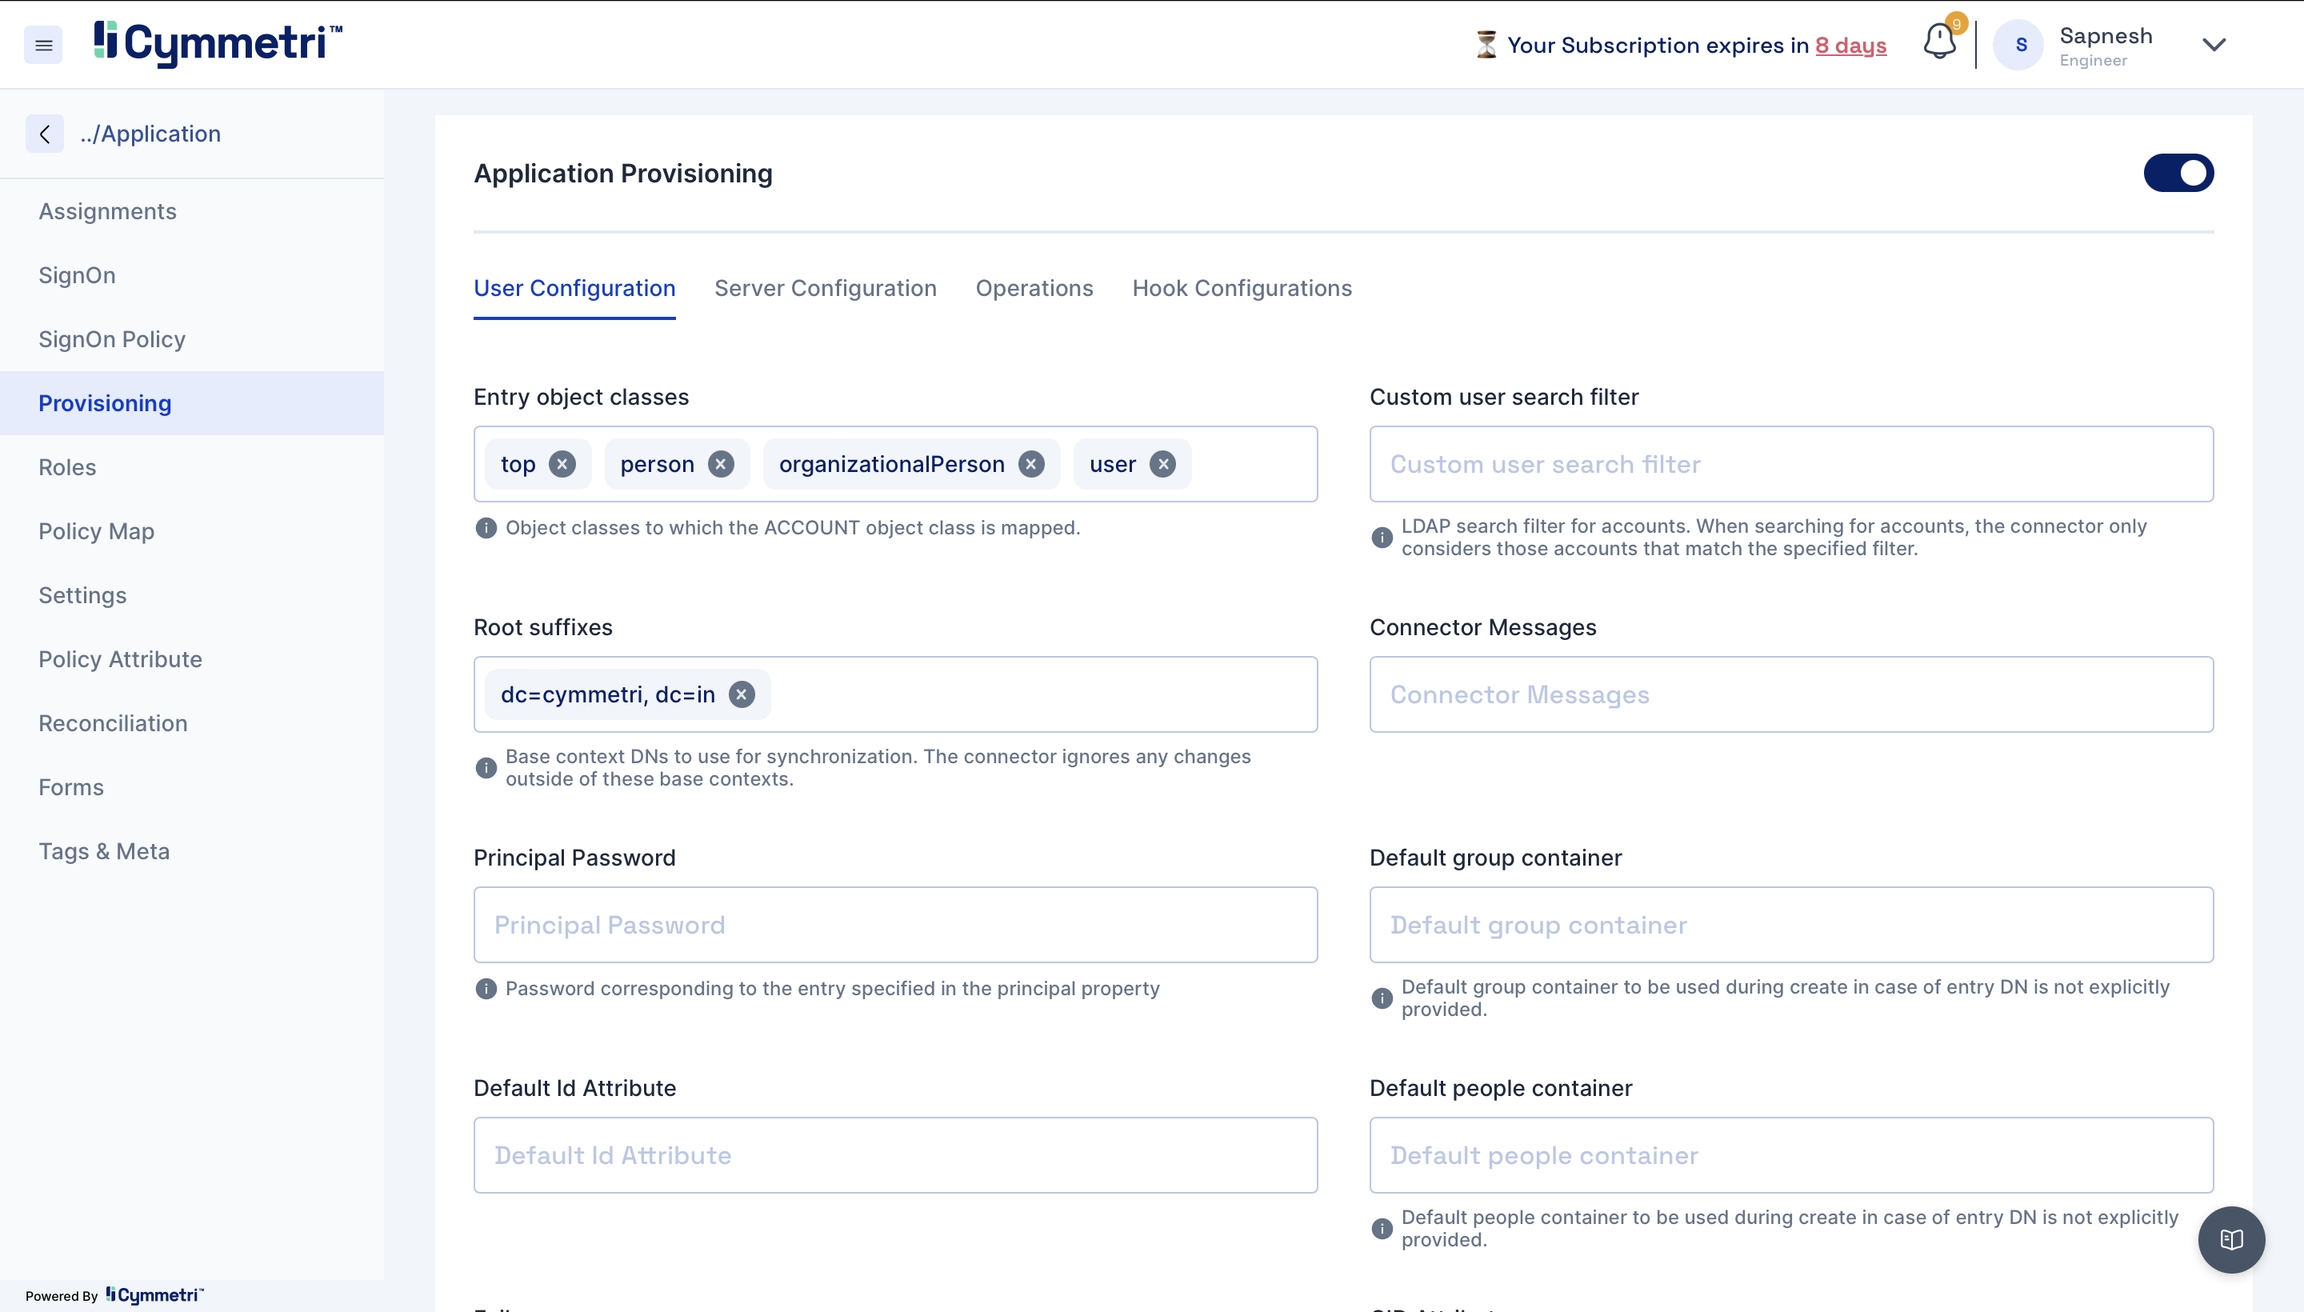
User Configuration - Consists of all user settings like domain name, search filter, etc. We can also configure an OU (Organisational Unit) in this window.
Entry object classes
Object classes to which the Account class is mapped
Root suffixes
Display names used for Active Directory synchronisation to Cymmetri, such as domain controller name
Principal password
Admin password to connect to Active Directory
Default id Attribute
Default attribute Id
Custom user search filter
Search filter used to search accounts
Connector messages
Custom connector messages
Default group container
Default group container can be used during create operation in case of entry DisplayName is not explicitly mentioned
Default people container
Default people container can be used during create operation in case of entry DisplayName is not explicitly mentioned
Group owner reference attribute
Group attribute referencing (by DisplayName) the users members of a group
Custom group search filter
User search filter for groups
Group search scope
Choose object, onlevel or subtree
Server hostname
Active Directory server hostname that would connect to Cymmetri
Conservative membership policy
Conservative management of assigned groups. The groups already assigned to an user on Active Directory will not be removed.
Memberships
Groups to identify users to synchronize. The connector ignores any changes about users not member of indicated groups.
Verify memberships in OR
Indicate if specified memberships must be verified using 'OR' logical operator.
Object classes to synchronise
User object classes to synchronise. The connector ignores any changes if it cannot find modified entry object classes in this property.
Page size
Get users from Active Directory with the provided size
Pageable result
Get users from Active Directory with the provided size pageable result
Server port
Port of the Active Directory connector server
Principal
Admin username of the Active Directory
Permit password update only
Permit password update only.
Create/delete operation will be denied, while other attributes update requests will be ignored.
Retrieve deleted groups
Indicate if deleted groups must be synchronized also.
Retrieve deleted users
Indicate if deleted users must be synchronised also.
SSL
True if the SSL certificate is configured
Trust all certs
Indicative if all server certificates can be trusted
UID attribute
Unique Identifier Attribute
Base context for user entry searches
Display the Name of OU (Organization Unit), Root domain or Root controller required for user entry search
User search scope
The scope could be a subtree or object for user search
Note - You would need to change the below fields as per your organisation:
Root suffix - Add your domain name here.
Principal Password - Add your server password here.
Server Hostname - Add your server name here.
Principal - Add your admin Display Name of the Active Directory.
The base context for user search - You can add your Organisation Unit here.
The base context for group search - Add the base context to enable group search
Server port - Ensure that it is set to 636 for push
Page size- Define pageable result count for users
SSL - True is SSL is configured
Trust all certs - True.
Disable User OU Movement - Provide the path for disabling OU movement here.
Click on the save configuration button. Next, click on test configuration to see a successful toast message if your configuration is successful.
While configuring, you might encounter errors like:
Authentication exception - Failure due to incorrect username and password.
Solution - Keep all your necessary credentials handy and enter the details carefully
Socket timeout - Connection refusal by the target system
Solution - Please ensure your network connections are accurate to avoid socket timeout errors.
SSL issue - SSL issue occurs mainly if certificates are not configured correctly.
Solution - Follow the steps mentioned in Step 1 rigorously to import the Active Directory certificate to avoid SSL-related errors.
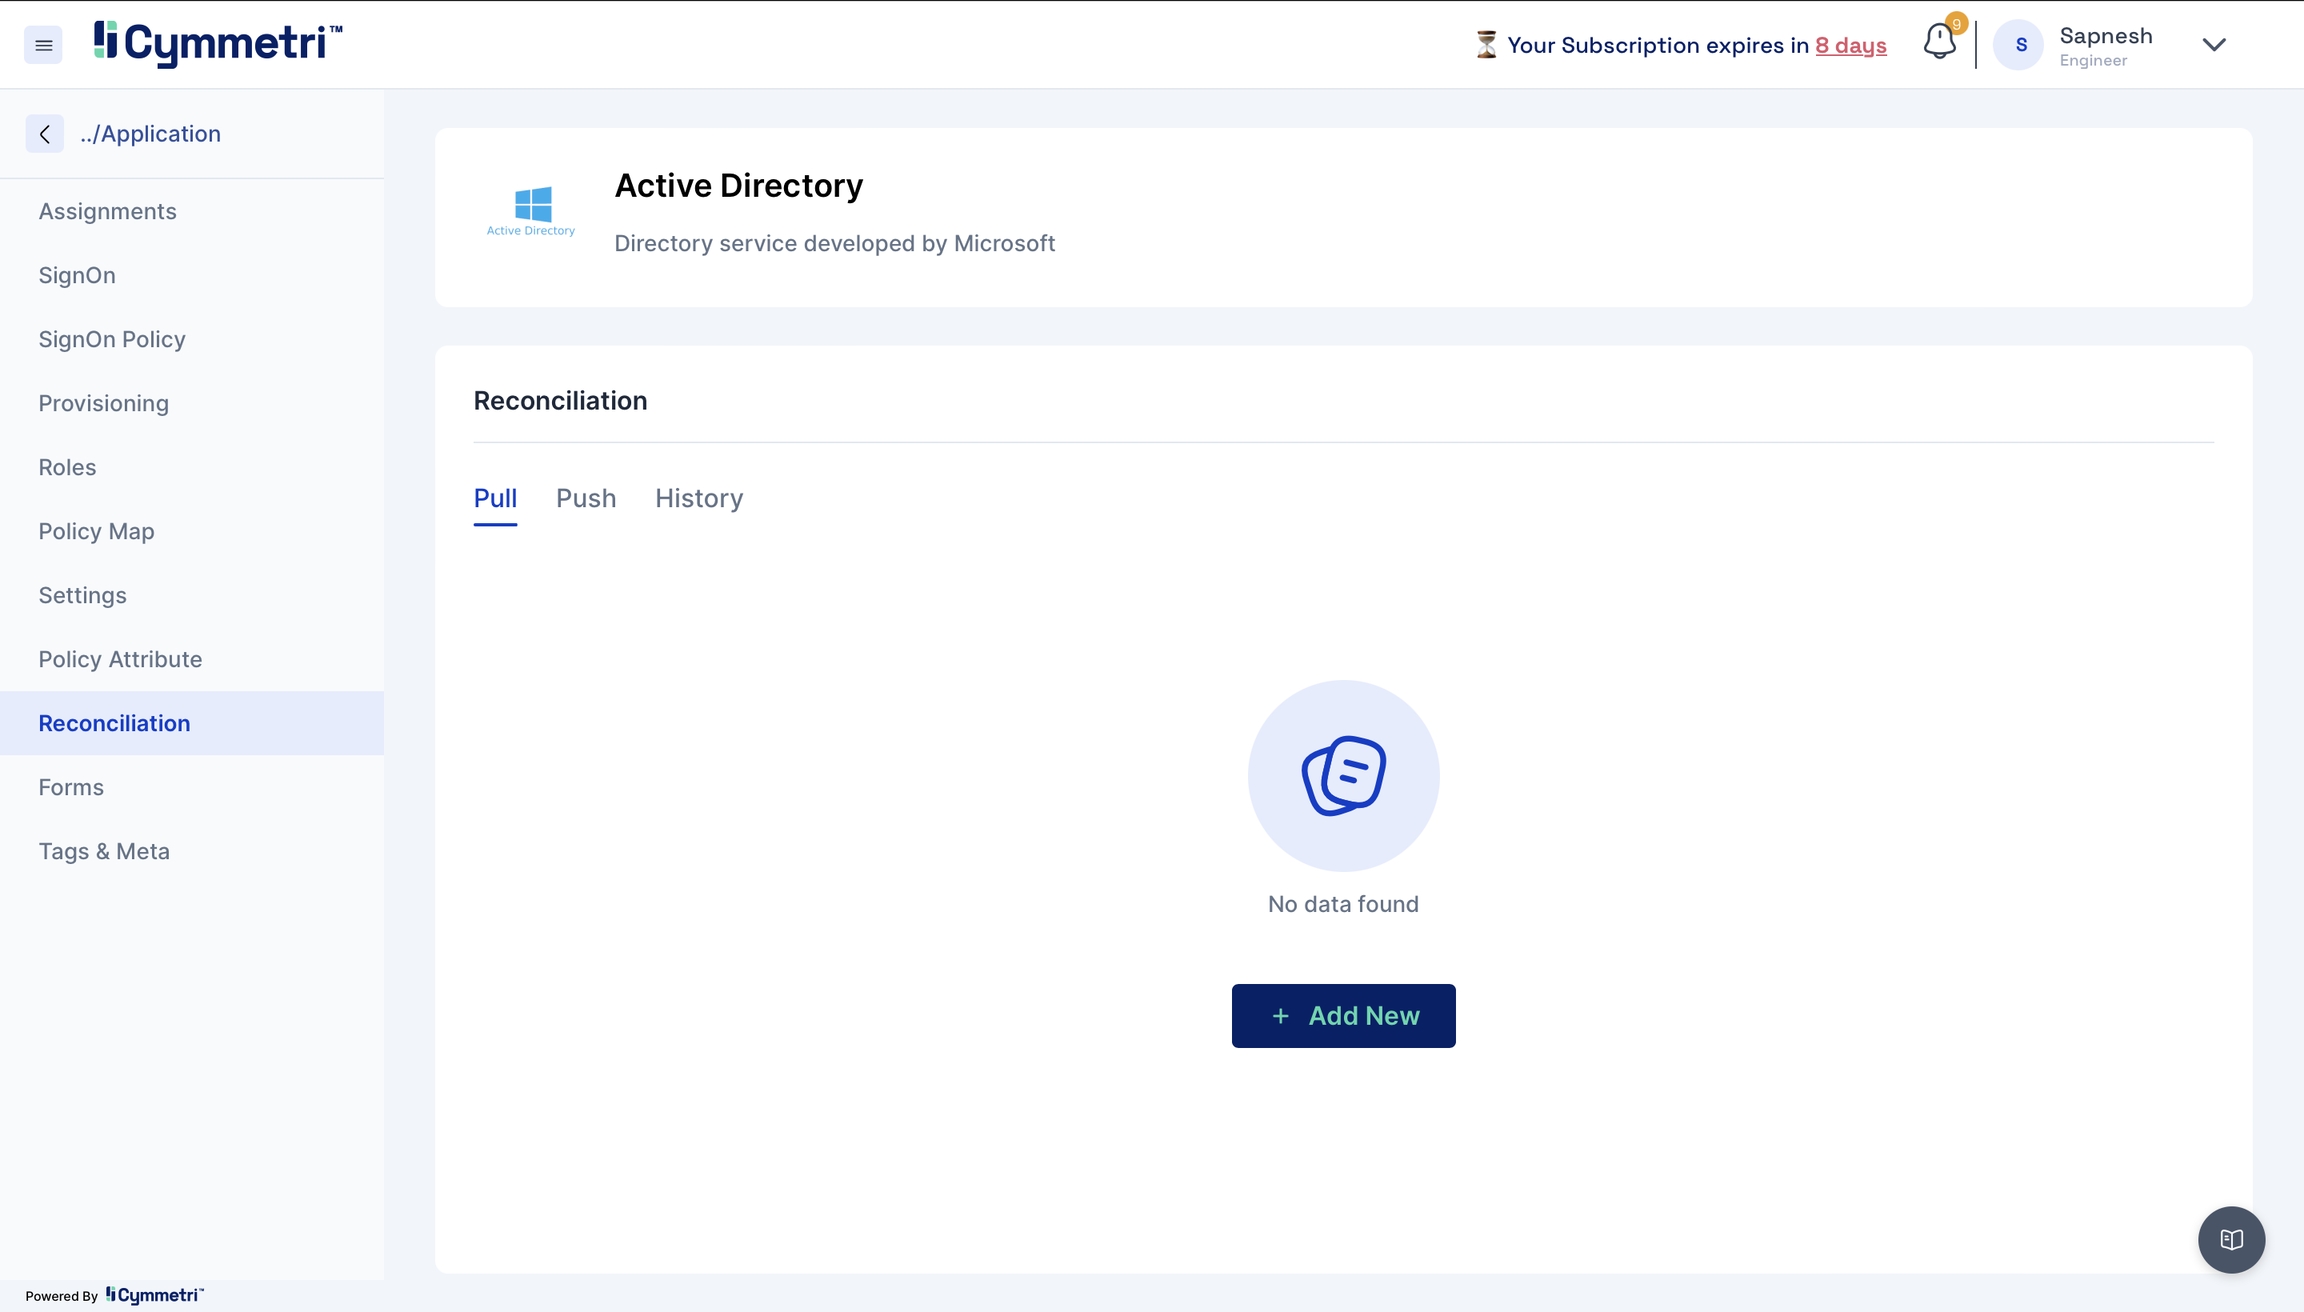
The last step of onboarding users is to add the users from Active Directory to Cymmetri by Reconciliation.
Pull users from your Active Directory to Cymmetri.
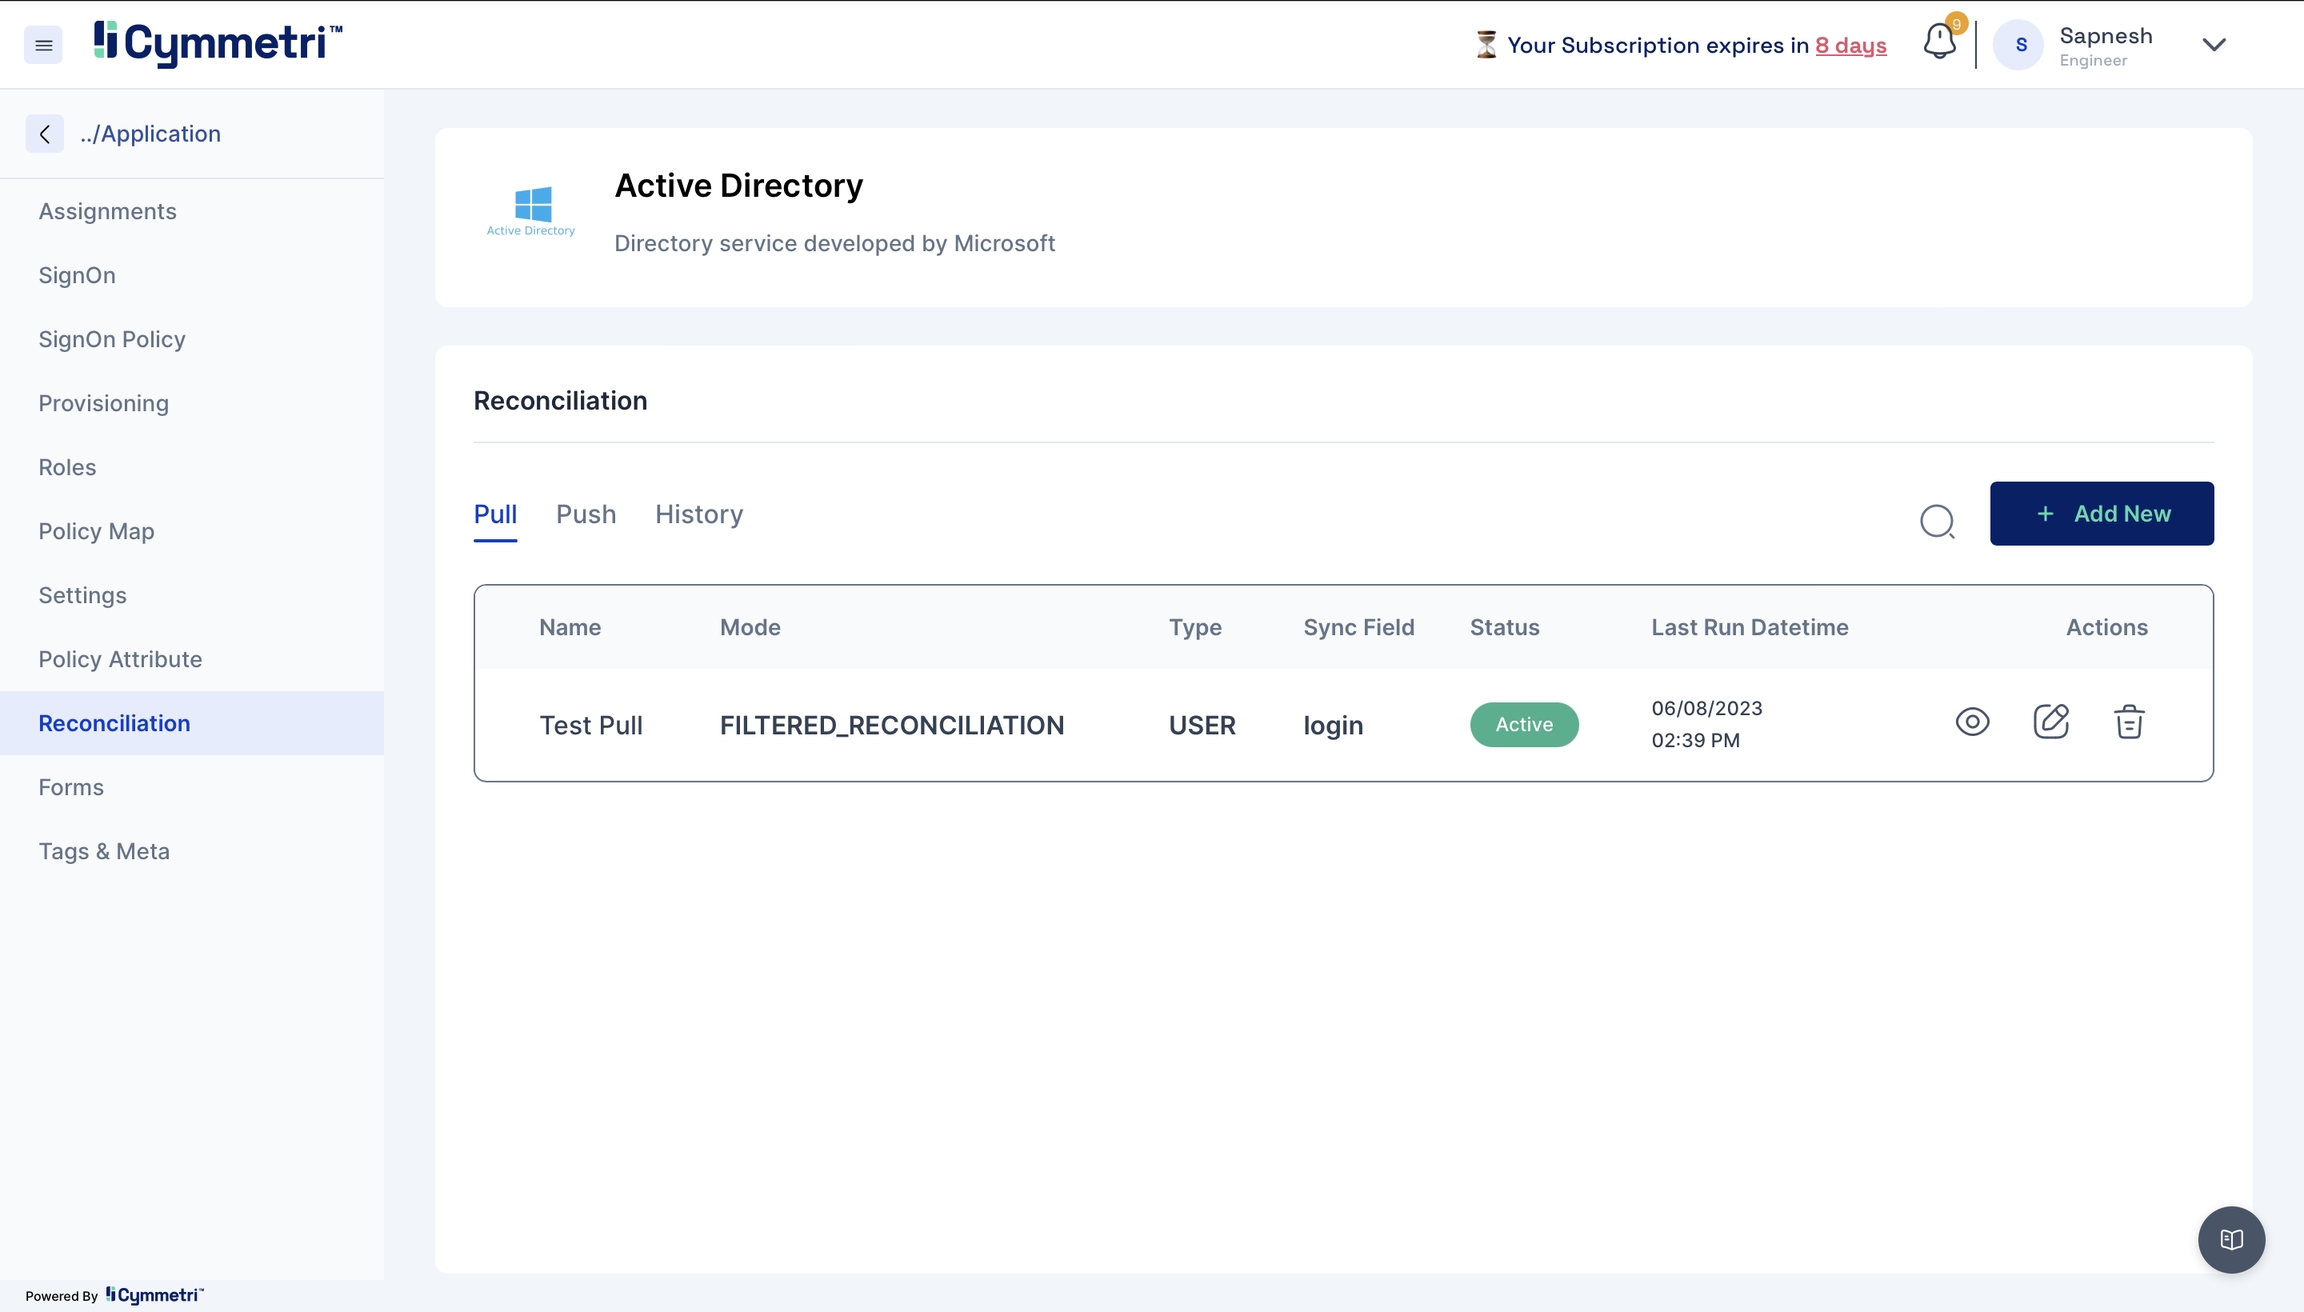
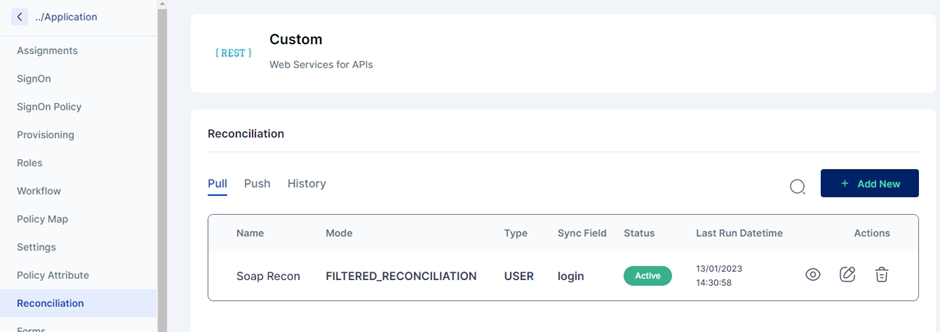
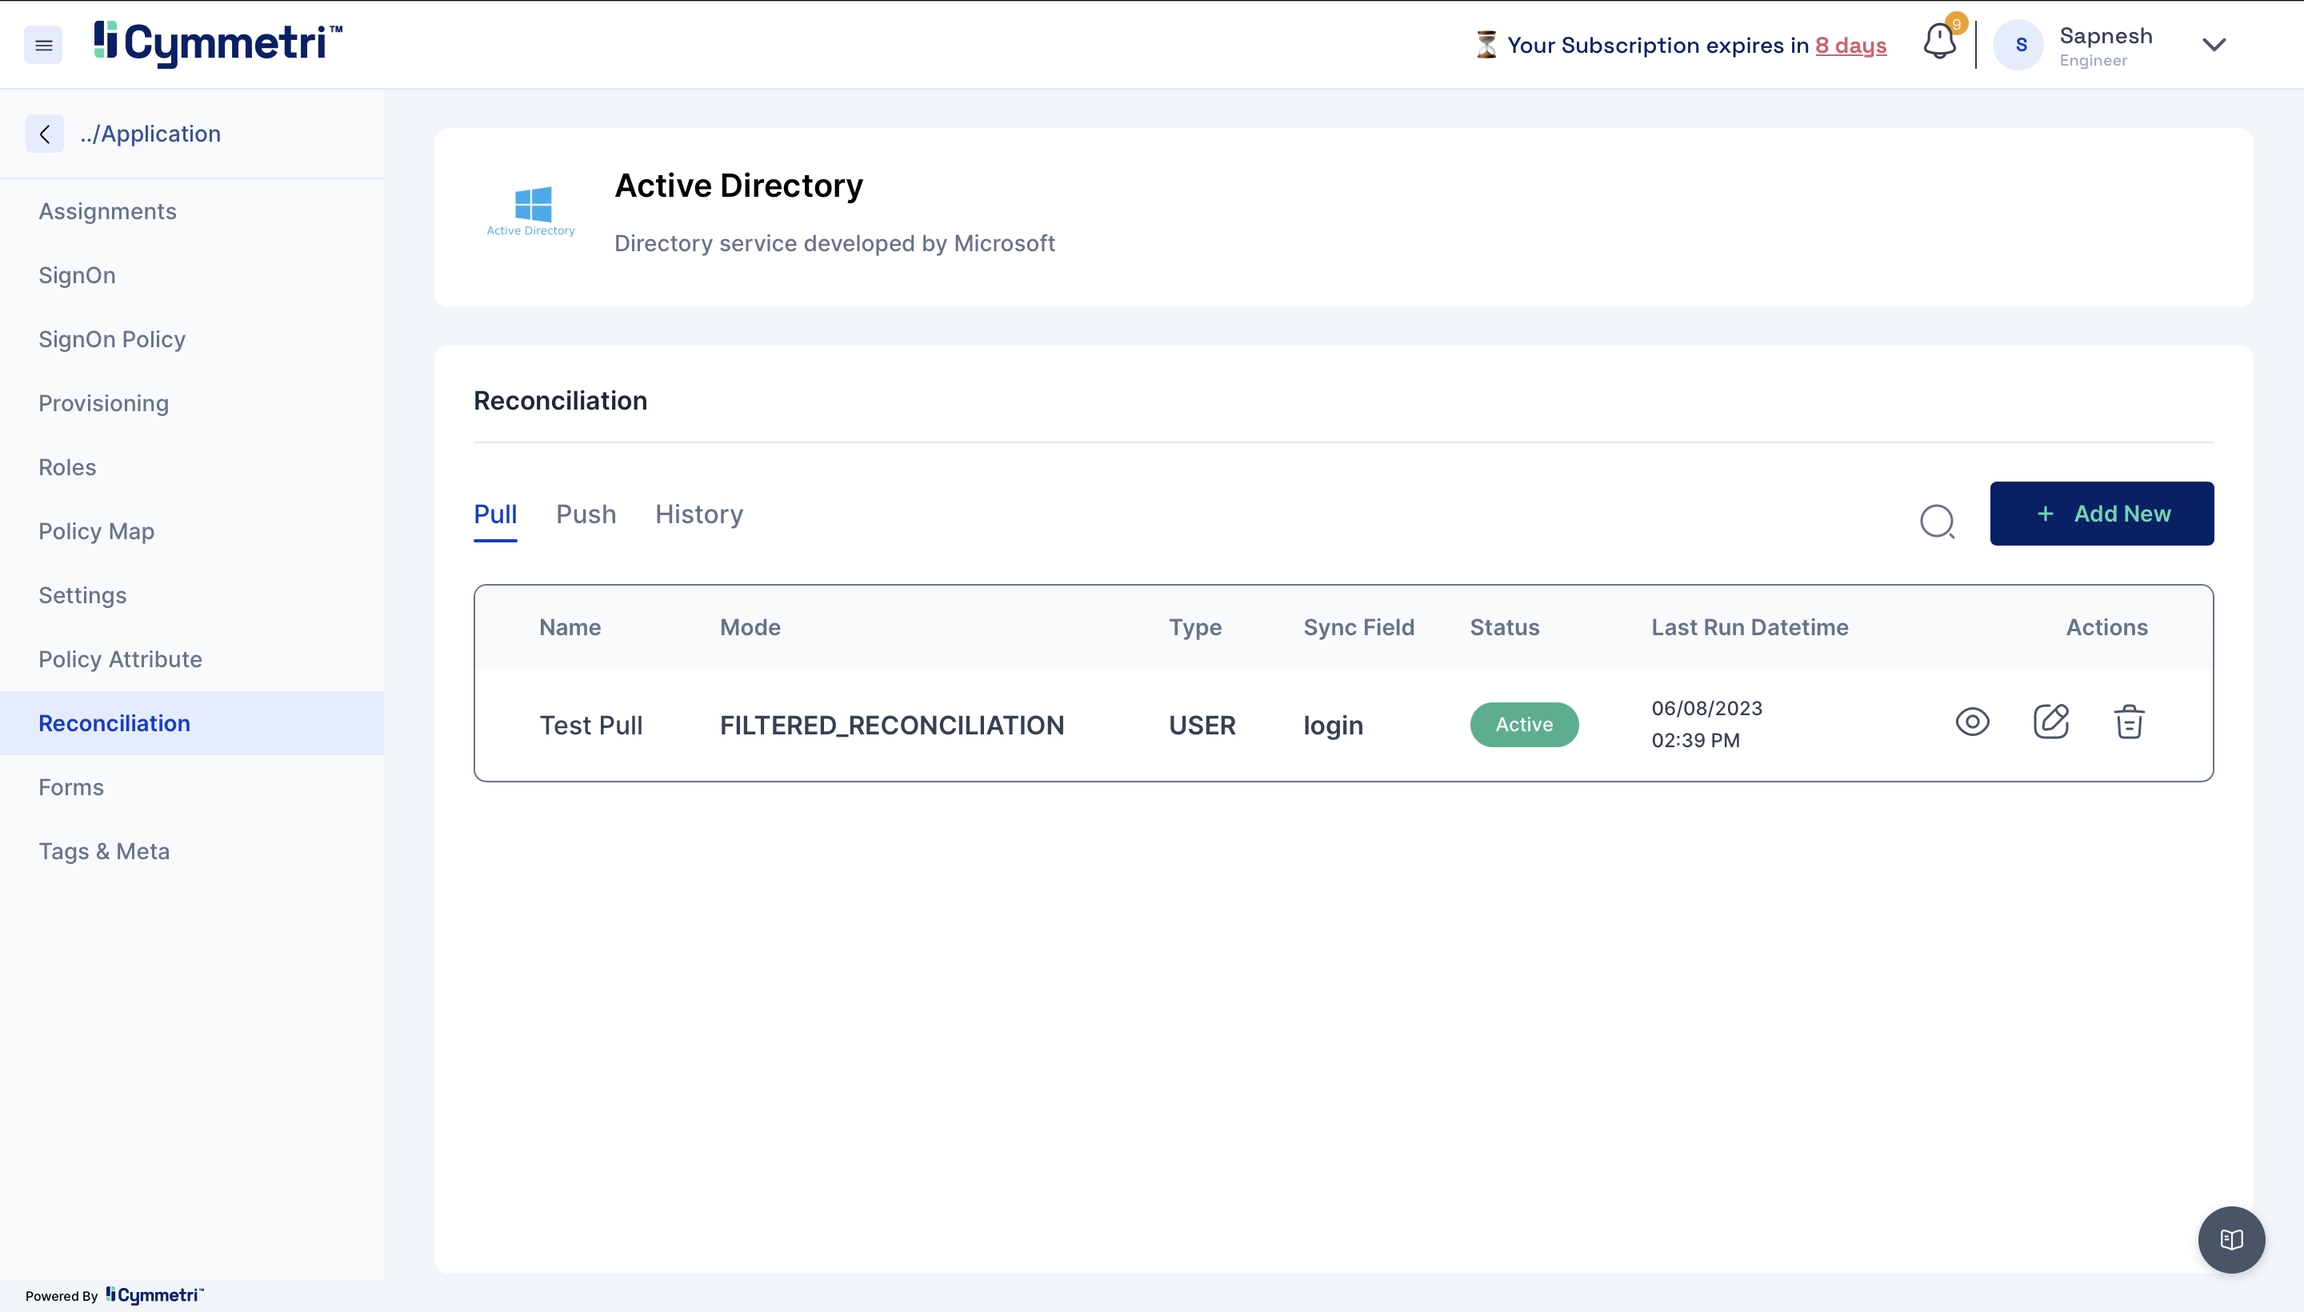
Click the 'Reconciliation' tab on the left navigation bar on the same page.
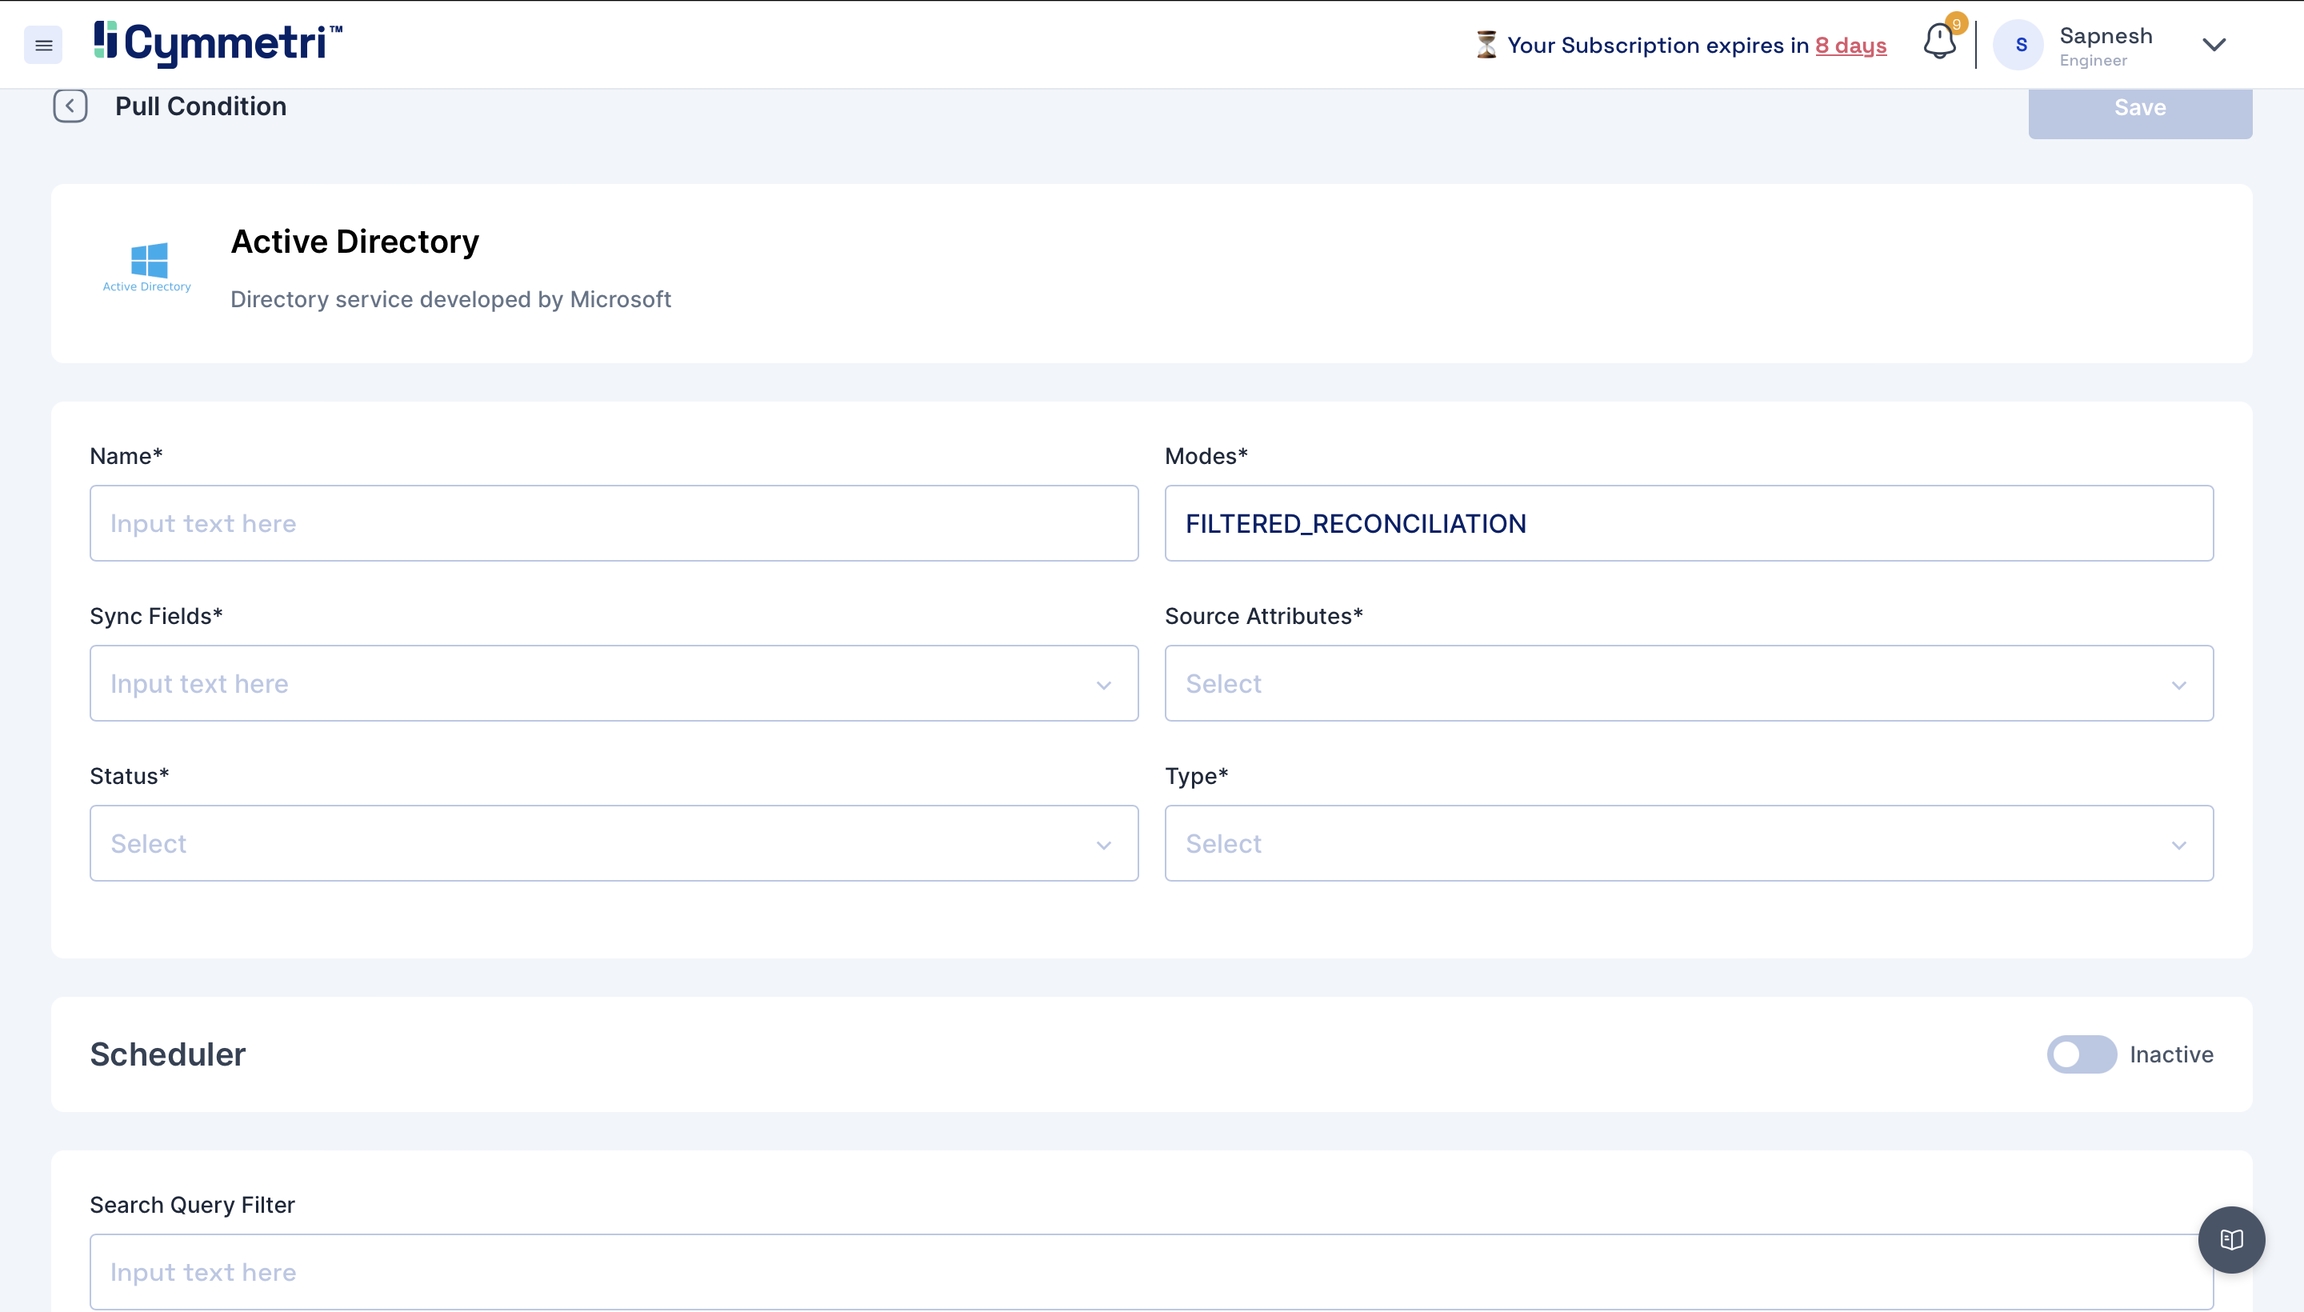
Next, click the 'Add New' button under the pull tab.
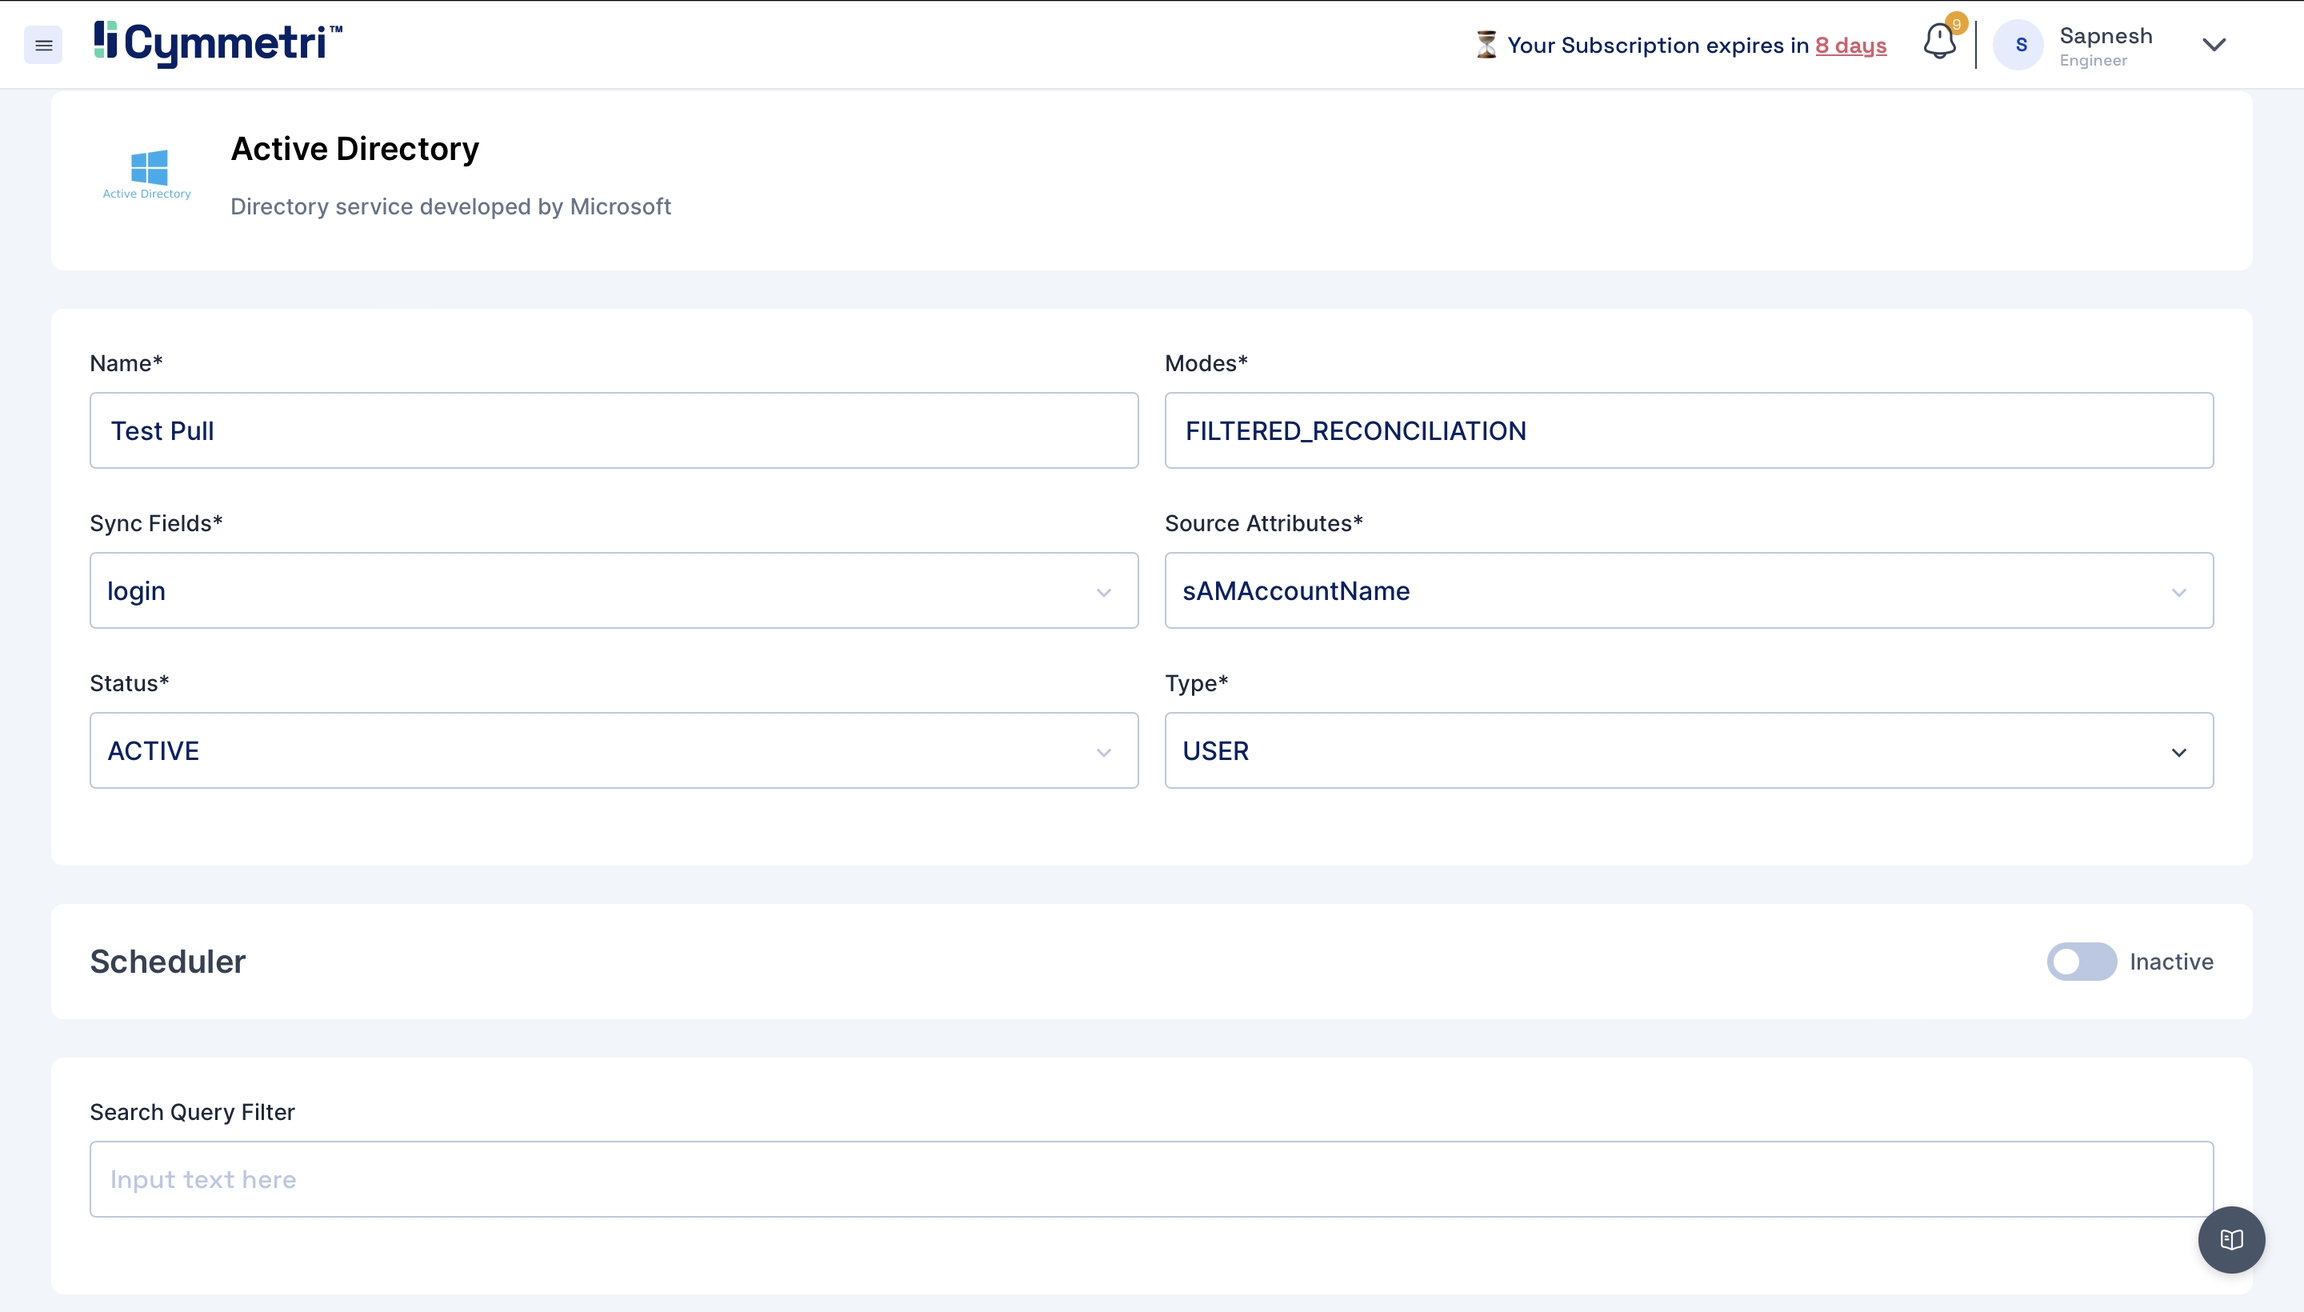
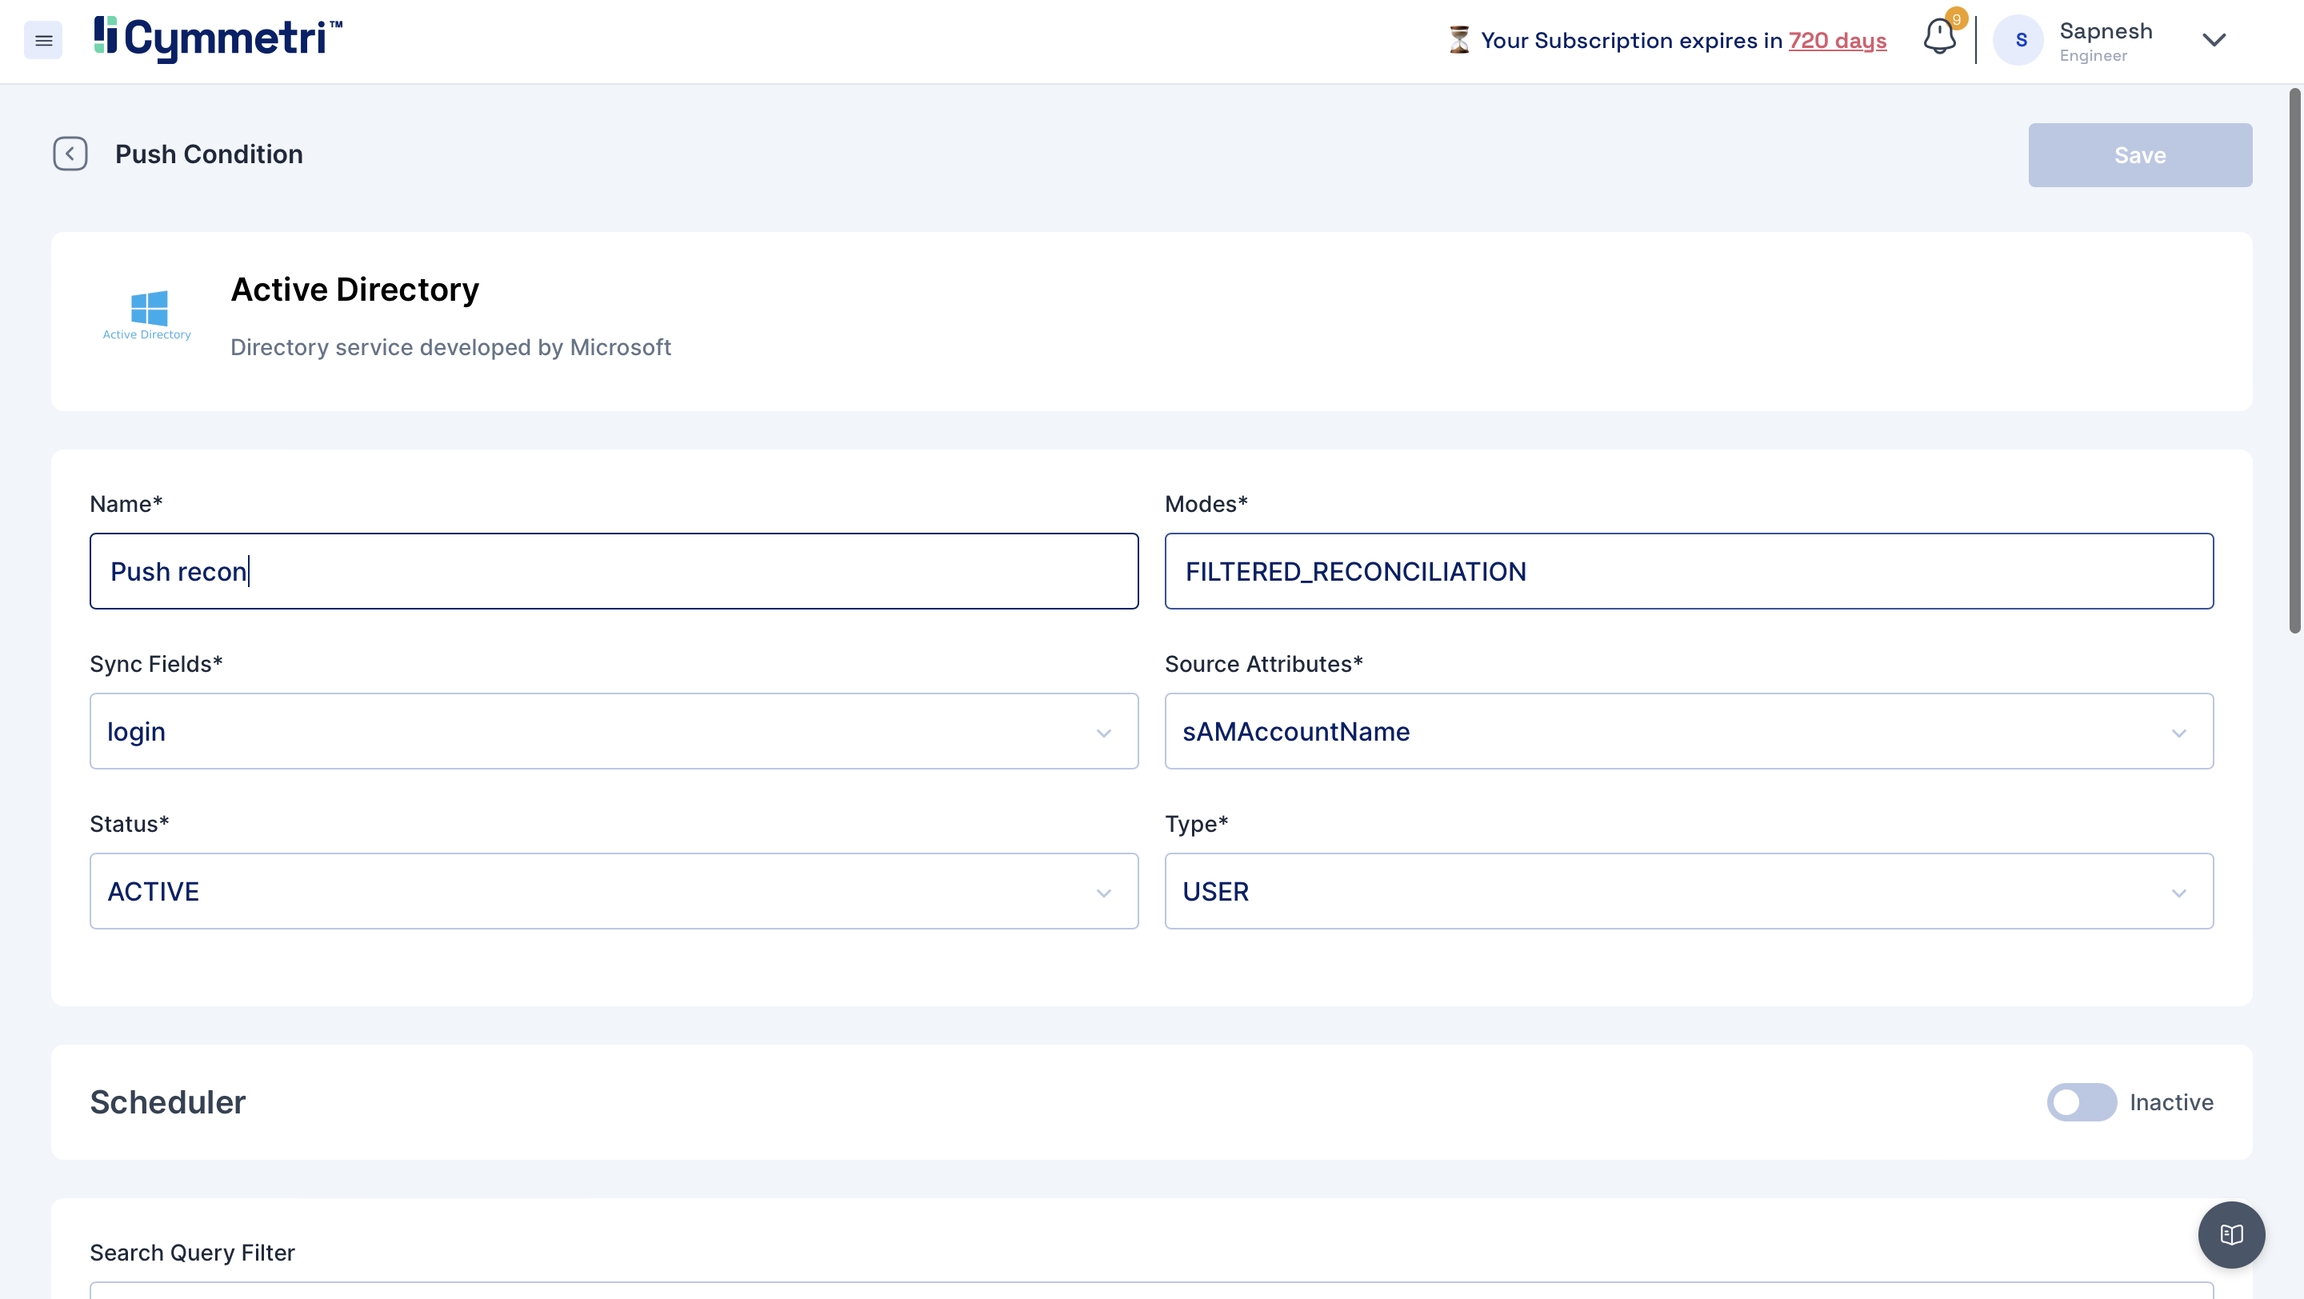
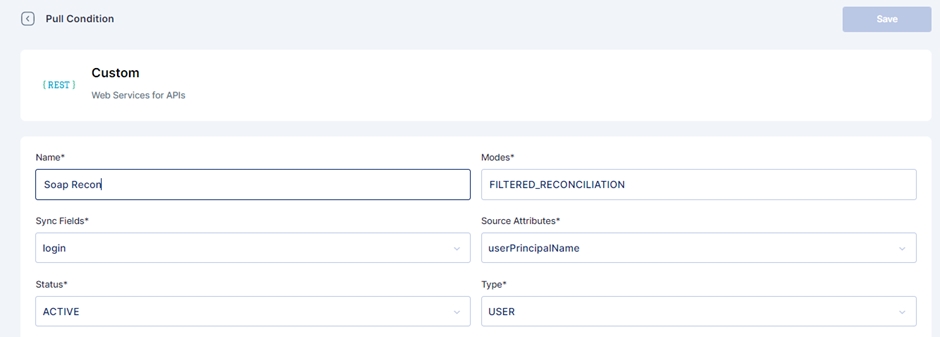
Add the field name details, and give a name to the pull reconciliation.
The modes field is prefilled with 'FILTERED_RECONCILIATION'; keep it as it is. It specifies the mode of Reconciliation.
The Sync fields are a drop-down menu with Cymmetri attributes that need to be mapped with the Source attributes, that is, your Active Directory attributes. Choose the correct mappings for these fields.
Keep the Status as Active.
Types are prefilled with the User. Keep it as it is.
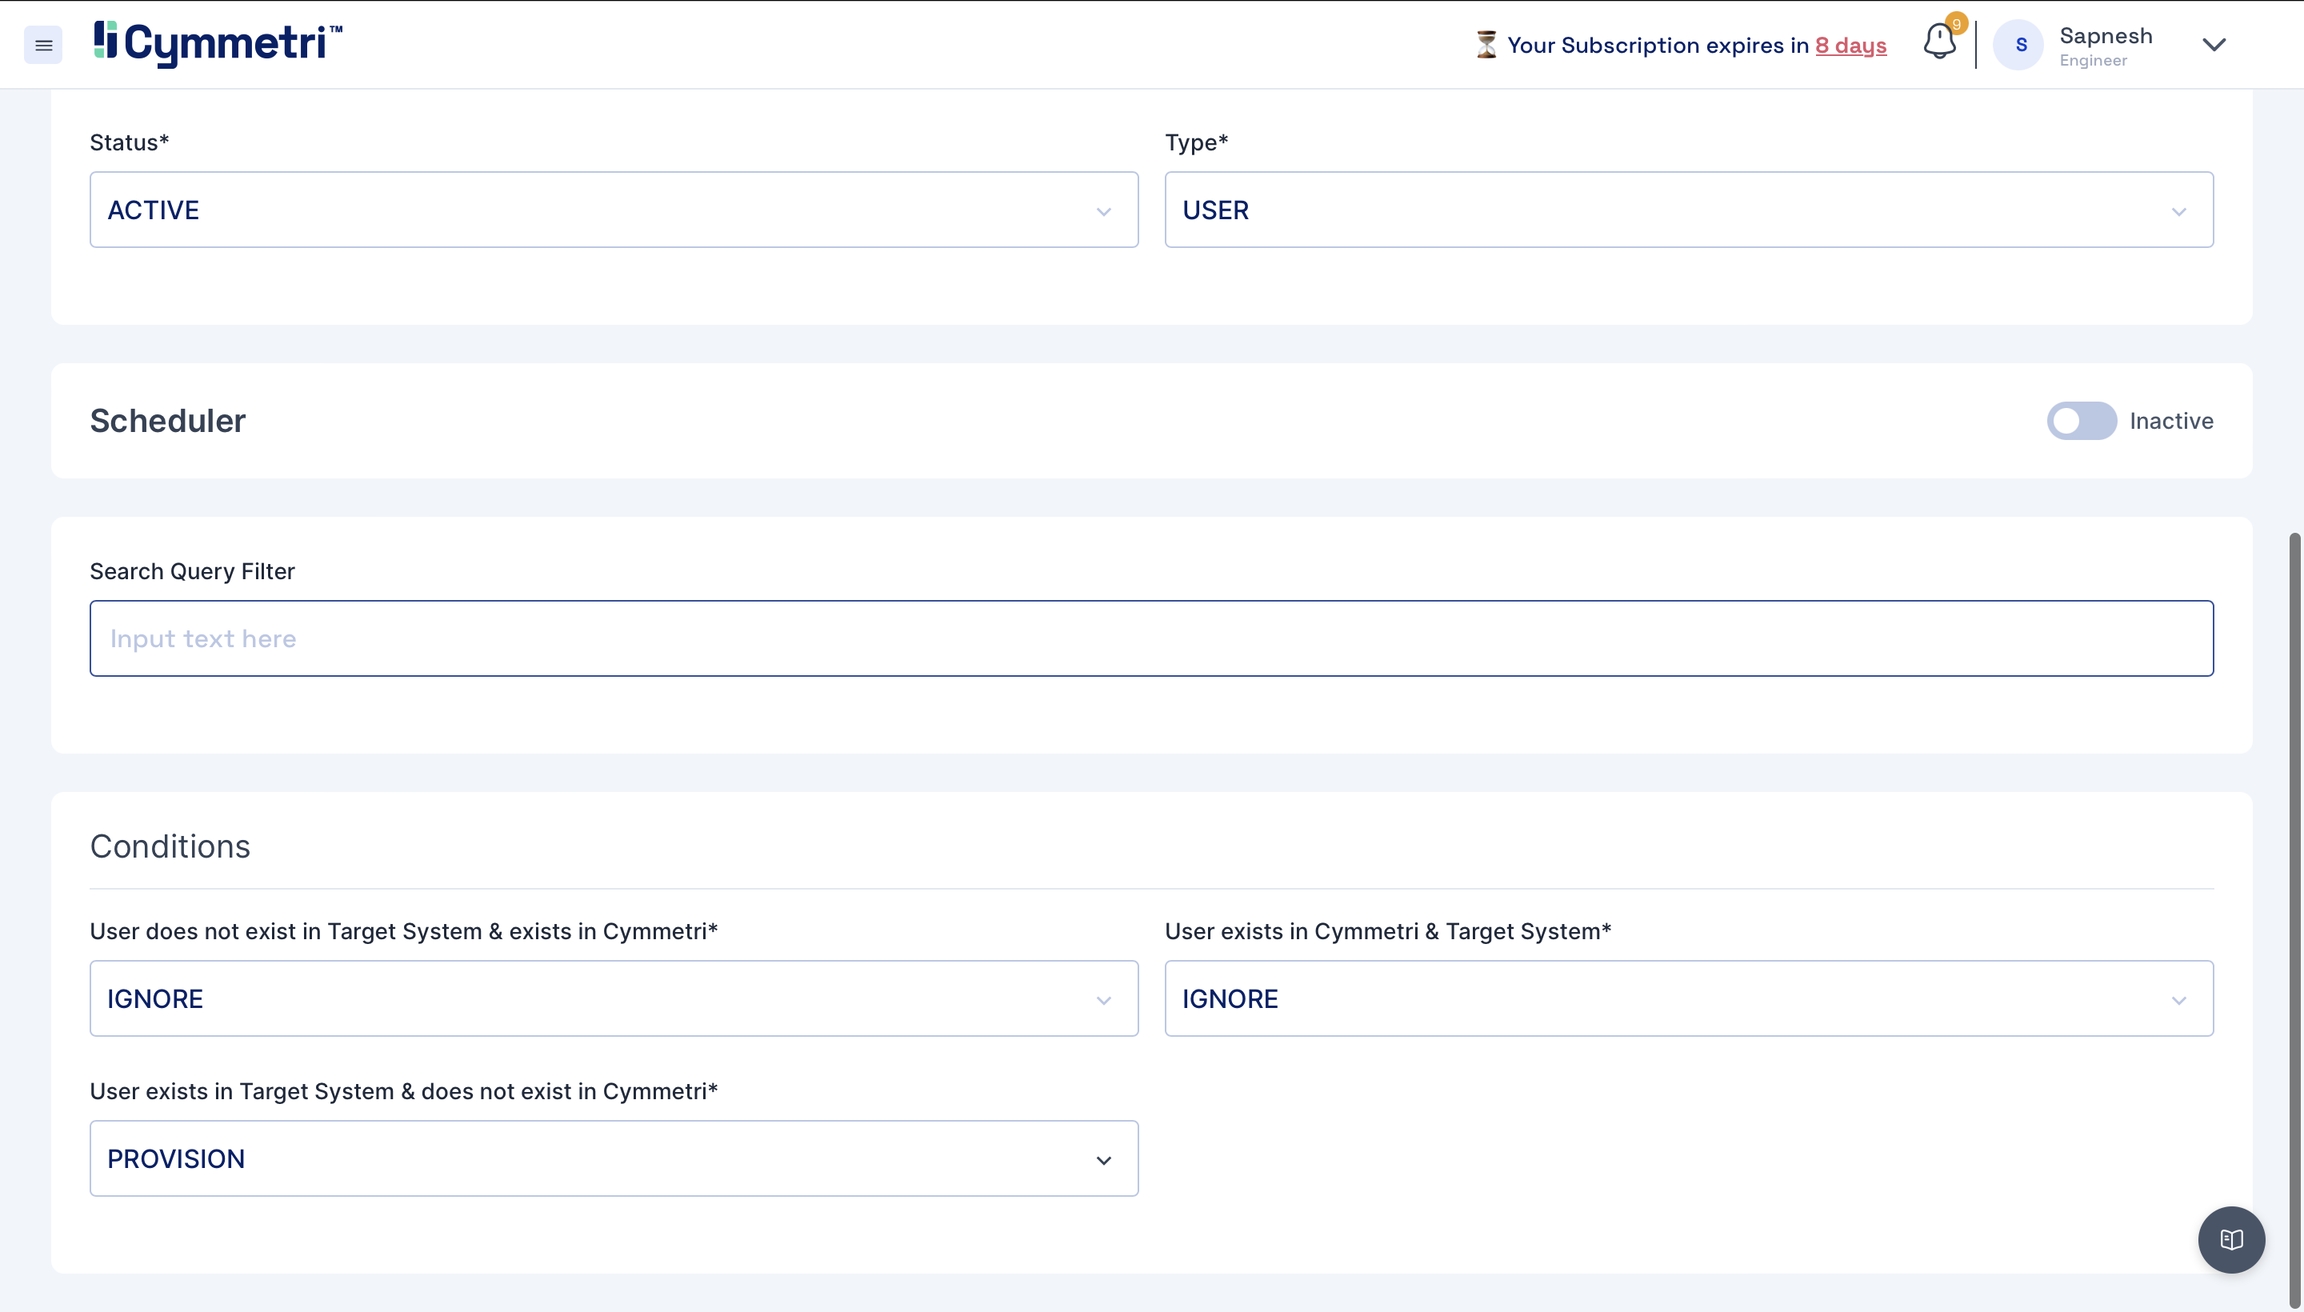
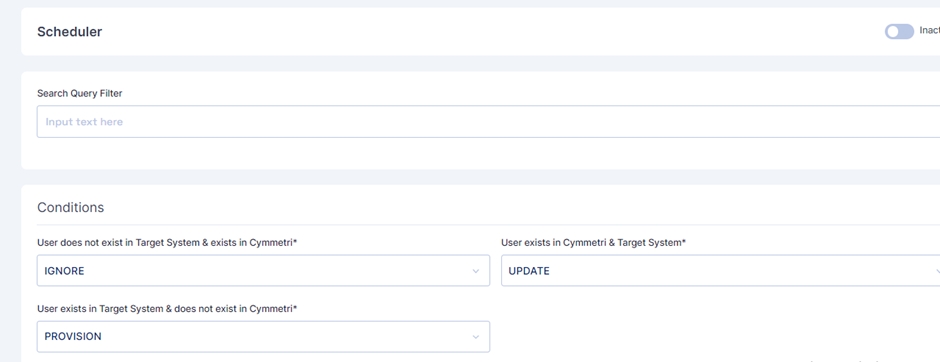
You can define the conditions for the Pull Reconciliation. It specifies the different scenarios of the Reconciliation. All the tabs have the same options in the dropdown: IGNORE, UPDATE, DEPROVISION, PROVISION, UNLINK, LINK, ASSIGN, UNASSIGN.
IGNORE
You can skip the process by choosing this option.
UPDATE
It can be used when you want to modify or reflect new changes.
PROVISION
You can use this option to onboard the users.
DEPROVISION
You can use this option to remove the users.
LINK
You can use this option to link the users to Cymmetri
UNLINK
You can use this option to unlink the users to Cymmetri
ASSIGN
You can use this option to assign the users to Cymmetri
UNASSIGN
You can use this option to unassign the users to Cymmetri
Here is an example scenario:
UPDATE
IGNORE
PROVISION
Update user details in the target system, ignore if a user is present in both systems and provision users that do not exist in the target system.
The options to choose in a Reconciliation operation depend on your use case and change accordingly.
In this case, we have chosen to IGNORE the users that do not exist in your Active Directory but exist in Cymmetri. Also, IGNORE users who are present in both the systems. PROVISION the users that exist in your Active Directory but do not exist in Cymmetri.
Hit the save button on the top left and click the 'Run now' button. The status of the recon changes to active.
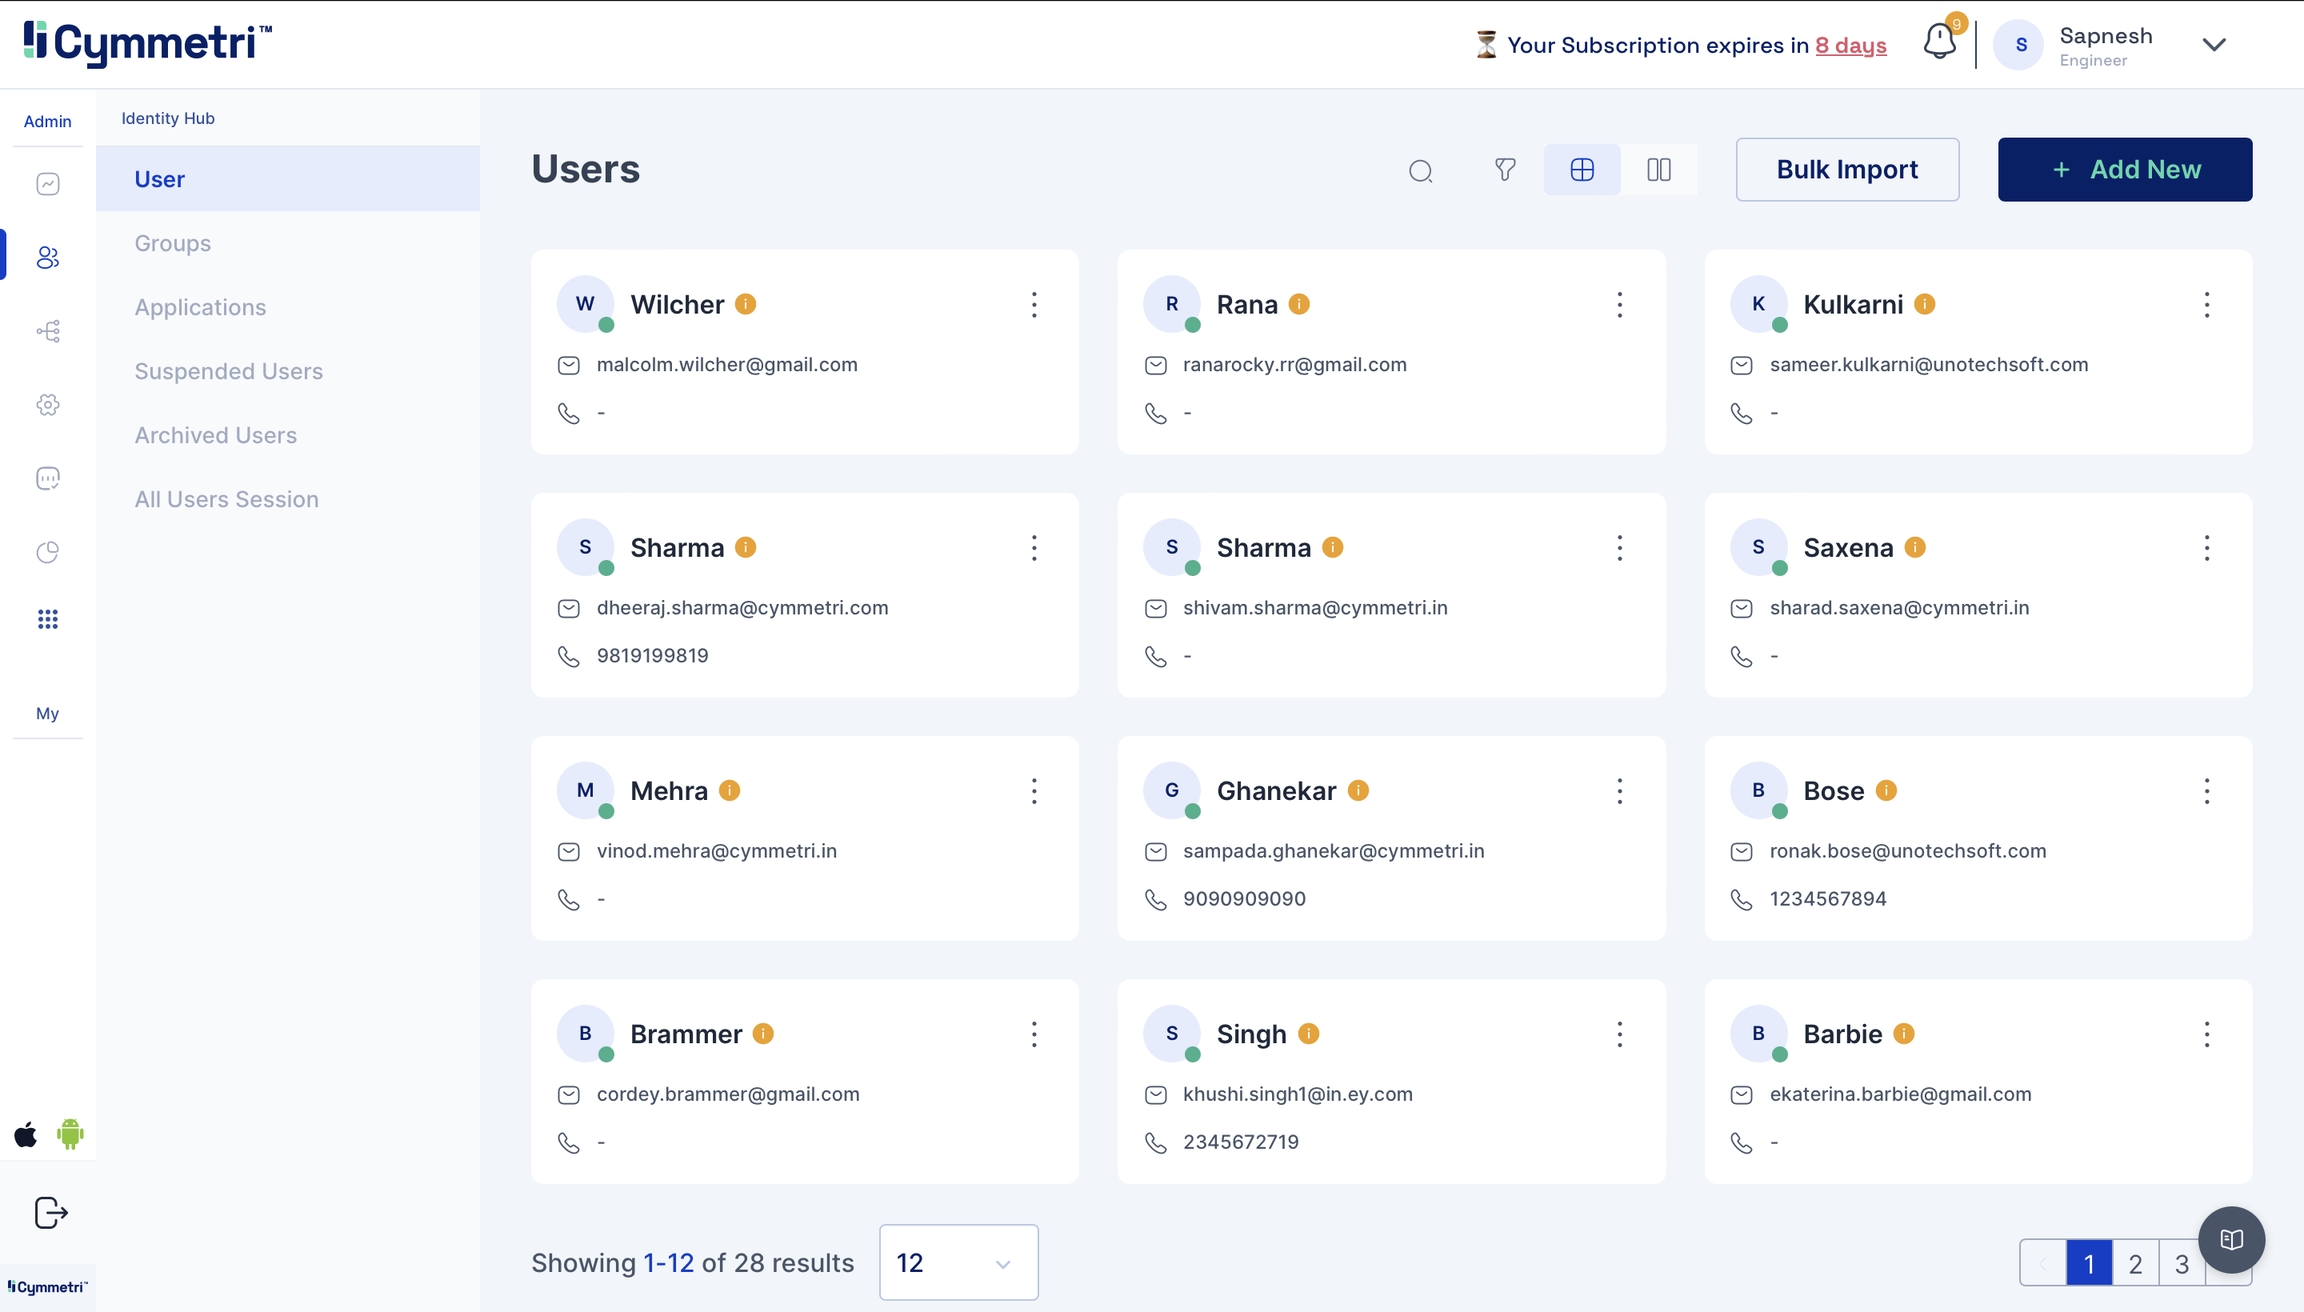
You can head to the users tab and check if users are synced. If the reconciliation is successful, the users start appearing in this tab.
Sync your user data to Active Directory.
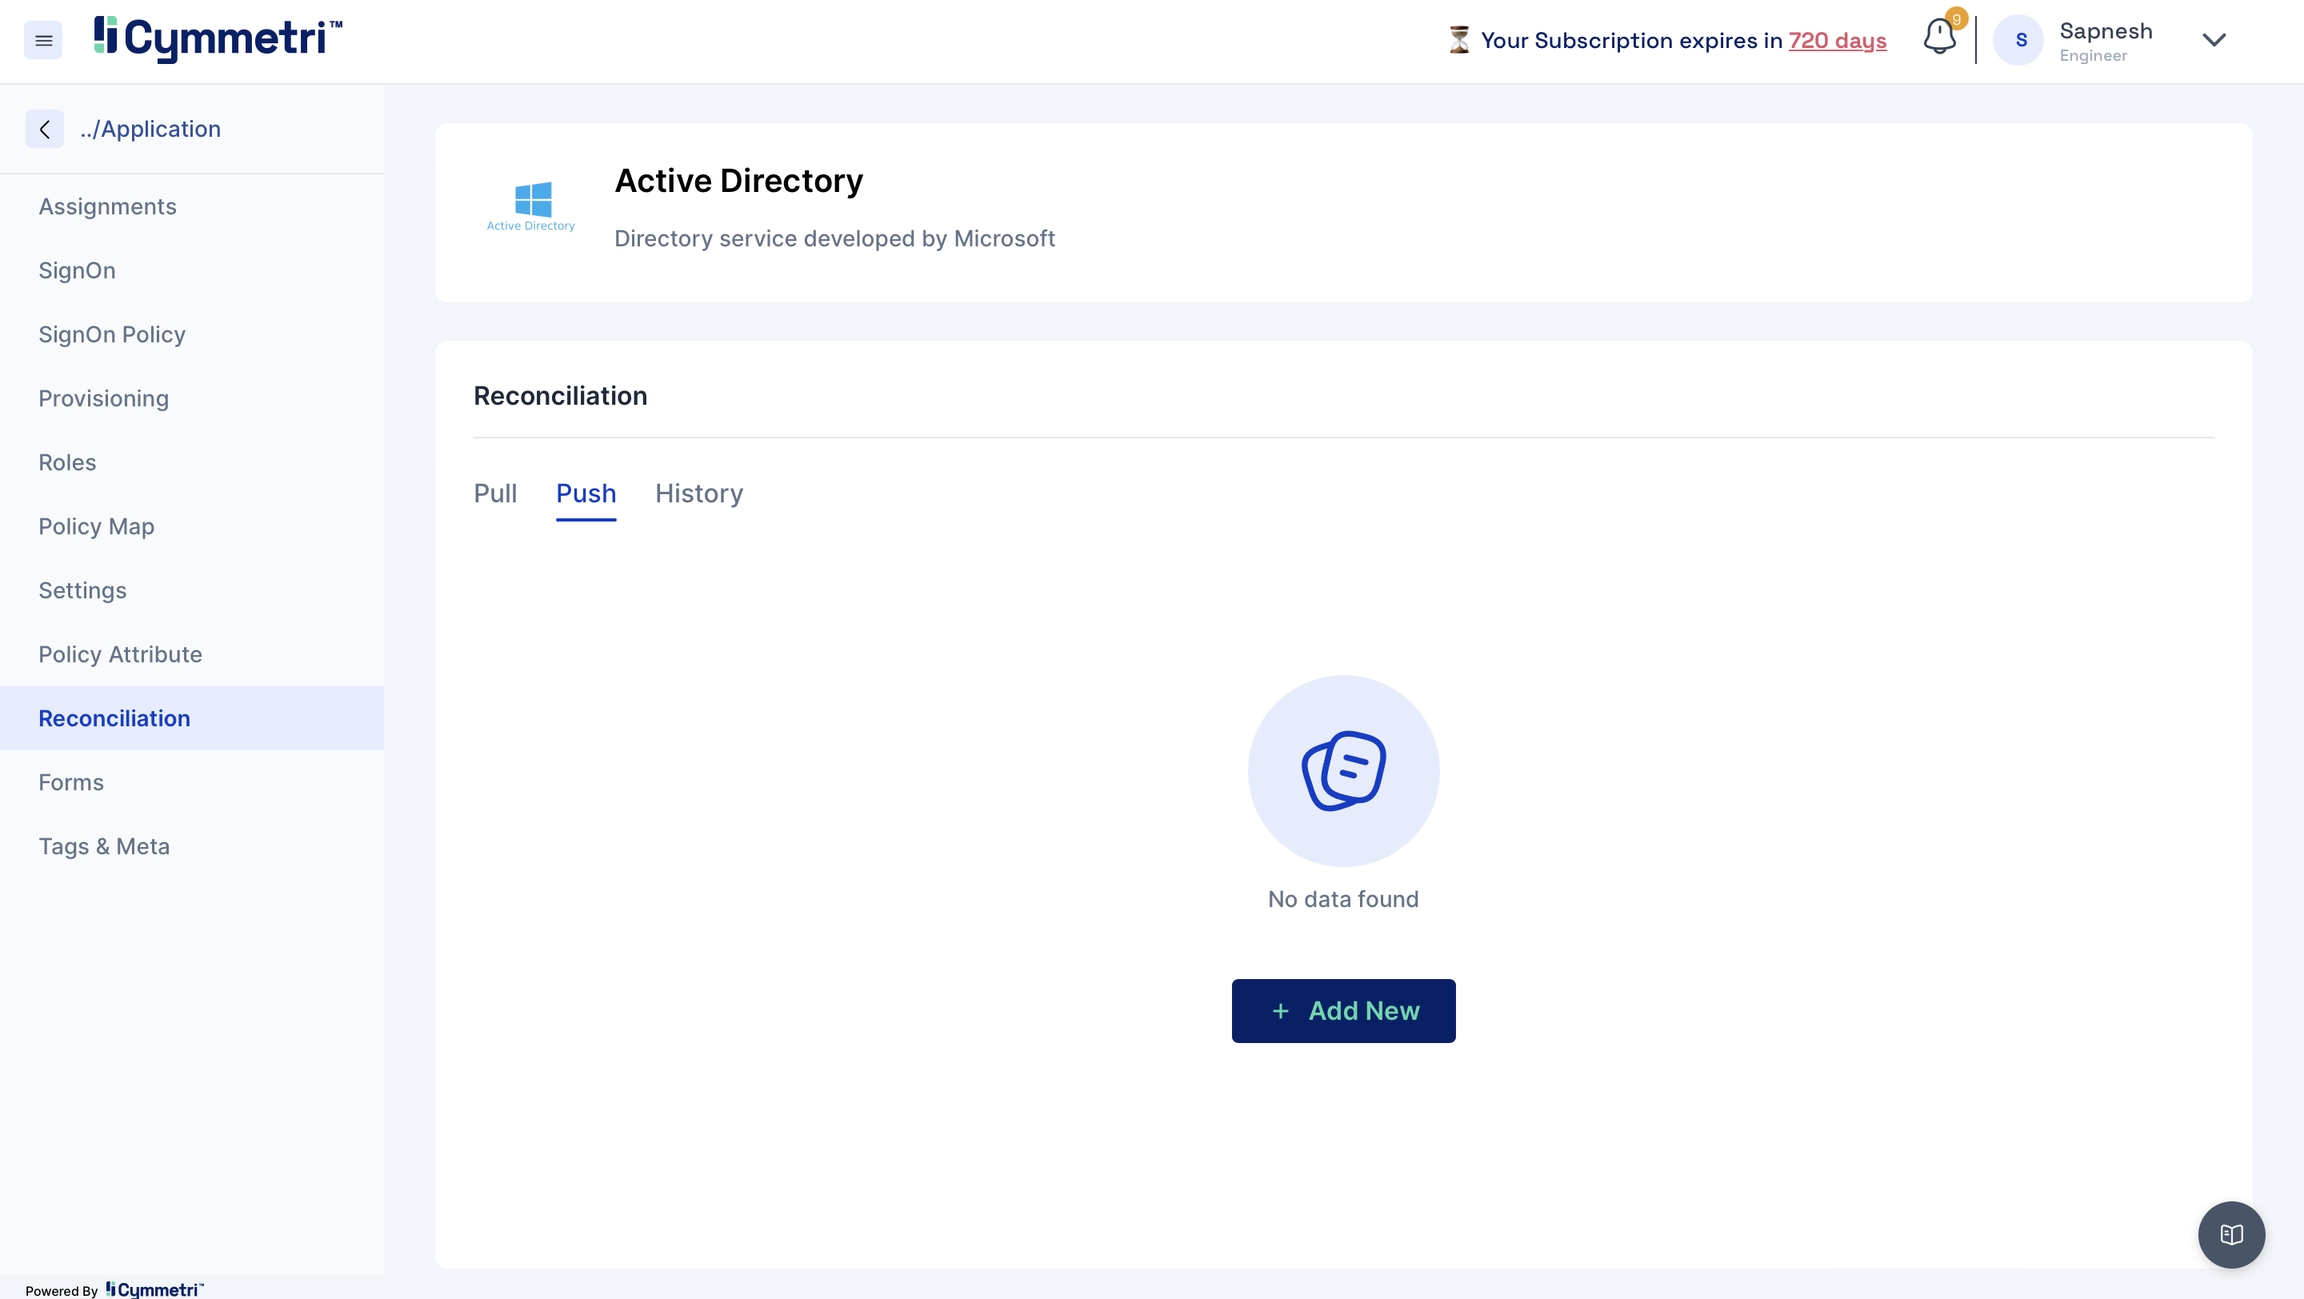
Navigate to the push tab and click on 'Add New'.
Repeat Steps 2 and 3 from Pull Reconciliation.
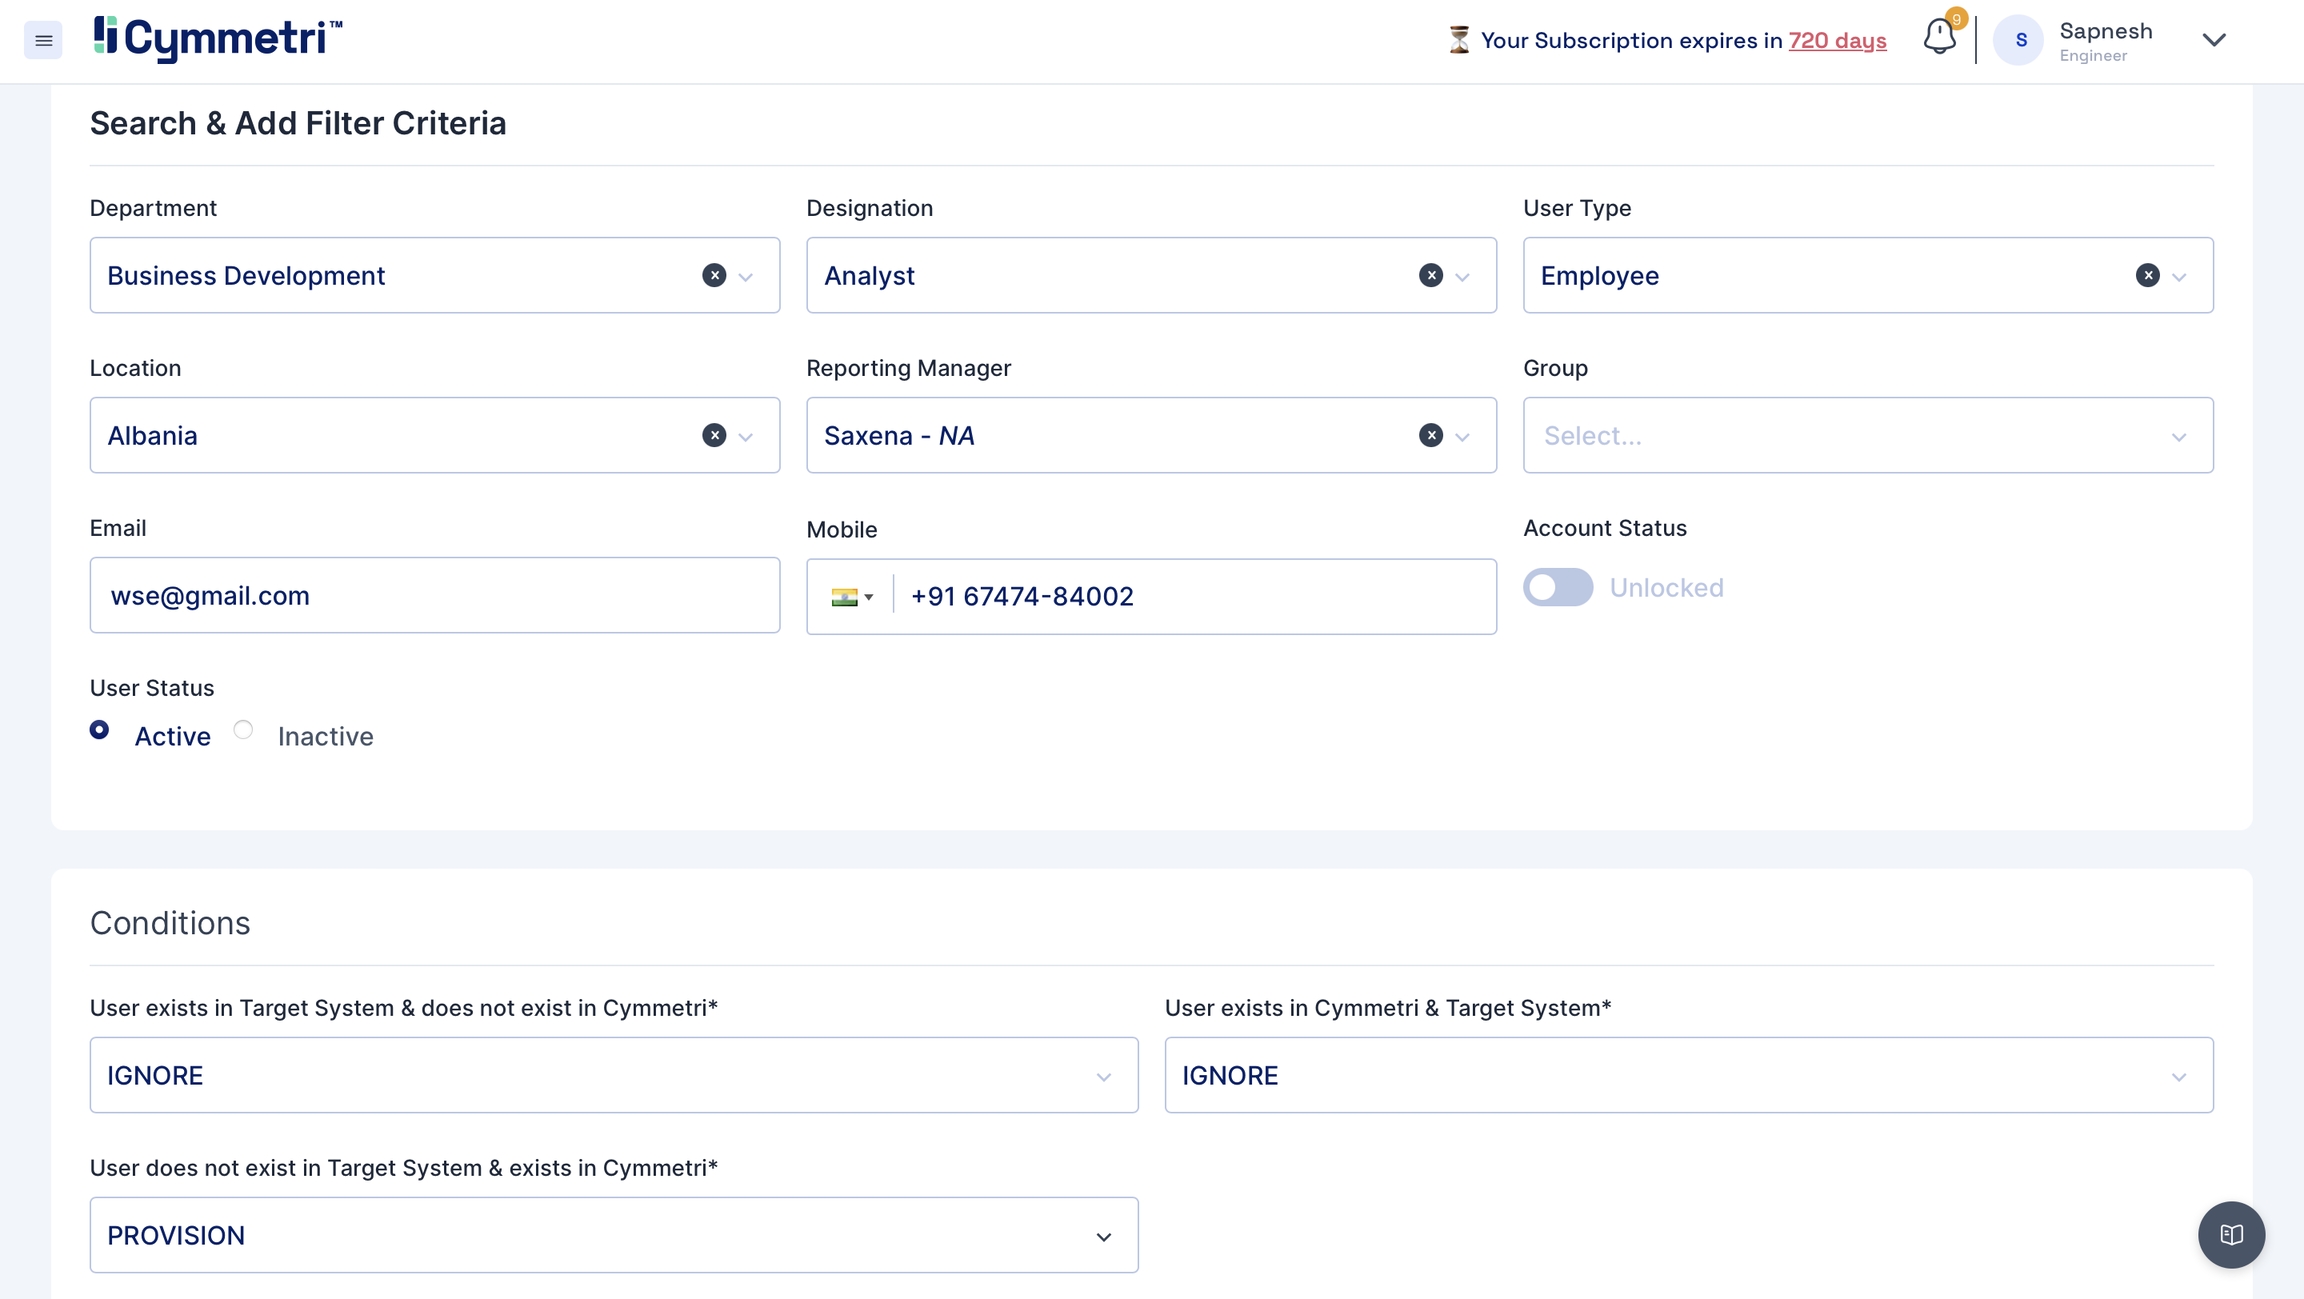
Move towards the Search Filter and Add Criteria section on the page.
Fill in all the user details like Department, Designation, User Type, Location, Manager, Group, if any, email and mobile number. Keep the account status slider in the unlocked option. Choose user status as 'Active'.
Set the conditions for the Push Reconciliation.
Click on Save at the top-right corner of the page.
Click on 'Run-now' to start the Push Reconciliation. You can check the status on the Reconciliation page.
Navigate to the users page to check the new users added to Cymmetri.
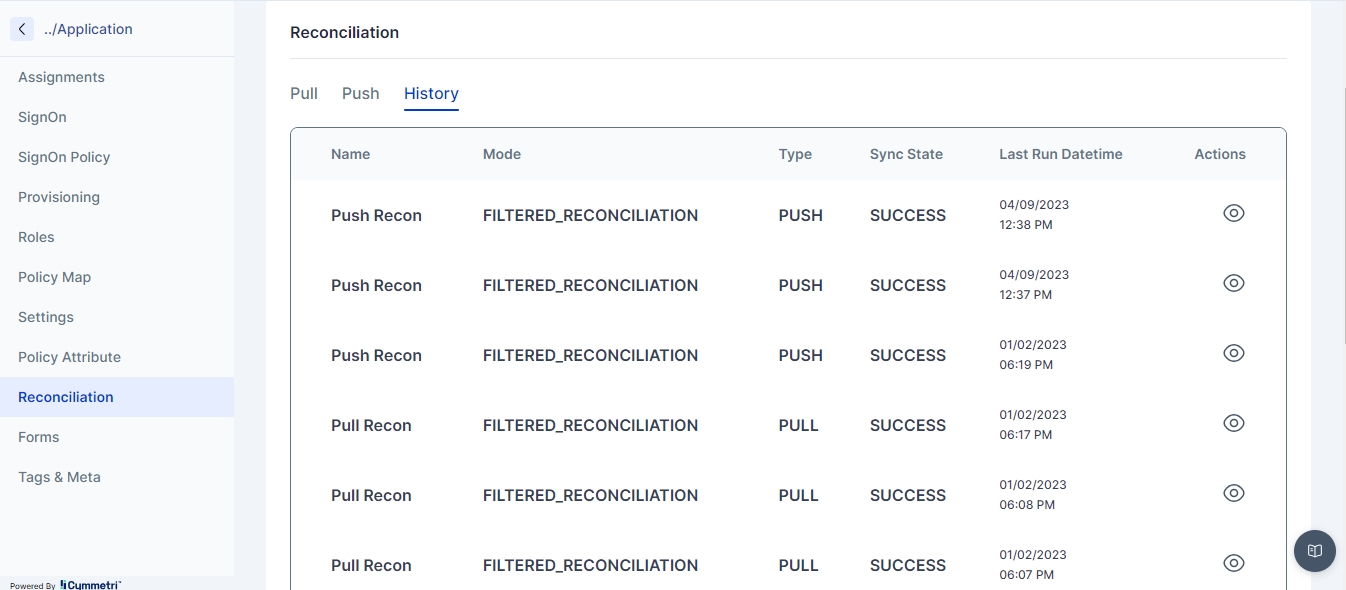
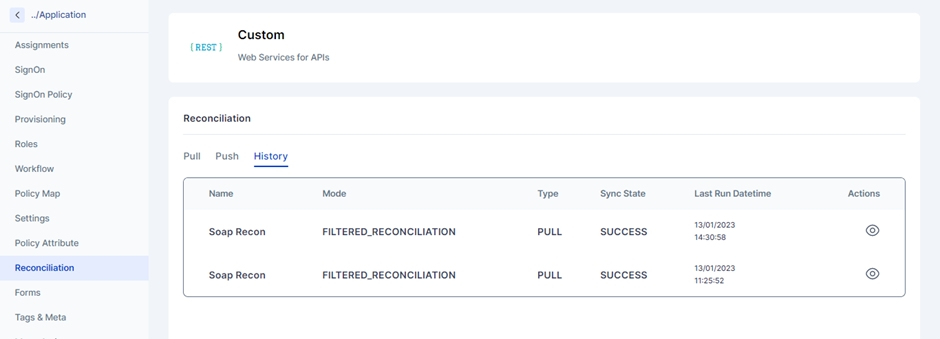
Navigate to the History tab to check and track the pull and push Reconciliation of the past.
Click on the eye icon to view the Push/Pull reconciliation operation.
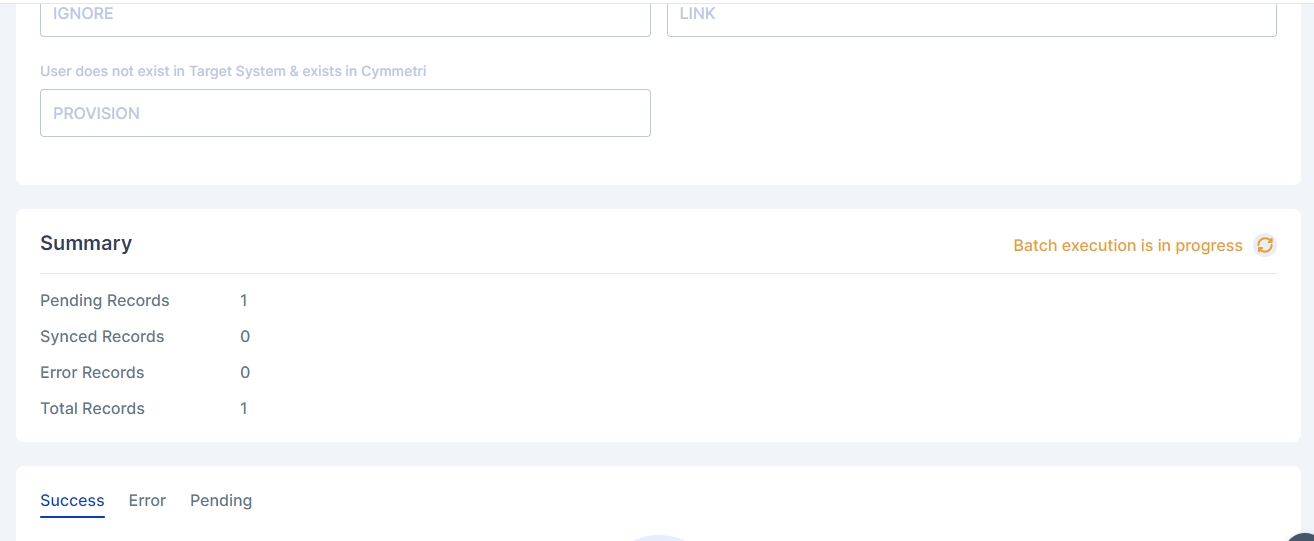
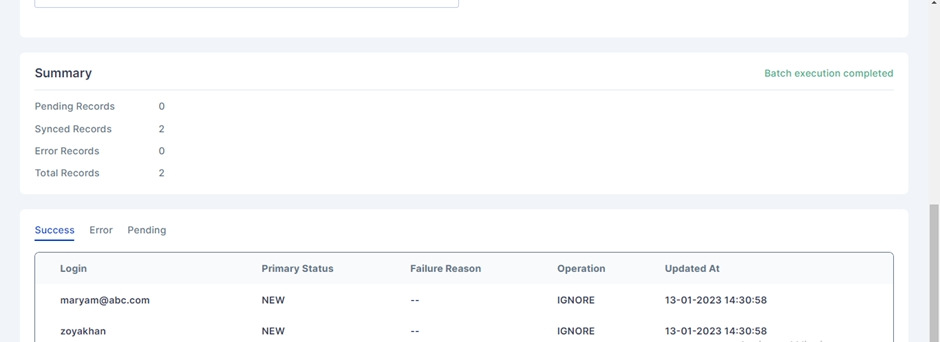
All the details configured in the Push/Pull Reconciliation can be seen here. It also displays the Summary of Pending, Synced and Error records.
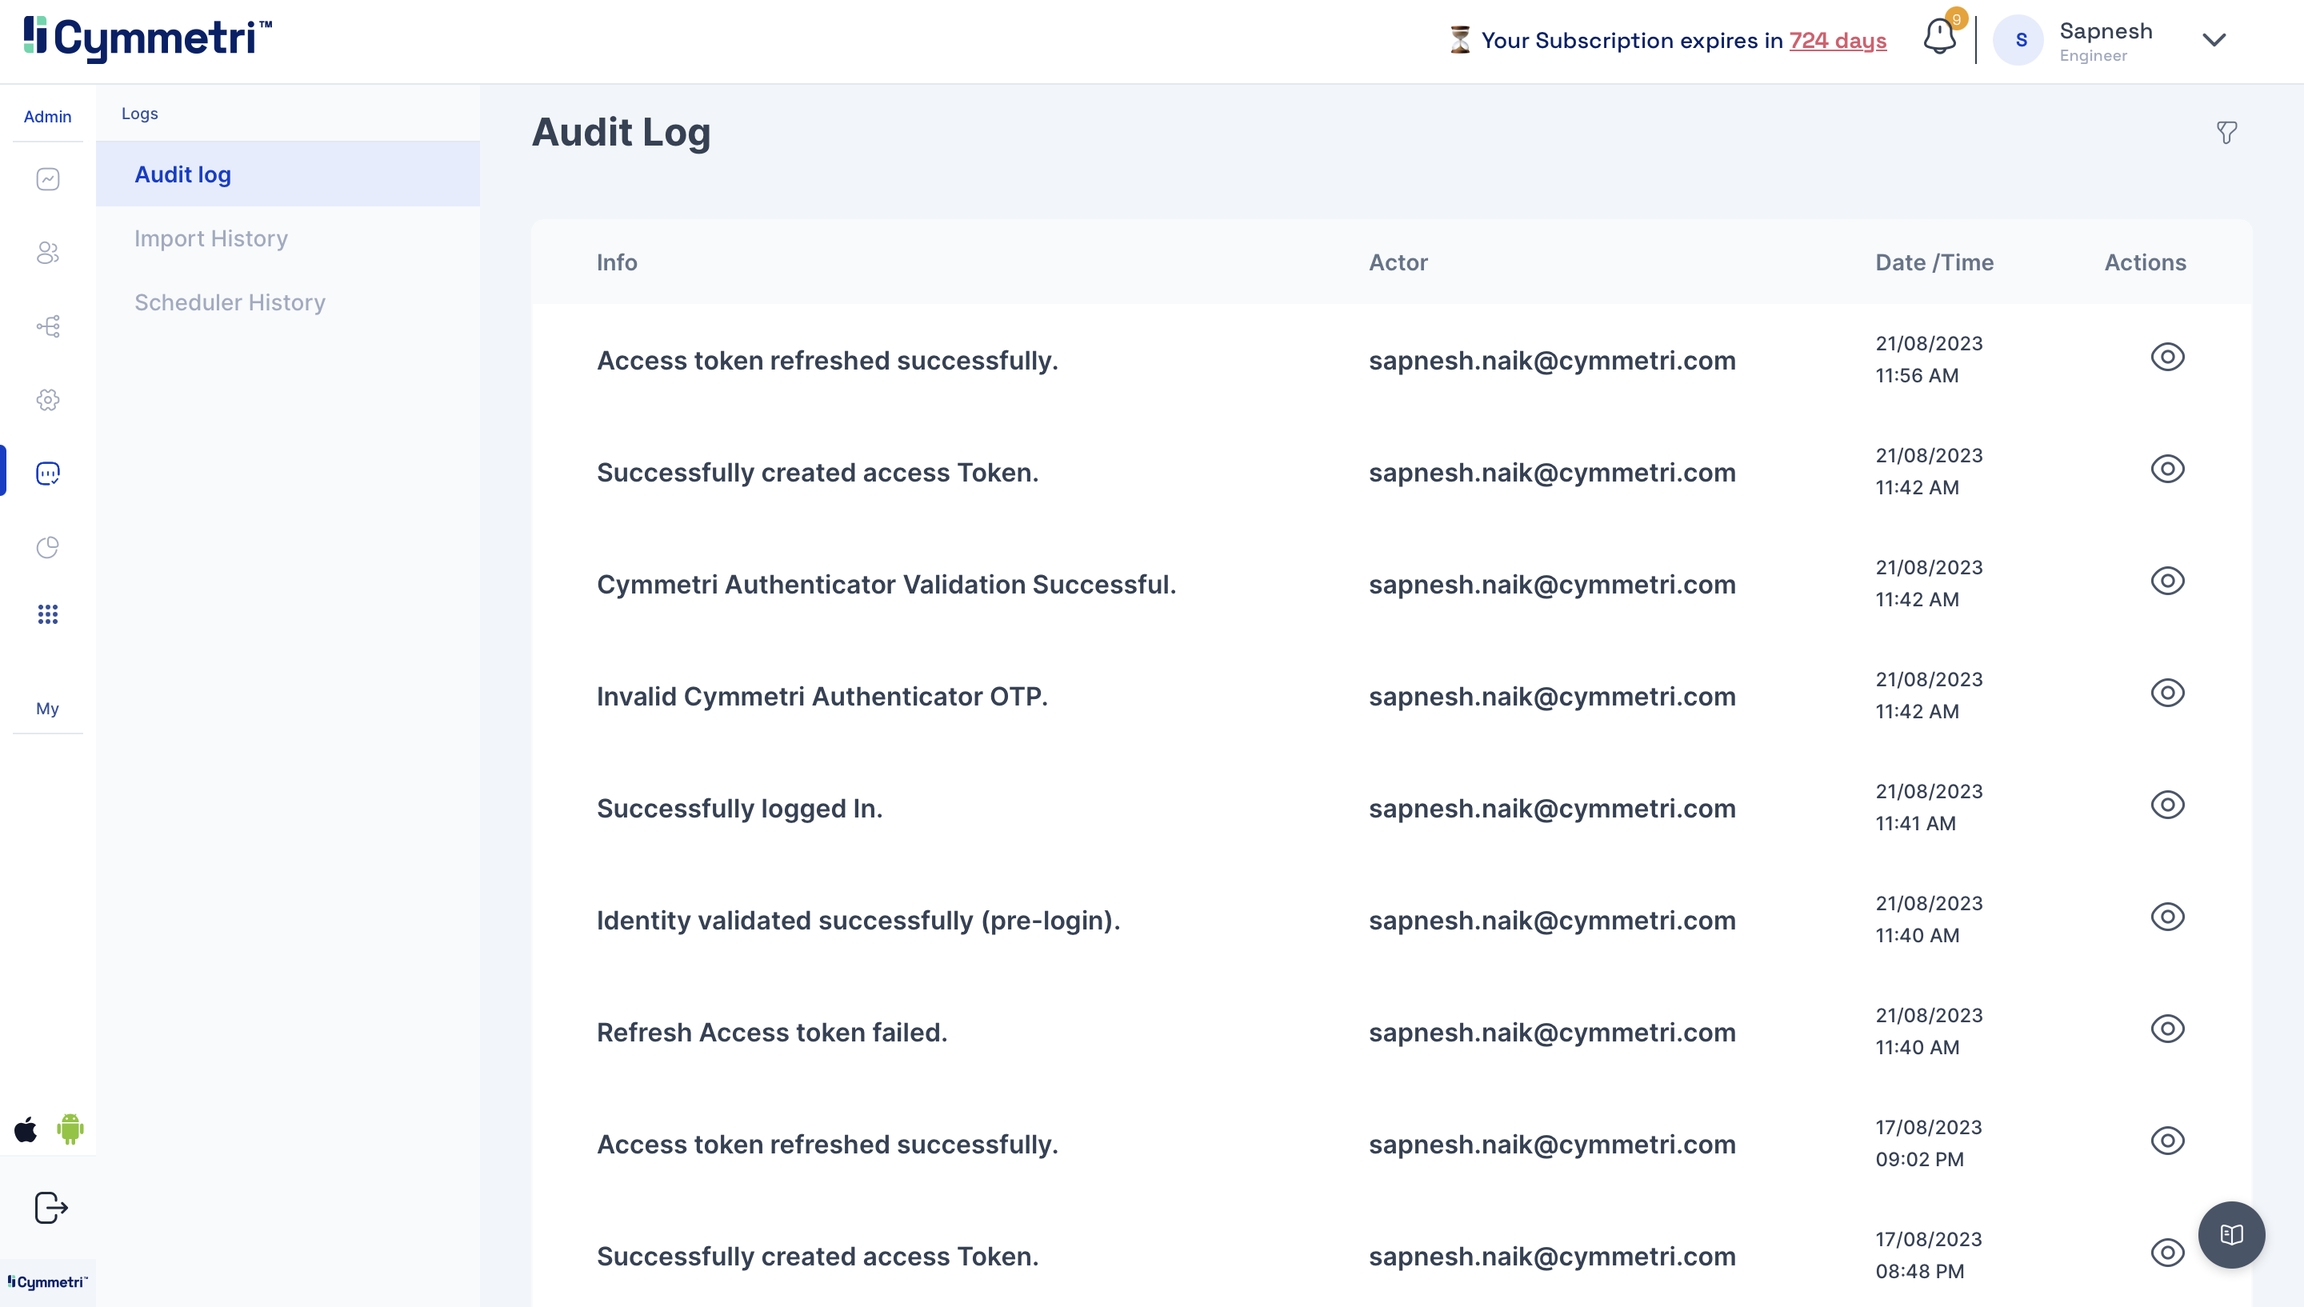
If, in any case, you're facing issues, head to the Logs->Audit Log to check for error logs.
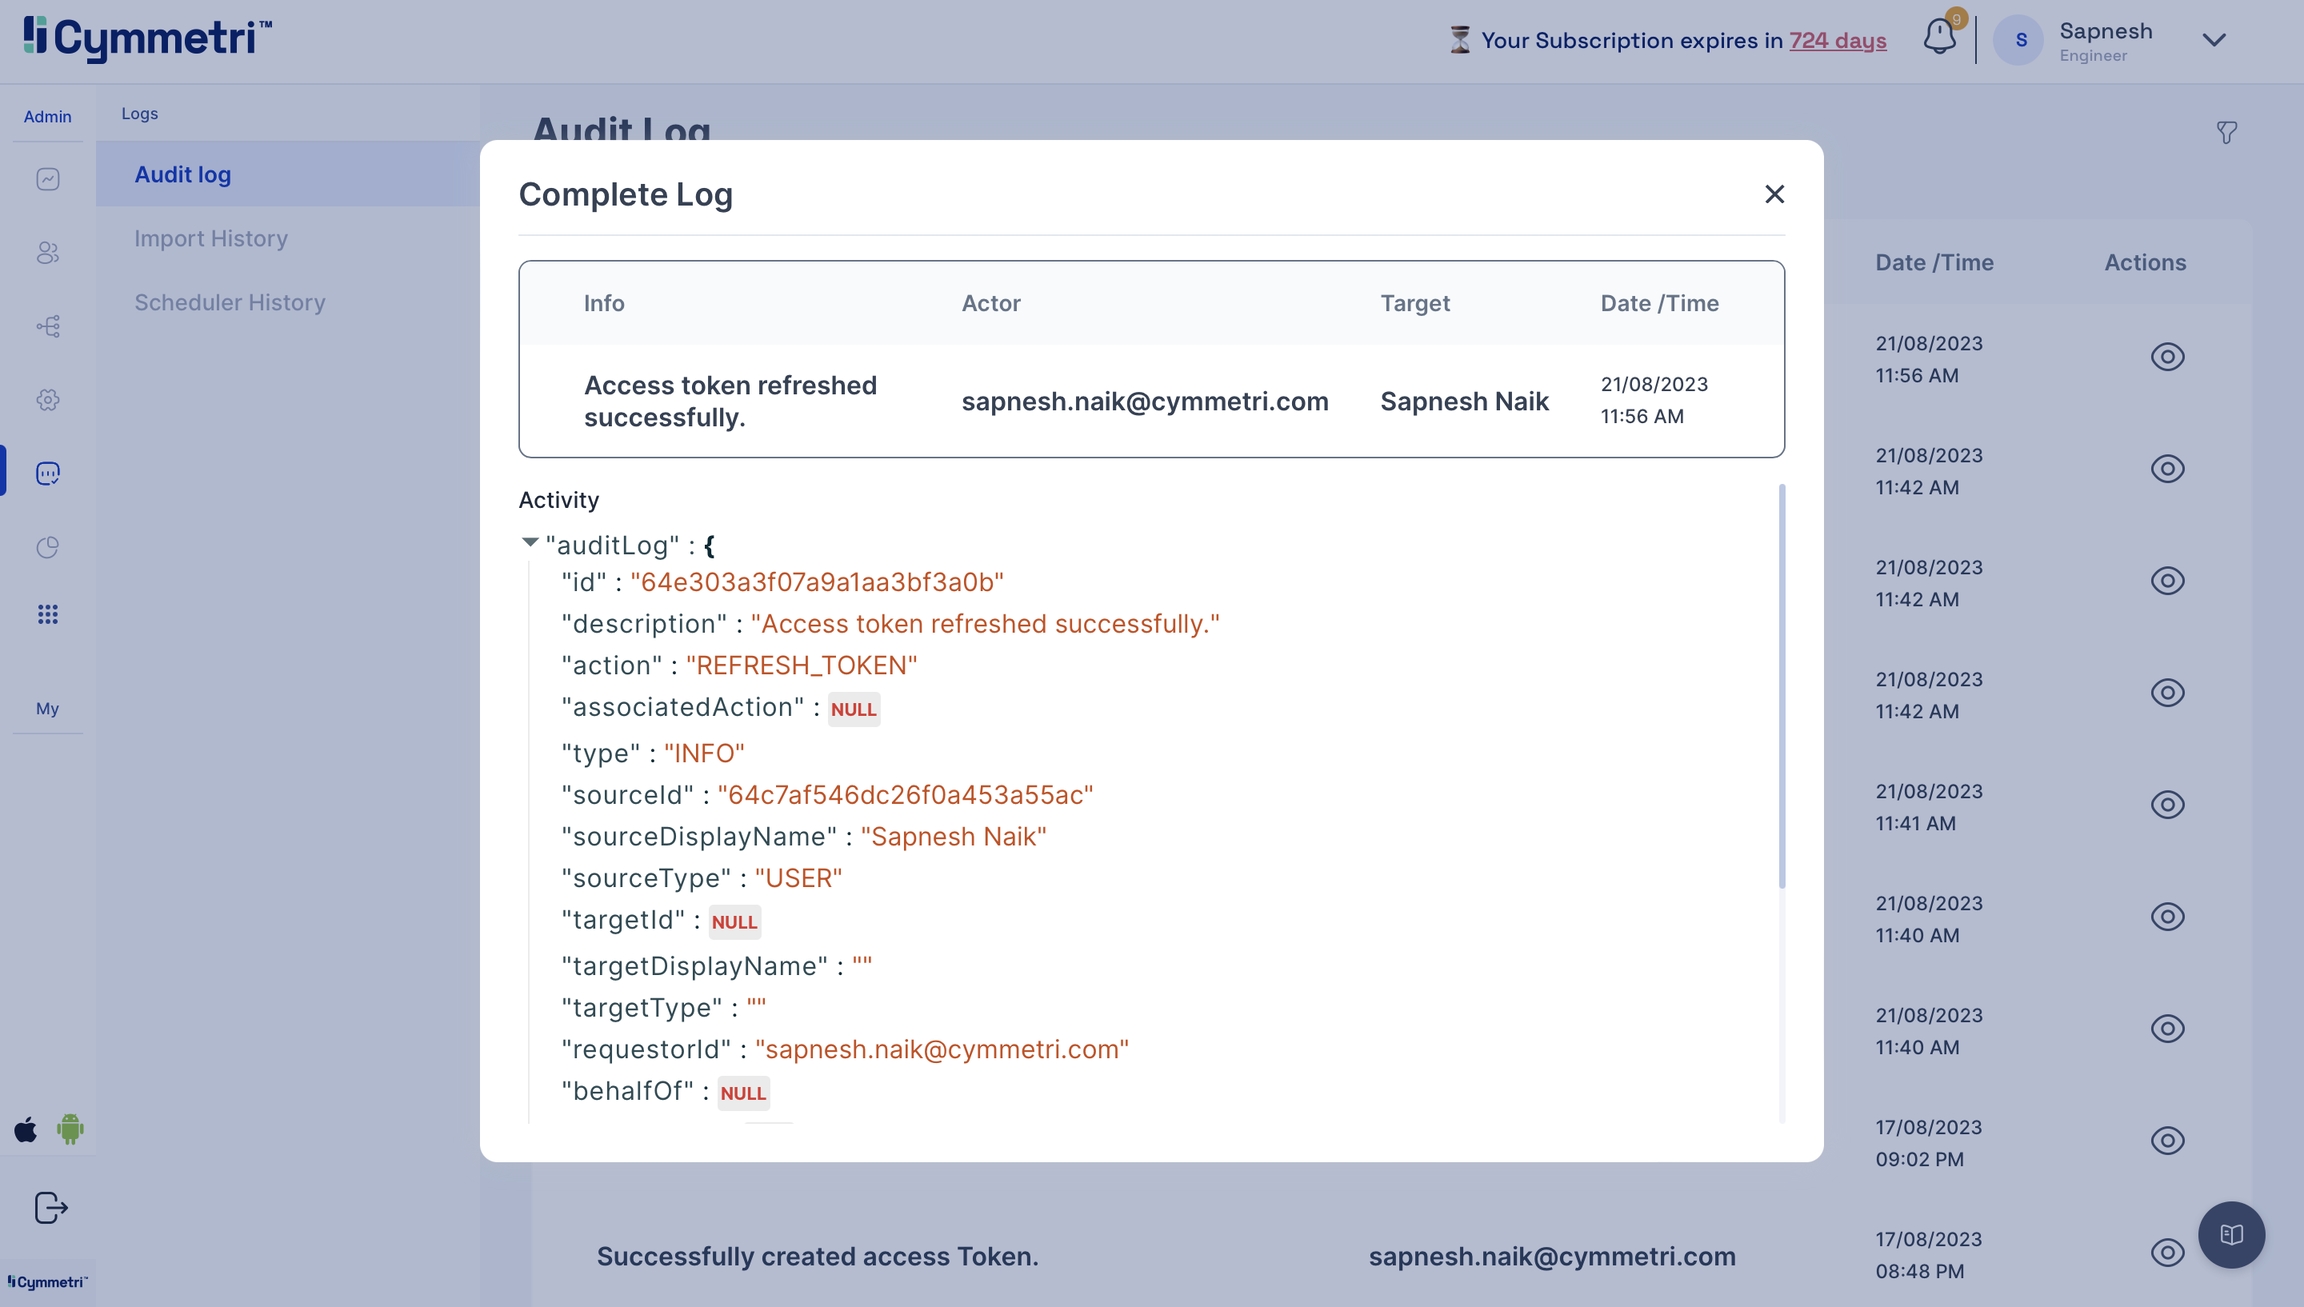
Click on the eye icon to check the event attributes in the audit log for errors.
Google Workspace is a software-as-a-service platform (SAAS) that provides email, calendar, documents and other services. This connector uses the Google Workspace provisioning APIs to create, add, delete and modify user accounts and email aliases.
Note: 1. Only the Premium (paid) or Educational versions of Google Workspace provide access to the provisioning APIs. 2. Connector will not work on the free Google Workspace Domain
For Configuring Google Workspace for provisioning we need to first obtain the client_secret.json file from the Google Workspace instance.
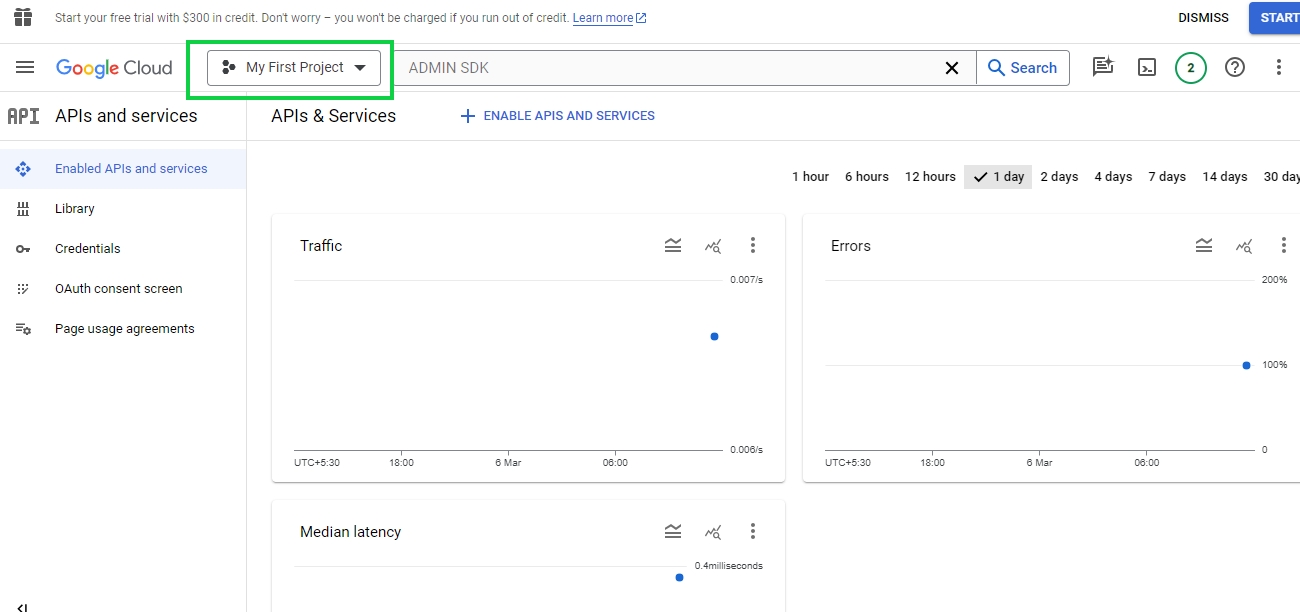
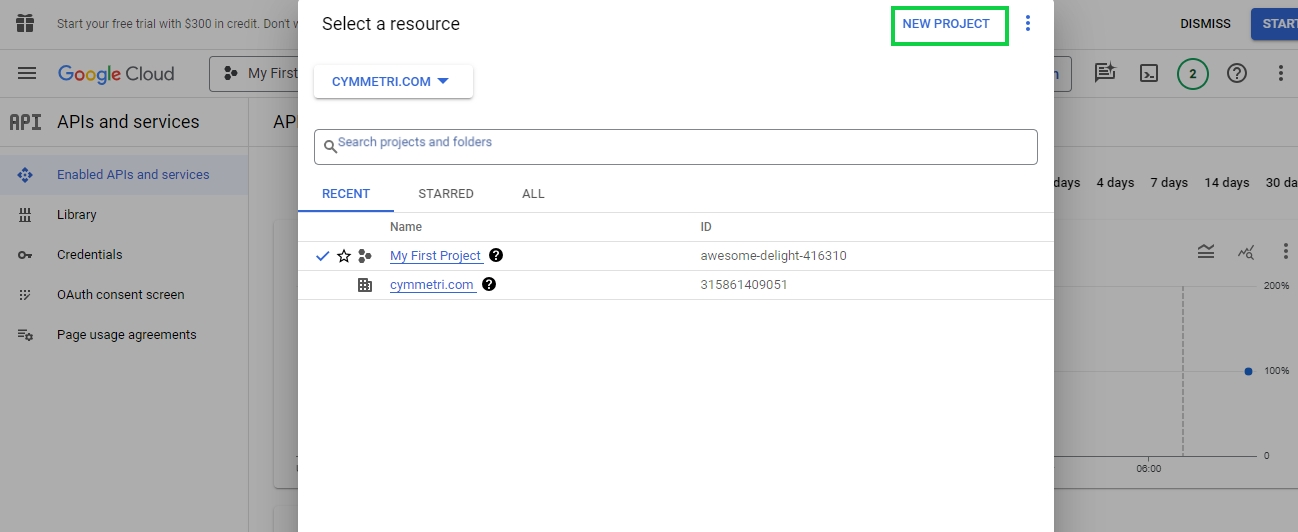
Go To https://console.developers.google.com/ and create a new Project if not already created. A new project needs to be created because it allows you to manage the credentials required to access Google APIs and services securely. A new project can be created by clicking on the New Project on top right or by clicking on the the Resource Dropdown
And the on the NEW PROJECT link on top right
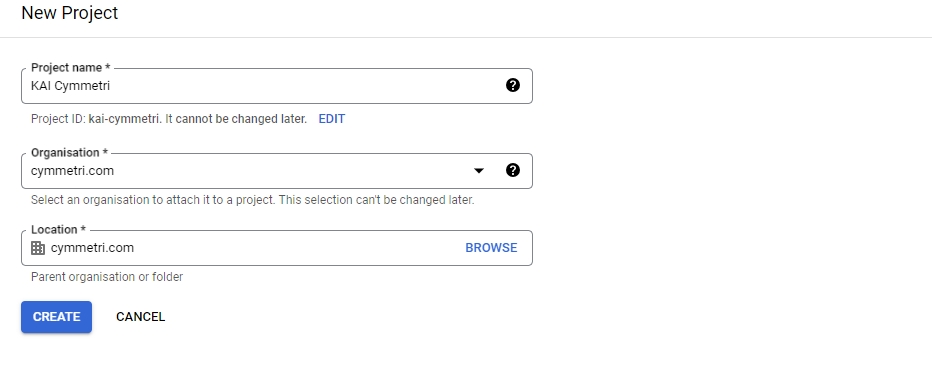
Next enter the Project name and select Organisation and Location as shown below and click on CREATE button
The Admin SDK API is needed to programmatically manage and interact with various aspects of a Google Workspace domain, such as users, groups, organizational units, and settings. Here are some key reasons why the Admin SDK API is essential:
User Management: The Admin SDK API allows you to create, retrieve, update, and delete user accounts in your Google Workspace domain. You can manage user details such as name, email address, password, and organizational unit.
Group Management: You can create, retrieve, update, and delete groups within your Google Workspace domain using the Admin SDK API. This includes managing group members and settings.
Organizational Unit Management: The API enables you to manage organizational units (OUs) within your Google Workspace domain. You can create, retrieve, update, and delete OUs, as well as move users and groups between OUs.
User Reports: The Admin SDK API provides access to various reports about user activity, such as login activity, email sending/receiving activity, and more. These reports can help you monitor and analyze user behavior within your domain.
Settings Management: You can manage various domain-wide settings, such as email routing, calendar sharing settings, and device management settings, using the Admin SDK API.
Security and Compliance: The API provides features for managing security and compliance settings within your Google Workspace domain, such as 2-step verification, password policies, and audit logs.
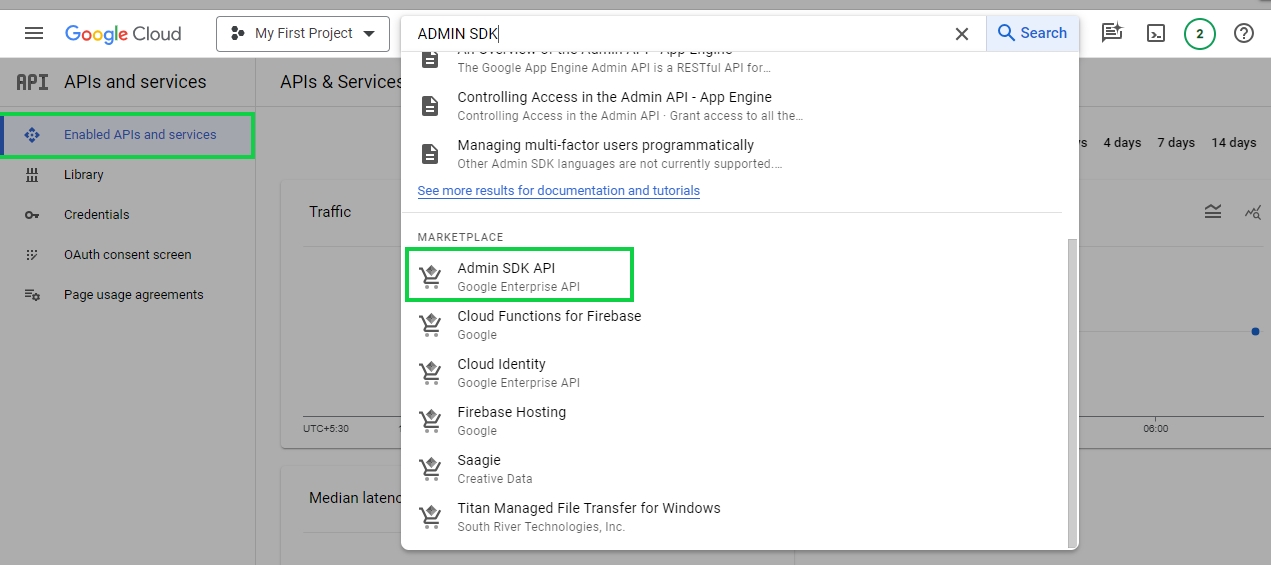
To enable ADMIN SDK API click on Enabled API & Services and Search for Admin SDK API:
Click on Admin SDK API and then click on the Enable button
Once enabled, Click on CREDENTIALS tab
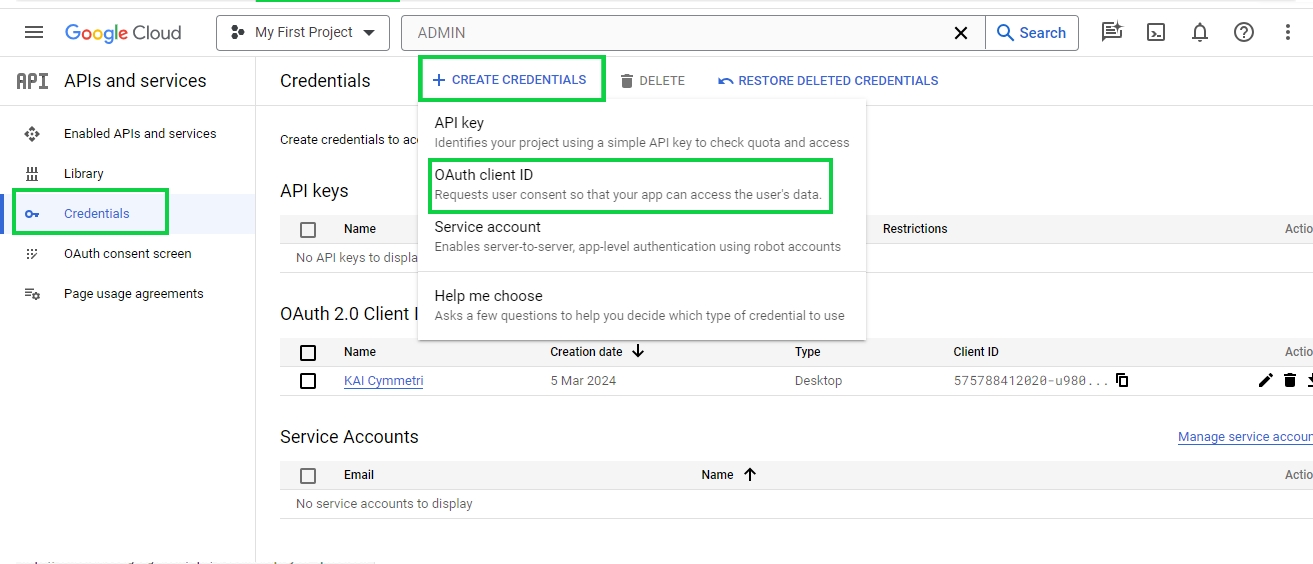
Now click on Credentials section and click on CREATE CREDENTIALS button and in that select OAuth client ID option
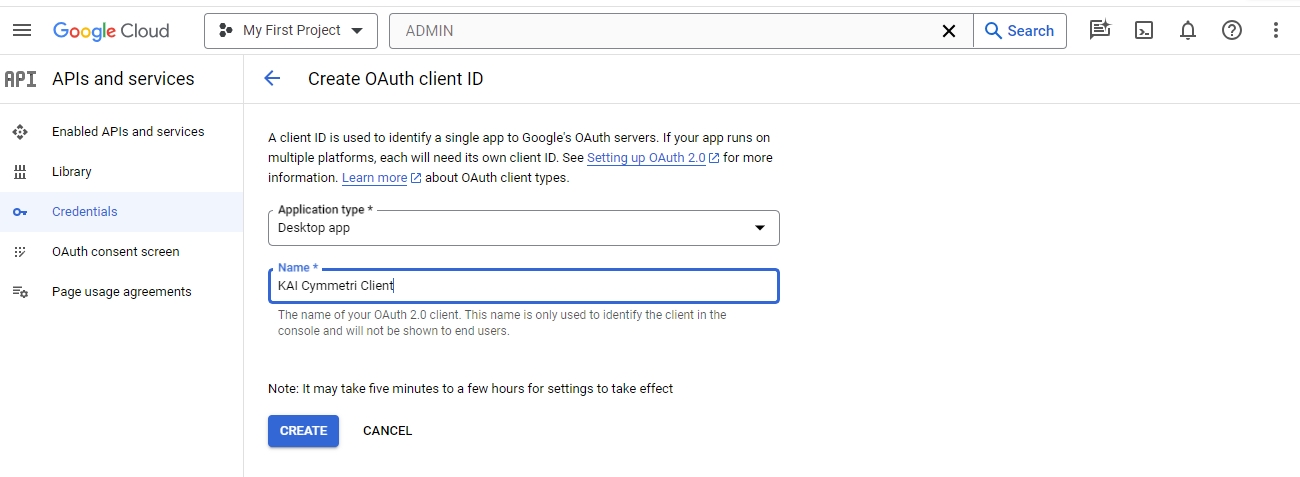
Select Desktop app as Application type, provide a name for the OAuth 2.0 client and then click on the CREATE button
A response screen is visible that shows that the "OAuth client created" It also displays Your Client ID and Your Client Secret. You may download the JSON here using the DOWNLOAD JSON option.
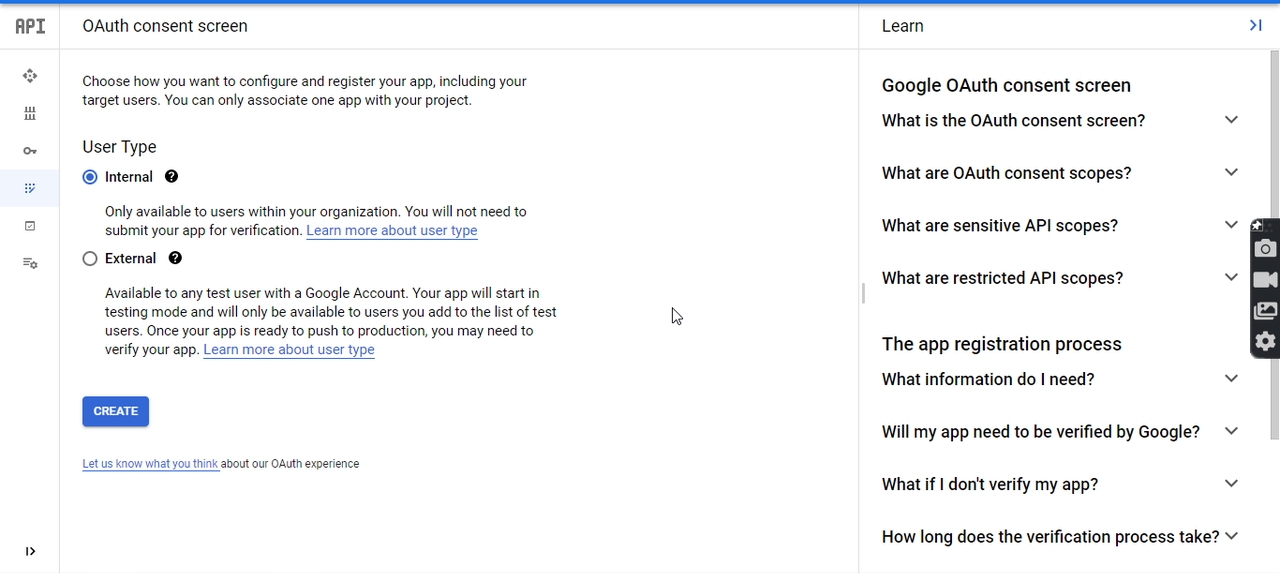
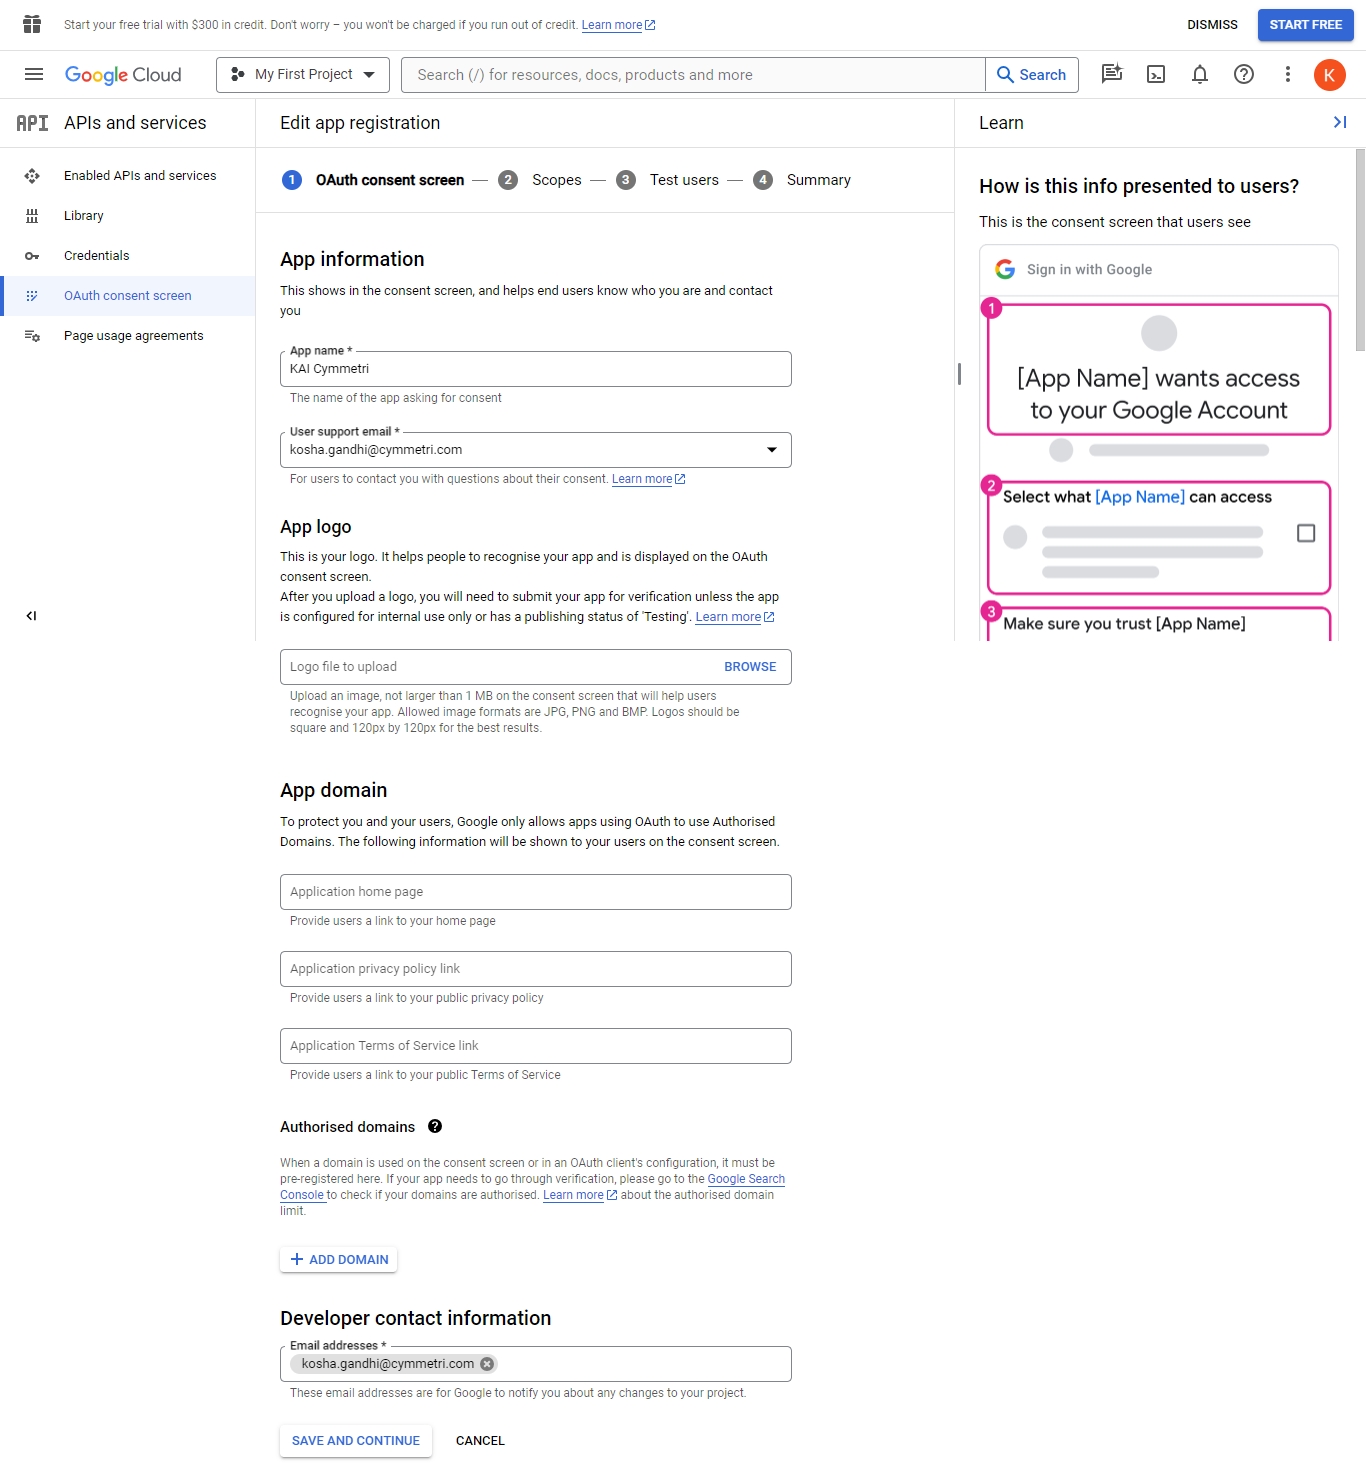
Click on OAuth consent screen and then Click on EDIT APP. Enter the required details and Click on SAVE AND CONTINUE button
Select Internal as User Type if you want to restrict access only to the users of your organization.
Search for Admin SDK API on the Scopes screen and select scope for user: .../auth/admin.directory.user
Select the scope for group: .../auth/admin.directory.group
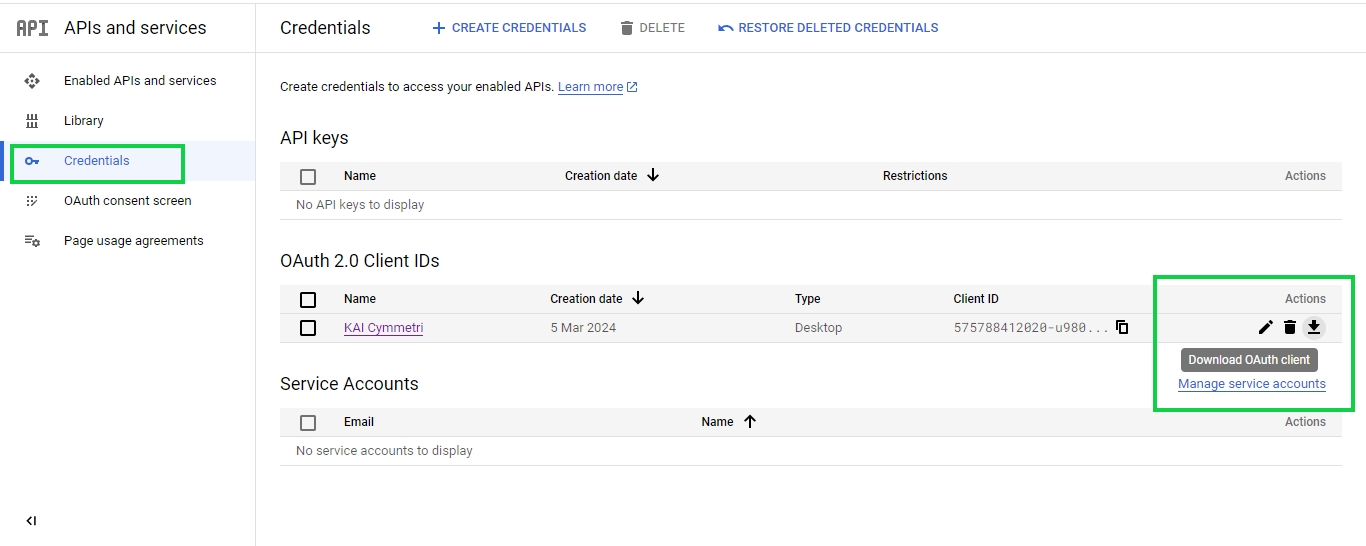
Next Click on Credentials section and downlaod OAuth client json file on your local machine by clicking on the Download OAuth client button.
Next download thenet.tirasa.connid.bundles.googleapps-1.4.2.jarbundle for Google Workspace from the Connector Server website. Once downloaded open a new command prompt and change to the directory where you have downloaded the bundle and run the following command on the client_secrets.json file that you obtained earlier step:
This command opens the default browser, and loads a screen on which you authorize consent to access the Google Apps account. When you have authorized consent, the browser returns a code. Copy and paste the code into the terminal from which you ran the original command
A response similar to the following is returned.
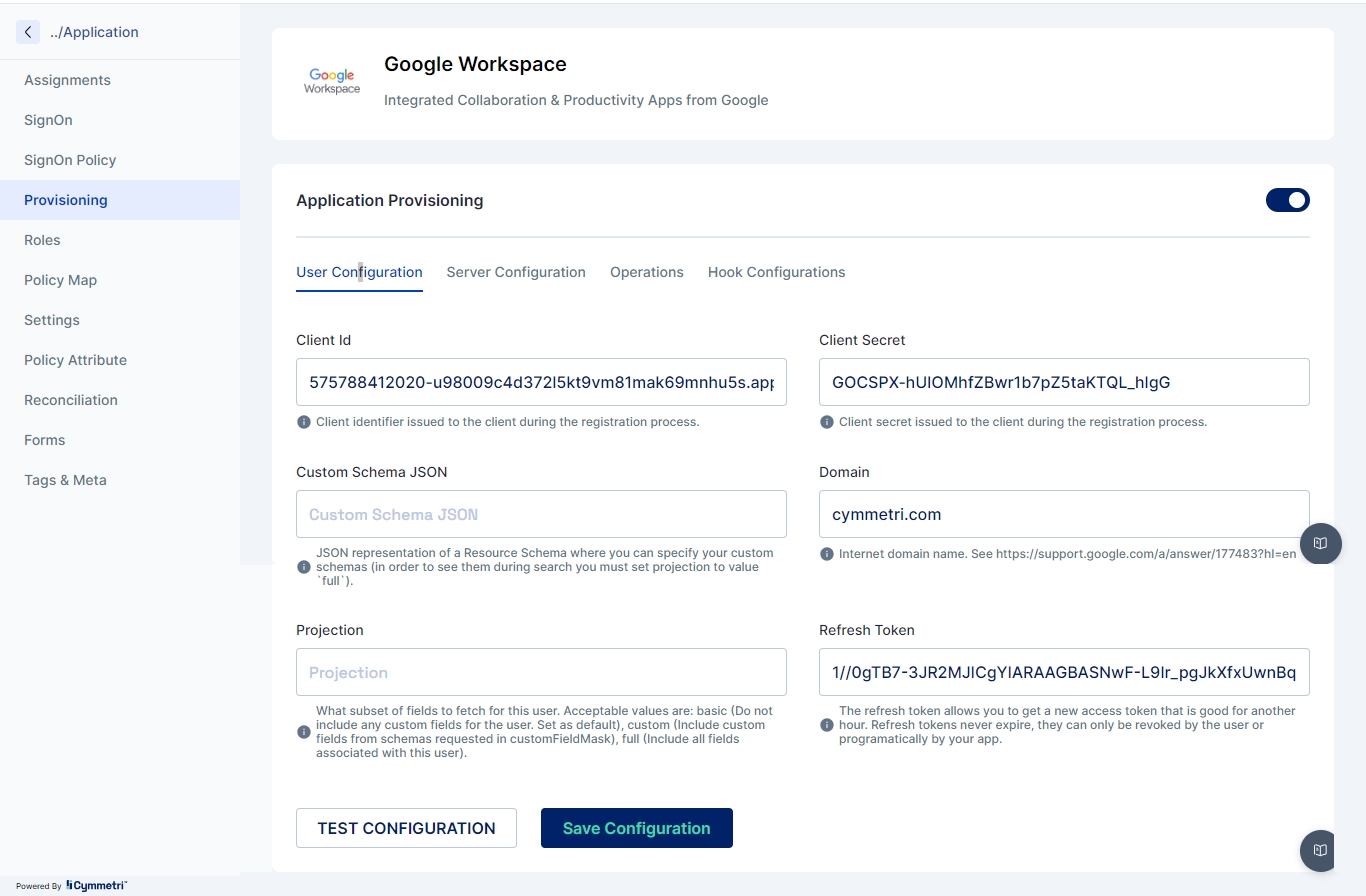
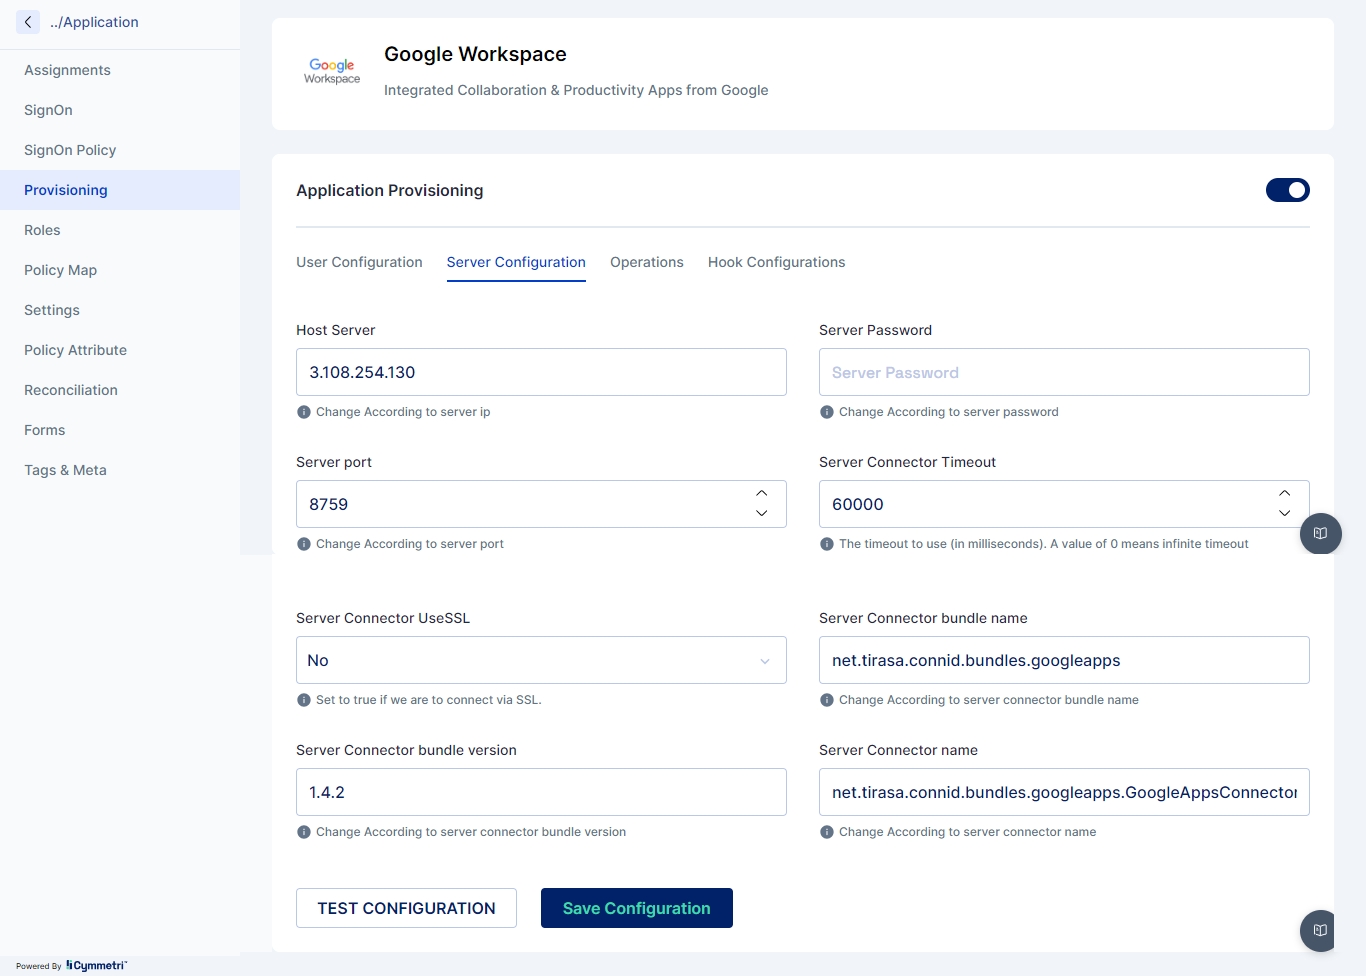
Once the above information is obtained we need to configure the Google Workspace in Cymmetri with Server Configuration and User Configuration as shown below:
Once the configuration is done click on TEST CONFIGURATION button to check if the configuration is working.
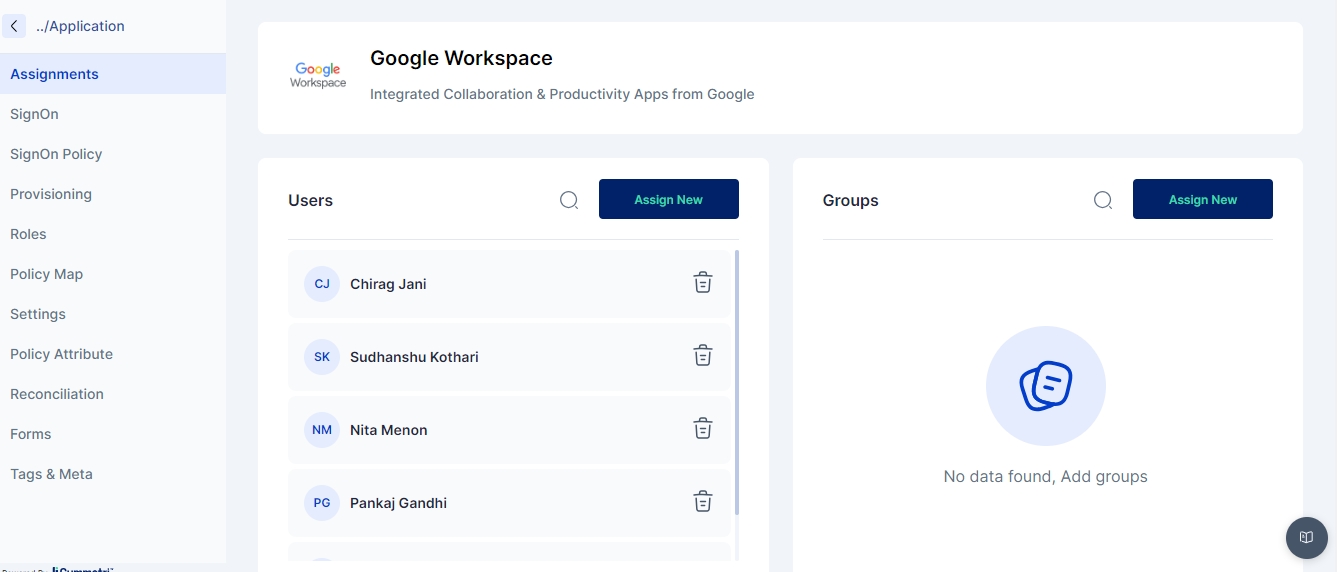
Once the test is successful next go to the Assigments section and assign the application to a user as shown below:
Once assigned ensure that the user is created in Google Workspace.
Azure provisioning in Cymmetri involves setting up configurations to automate the creation and management of user accounts in Microsoft Entra ID. This allows for seamless user onboarding and offboarding processes.
To implement Azure provisioning in Cymmetri, follow these general steps:
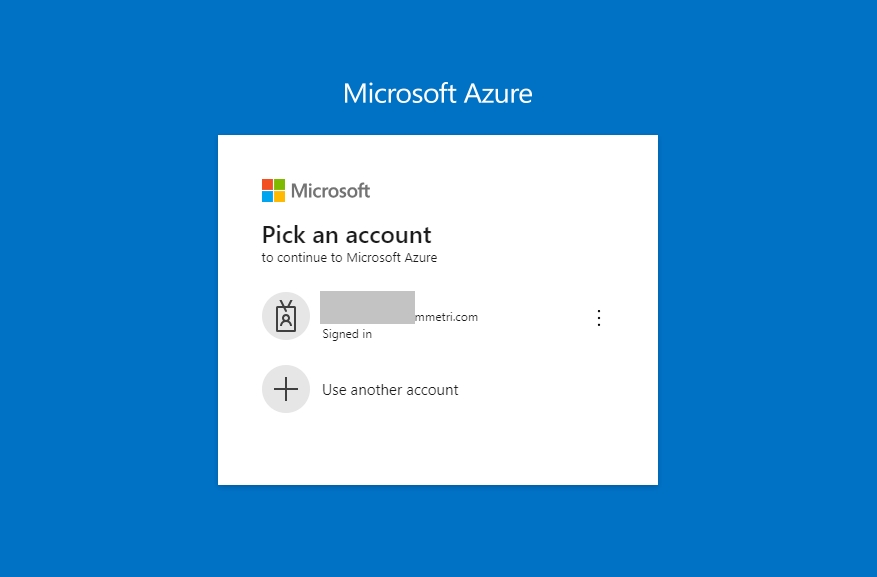
The administrator needs to login to Azure Portal: https://portal.azure.com
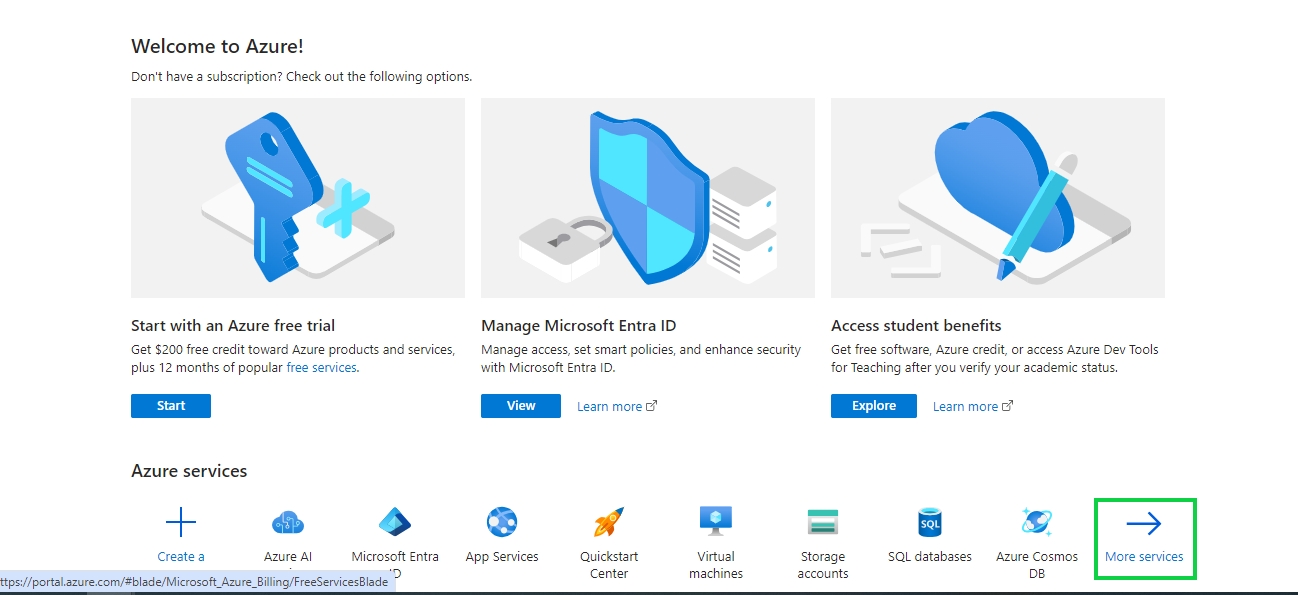
Once logged in click on More services-> button
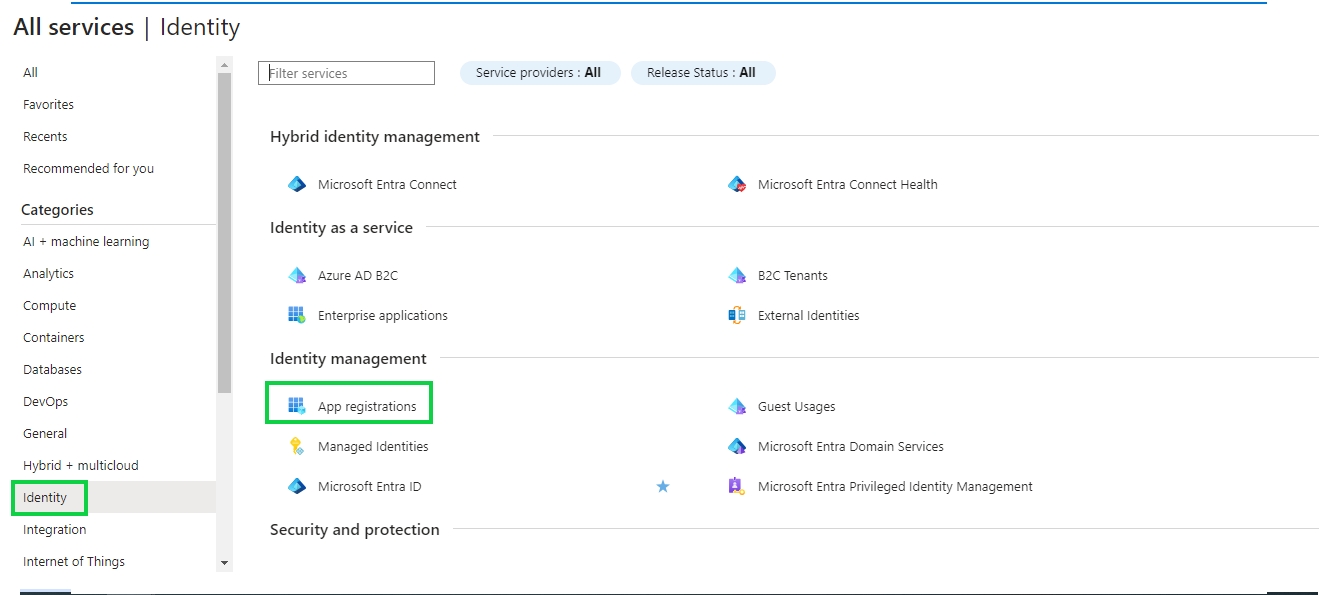
In the next screen click on Identity -> App registrations inside the Identity management section
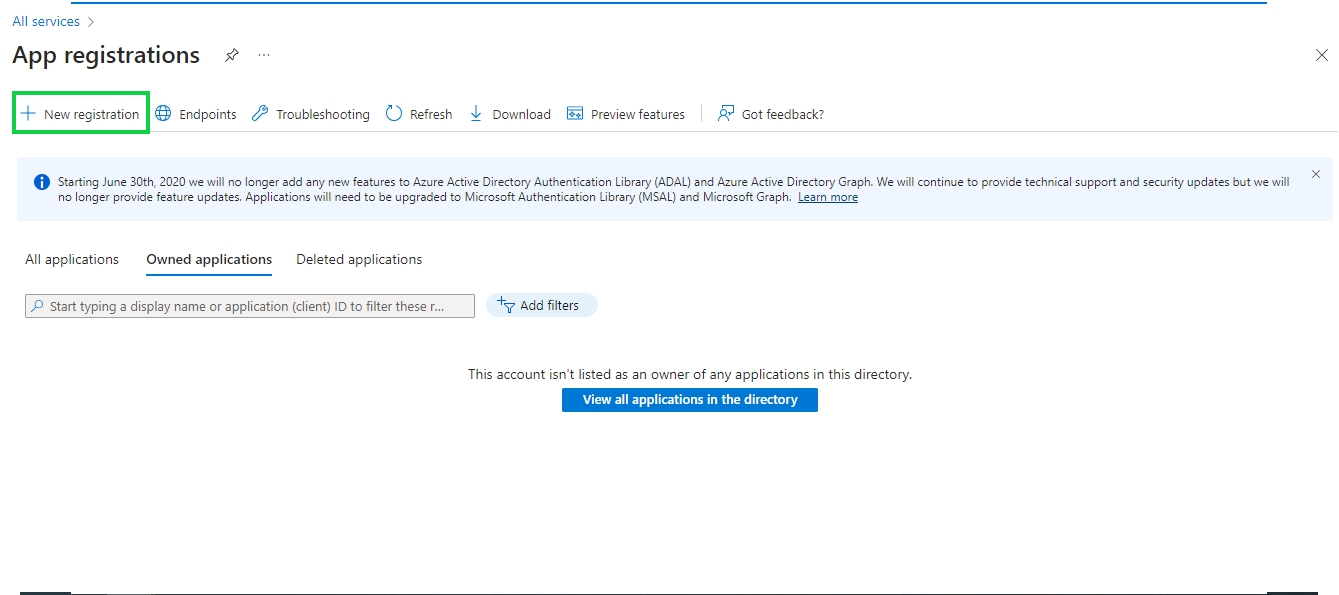
Next click on New registration to register a new App. Registering your application establishes a trust relationship between your app and the Microsoft identity platform. The trust is unidirectional: your app trusts the Microsoft identity platform, and not the other way around. Once created, the application object cannot be moved between different tenants.
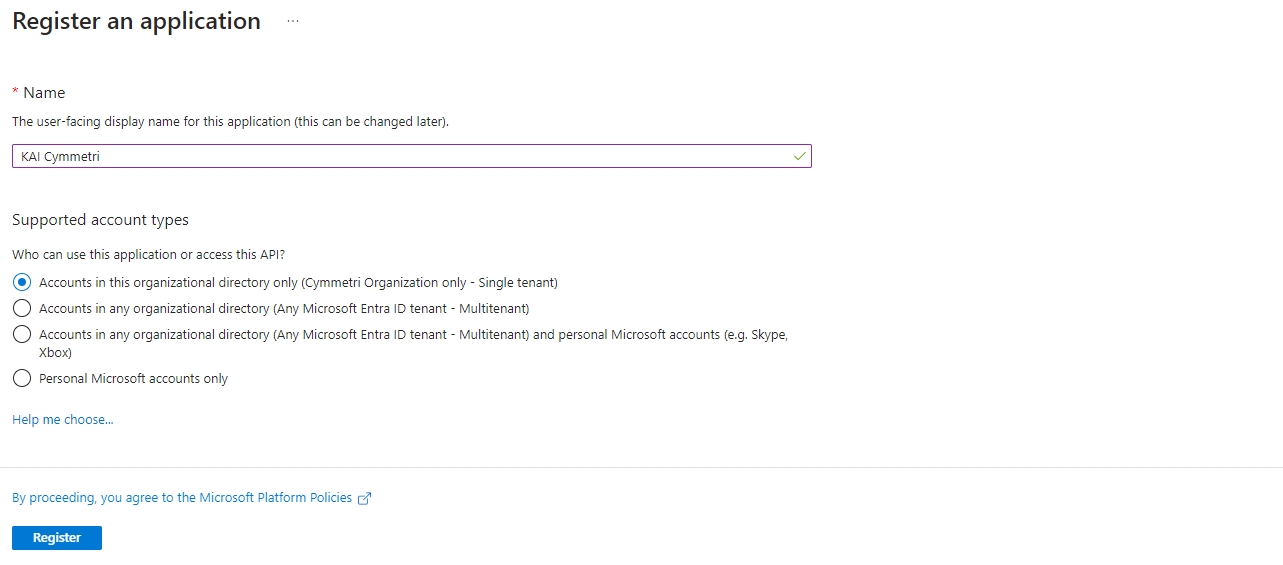
Next enter the Application Name and select the Supported account types to organizational directory only : Accounts in this organizational directory only (Cymmetri Organization only - Single tenant) and then click on Register
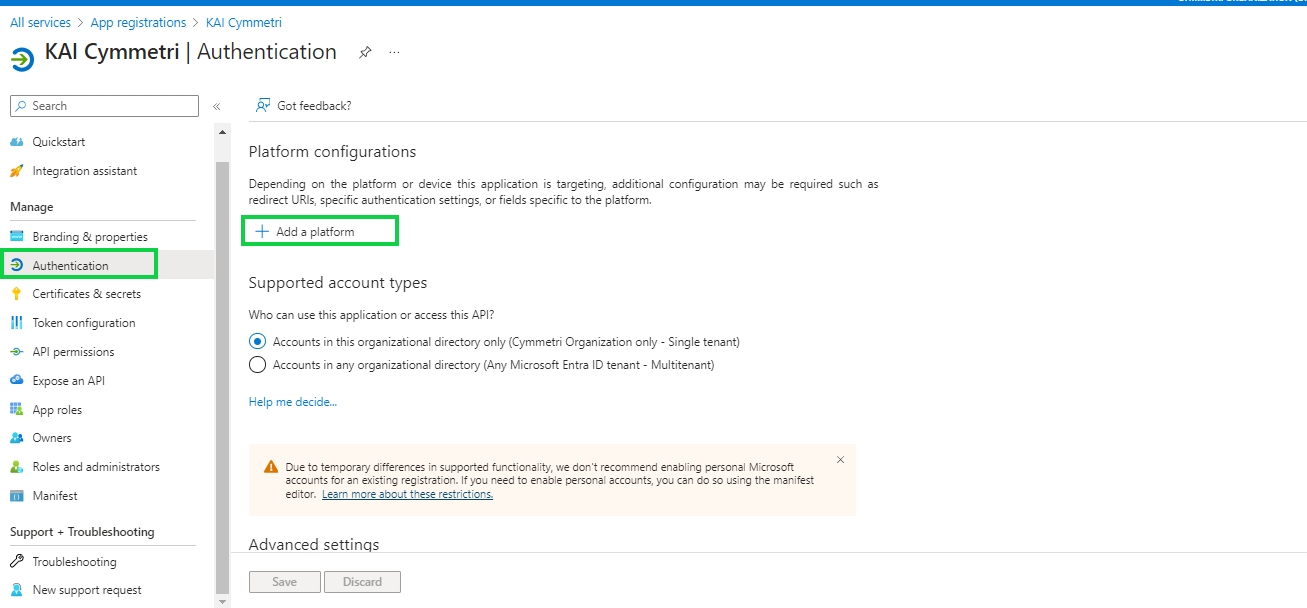
Once registered next click on Authentication menu and +Add a platform.
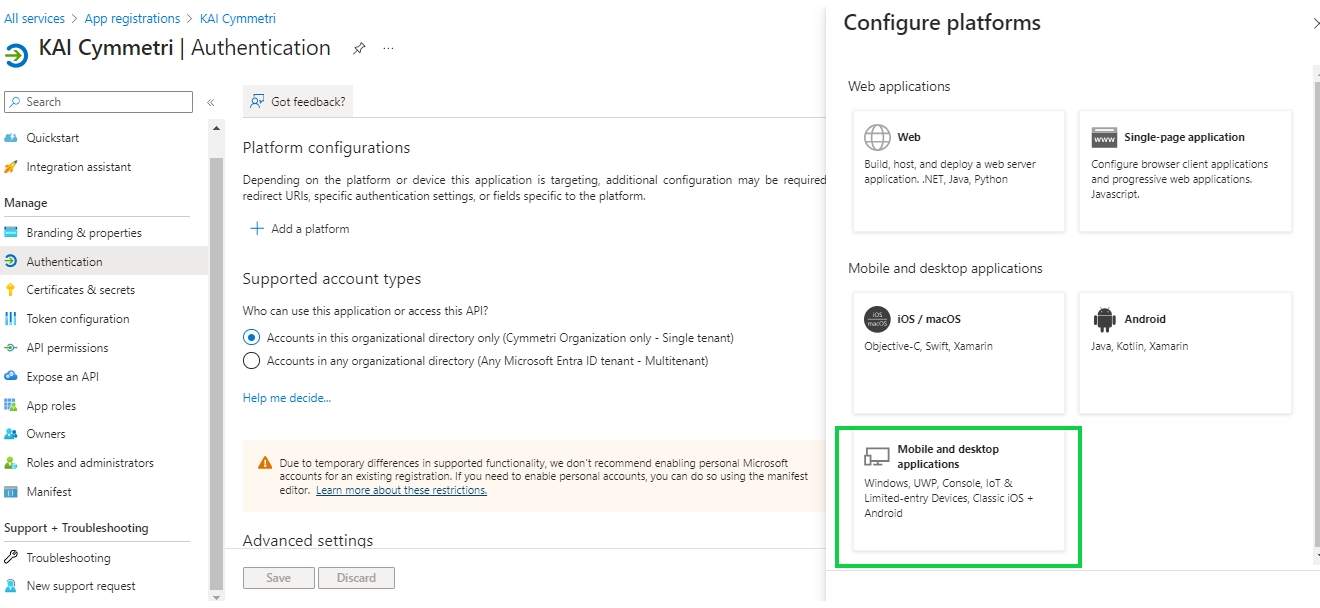
On the next screen select Mobile and desktop applications
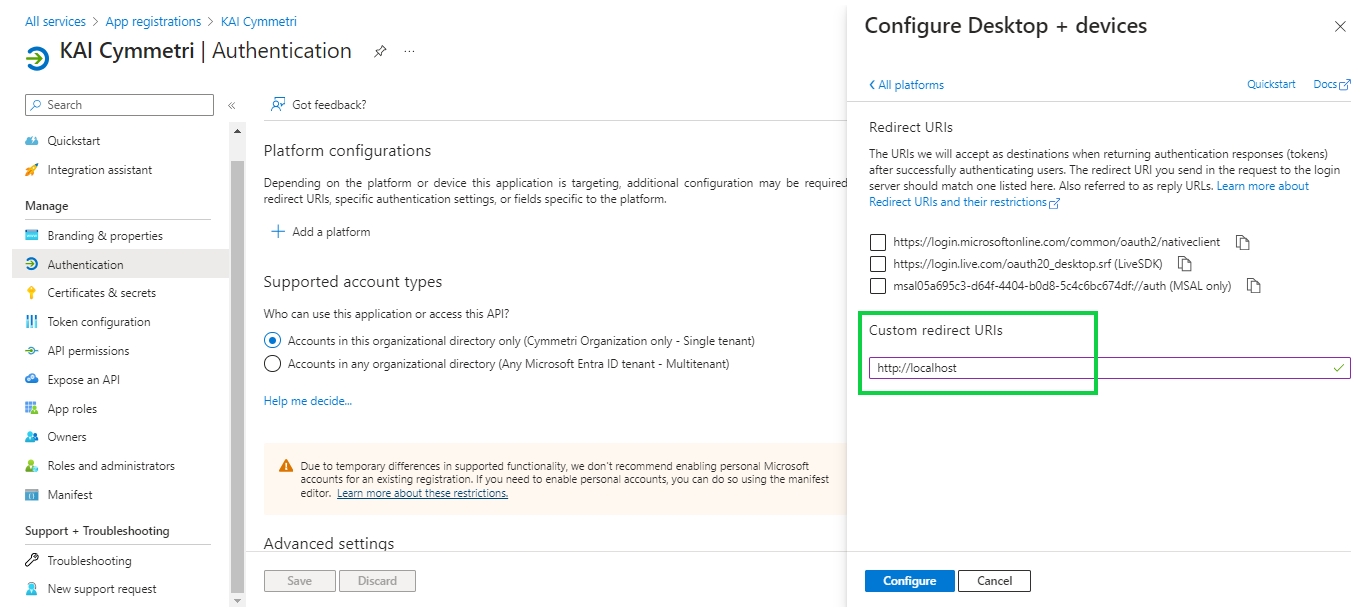
Enter a Custom redirect URIs: http://localhost and click on Configure
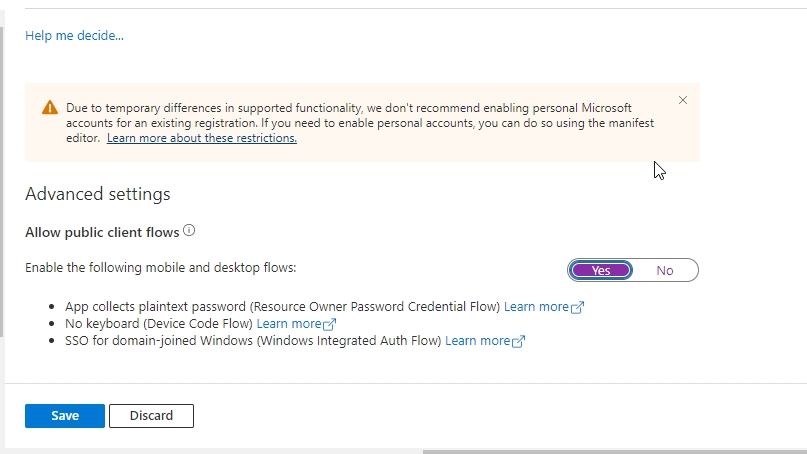
Further enable the Public Client flows and click on Save button
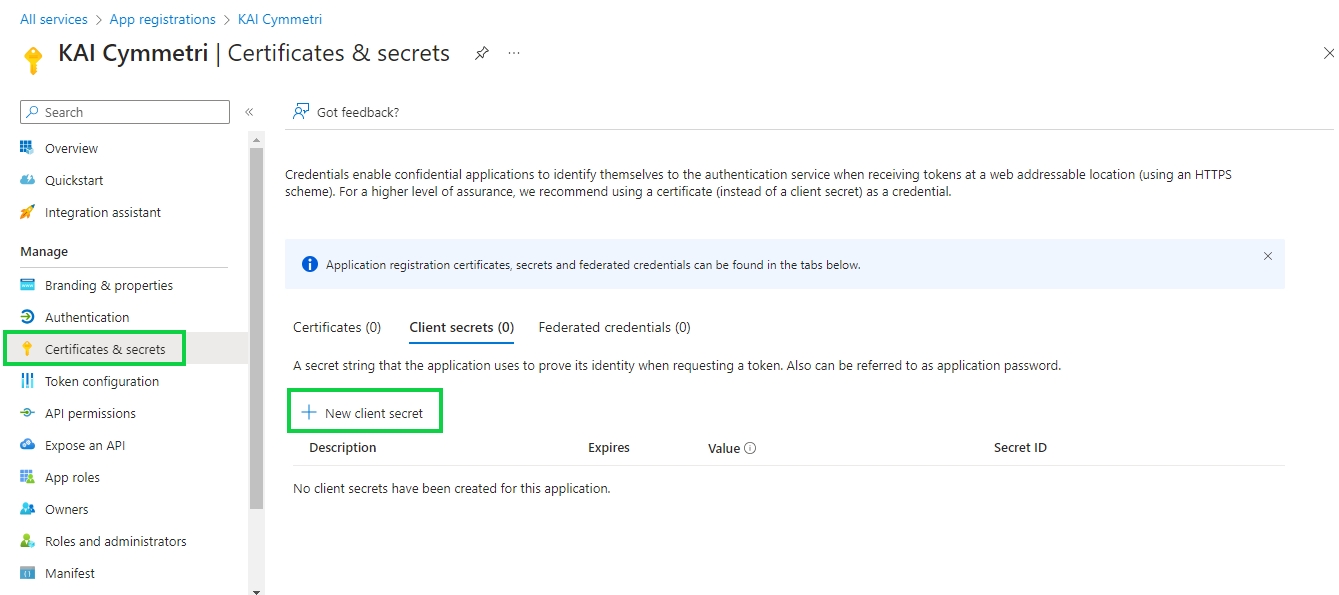
Next go to Certificates and secrets menu and create a new client secret:
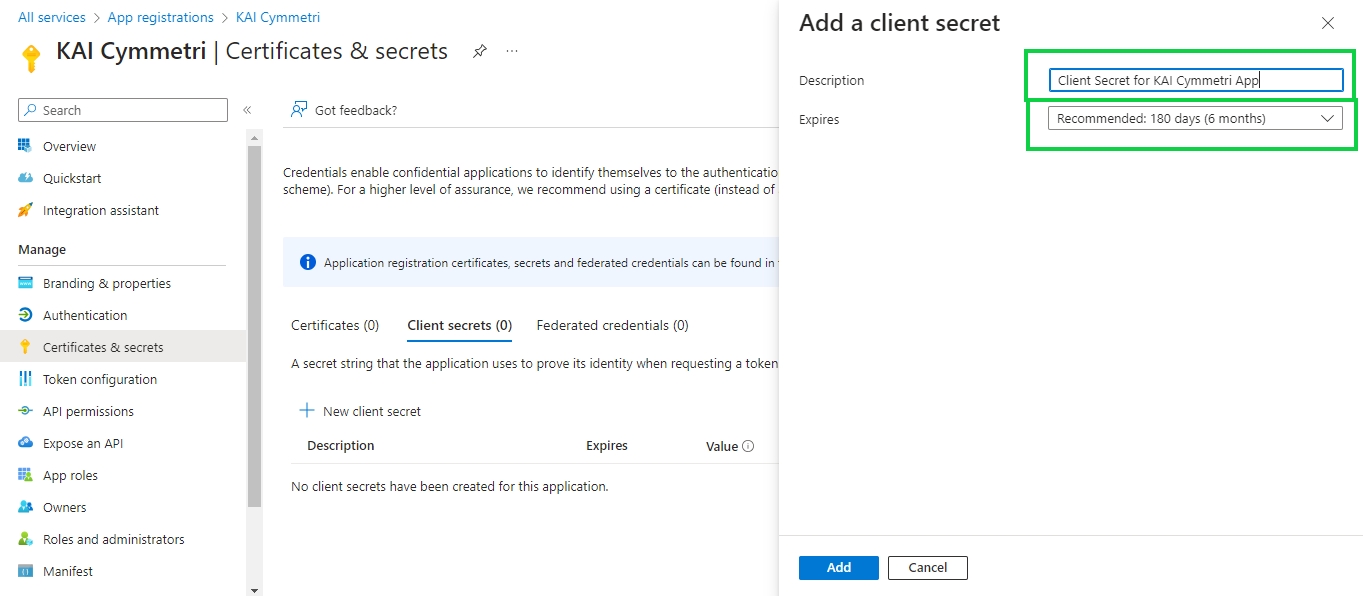
Next enter a Description for the and select the duration after which the secret would Expire -Recommended is 180 days (6 months) but can be changed as per the need. Once both the details are entered click on Add button
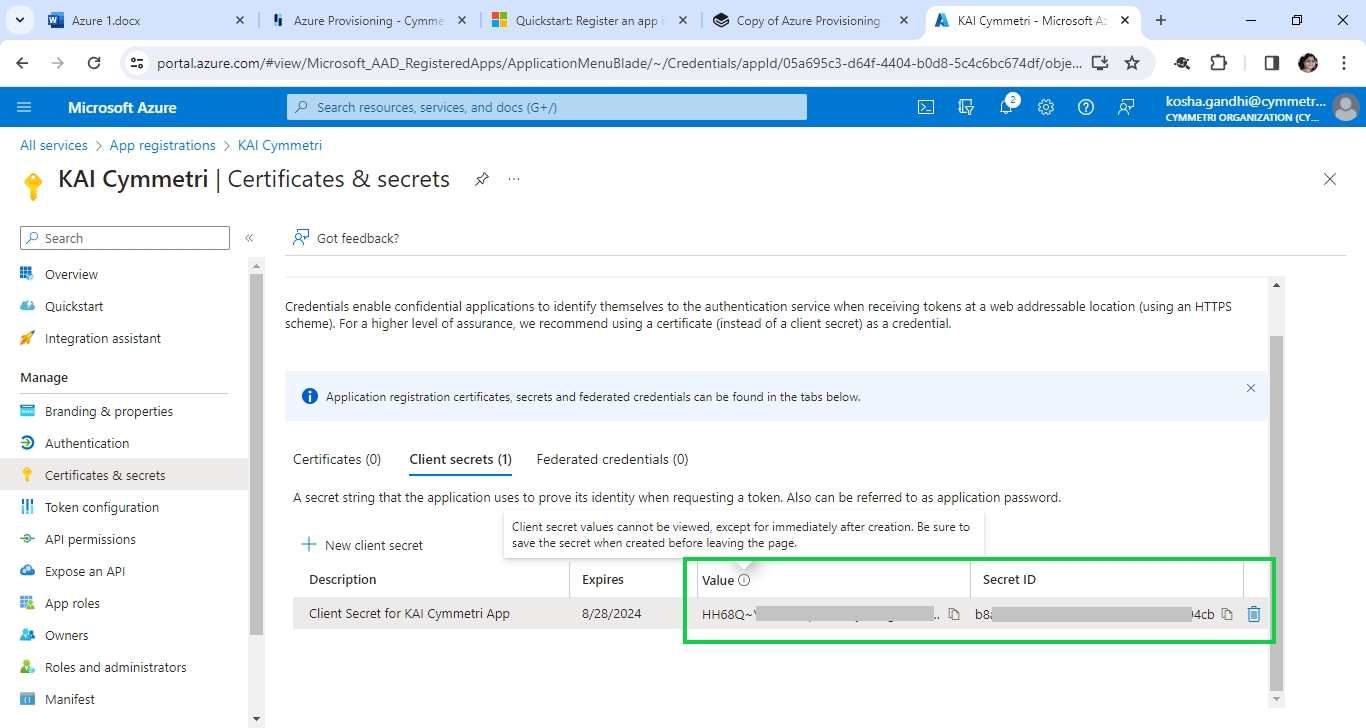
Next copy and save the Client Secret ID and Client Secret Value in a safe and accessible place. Client secret values cannot be viewed, except for immediately after creation. Be sure to save the secret when created before leaving the page.
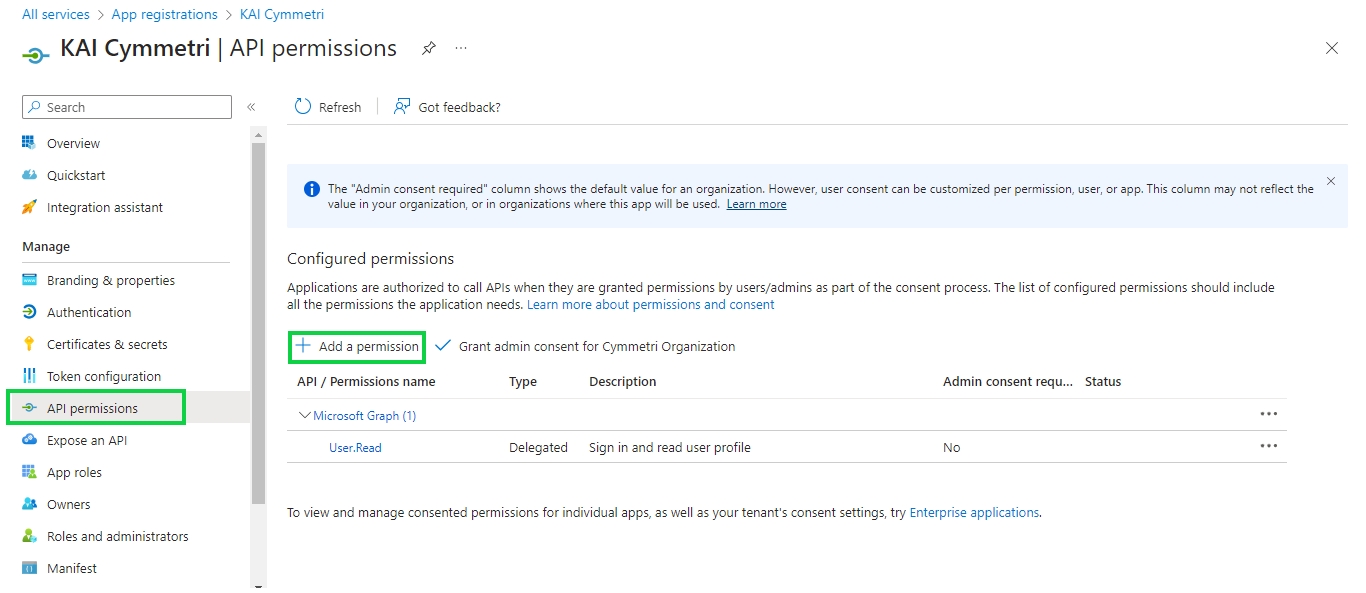
Once the client secret details are stored next click on API permissions menu and then + Add a permission
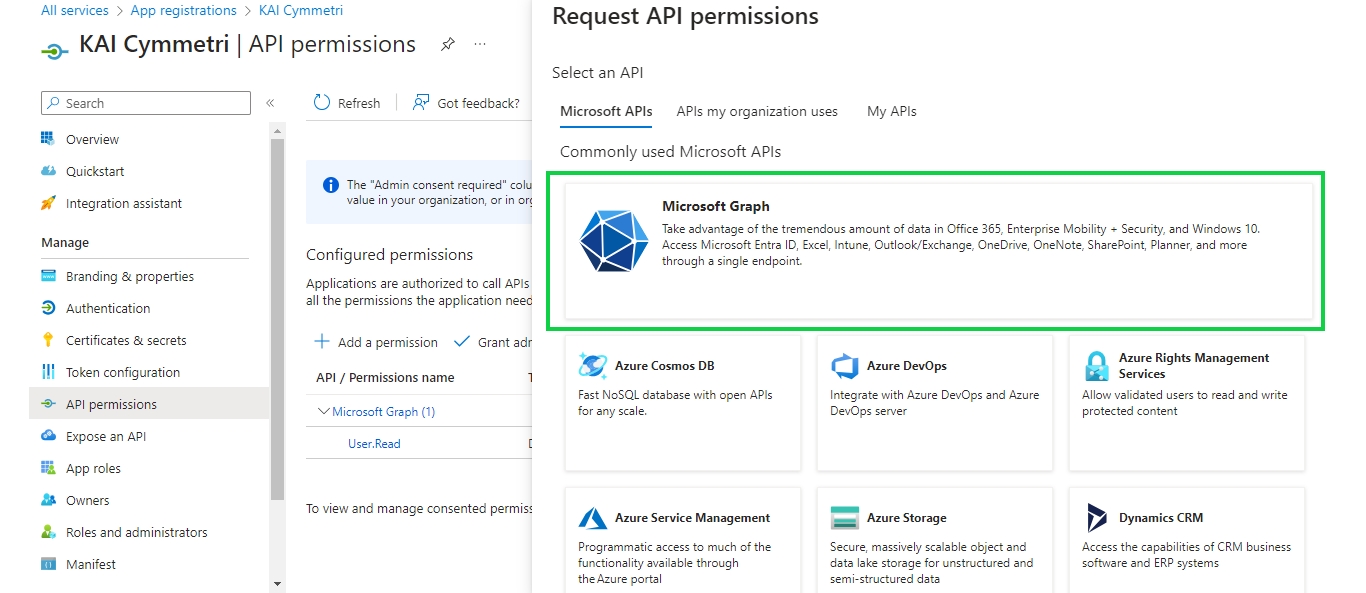
On this page select Microsoft Graph
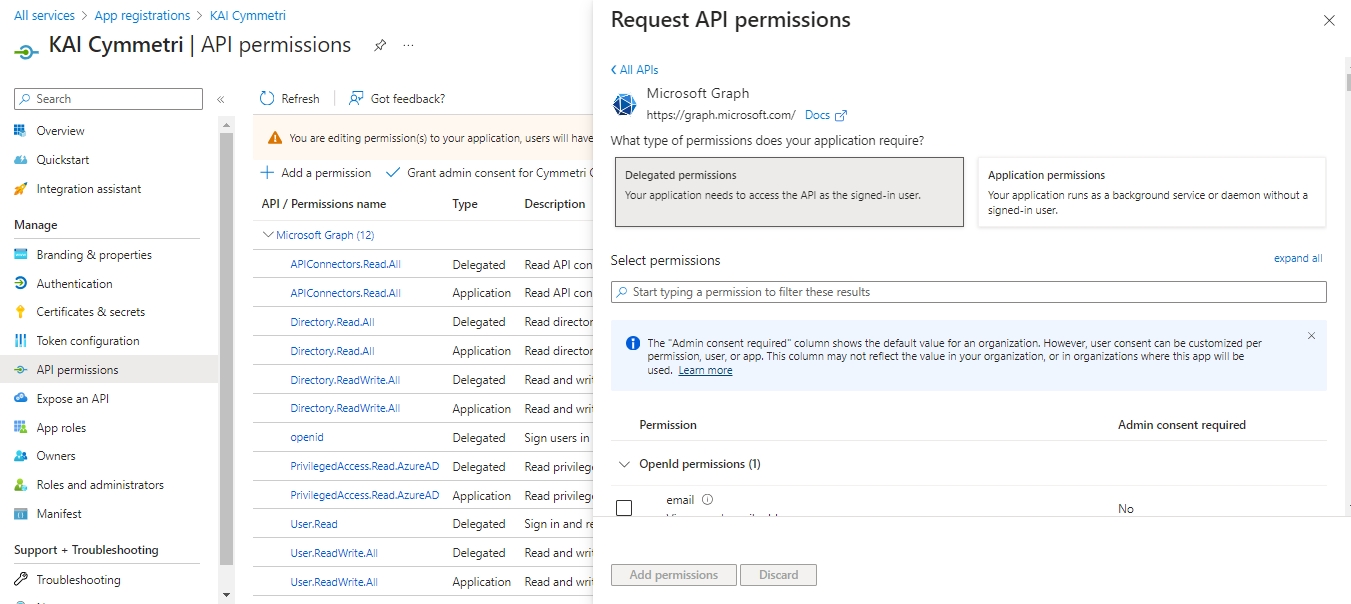
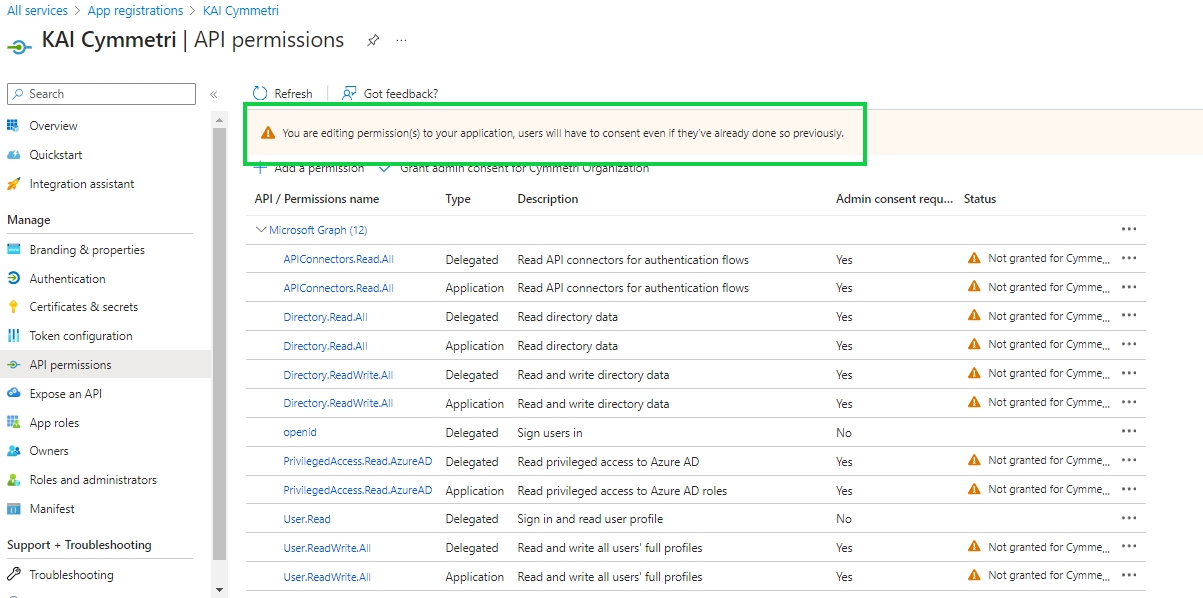
On the next page we require permissions for both Delegated and Application permissions. Select each type of permission and in that Search and select the following permissions/scopes:
APIConnectors.Read.All
Directory.ReadWrite.All
OpenID (Not available for Application Permissions)
PrivilegedAccess.Read.AzureAD
User.ReadWrite.All
Directory.Read.All
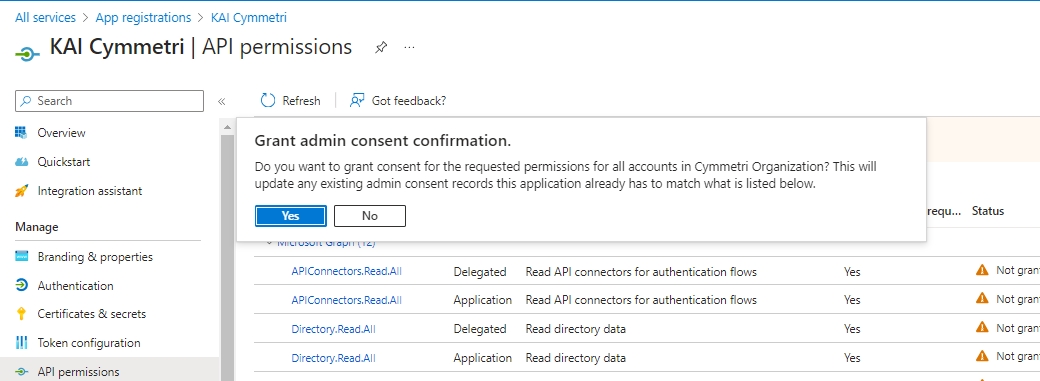
Once all the permissions are added a warning is shown: "You are editing permission(s) to your application, users will have to consent even if they’ve already done so previously." The administrator needs to click on the "Grant admin consent for Cymmetri Organization" link
On the click of the link a popup appears to grant admin consent, click on Yes
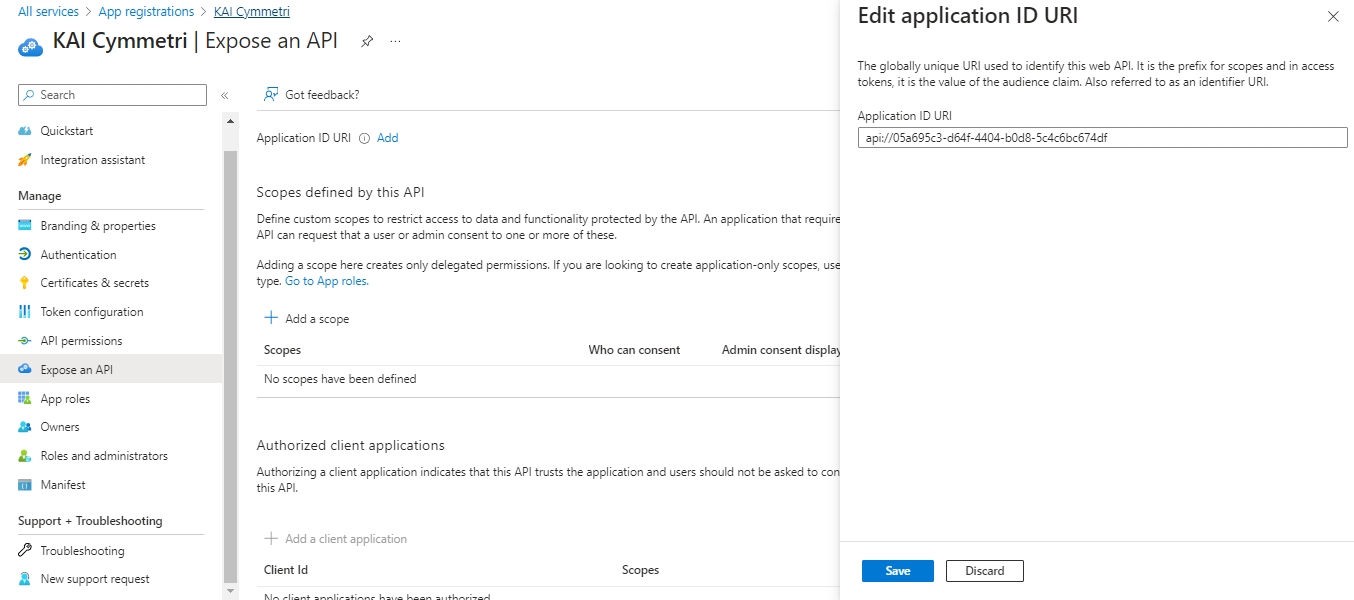
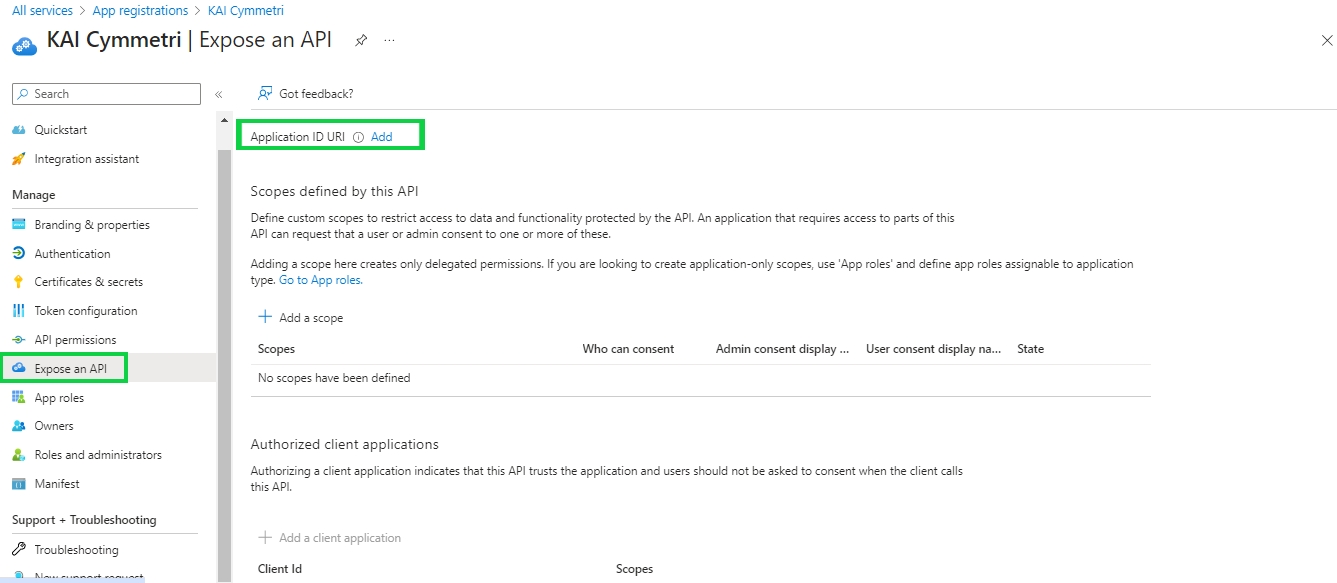
Next click on Expose an API and then click on Add to add an Application ID URI: The Application ID URI, also called identifier URI, is a globally unique URI used to identify the web API. This URI is the prefix for scopes in the Oauth protocol. You can either use the default value in the form of api://, or specify a more readable URI.
On the next page keep the default values intact and click on Save button
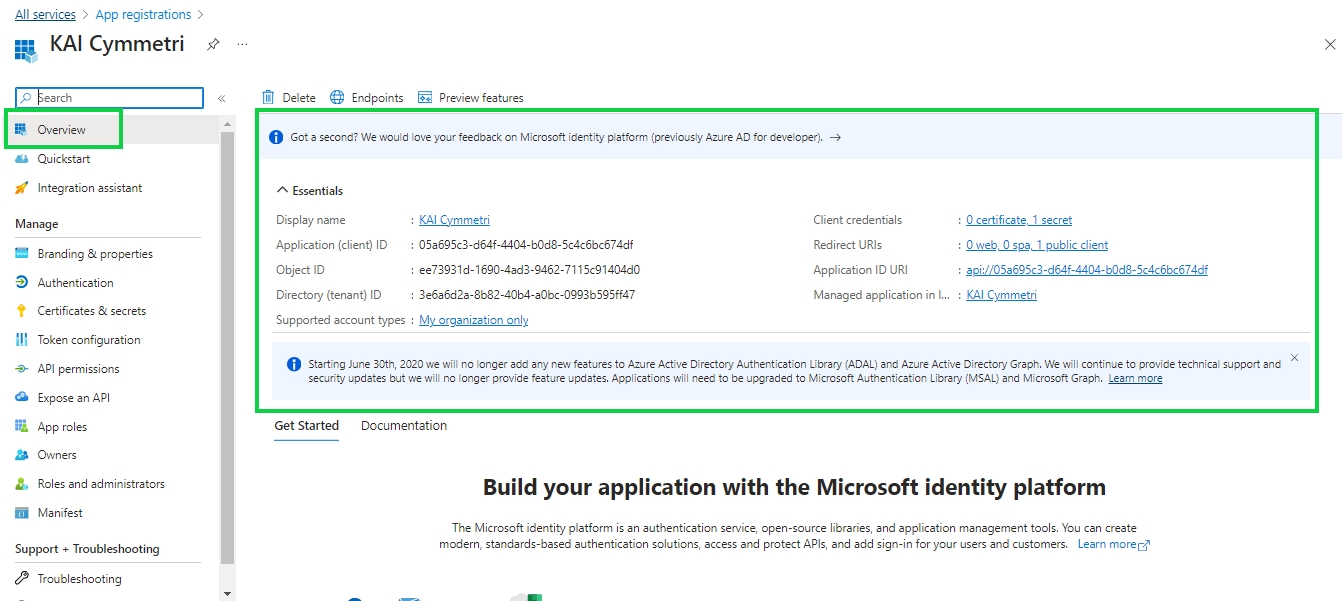
Finally you can see the Overview page that contains all the information you need to configure Azure in Cymmetri.
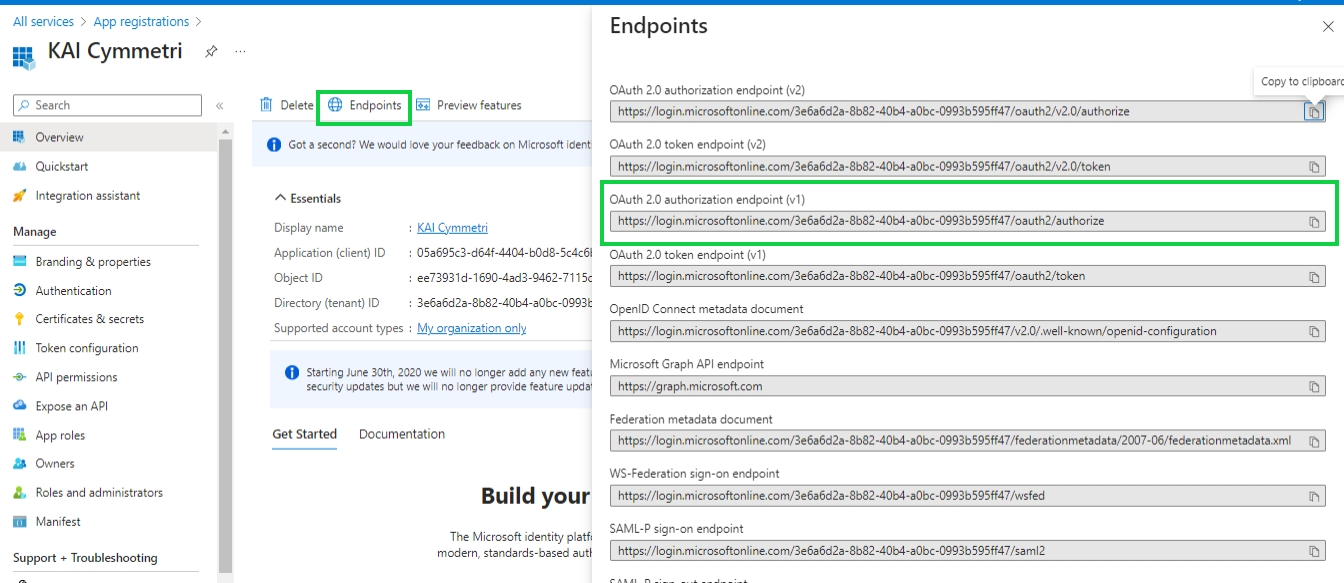
Also the User config Application Authority can be obtained from the endpoint section in the Overview page:
This completes the Azure side of the configuration, next the administrator needs to need to move to Cymmetri and configure the Azure application. Mentioned below are the steps required to configure Azure in Cymmetri:
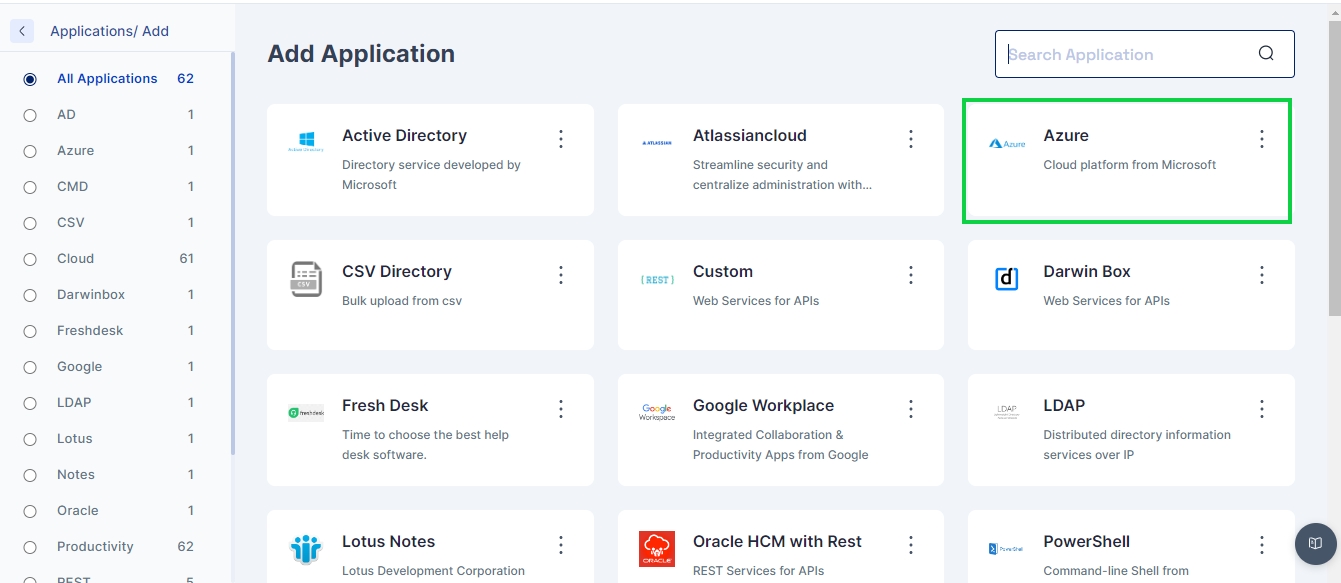
Add a new Azure application Identity Hub->Applications and then click on the +Add New button
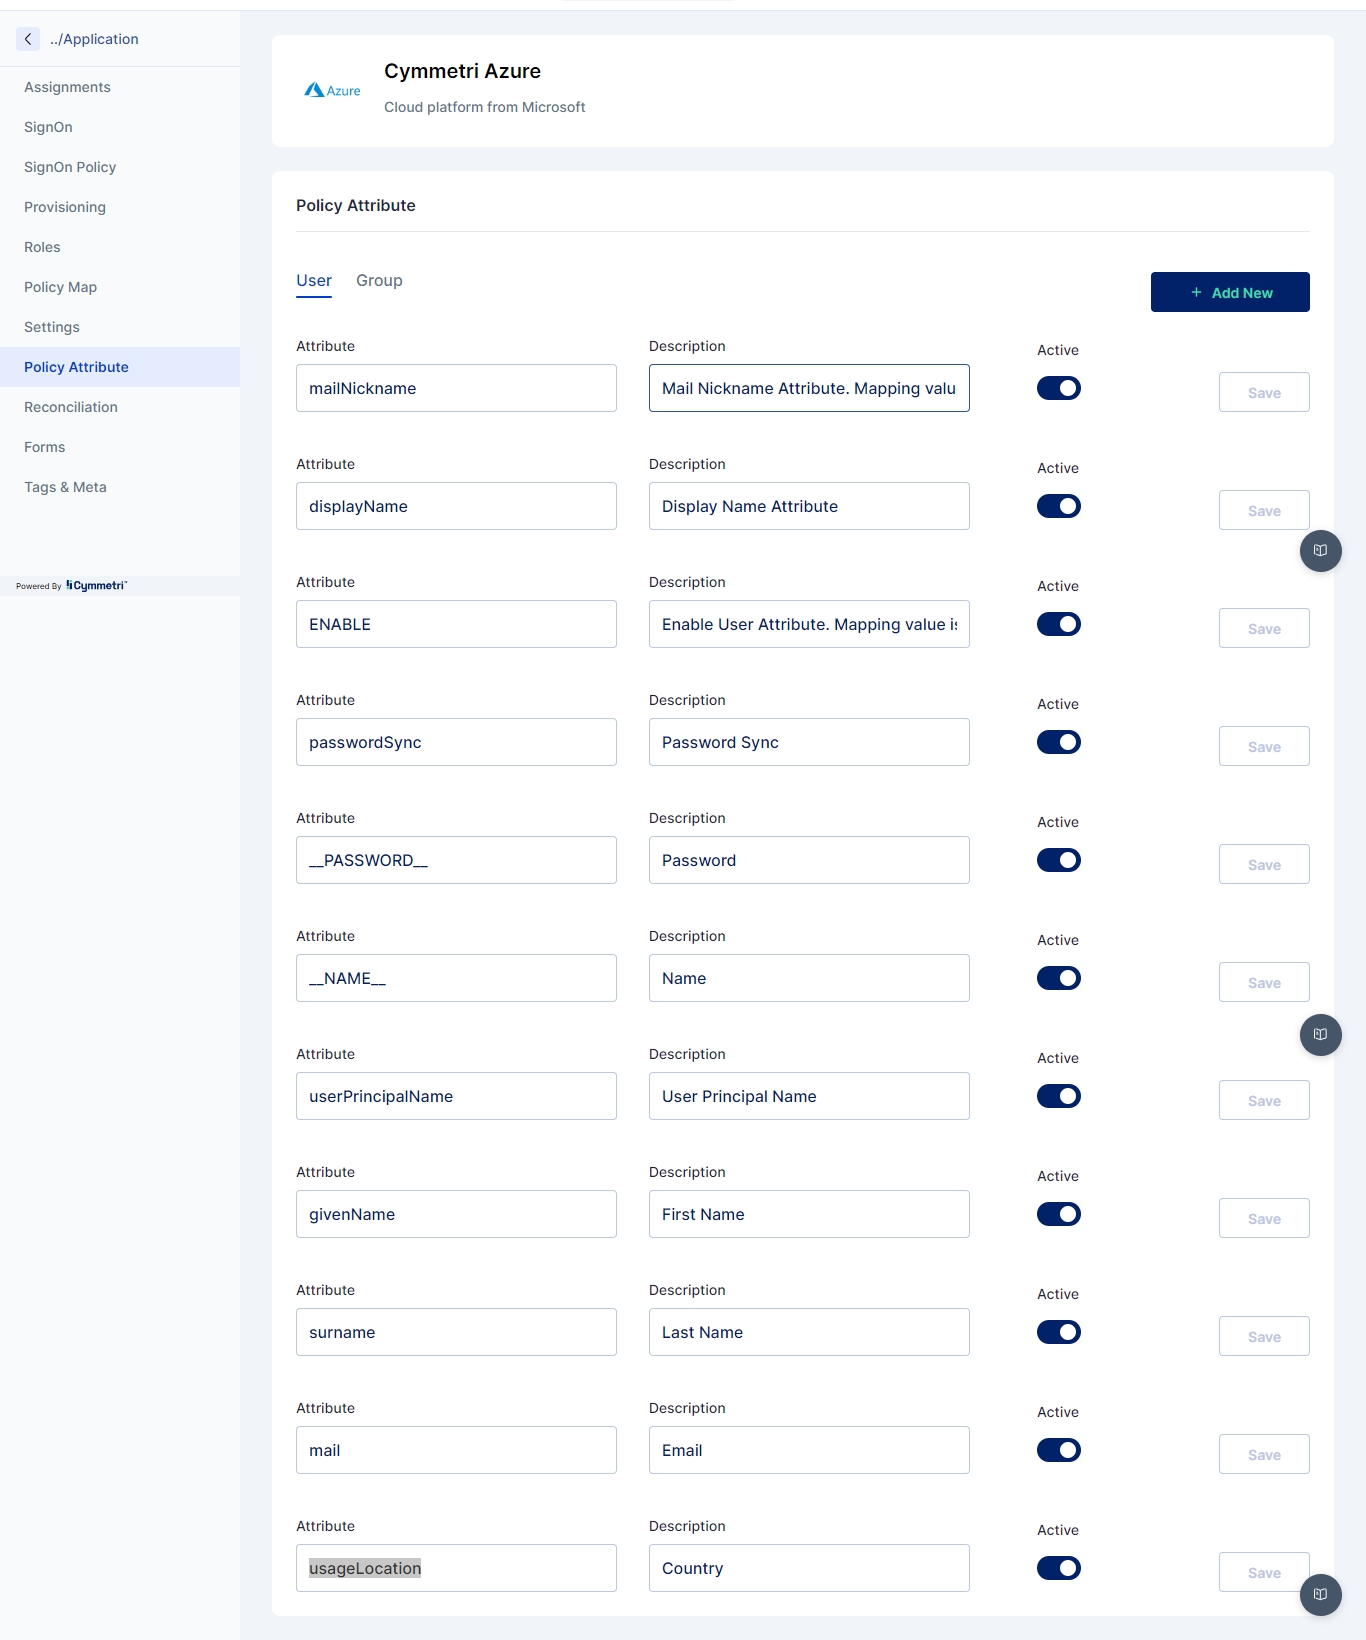
Once added the administrator needs to go to Policy Attribute section and ensure all the below mentioned attributes are present (Add if not already present):
mailNickname
displayName
__PASSWORD__
__NAME__
userPrincipalName
givenName
surname
usageLocation
Next the administrator needs to go to the Policy Map section and ensure a mapping shown as below is created:
displayName
displayName
-
True
True
__NAME__
login
-
True
True
__PASSWORD__
password
-
True
True
mailNickname
mailNickName
-
True
True
userPrincipalName
login
True
True
True
givenName
firstName
-
True
True
surname
lastName
-
True
True
-
True
True
usageLocation
country
True
True
azureLicense
azureLicense
<actual license key>
True
True
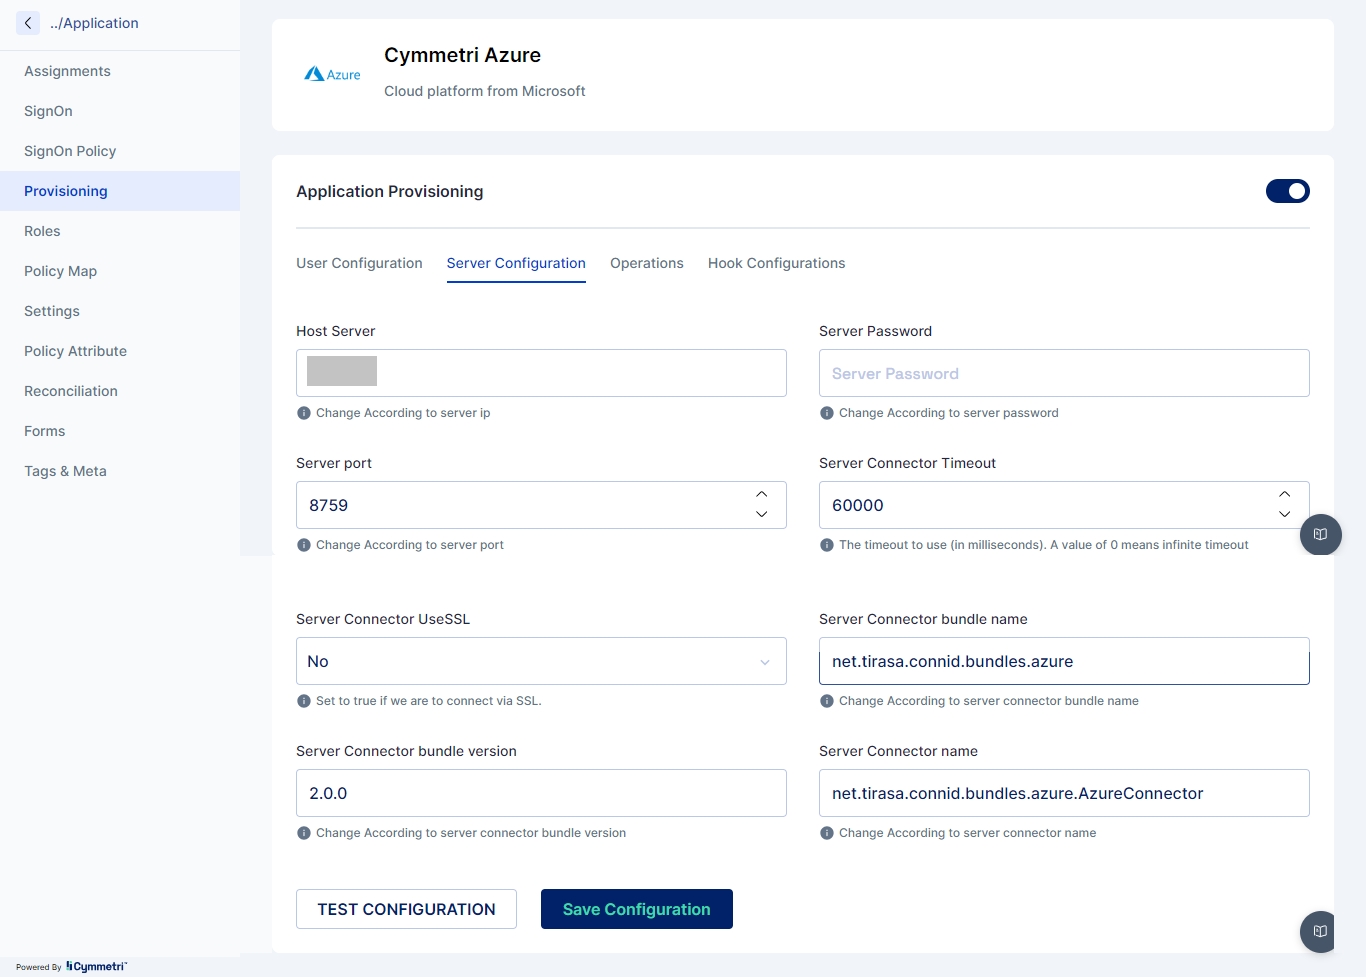
Once the policy map is created next the administrator needs to go to Provisioning section and then to Server Configuration and need to configure the connector server as shown below:
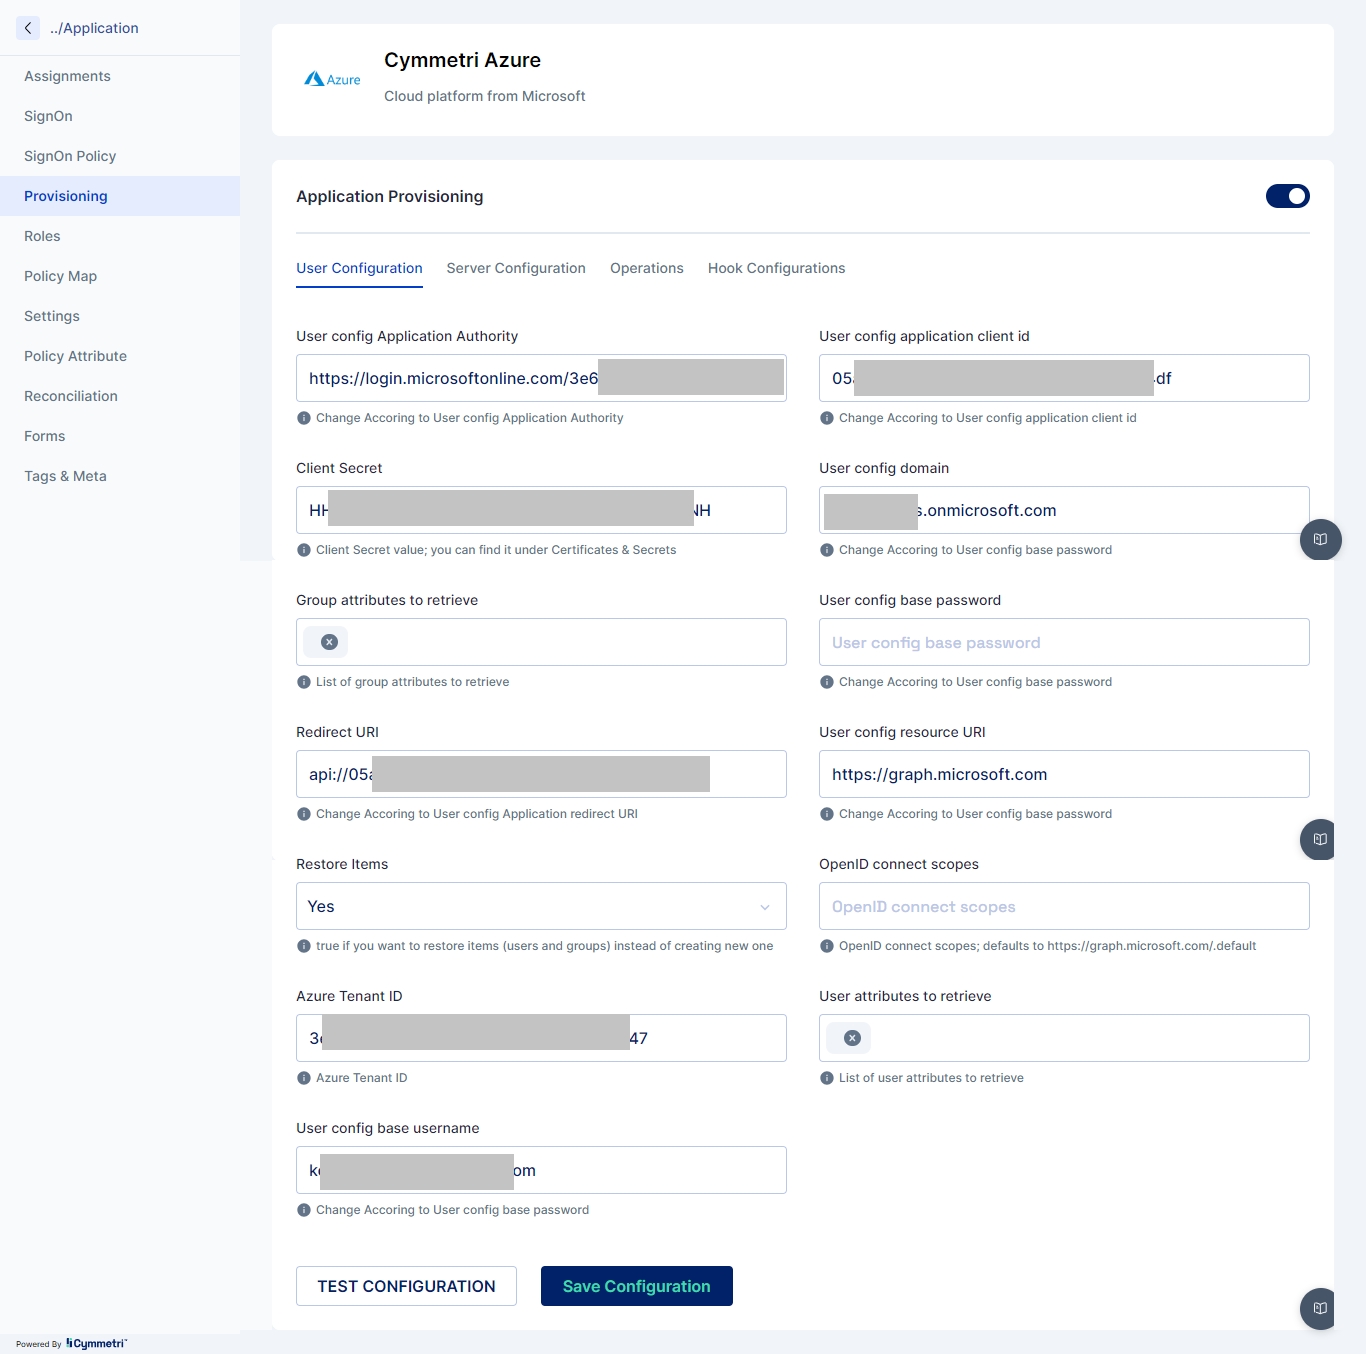
Once the Server Configuration is done next the administrator needs to implement User Configuration with the below mentioned fields:
User config Application Authority: This is the authority under which the application operates. For example, if you're using Azure AD, the application authority might be https://login.microsoftonline.com/<tenant_id>/oauth2/authorize
User config application client id: This is the unique identifier for your application. It is provided by Azure when you register your application. For example, e9a5a8b6-8af7-4719-9821-0deef255f68e.
Client Secret: This is a secret key used by the application to prove its identity when requesting access tokens. It should be kept confidential. For example, 7f7df45a-251e-49d3-a396-748bf8e05a3c.
User config domain: This is the domain associated with your Azure AD. For example, contoso.onmicrosoft.com.
User config base password: This is the base password used for your application. For example, MyBasePassword123.
Redirect URI: This is the URI to which Azure AD will redirect the user after authentication. For example, api://05b765c3-d64f-7704-b0d8-5c4c6bc674df
User config resource URI: This is the URI of the resource (API, web app, etc.) that the application wants to access. For example, https://graph.microsoft.com.
Azure Tenant ID: This is the identifier for your Azure AD tenant. For example, 72f988bf-86f1-41af-91ab-2d7cd011db47.
User config base username: This is the base username used for your application. For example, MyUsername@contoso.onmicrosoft.com.
Once the configuration is done and saved, Next click on TEST CONFIGURATION to test if Cymmetri is able to connect to Azure Server.
For assigning any sort of licenses to a user of various products two main policy map entries need to done as shown below:
azureLicense: Need to provide license key for the product you wish to assign to the user
usageLocation: This field needs a two-letter country code (ISO standard 3166). Required for users that are assigned licenses due to legal requirements to check for availability of services in countries. Examples include: US, JP, and IN.
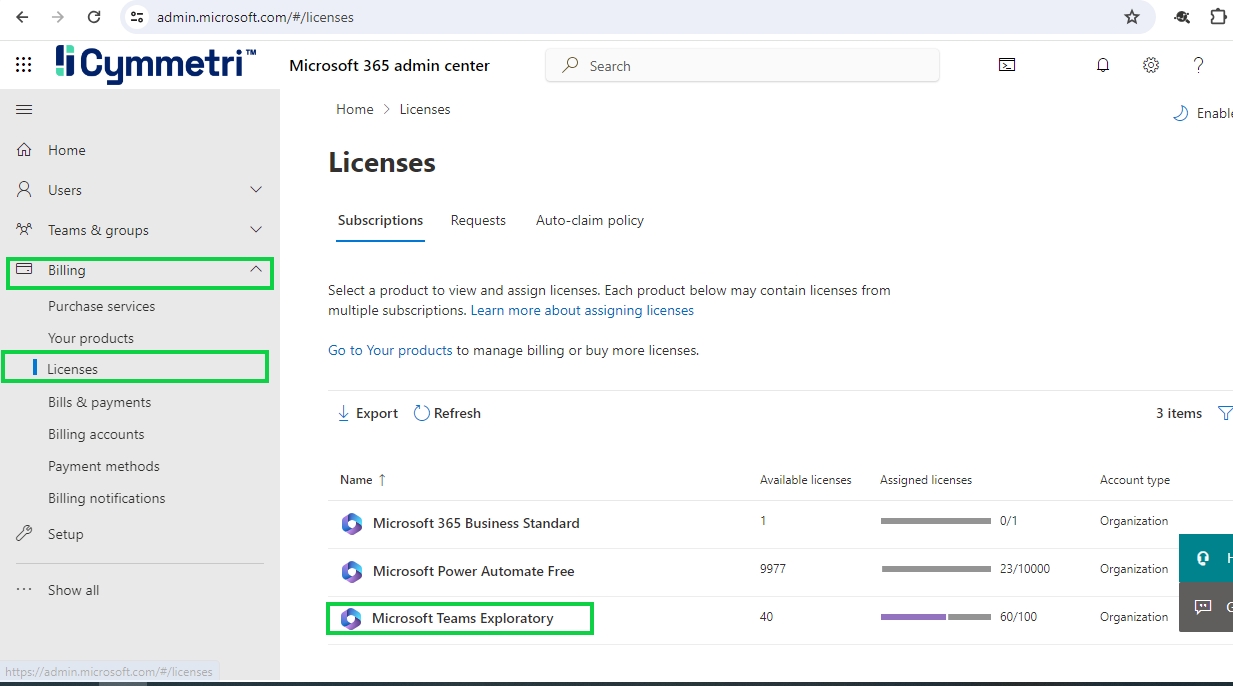
The value for azureLicense can be obtained as explained below:
Go to https://admin.microsoft.com/ and login using the admin credentials. Once logged in go to Billing->Licenses->Microsoft Teams Exploratory
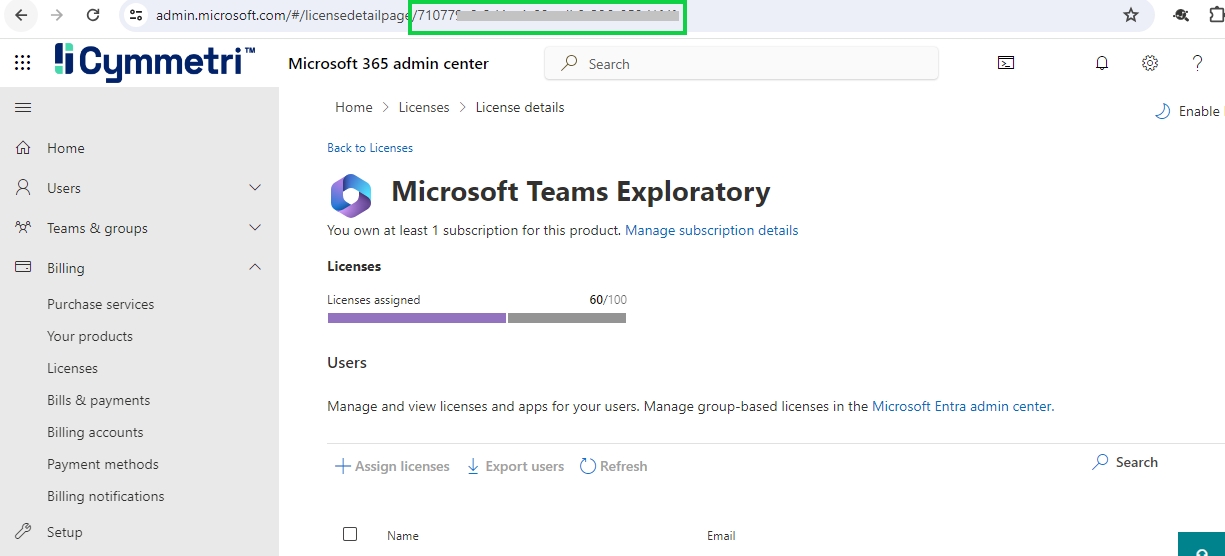
Once you click that it opens the page from which we can copy the product id from URL as shown below:
Once all the above configuration is done, on the same page in Cymmetri go to Assignments section and assign users to the application and ensure that these users are created in Azure's Microsoft Entra ID along with the Microsoft Teams license.
Below is a list of Cymmetri connectors along with brief descriptions:
Once the managed application has been added to your Cymmetri Identity platform tenant, you will be able to assign applications to your end-users.
There are three ways in which applications can be assigned to users:
Admin may assign an application directly to a user.
Admin may map an application to a group; and the user is added to the group or is already part of the group.
End User may request an application and is granted access to the application.
Bulk Assignment of application to a set of users
Let us understand the flow for each of the above mentioned scenarios:
Users with admin roles such as Organization Admin, Domain Admin, or Application Admin on the Cymmetri platform can assign managed applications to end-users .
First, we need to add the application to the Cymmetri platform
Next, we move to configure the application to assign it to an end user.
Click on the application tile to configure it.
The flow for assignment goes as follows -
Description:
Admin clicks on the application tile, and starts the configuration.
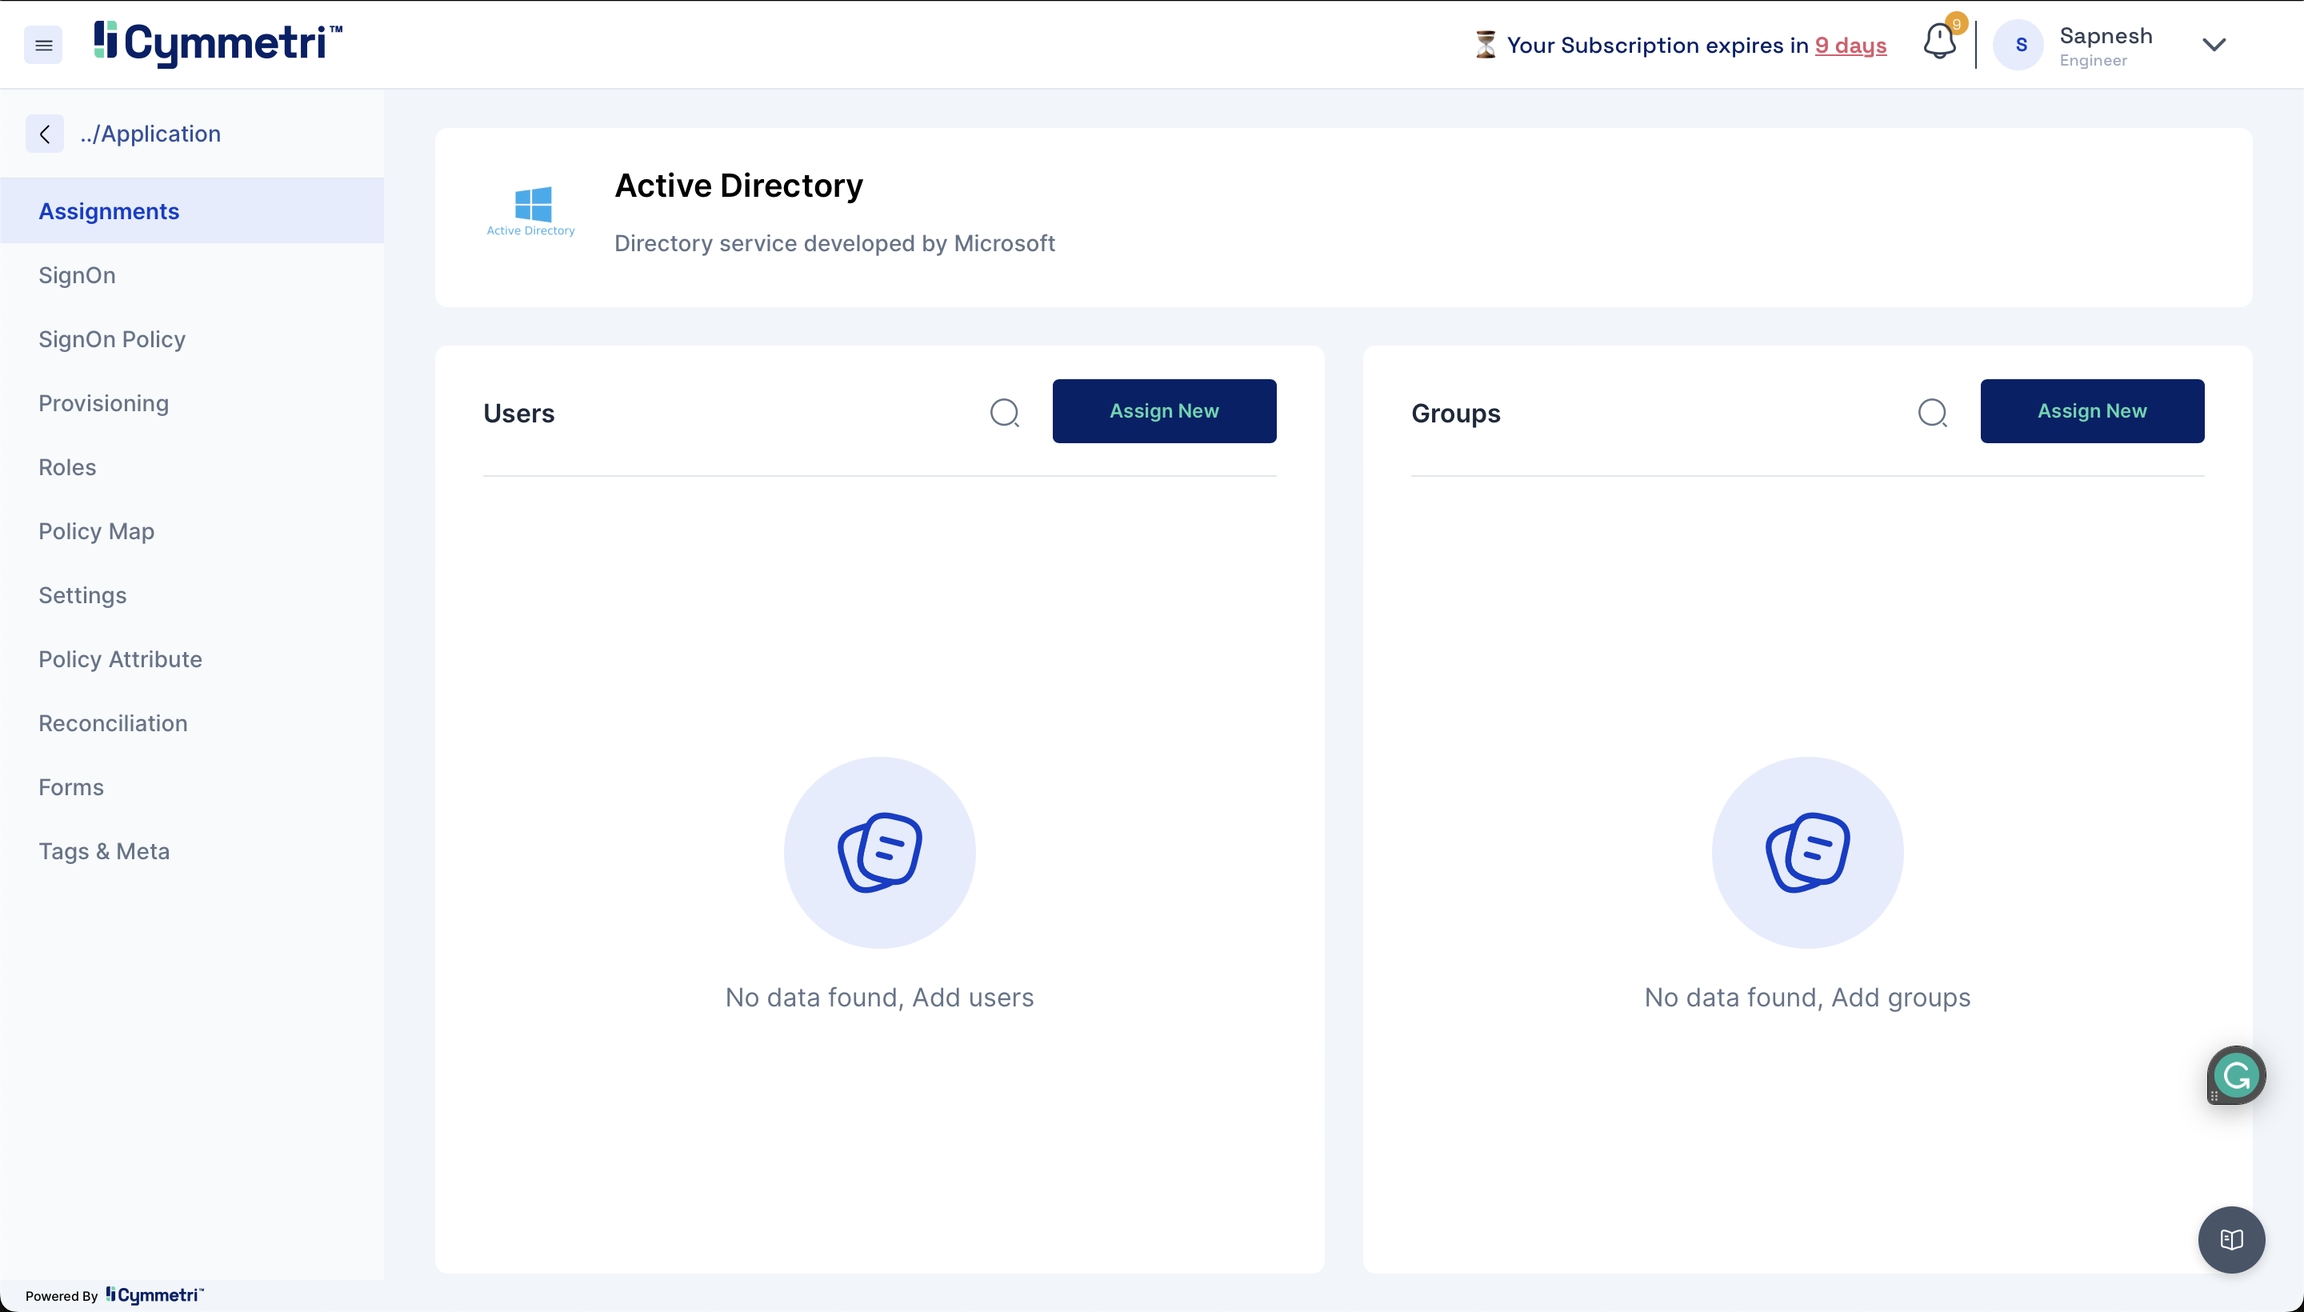
Click on the Assignments tab on the left hand side menu.
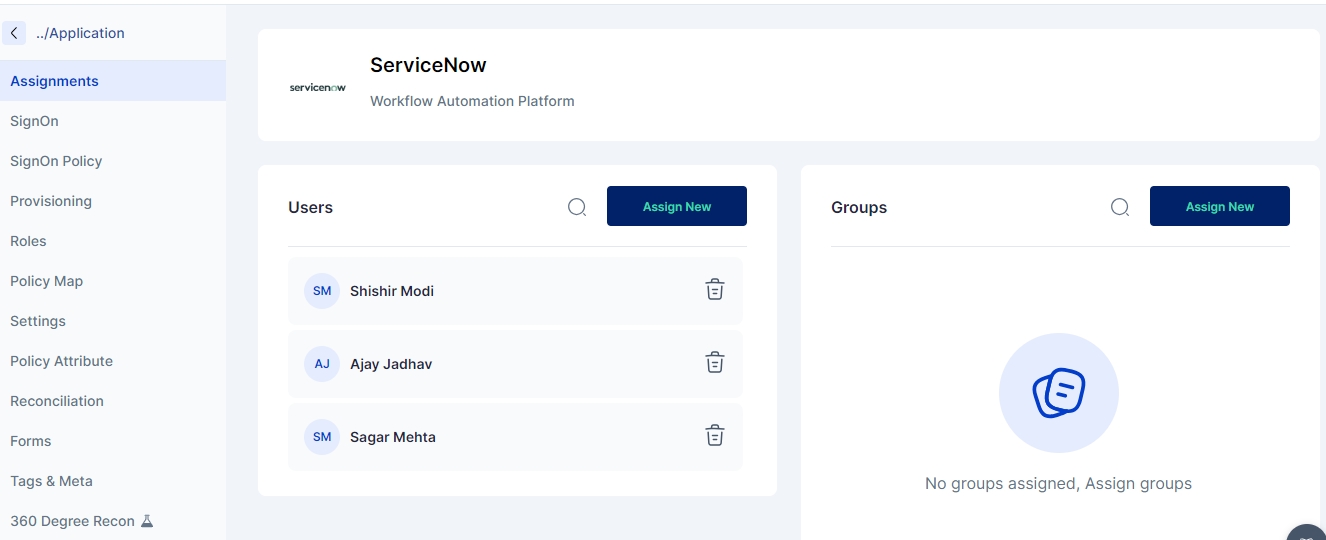
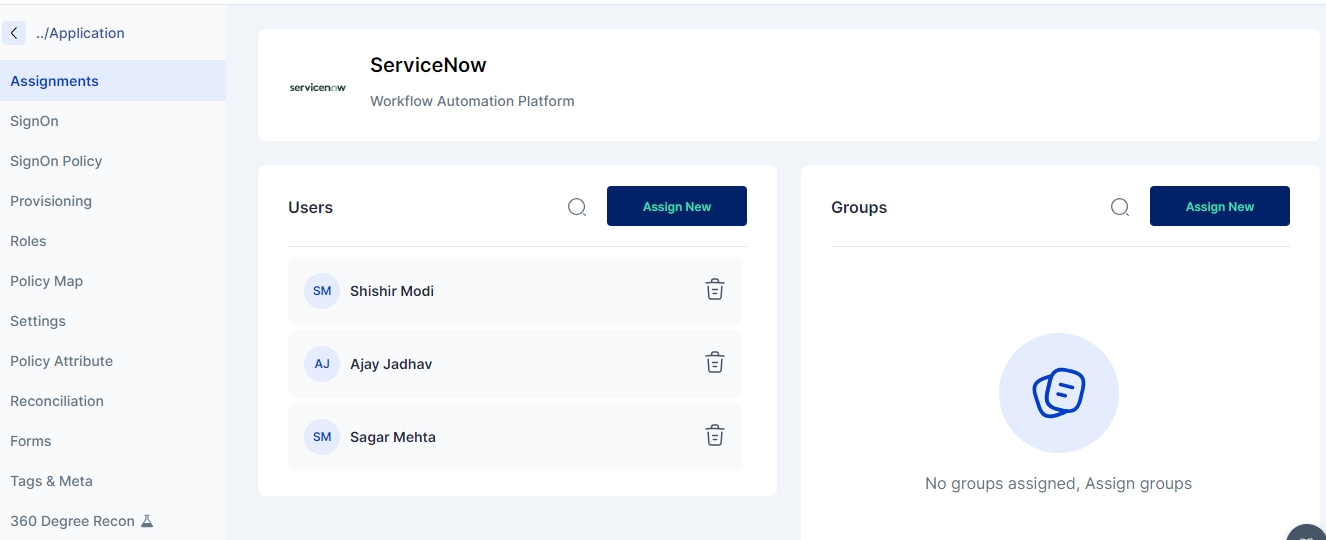
Click on the “Assign New” button on the Users menu.
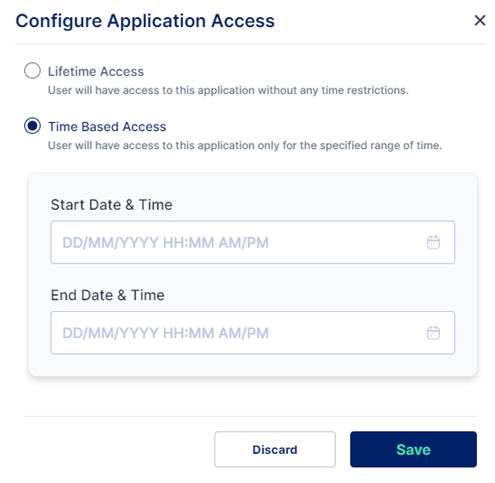
Here we need to decide whether we want to provide a Lifetime Access or a Time Based Access
Lifetime Access: Users have access to the application without any time restrictions.
Time Based Access: Users have access to the application only for the specified range of time. We need to provide a Start Date & Time and an End Date & Time for Time Based Access.
Now click on Save to register a request for the application assignment. If no Workflow is configured for the said application the application is immediately assigned to the user.
If a workflow for application provisioning is configured then the workflow is been initiated.
The workflow approver will then receive a request to approve the user assignment in their inbox.
Now the approver may approve or reject the user assignment
The approver may change the start and end date, if required; refer to the dynamic form attributes passed during the application assignment.
To continue the flow click on Accept button.
Now the next level of approver will be able to see the previous levels of approval, and similar to the previous level of approval, the approver may change the start and end date, if required; refer to the dynamic form attributes passed during the application assignment.
Click “Accept” to proceed.
After the last level approver has also approved the assignment, the backend processes will run the application provisioning flow.
Once the user has been provisioned in the application, they will be able to see it in their list of applications.
Users with admin roles, such as Organization Admin, Domain Admin, or Application Admin, in a Cymmetri Identity platform deployment, will have the ability to assign entire groups of users to managed applications.
First, we need to add the application to the Cymmetri platform
Next, we move to configure the application to assign it to a group.
Click on the application tile to configure it.
The flow for assigning a group to an application goes as follows:
Click on the application tile, and start the configuration.
Click on the Assignments tab on the left hand side menu.
3. Click on the “Assign New” button in the Groups section.
4. Search for the group you wish to assign the application to and click on the assign button.
5. Checking for the users who belong to the group, we can see that the application has been assigned.
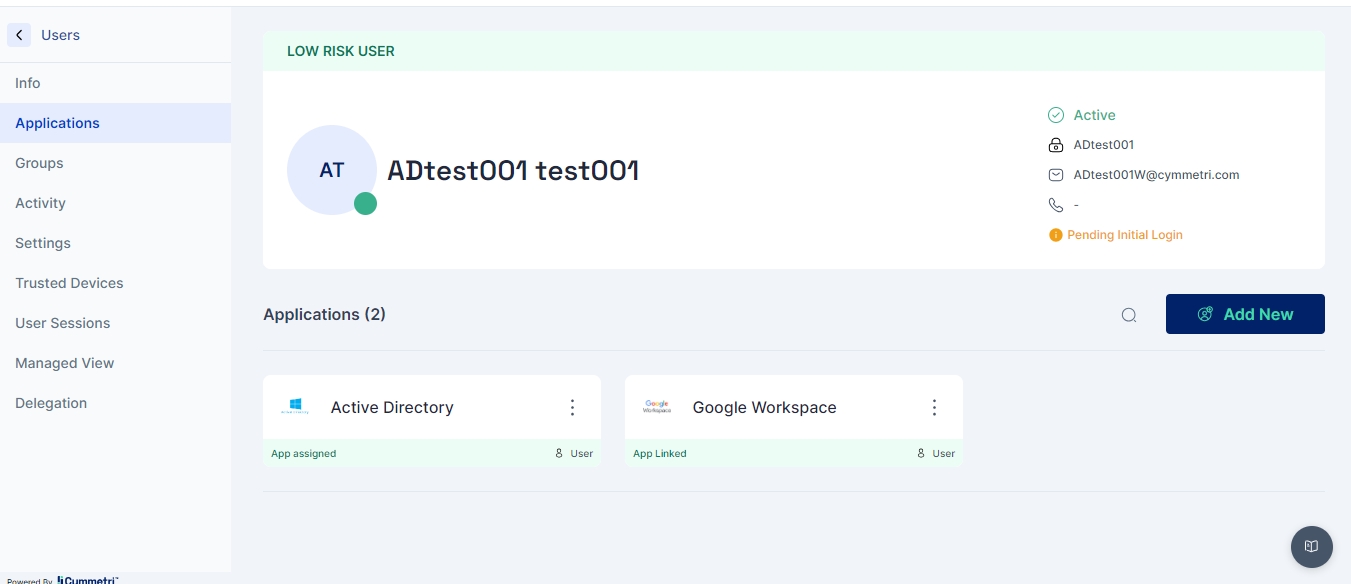
6. Viewing the application tiles, we can see if the user was directly assigned the application or received access by the virtue of being part of a group.
Users on the Cymmetri platform can request access to a managed applications as a Self-Service feature.
The flow for an end-user to request for an application is as follows:
Visit the “My Workspace” menu.
Click on the “My Access” left-hand side menu.
3. Now Click on the “+ Request” button on the top-right button.
Here we need to decide whether we want to provide a Lifetime Access or a Time Based Access
Lifetime Access: Users have access to the application without any time restrictions.
Time Based Access: Users have access to the application only for the specified range of time. We need to provide a Start Date & Time and an End Date & Time for Time Based Access.
Now click on Save to register a request for the application assignment. If no Workflow is configured for the said application the application is immediately assigned to the user.
If a workflow for application provisioning is configured then the workflow is been initiated.
The workflow approver will then receive a request to approve the user assignment in their inbox.
Now the approver may approve or reject the user assignment
The approver may change the start and end date, if required; refer to the dynamic form attributes passed during the application assignment.
To continue the flow click on Accept button.
Now the next level of approver will be able to see the previous levels of approval, and similar to the previous level of approval, the approver may change the start and end date, if required; refer to the dynamic form attributes passed during the application assignment.
Click “Accept” to proceed.
After the last level approver has also approved the assignment, the backend processes will run the application provisioning flow.
Once the user has been provisioned in the application, they will be able to see it in their list of applications.
An administrator can bulk assign an application to a set of users. This an be achieved by uploading a .csv file which contains user information like., loginId, appUserId and roleId. For bulk assigning applications to users in Cymmetri platform administrator needs to
Click on Identity Hub > Applications menu and then click on the Applications Assignments button.
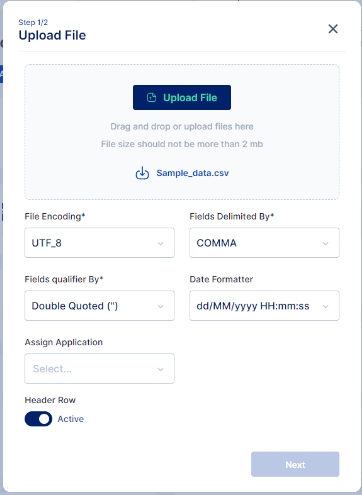
A screen pops up that lets you select the csv file you want to upload that contains the list of users to whom the application needs to be assigned, Upload the csv file, you may also use the sample data file available and modify it to match your user details.
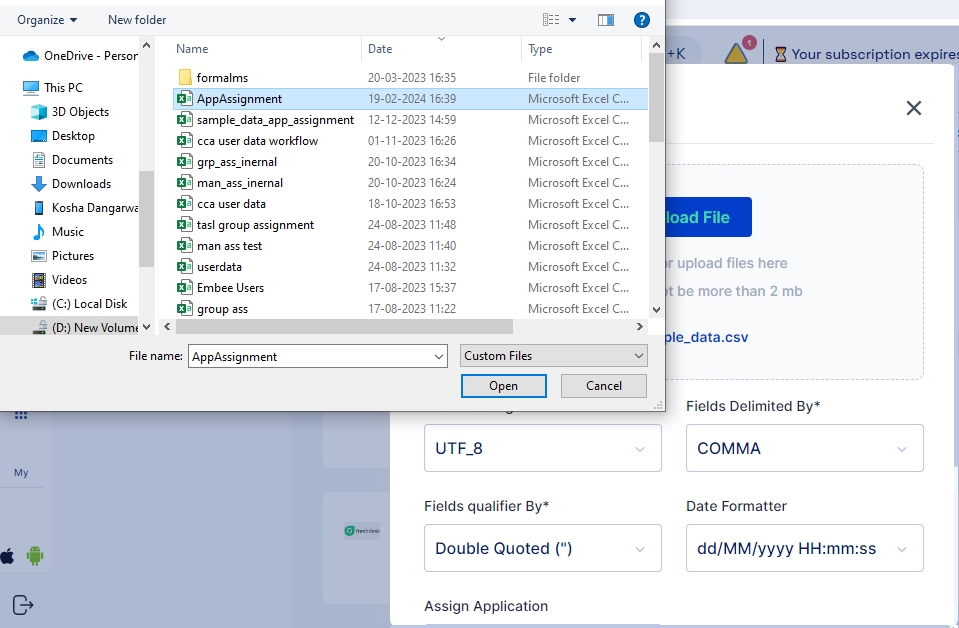
Click on the Upload File button and select the file you wish to import
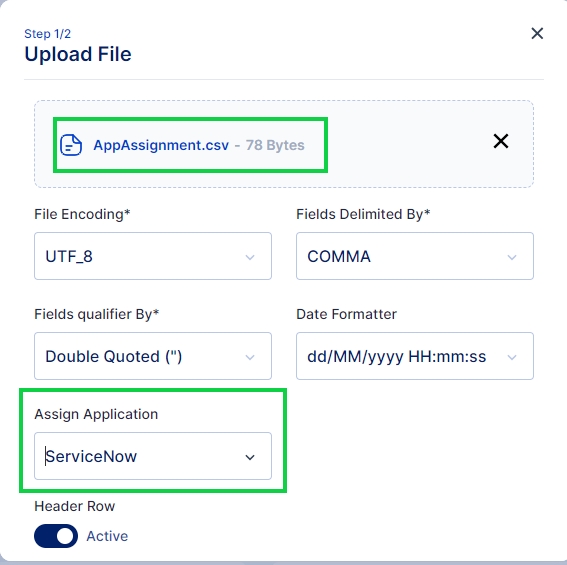
Once the file is selected ensure that the default parameters select match your requirement else you may change these parameters as per your requirement.
Once you have ensured the parameters are correct next select the application that needs to be assigned and click on Next button.
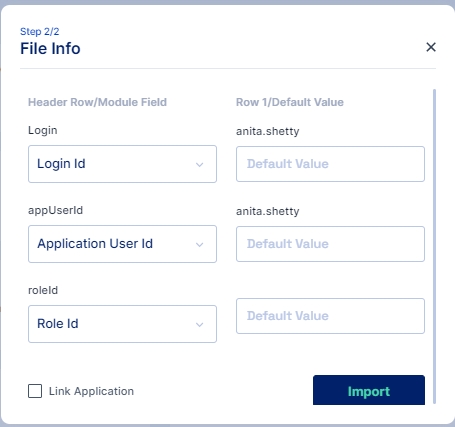
Match the Column names from the CSV file with the corresponding attributes using this File Info dialog box and click on the Import button.
Note: The "Link Application" check box is available to provision the user in the target application
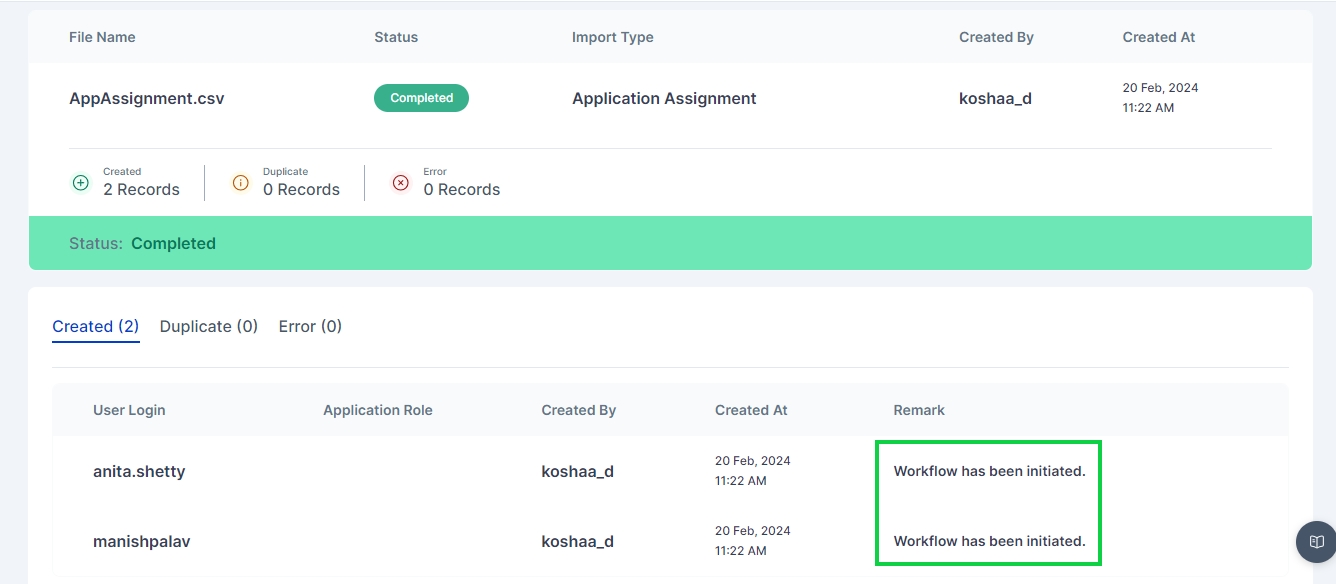
Once Imported results of successfully Imported Users, Duplicate Users or any error that occurred during import can be see in Logs > Import History page
If any workflow is configured on the application provisioning then the corresponding workflow is triggered after the successful completeion of assignment as shown below:
For LDAP connector integration we need an LDAP server with the following detail sample.
Host/IP
LDAP Base Context
service user (Manager Username)
password (Manager User password)
After configure LDAP server we need to configure the Ldap application into the Cymmetri.
Check policy map to add proper attributes as needed by LDAP schema.
Integration SCIM v2.0 with Basic
Any application which supports SCIM v2.0 with basic authentication is workable for application.
Following are configuration which is used for SCIM with basic authenticator.
Base address - It is the endpoint of the target system which supports SCIM v2 API’s.
Username - Username to authenticate SCIM API endpoint.
Password - Password to authenticate SCIM API endpoint.
Authentication type - It is Fixed Bearer compulsory.
Update method - Patch or Put method.
Accept - Http header which accepts (application/json etc).
Content Type - Http header which accepts (application/json etc).
Integration REST Application
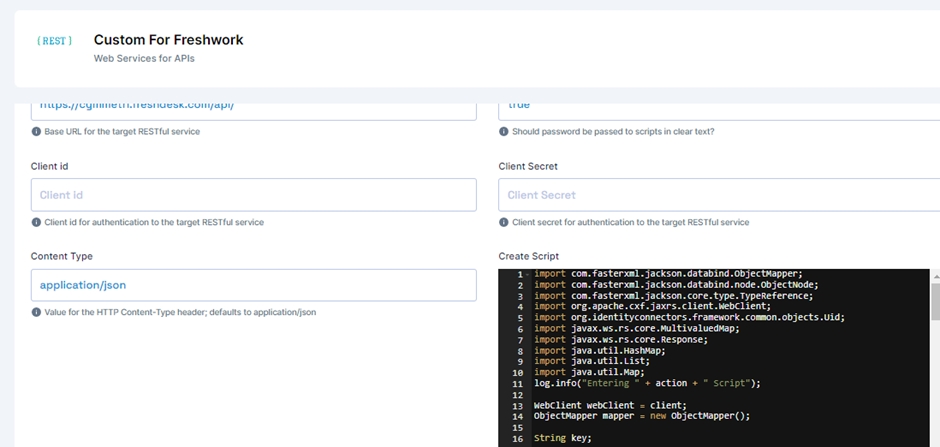
The REST connector is designed to manage provisioning by relying on RESTful service.
For REST applications we need target applications which support REST API’s.
Following configuration is tested for felicity application.
We need REST API’s to integrate with cymmetri.
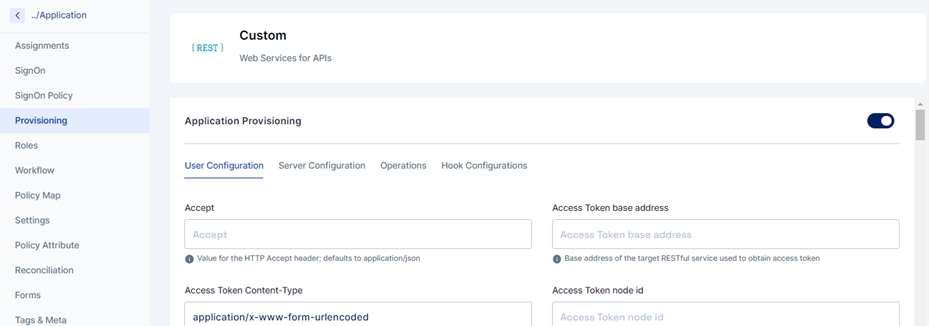
Following are the cymmetri configuration which need to configure in user configuration in cymmetri.
It is Basic REST configuration which need to configure in application.
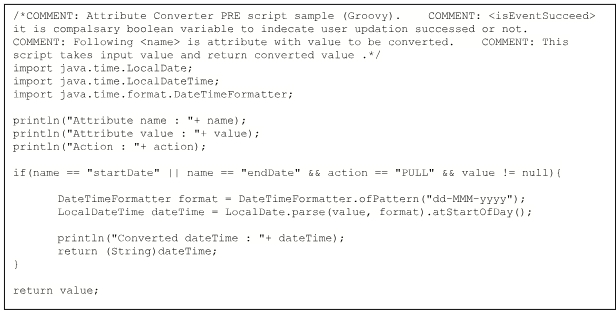
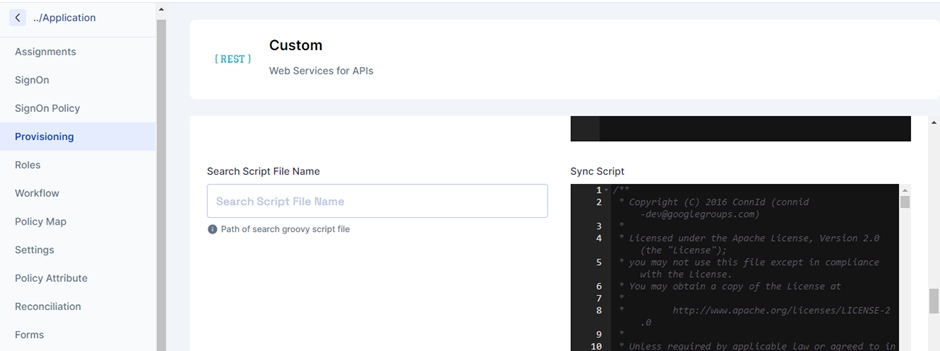
We need to provide Groovy code to run create user, update user, delete user and also recon pull and push (for recon pull we need to add sync script and for recon push we need to add search script)
For sample script please validate following link
Note: Please Configure script step by step
Configure test script at initial step and then test configuration for provided script (If configure successfully then only go for step b).
Configure create script and test configuration (If successfully configured then only go for step c).
Configure update script and test configuration (If successfully configured then only go for step d).
Configure delete script and test configuration (If successfully configured then only go for step e).
Configure sync(pull) script and test configuration (If successfully configured then only go for step f).
Configure search(push) script and test configuration (If successfully configured then only go to the next step).
Any application which supports SCIM v2.0 with fixed bearer is workable for application.
Following are configuration which is used for SCIM with fixed bearer
Base address - It is the endpoint of the target system which supports SCIM v2 API’s.
Username - Username to authenticate SCIM API endpoint.
Password - Password to authenticate SCIM API endpoint.
Authentication type - It is Fixed Bearer compulsory.
Fixed Bearer Value - The value for fixed bearer.
Update method - Patch or Put method.
Accept - Http header which accepts (application/json etc).
Content Type - Http header which accepts (application/json etc).
Any application which supports SCIM v2.0 with bearer token is workable for application.
Following are configuration which is used for SCIM with bearer.
Base address - It is the endpoint of the target system which supports SCIM v2 API’s.
Username - Username to authenticate SCIM API endpoint.
Password - Password to authenticate SCIM API endpoint.
Security Token - It is a token which is used to authenticate.
Grant Type - It is grant type which is used to grant access for API’s.
Client Id - client id for authentication
Client Secret - client secret for authentication
Authentication type - It is Fixed Bearer compulsory.
Update method - Patch or Put method.
Accept - Http header which accepts (application/json etc).
Content Type - Http header which accepts (application/json etc).
Access Token Base Address - base address for access token
Access Token Node Id - node id for access token
Access Token Content Type - content type for access token.
Search for a user in the search text box, and once the user is found, click on the “Assign” button.
4. Click on the Application Icon to start the request process
Reference:
15Five
Employee engagement and performance management platform.
Active Directory
Directory service for managing users and resources in a Windows network.
Airbrake
Error tracking and performance monitoring tool.
Airtable
Collaborative database and spreadsheet tool.
Aiven
Managed cloud database services provider.
Akamai
Content delivery network (CDN) and cloud service provider.
AlertMediaCom
Communication and alerting platform for emergency situations.
AlertOps
Incident management and alerting system.
AlexisHR
Human resources management system.
Ally
Goal-setting and performance management tool.
AlphaSense
Market intelligence and research platform.
Alterdesk
IT service management and helpdesk software.
AlternativeInvestmentExchange
Platform for alternative investments.
Amadeus
Travel technology solutions provider.
Amazon AppStream
Desktop application streaming service.
Amazon AWS
Cloud computing services platform by Amazon.
Amazon AWS Redshift
Data warehousing service on Amazon AWS.
Amazon AWS SSO
Single Sign-On service by Amazon AWS.
Amazon Business
E-commerce platform for businesses.
AmazonManagedGrafanaSAML
Managed Grafana service with SAML support.
AmbientAI
AI-powered workplace safety and compliance solutions.
AMGTime
Time and attendance management software.
Anaplan
Cloud-based planning and performance management platform.
Anaqua
Intellectual property management software.
AndFrankly
Employee engagement and feedback platform.
Andromeda
Security and risk management solutions.
Anecdotes
Employee recognition and rewards platform.
AngelPoints
Employee rewards and recognition platform.
Animaker
DIY video-making platform.
Anodot
Real-time analytics and anomaly detection platform.
Anomalo
Data quality and anomaly detection tool.
AnswerHub
Enterprise Q&A platform.
Aon Hewitt
Human resources and benefits consulting services.
AperianGlobal
Talent management and recruitment solutions.
AppAegis
IT security and compliance solutions.
AppDynamicsEncrypted
Application performance management with encryption support.
AppDynamicsSSO
Single Sign-On support for AppDynamics.
Apperio
Legal spend management and analytics platform.
Appian
Business process management and automation platform.
AppianOnPrem
On-premises deployment of Appian's platform.
AppreciateHub
Employee recognition and rewards platform.
Apptio
IT financial management and optimization software.
Aprimo
Marketing operations and digital asset management platform.
AquaCloudSecurityPlatform
Cloud security management platform.
Arbitrip
Travel and expense management solution.
Arc GIS Online
Online geographic information system (GIS) service.
ArculessAML
Anti-Money Laundering compliance platform.
Area1Horizon
Security solution for email and phishing protection.
Area1Security
Advanced threat protection and security platform.
Ariba Network
Procurement and supply chain management platform.
AribaContractManagement
Contract management solutions by Ariba.
Articulate360
eLearning authoring and content creation suite.
Arxspan
Laboratory information management system (LIMS).
Asana
Work management and collaboration tool.
AskSpoke
IT support and service management platform.
AspenMesh
Service mesh solution for microservices.
Aspera
High-speed file transfer solutions.
AsperaV4
Updated version of Aspera's file transfer solutions.
AssemblaSAML
Single Sign-On (SSO) integration for Assembla.
Assembly
Employee engagement and performance management platform.
AssetBank
Digital asset management system.
AssetSonar
IT asset management and inventory system.
Atatus
Application performance monitoring and error tracking.
Atiim
Performance management and employee feedback platform.
Atipica
Talent acquisition and recruitment solutions.
Atlassian
Collaboration and productivity tools, including Jira and Confluence.
AtlassianCloud
Cloud-based solutions by Atlassian.
Attendease
Event management and planning software.
Aurion
HR and payroll management system.
Autodesk360
Cloud-based design and engineering tools.
Automox
Endpoint management and patching solution.
Auvik
Network management and monitoring solution.
AvidSecureInc
Security and compliance management services.
AvisoSAML
SAML integration for Aviso.
Avochato
Communication and messaging platform for sales teams.
Awardco
Employee recognition and rewards platform.
Axiom
Data management and analytics platform.
Axomo
IT management and automation solutions.
Axonius
Security asset management and visibility platform.
AxwayAmplify
Integration and API management platform by Axway.
Cloud computing services platform by Microsoft.
BakerHillNextGen
Loan origination and account management platform.
BambooHR
Human resources management and tracking software.
BambuSproutSocial
Social media management and marketing tools.
BanyanCommandCenter
Security and access management solution.
BasicOps
IT operations and incident management platform.
Beam
Employee engagement and performance management tool.
BeautifulAI
Presentation and slide design software.
BenchlingEnterprise
Life sciences research and data management platform.
BenefexRewardHub
Employee rewards and benefits management platform.
BenefitFocus
Benefits administration and management platform.
BenefitsolverSAML
SAML integration for Benefitsolver.
Beneplace
Employee benefits and discount programs.
Benetrac
Benefits administration and management software.
Benevity
Corporate social responsibility and employee giving platform.
BenSelect
Employee benefits selection and management tool.
Betterworks
Performance management and goal-setting platform.
BeyondTrust
Privileged access management and security solutions.
BigCenter
IT management and support platform.
BigID
Data privacy and protection platform.
BigPanda
IT operations and incident management platform.
BigTinCan
Sales enablement and content management solutions.
Birdeye
Customer experience and reputation management platform.
Birst
Business intelligence and analytics platform.
BitGlass
Cloud security and data protection platform.
BitlySAML
SAML integration for Bitly.
BitSightTech
Security ratings and risk management platform.
Biztera
IT management and service delivery platform.
Blackboard
Education technology and learning management system.
Blink
Employee communication and engagement platform.
BlissBook
Employee recognition and engagement tool.
Blissfully
SaaS management and vendor management platform.
BlocksEdit
Content management and editing tool.
BlogIn
Blog management and publishing platform.
BlueBoard
Employee recognition and rewards platform.
BlueJeans
Video conferencing and collaboration tool.
BlueOceanBrain
Employee learning and development platform.
BMCAtriumSSO
Single Sign-On integration for BMCAtrium.
BoardBookit
Board meeting and governance management tool.
BoardEffect
Board management and governance platform.
Bob
People management and HR platform.
Bonsai
Freelance management and invoicing software.
BoomiSAML
SAML integration for Boomi.
Boostr
Employee recognition and performance management tool.
BoxNet
Cloud storage and file sharing service.
Brainshark
Sales enablement and training platform.
BrainstormQuickHelp
Quick help and support tool for brainstorming.
BranchSAML
SAML integration for Branch.
BrandfolderSAML
SAML integration for Brandfolder.
BrandWorkzCom
Brand management and marketing platform.
Braze
Customer engagement and marketing automation platform.
Breezy
Recruitment and applicant tracking system.
BreezyHR
HR and recruitment software.
BridgeCrew
Cloud security and compliance platform.
BrightEdge
SEO and content performance platform.
CentrifyPrivilegeAccessService
Privileged access management and security solution.
CenturyLink
Telecommunications and cloud services provider.
CequenceSecurity
Security solutions for data and infrastructure.
Cerby
Security and compliance management platform.
Ceresa
Data protection and privacy management solution.
Ceridian
Human resources and payroll management software.
Cerner
Health information technology solutions provider.
Certify
Expense management and reporting tool.
Cezanne
HR software for small and medium-sized businesses.
CGRFoundation
Foundation for research and data management.
ChangePoint
Project and portfolio management software.
Chargebee
Subscription management and billing platform.
ChartHop
Org chart and employee directory tool.
ChartioSAML
SAML integration for Chartio.
ChatterSAML
SAML integration for Chatter.
ChatWork
Team communication and collaboration platform.
CheckpointInfinityPortal
Security management and threat detection solution.
Cherwell
IT service management and workflow automation platform.
ChorusAI
Conversation analytics and sales performance platform.
ChromeRiver
Travel and expense management software.
CSV Directory
Custom integration for CSV-based directories.
Custom
Custom integration solution for unique use cases.
DarwinBox
HR and talent management software.
FreshDesk
Customer support and ticketing system.
Freshservice
IT service management and helpdesk software.
Freshworks
Customer engagement and support platform.
Google services integration, including Google Workspace.
Google Workplace
Productivity and collaboration suite by Google.
hCaptcha
CAPTCHA service for protecting websites from bots.
Hive
Collaboration and project management tool.
Ingenium
Enterprise content management system.
Jedox
Performance management and business analytics platform.
Jenkins
Continuous integration and delivery tool.
Joomla
Content management system for websites.
LDAP
Lightweight Directory Access Protocol for directory services.
Liferay
Enterprise portal and content management system.
Lotus Notes
Email and collaboration software.
Lucid
Visual collaboration and diagramming tool.
Lucidchart
Diagramming and flowchart creation software.
ManageEngine AD Manager Plus
Active Directory management and reporting tool.
ManageEngine ServiceDesk Plus
IT service management and helpdesk solution.
NetSuite
Cloud-based ERP and business management software.
NextThink
IT operations analytics and end-user experience management.
oDesk
Freelance job platform (now Upwork).
Office365
Productivity suite by Microsoft.
OracleFusion
Oracle's suite of cloud-based enterprise applications.
OracleHCM
Human Capital Management solutions by Oracle.
PagerDuty
Incident management and response platform.
Paladin
Legal and compliance management software.
PaloAltoNetworksSAML
SAML integration for Palo Alto Networks.
PAM
Privileged Access Management solutions.
Pivotal
Application development and deployment platform.
Piwik
Open-source web analytics platform (now Matomo).
PowerShell
Task automation and configuration management framework.
Prezi
Presentation software with interactive and dynamic features.
ReadCube
Research management and document discovery tool.
SailPointIIQ
Identity governance and administration platform.
Salesforce
Customer relationship management (CRM) platform.
Samanage
IT service management and asset management software.
SAPNetWeaverSAML
SAML integration for SAP NetWeaver.
ScienceLogic
IT operations and management platform.
SCIM v1.1
System for Cross-domain Identity Management version 1.1.
SCIM v2.0 (Basic)
Basic implementation of SCIM v2.0 for user management.
SCIM v2.0 (Bearer)
SCIM v2.0 with Bearer token authentication.
SCIM v2.0 (Fixed Bearer)
SCIM v2.0 with Fixed Bearer token authentication.
SCIM v2.0 (Github)
SCIM v2.0 implementation for GitHub.
SCIM v2.0 (Salesforce)
SCIM v2.0 implementation for Salesforce.
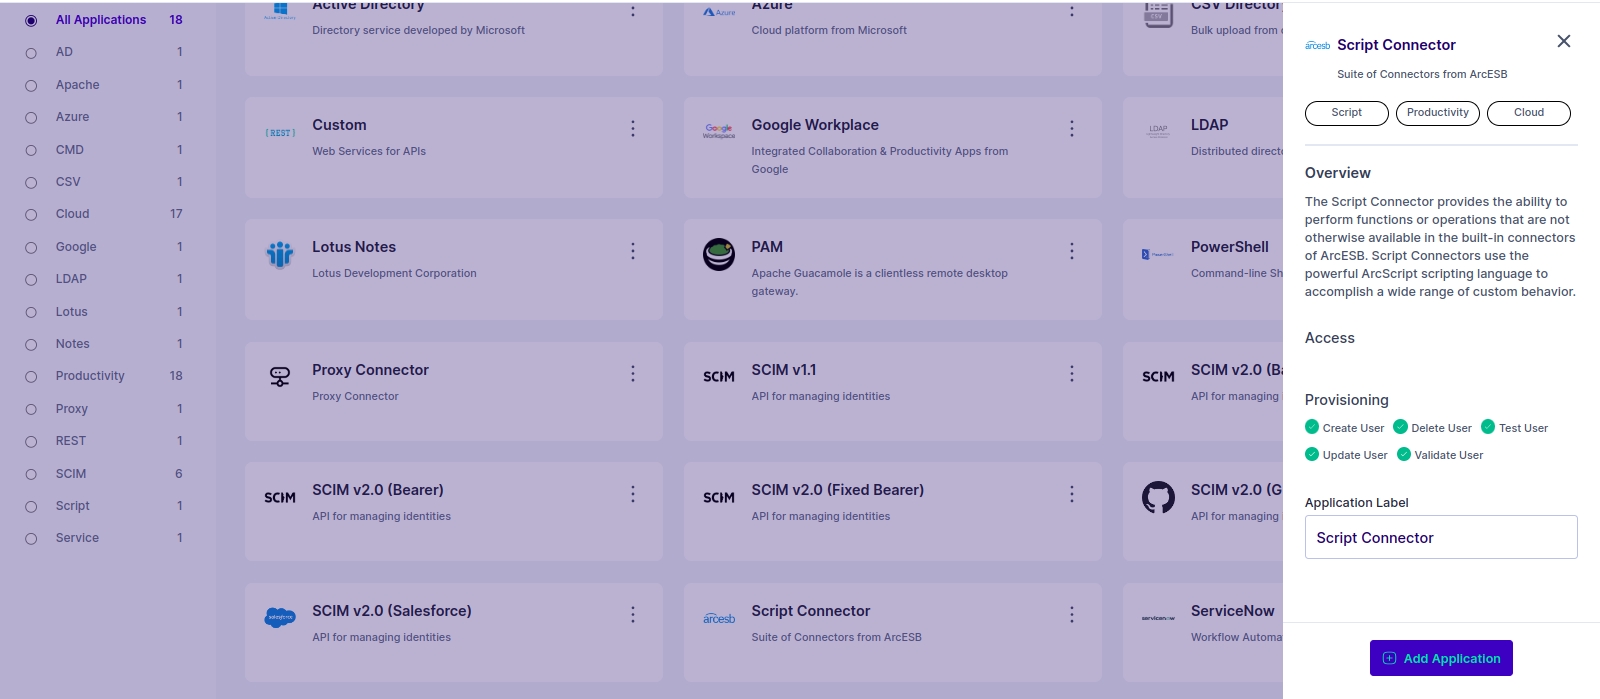
Script Connector
Custom integration using scripting for unique requirements.
ServiceNow
IT service management and enterprise workflow solutions.
Shutterstock
Stock photo and image licensing platform.
Sisense
Business intelligence and analytics platform.
Slack
Team communication and collaboration tool.
Smartsheet
Work management and automation platform.
SNOW Commander
Snowflake data management and automation tool.
Snowflake
Cloud-based data warehousing platform.
Splunk
Data analysis and monitoring platform.
SplunkCloud
Cloud-based data analysis and monitoring by Splunk.
SuccessFactors
Human resources management and talent management solutions.
SugarCRM
Customer relationship management (CRM) software.
Tableau
Data visualization and business intelligence platform.
TeamViewer
Remote access and support software.
Vimeo
Video hosting and sharing platform.
Zendesk
Customer service and support ticketing system.
Zenduty
Incident management and response platform.
ZingHR
Human resources management and payroll solutions.
In this section, we will provide you with detailed information about the types of applications and connectors supported by Cymmetri
Cymmetri seamlessly integrates with various cloud-based applications to help you efficiently manage user access and entitlements. The following are the pre-configured cloud-based applications that Cymmetri supports:
Azure: Manage user access and entitlements within your Microsoft Azure environment effortlessly.
Google Workplace: Simplify access management for Google Workspace applications, including Gmail, Google Drive, and more.
ServiceNow: Effectively control access to your ServiceNow instance to enhance security and compliance.
Salesforce: Streamline Salesforce user access management for better control and auditing.
SCIM v2.0 (Salesforce): Utilize the System for Cross-domain Identity Management (SCIM) 2.0 protocol specifically for Salesforce integration.
Github (Using SCIM 2.0 connector): Manage user access to GitHub repositories efficiently through our SCIM 2.0 connector.
Cymmetri extends its support beyond cloud-based applications to include various on-premises applications. Here are the on-premises applications supported by Cymmetri:
Active Directory: Efficiently manage user access to your Windows Active Directory resources.
OpenLDAP: Simplify access control for your LDAP directory services with Cymmetri's integration.
Lotus Notes: Streamline user access management for Lotus Notes applications.
Powershell: Integrate and manage access to PowerShell scripts and resources seamlessly.
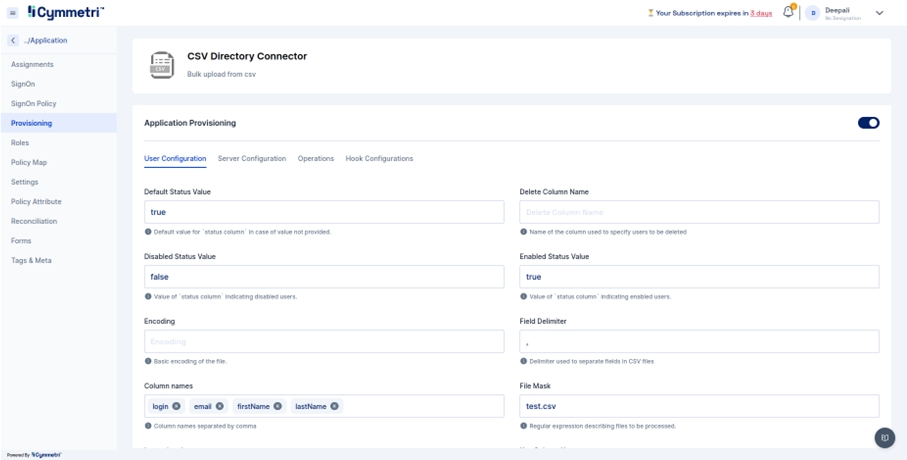
CSV Directory: Effectively manage user access within CSV-based directory services.
Cymmetri offers versatile connector support to ensure seamless integration with a wide range of applications. Here are the supported connectors categorized by deployment type:
Cymmetri's Cloud Connectors are designed to simplify access management for various cloud-based applications. Supported cloud connectors include:
Azure: Easily manage access to Microsoft Azure resources with our cloud connector.
Google Workplace: Streamline access management for Google Workspace applications using our cloud connector.
ServiceNow: Control access to your ServiceNow instance efficiently with our cloud connector.
Salesforce: Seamlessly manage user access to Salesforce through our cloud connector.
SCIM 1.1: Leverage the SCIM 1.1 protocol for connector support, ensuring compatibility with various cloud services.
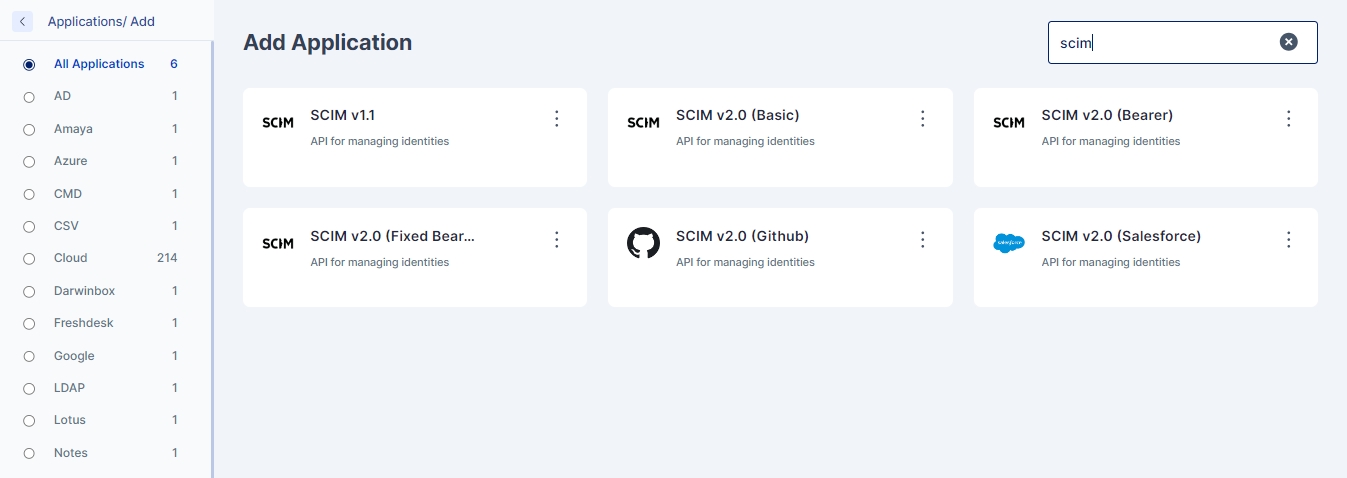
SCIM 2.0 (Basic, Bearer, Fixed Bearer): Our platform supports multiple SCIM 2.0 authentication methods to accommodate diverse integration needs.
For on-premises applications and custom integration scenarios, Cymmetri offers locally deployed connectors, providing flexibility and control. Supported locally deployed connectors include:
Active Directory: Manage access to Windows Active Directory resources seamlessly using our connector.
Custom Script for Databases: Custom Script based connectors using groovy scripts for database applications, tailored to your specific requirements.
LDAP: Integrate and manage access to LDAP-based directory services through our connector.
Lotus Notes: Simplify user access management for Lotus Notes applications with our connector.
Powershell: Seamlessly integrate and manage access to PowerShell resources using our connector.
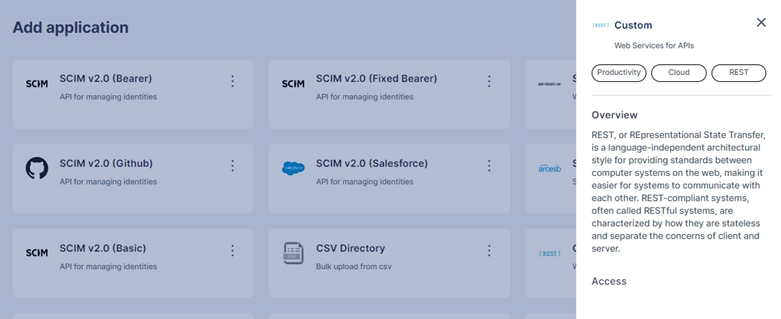
REST API: Extend your integration capabilities with Cymmetri's support for RESTful API connectors leveraging the flexibility of Groovy and UI based scripts.
Cymmetri's comprehensive support for both pre-configured applications and versatile connectors ensures that you have the tools needed to efficiently manage user access and entitlements across a diverse range of applications and environments. For detailed setup instructions and configuration guidelines, please refer to the specific documentation for each application and connector.
Connectors can be deployed in two ways:
Local connectors are deployed to a Cymmetri instance. This is the usual way how connectors are used. The connector is executed inside a Cymmetri instance, has the same lifecycle (start/stop), etc. Cymmetri can detect local connectors automatically and overall the connector management is easier.
Remote connectors are executed in a different process or on a different node than Cymmetri instance. Remote connectors are deployed to a connector server. There may be need to use a remote connector e.g. to access a file on a remote system (e.g. in case of CSV connector) or because of platform incompatibilities (e.g. .NET connectors)
Connector is not developed as local or remote. The placement of the connector is a deployment-time decision. There is just one connector package that can be deployed locally or remotely.
A connector server is required when a connector bundle is not directly executed within your application. By using one or more connector servers, the connector architecture thus permits your application to communicate with externally deployed bundles.
Connector servers are available for both Java and .NET.
A Java connector server is useful when you do not wish to execute a Java connector bundle in the same VM as your application. It may be beneficial to run a Java connector on a different host for performance improvements if the bundle works faster when deployed on the same host as the native managed resource. Additionally, one may wish to use a Java connector server under a Java remote connector server in order to eliminate the possibility of an application VM crash due to a fault in a JNI-based connector.
The use of .NET connector server is especially useful when an application is written in Java, but a connector bundle is written using C#. Since a Java application (e.g. J2EE application) cannot load C# classes, it is necessary to instead deploy the C# bundles under a .NET connector server. The Java application can communicate with the C# connector server over the network, and the C# connector server serves as a proxy to provide to any authenticated application access to the C# bundles deployed within the C# connector server.
Minimum Requirements:
Java 1.6 or later for 1.4.X.Y / Java 1.8 for 1.5.X.Y
Refer to your Java connectors to determine if there are any additional requirements
Unzip it in a directory of your choice (e.g. /usr/jconnserv) on the host where you wish to run the Java connector server
From the directory created above, run the Java connector server with no arguments to see the list of command-line options:
Linux / MacOS: ./bin/ConnectorServer.sh
Windows: \bin\ConnectorServer.bat
You should see the following output:
Run the connector server with the setkey option as described below to set your desired key into your properties file
Linux/ MacOS: ./bin/ConnectorServer.sh -setkey <key> -properties conf/ConnectorServer.properties
Windows: bin\ConnectorServer.bat /setkey <key> /properties conf\ConnectorServer.properties
For all other properties (e.g. port), edit the conf/connectorserver.properties manually. The available properties are described in the connectorserver.properties file.
Run the server by launching with the -run option:
Linux / MacOS: ./bin/ConnectorServer.sh -run -properties conf/ConnectorServer.properties
Windows: bin\ConnectorServer.bat /run -properties conf\ConnectorServer.properties
To deploy a Java connector:
Copy the Java connector bundle jar file into the bundles directory in your Java connector server directory
If necessary, add to the classpath any 3rd party jars required by any Java connector
Restart the Java connector server
The following steps are necessary to successfully communicate with a connector server using SSL:
Deploy an SSL certificate to the connector server's system.
Configure your connector server to provide SSL sockets.
Configure your application to communicate with the communicate with the connector server via SSL.
Refer to your application manual for specific notes on how to configure connections to connector servers. You will need to indicate to your application that an SSL connection is required when establishing a connection for each SSL-enabled connector server.
Additionally, if any of the SSL certificates used by your connector servers is issued by a non-standard certificate authority, your application must be configured to respect the additional authorities. Refer to your application manual for notes regarding certificate authorities.
Java applications may solve the non-standard certificate authority issue by expecting that the following Java system properties are passed when launching the application:
javax.net.ssl.trustStorePassword
For example, -Djavax.net.ssl.trustStorePassword=changeit
javax.net.ssl.trustStore
For example, -Djavax.net.ssl.trustStore=/usr/myApp_cacerts
Or, instead, the non-standard certificate authorities may be imported to the standard ${JAVA_HOME}/lib/security/cacerts.
Minimum Requirements:
Windows Server 2003 or 2008
.NET Framework 3.5 or higher
Refer to your .NET connector to determine if there are any additional requirements
Execute ServiceInstall.msi. Just follow the wizard. It will walk you through the whole process step by step. Upon completion, the Connector Server will be installed as a windows service.
Start the Microsoft Services Console. Check to see if the Connector Server is currently running. If so, stop it. From a command prompt, set the key for the connector Server. This is done by changing to the directory where the connector server was installed (by default: \Program Files\Identity Connectors\Connector Server) and executing the following command:
where <newkey> is the value for the new key. This key is required by any client that connects to this Connector Server.
Look through the configuration file and inspect all settings. The most common things to change would be the port, trace, and ssl settings.
The port, address, and SSL settings are in the tag called AppSettings, and look like this:
The port can be set by changing the value of connectorserver.port. The listening socket can be bound to a particular address, or can be left as 0.0.0.0. To setup to use SSL, you must set the value of connectorserver.usessl to true, and then set the value ofconnectorserver.certifacatestorename to your the certificate store name.
You will need to record for use later the following information regarding your connector server installation:
Host name or IP address
Connector server port
Connector server key
Whether SSL is enabled
Trace settings are in the configuration file. The settings look like this:
The Connector Server uses the the standard .NET trace mechanism. For more information about the tracing options, see Microsoft's .NET documentation for System.Diagnostics.
The default settings are a good starting point, but for less tracing, you can change the EventTypeFilter's initializeData to "Warning" or "Error". For very verbose logging you can set the value to "Verbose" or "All". The amount of logging performed has a direct effect on the performance of the Connector Servers, so be careful of the setting.
Any configuration changes will require the connector server to be stopped and restarted.
The best way to run the Connector Server is as a Windows service. When installing, the Connector Server is installed as a Windows service. This should be fine for most installations.
If for some reason, this is not adequate, the connector server may be installed or uninstalled as a Windows service by using the /install or /uninstall arguments on the command line. To run the Connector Server interactively, issue the command:
To install new connectors, change to the directory where the Connector Server was installed, and unzip the zip file containing the connector there. Restart the Connector Server.
To install additional Connector Servers on the same machine, download the Connector Server zip file from the downloads section. Create a directory to install to, and unzip the file there. Edit the configuration file as described above ensuring that you have a unique port. You may also want to make sure that the trace file is different as well. You can then run the additional Connector Server interactively or as a service.
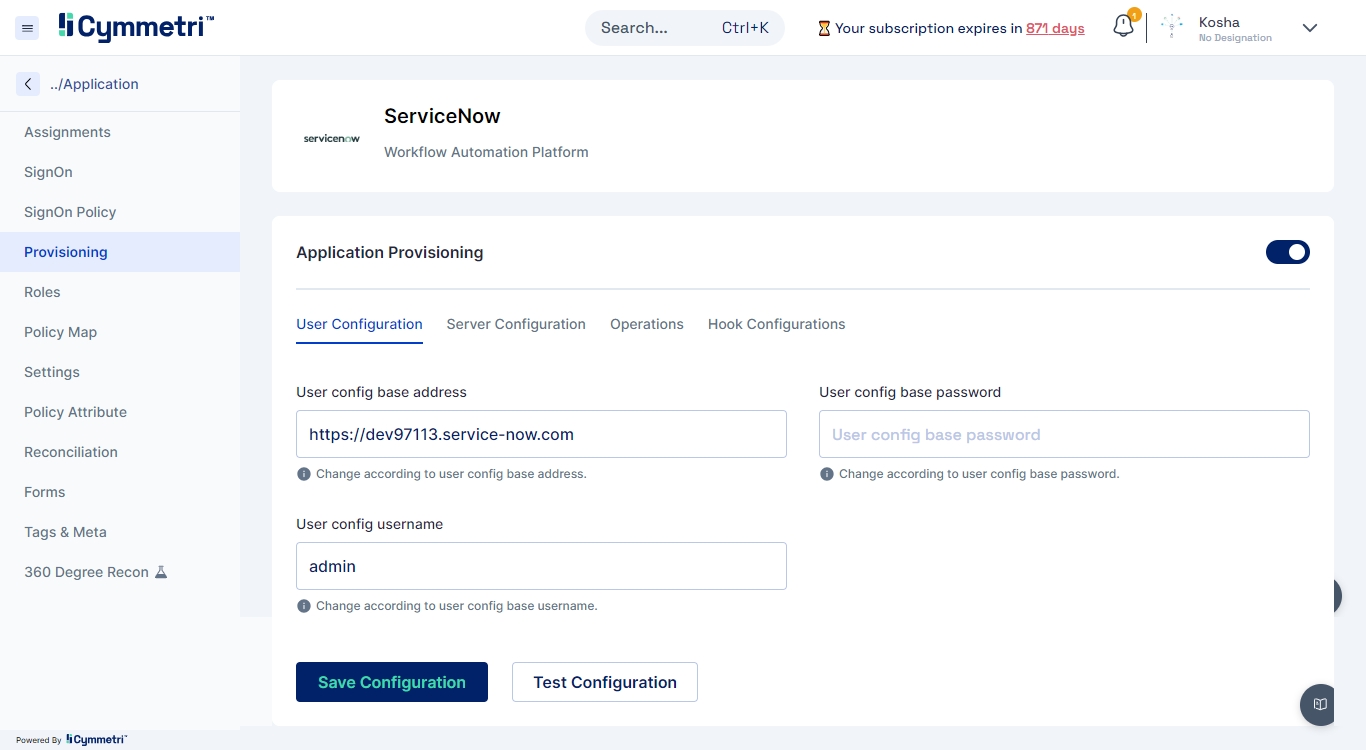
This page outlines the process for integrating your Service Desk platform with Cymmetri. This integration will streamline workflows, enhance communication, and improve overall service management.
Before beginning the integration, ensure you have:
Administrative access to both the Service Desk and Cymmetri.
API keys or authentication tokens for both platforms.
Backup of existing configurations, if necessary.
Login to Your Service Desk
Access your Service Desk portal and log in with your admin credentials.
Access API Settings
Navigate to Settings > API.
Enable API access if it is not already enabled.
Generate an API key if you do not have one.
Record API Endpoint
Note the API endpoint URL (e.g., https://your-servicedesk.com/api/v1/).
Login to Cymmetri
Go to your Cymmetri dashboard and log in as an administrator.
Access Integration Settings
Navigate to Identity Hub > Applications.
Click on Add New Application.
Select Service Desk
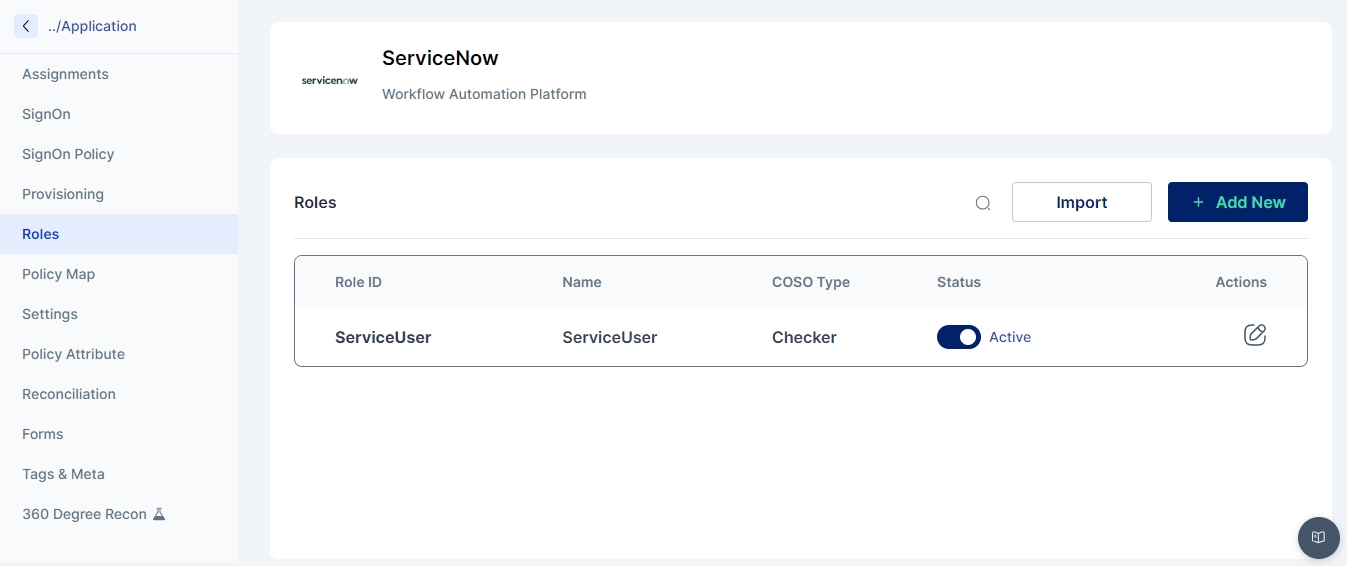
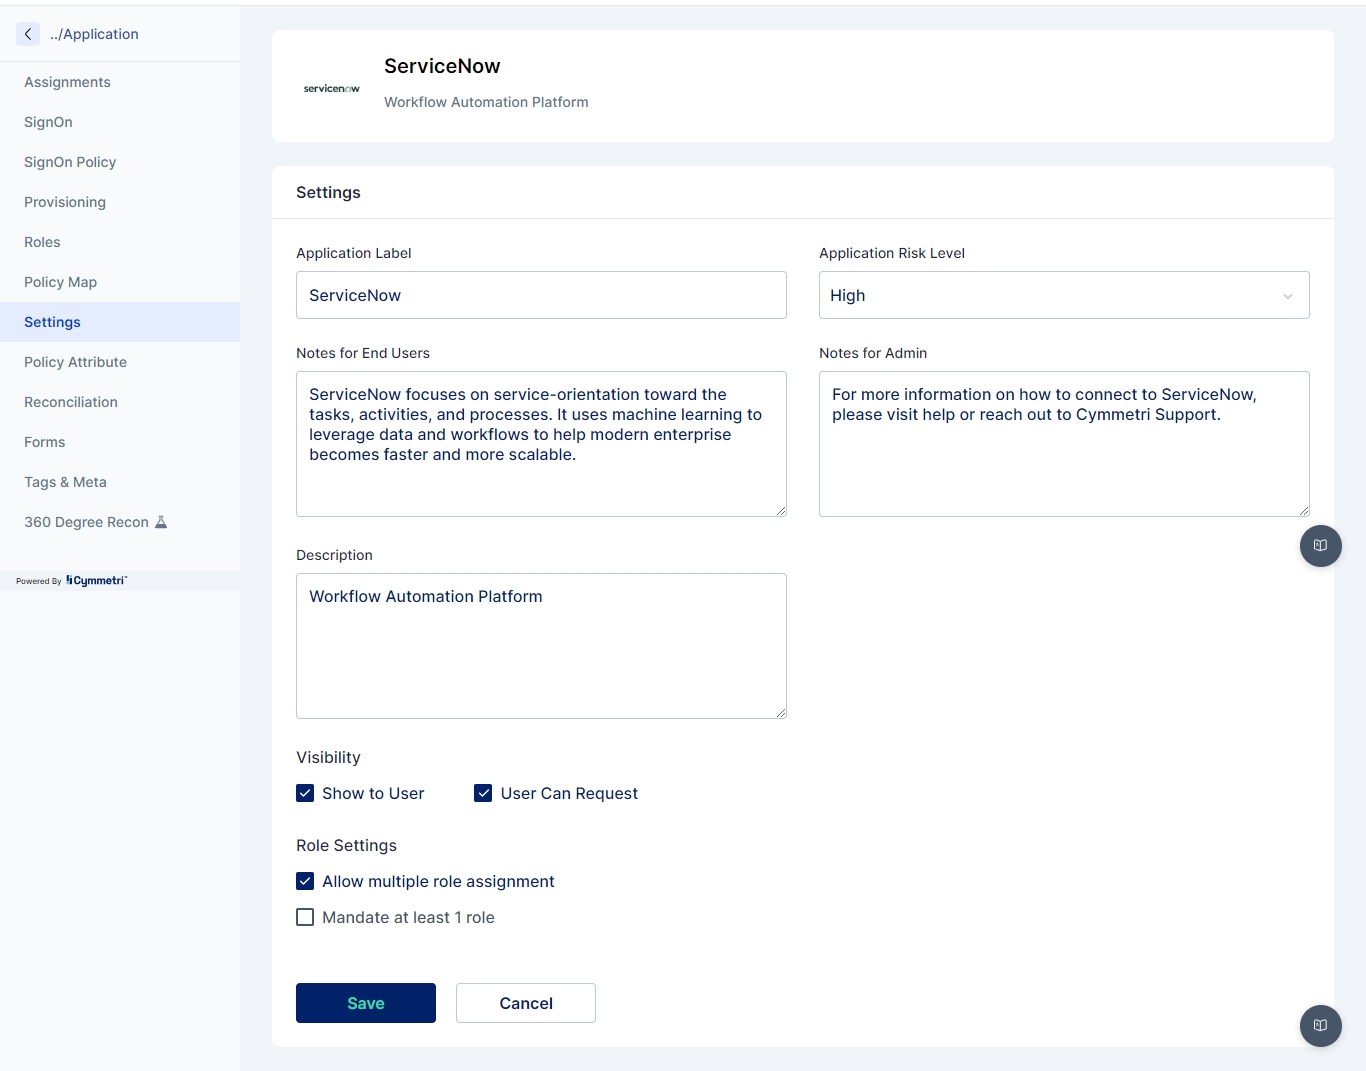
Choose your specific Service Desk platform from the list of available integrations. Cymmetri has ready connectors for ServiceNow, Atlassian (Jira), Fresh Service, etc.
Enter API Details
API URL: Enter the API endpoint noted from your Service Desk.
API Key: Paste the API key generated in your Service Desk.
Test Connection
Click on Test Connection to ensure Cymmetri can successfully communicate with your Service Desk.
If successful, proceed to the next step. If not, double-check your API settings.
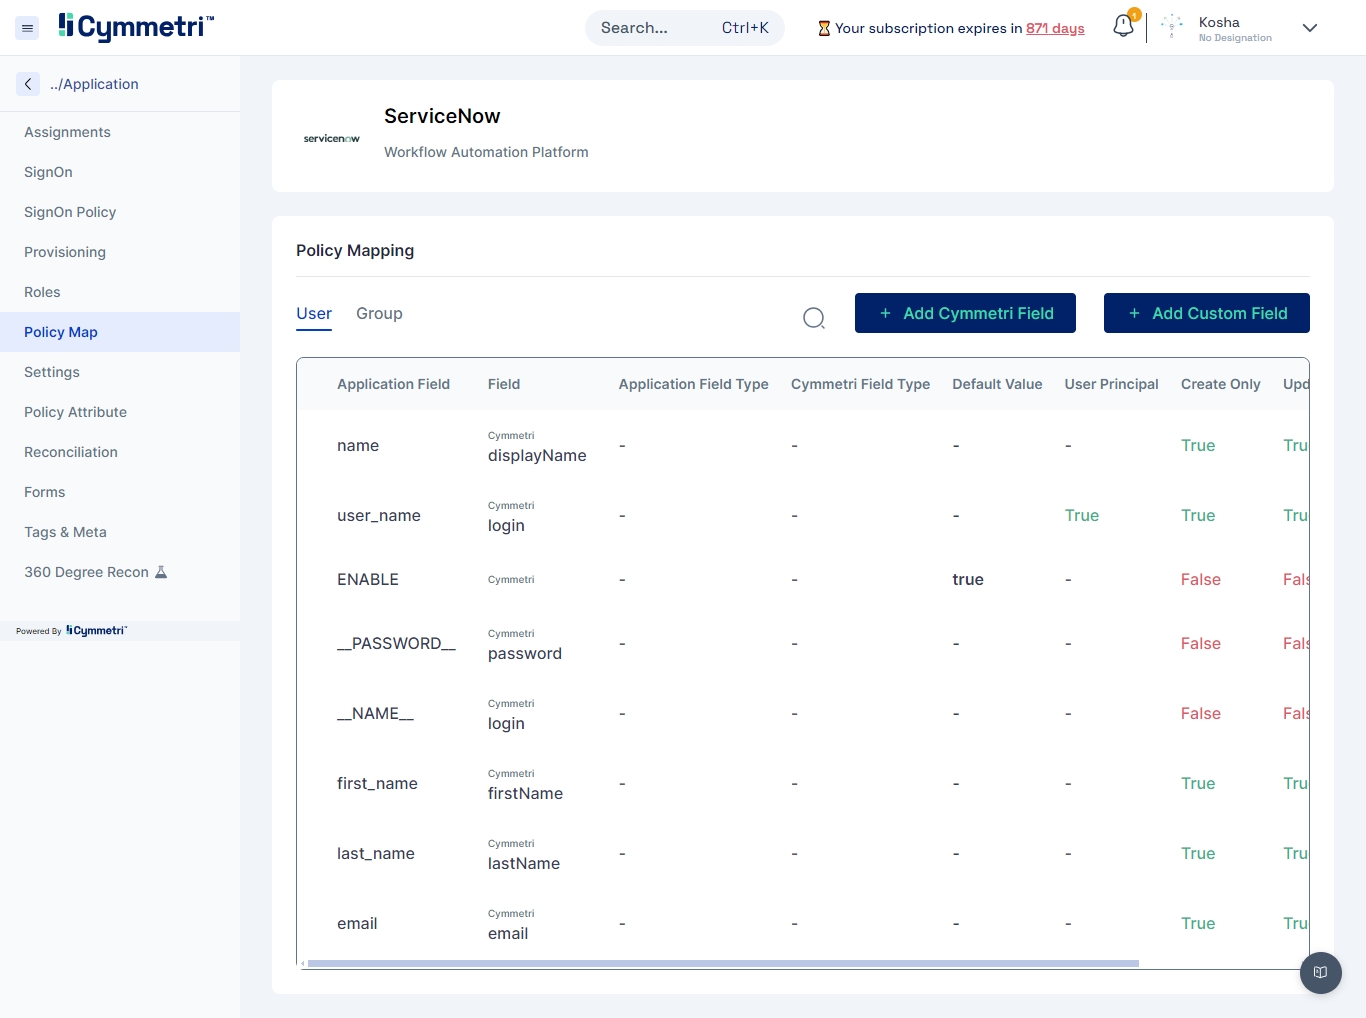
Field Mapping using Policy Map
Map relevant fields between your Service Desk and Cymmetri. Common fields to consider include:
Ticket ID
Status
Priority
Assignee
Comments
Configure Sync Settings
Decide on the synchronization direction (one-way or two-way).
Set the sync frequency (e.g., real-time, hourly, daily).
To integrate a service desk with Cymmetri for handling requests such as user provisioning for applications like CRM, the process involves leveraging Cymmetri’s Identity Governance and Administration (IGA) platform capabilities to manage the lifecycle of requests while synchronizing the ticketing and provisioning process. Here’s a brief description of how to manage this integration:
The integration between Cymmetri and service desks like Zoho Desk or ServiceNow typically uses APIs or webhooks to enable communication between the two systems. The integration can be broken down into the following steps:
• A user submits a request for access to an application, like CRM, via the service desk portal.
• This request triggers an API call or webhook from the service desk to Cymmetri, initiating the workflow in Cymmetri for provisioning.
• Cymmetri receives the request and starts the approval workflow, following its defined governance policies.
• Multiple layers of approval can be enforced, such as managerial, application owner, or compliance approval, based on pre-defined rules.
• Once the request is approved, Cymmetri will provision the user access to the requested application (in this case, CRM).
• Once the provisioning is successful, Cymmetri sends an API response or webhook back to the service desk, indicating that the provisioning process is complete.
• The service desk system then automatically updates the ticket status to “Closed.”
Governance is crucial in ensuring the proper approval, auditing, and compliance are maintained throughout the request and provisioning lifecycle. Here’s how governance can be managed:
• Define governance rules and policies for access requests originating from the service desk.
• Set up role-based access controls (RBAC) to ensure that users can only request access to applications they are entitled to.
• Configure workflows in Cymmetri to enforce approval chains before provisioning occurs. For instance, managerial approval, application owner approval, and segregation of duties (SoD) checks can be part of the process.
• Cymmetri maintains a detailed audit trail of each request. This ensures that all approvals, denials, or escalations are documented, providing an audit trail for governance and compliance reporting.
• Approval workflows should be automated and governed by pre-defined policies such as the least privilege principle or SoD rules, which prevent conflicting roles from being assigned.
• Cymmetri can be configured to check for policy violations before completing the provisioning. For example, if a user requests access to a role that creates an SoD violation, Cymmetri can trigger a violation notification and require additional approvals or corrective actions before the process can move forward.
• Cymmetri ensures that de-provisioning is part of the governance process. If a user’s access is no longer required, a de-provisioning request can be triggered either automatically or through the service desk. This will update both systems (Cymmetri and service desk) accordingly.
• Regular audits can be run through Cymmetri to ensure compliance with governance policies. Reports can show who has been granted access, what approvals were made, and if there were any violations or exceptions.
• Cymmetri can generate compliance reports for auditing, allowing organizations to meet regulatory requirements like SOX or GDPR.
• User logs into the service desk (e.g., Zoho Desk or ServiceNow) and submits a request for CRM application access.
• The service desk creates a request ticket with relevant details, such as the user’s name, department, requested application, and purpose.
• The service desk system calls Cymmetri’s API or triggers a webhook to submit the request into Cymmetri.
• Cymmetri initiates the appropriate access request workflow, considering any SoD checks or policy violations.
• The request is sent through an approval process within Cymmetri based on the organization’s policies. This may involve managerial approval, compliance checks, or application owner approval.
• If any SoD violations are detected, Cymmetri can block the request, notify the necessary stakeholders, and propose alternate access solutions.
• Once the request is approved, Cymmetri provisions access to the CRM application via its integration with the organization’s IAM system.
• Cymmetri ensures that appropriate roles or permissions are granted according to the approved request.
• Once provisioning is complete, Cymmetri sends a notification back to the service desk via API or webhook.
• The service desk automatically closes the request ticket, notifying the user that their access has been granted.
• Cymmetri logs all actions, approvals, and violations, ensuring a detailed audit trail.
• Governance reports can be generated to meet compliance standards and verify that all requests followed organizational policies.
• Policy Definition: Define access policies and approval workflows for requests.
• Role-Based Access Control (RBAC): Assign roles and permissions based on user attributes, and automate provisioning accordingly.
• Segregation of Duties (SoD) Enforcement: Prevent conflicting roles from being granted by ensuring compliance with SoD policies.
• Audit and Compliance Reporting: Keep detailed logs of all actions, approvals, and violations for audit purposes.
• Automated Lifecycle Management: Automate provisioning and de-provisioning workflows while maintaining governance controls.
This integration ensures smooth communication between the service desk and Cymmetri, enabling automated provisioning with governance controls, reducing the manual effort required to manage access requests, and ensuring compliance with policies.
Create Test Tickets
Create several test tickets in your Service Desk.
Confirm that these tickets are reflected in Cymmetri as expected.
Update Test Tickets
Modify the status or comments of the test tickets in either system and check if the changes sync properly.
Connection Issues: Double-check API keys and endpoint URLs. Ensure both systems are operational.
Data Sync Problems: Review field mappings and sync settings. Check integration logs for errors.
Applications menu in the administration page displays the various options pertaining to the Application Management Process.
Applications menu can be accessed as mentioned below:
Identity Hub
Login as either an Organization Administrator, Domain Administrator, or Application Administrator.
Click on the Identity Hub icon on the left side bar.
Click on the Applications text on the slide out bar.
Applications supported by the Cymmetri platform fall majorly into three categories -
Pre-configured Applications These are the applications that have already been configured by the Cymmetri platform for provisioning on cloud or on-premises.
Custom Applications for Provisioning These are the applications that you wish to manage through Cymmetri and support the generic connectors that the Cymmetri platform provides.
Custom Applications for Single SignOn only When you need to add an application for the sole purpose of enabling Single Sign-On (SSO), Cymmetri offers the capability to add a custom application that can be configured for SSO using the supported mechanisms.
Once you have chosen the application to be added from the above categories, you are ready to add a new application.
1. Click on the “Add New” button on the top-right corner in the Applications page.
2. In the Add New Application screen, you may search for your desired application (e.g., Active Directory or some authorative source like Darwin Box or Oracle HCM), or your desired connector (e.g., REST) or choose the “Custom” application type from the available application catalogue.
And also support for other standard categories of applications as shown below:
3. Now click on the tile shown in the list below to open the right slide out menu for renaming application as shown below.
4. Add your custom label (if you wish) in the text box and click on the “Add Application” button.
Application has been successfully added to your listing now. You may click on the configure now button to start configuring the application.
Dynamic Forms enable administrators to request additional fields from either administrators or end-users when assigning applications. These additional user fields are then collected and used for provisioning the user into the managed application.
For creating a dynamic form the administrator needs to configure the managed application. For e.g. Identity Hub->Applications->Service Now(Application may change )->Forms
Load the default form by clicking on the “Load Sample Data” button
Edit the default form in the JSON Schema section, In the JSON Schema section the administrator can define the form structure with the type of element, and its various properties like type, title, default value etc., a preview of the form is shown on the right hand side.
Let us create a simple form that can capture
“Preferred Username” [text field] and
“Request Additional Modules” [Radio] with two options “Administrator” and “Read Only”.
The code below shows how to create a simple form described above:
The UI Schema is like a set of json properties that are used to configure how the form should look and behave. It lets you tweak things like the length of a text box or whether a choice should be shown as radio buttons or checkboxes. In the example code, we're using the UI Schema to make the "preferredName" field have a placeholder and also set a maximum length. For "additionalModules," we're using widget property to make it show up as a radio button.
The Preview Form Data displays how the data entered in the UI will be gathered and shows the structure in which the data will be sent to the API.
The preview of the form looks as below after making the changes:
Once configured the administrator can Click on the Save button.
Once saved a confirm box appears to enable the form; the administrator needs to click on the Confirm button in the popup to enable the form for the application.
There are four options in that can be configured after enabling forms in Cymmetri
Form View: If enabled, the user has the option to see the application request form within the My Access section.
Form Edit: If enabled, the user has the option to edit the application request form within the My Access section, this will make changes in the respective fields in the target application.
Role Assignment: If activated, the user will be displayed the request form for applications that are already assigned to them when attempting to request additional roles.
Role Unassignment: If activated, the user will be displayed the form for applications when he/she is raising requests for role removal.
To configure ServiceNow Application with cymmetri we need to configure Active Directory application. Please follow the steps provided below.
Get ServiceNow application from Cymmetri Master apps.
After Getting application from cymmetri master activate provisioning of selected application i.e Service Now.
After successfully activating provisioning, setup server configuration.
Note: Basic configuration is already provided in cymmetri master application. If the connid server is configured externally then configure server config as per requirement.
Successfully configuring server configuration, next step is to configure User Configuration. This is the most important step to connect and perform operations with Service Now.
For User configuration we need User config base address,User config username and User config base password for all these credentials first we need to create account in Service Now which is a target application
Create account by clicking on below link
https://developer.servicenow.com/ and sign in to the account.
After clicking continue we have to enter a verification code which we will get from the entered email address.
Now we can go to Service Now account and click on My Profile and setting
it again asking for verification code.
Enter the verification code and verify the account.
Then click on Developer Program option
Now check the job responsibilities for admin account as shown in the screenshot
Now click on “Start building” tab for setting up an instance.
After setting up an instance we will get credentials for configuring the service now.
Add these credentials to the user configuration and save and test the configuration.
Now we have to add the policyAttribute which is not available. Go to policyAttribute and click on Add New button.
After clicking on the new button we have to add policyAttribute.
Now we also need to map the policyAttribute name and description and save it.
After completing policyAttribute we need to map these attributes with the cymmetri fields.
Go to policyMap and for user policyMap click on AddCymmetriField.
After clicking Add Cymmetri Field, window will open
Click application field and select field which we want to map with cymmetri field (Select Cymmetri Field) and check create Only and Update Only tab and if we want to make any field as unique field then check Is User Principal checkbox and save it.
Map remaining field as above just remember which field is unique(is user Principal marked checked).
After all configuration with these above steps now we are able to assign Service Now Application to the user. To check whether a user created or not to the target application we need to go to Service Now account click on All and search for Users
Here we will get all the user list.
In Cymmetri, database provisioning involves setting up and managing database access for provisioning users from the Database Management System into Cymmetri.
To configure a Database application for provisioning we need a database on the server. We need one table in the database on which we want to create users.
In the above image Userdetails is a table with some basic fields.
To configure Database Application with cymmetri we need to configure ScriptOn (Database) Application. Please follow the steps provided below.
Get ScriptOn (Database) Application from Cymmetri Master apps list
After Getting application from Cymmetri Master activate provisioning of selected application i.e ScriptOn application (Database).After successfully activation of provisioning, setup server configuration.
Note: Basic configuration is already provided in cymmetri master application. If the connid server is configured externally then configure server config as per requirement.
After successfully configuring server configuration, next step is to configure User Configuration. This is the most important step to connect and perform operations with ScriptOn (Database) applications.
To configure User configuration please refer to the following steps (It is abstract level steps that may be vary as per client). Following are the basic configuration which is required for every ScriptOn (Database) application to connect.
Database :- Name of the database on the database server that contains the table.
Datasource Path :- JDBC Data Source to connect to the database server.
Host :- The name of the host where the database is running.(eg localhost or 10.0.1.7)
JDBC Driver :- The JDBC Driver class name.
Eg: For Oracle Driver Class Name is oracle.jdbc.driver.OracleDriver For MySQL is org.gjt.mm.mysql.Driver For PostgreSQL is org.postgresql.Driver
JDBC Connection URL :- Specify the JDBC Driver Connection URL. Examples: Oracle: jdbc:oracle:thin:@[host]:[port(1521)]:[DB] MySQL: jdbc:mysql://[host]:[port(3306)]/[db] PostgreSQL template is jdbc:postgresql://[host]:[port(5432)]/[db]
Db is a database name. It Could be empty if a datasource is provided.
User Password :- User account that has permission to access accounts table.
Port :- The port number the database server is listening on. For postgreSQL it could be 5432. For mysql it could be 3306. We need to use it according to our database.
Reload Script On Execution :- This flag value must be true if we pass scripts file name (Groovy Scripts upload in server)
User :- The name of the mandatory Database user with permission to the account table.
Test Script or Test Script File Name :- Test script for testing connection from database with Cymmetri
Create Script or Create Script File Name :- Create user script for creating user in database application (supports PostgreSQL, MySQL, Oracle 11g) <uid needs to return from create script>
Update Script or Update Script File Name :- Update user script for updating user in database application (supports PostgreSQL, MySQL, Oracle 11g) <user update based on uid>
Delete Script or Delete Script File Name :- Delete user script for deleting user from database application (supports PostgreSQL, MySQL, Oracle 11g) <user delete based on uid>
Search Script or Search Script File Name :- Search script for searching user from database (Bulk search)
Sync Script or Sync Script File Name :- Sync script for Synchronizing users from database into/from cymmetri.
Above are the most important fields in user configuration which need to be configured. The details for the above fields are given in the application configuration page.
Configuring all the user and server configuration with proper data and Test application for connectivity. If it is successful then we can proceed for assignment and reconciliation operations or if it fails then check the audit log for error.
Other than user and server configuration we need Policy Attribute and Policy Map for mapping attributes of Database application with Cymmetri.
Following are the steps to configure policy attribute and policy map.
Policy Attribute :- There is default policy attribute cymmetri master application provides which has basic fields which needs to be configured for performing provisioning operation.
To add a new policy attribute click on the new button and add policyAttribute and its description.
Policy Map :- There is default policy map present in cymmetri master application which provides basic mapping of ScriptOn (Database) application with cymmetri. To configure these mapping we need to activate it as in create only and update only flags need to be true as per requirement.
To add a new policy map click to Add Cymmetri field.
Some important policy map fields which need to be declared in the policy map are as follows.
__NAME__ :- users login (supports from ‘cloud_2.7.21’)
__PASSWORD__ :- users password (supports from ‘cloud_2.7.21’)
For sample script please validate following link
https://drive.google.com/drive/folders/1-XSIlHSnf6UM0JYiaysA5Vg-TdfrMe0I?usp=drive_link
We need to provide Groovy code to run create user, update user, delete user and also recon pull and push (for recon pull we need to add sync script and for recon push we need to add search script)
Note: Please Configure script step by step
Configure test script at initial step and then test configuration for provided script (If configure successfully then only go for step b).
Configure create script and test configuration (If successfully configured then only go for step c).
Configure update script and test configuration (If successfully configured then only go for step d).
Configure delete script and test configuration (If successfully configured then only go for step e).
Configure sync(pull) script and test configuration (If successfully configured then only go for step f).
Configure search(push) script and test configuration (If successfully configured then only go to the next step).
NOTE :- While configuring the database you need to add a jdbc jar for a particular database into connid server (Inside the lib folder of the connid server).
Darwin Box Provisioning in Cymmetri involves integrating the Darwin Box HR management system with Cymmetri's identity and access management platform to automate and streamline user provisioning processes.
Add the Darwin Box application from the master and Enable the application provisioning.
Next we do User and Server Configurations
Api Key: <api_key_value>
Username: <username>
Password: <password>
Dataset Key: <dataset_key_value>
Unique key: employee_id
Base Address: <base_address_value>
Full Sync: <Select accordingly if want to do full sync or partial sync>
Host Server: 10.0.1.8
Server Password: <password>
Server Port: 8760
Server Connector bundle name: darwinBoxRest
Server Connector bundle version: 1.0
Server Connector name: com.cymmetri.connector.darwinBoxRest.DarwinBoxRestConnector
Group Company
Function
Office Area
Work Area Code
Office City
Direct manager employee id
Office mob no
Centre type
Office State
Office Address
first_name
last_name
employee_id
departments_hierarchy
company_email_id
designation_title
office_country
group_company
function
office_area
work_area_code
office_city
direct_manager_employee_id
office_mobile_no
center_type
office_state
office_address
employee_id with login
first_name with firstName
last_name with lastName
company_email_id with email
employee_id with employeeId
group_company with Group Company
function with Function
departments_hierarchy with department
office_area with Office Area
work_area_code with Work Area Code
office_city with Office City
office_country with country
direct_manager_employee_id with Direct manager employee id
office_mobile_no with Office mob no
center_type with Center type
office_state with Office State
designation_title with designation
office_address with Office Address
Create and Run the reconciliation pull.
Add the following script for date conversion in hook config
For now, only sync operation is supported for Darwin Box.
Unique key is considered as an employee id.
Github Enterprise provides provisioning using SCIM 2.0
Pre-requisites
Create an account in Github (Enterprise).
Enable SAML for the Github tenant to be used with Cymmetri.
Step 1. Configure SSO in Cymmetri
Note the application URL received from the Git SAML configuration
Continue the configuration by logging into Cymmetri using at least Application Administrator role
Note: Public certificate gets from SSO metadata(cymmetri) and format it using following
https://www.samltool.com/format_x509cert.php
Note: Make sure when you test SAML then in cymmetri login with github admin users loginid which is added in cymmetri.
Configure Profile Mapping
Create User in Cymmetri and make sure login id of Cymmetri is same as gitHub Admin user login id.
Test SSO with the Cymmetri user.
Configure SCIM v2.0 (Github) application from master (cymmetri).
Basic provisioning policy attribute and policy map already aaded in default schema.
Github Application is run using Fixed Bearer token.
To get Fixed bearer token following steps used.
Step 1: Go to user settings in github
Step 2: Go to developer settings
Step 3: Go to personal access token and generate new token
Step4: Click on Configure SSO
Step 5: Click on Authorize
Use following cymmetri provision configuration and change according to github account.
Fixed Bearer Value copy from personal access token
Click on save
Click on Test Configuration with success message.
Check Policy map
Disable default for the respective attribute
AMAYA is Cymmetri's no-code/low-code provisioning tool designed to streamline and simplify the provisioning process for users. This tool allows administrators to create, manage, and automate user provisioning workflows without needing extensive coding knowledge.
The AMAYA application within Cymmetri is designed to facilitate the provisioning of users and groups to various target systems through a series of configurable operations. This application supports a variety of operations to manage the lifecycle of user identities, including testing a connection to target system, syncing, searching, creating, updating, deleting, and managing roles.
The Application Provisioning interface for AMAYA is divided into several tabs:
Lets you configure the various user identity operations quickly and without coding
This interface allows administrators to configure and manage how users and groups are provisioned to or from target systems like Slack, Azure, ServiceNow, etc.
Test Operation: This operation is used to test the configuration with the target system. It ensures that the setup is correct and that the AMAYA application can communicate with the target system.
Sync Operation: This operation is used to synchronize users or groups from the target system. It ensures that the user/group data in Cymmetri is consistent with the data in the target system.
Search Operation: This operation allows administrators to search for users or groups in the target system, making it easier to find specific entities.
Create Operation: This operation is used to create users or groups in the target system based on the information in Cymmetri.
Update Operation: This operation allows for updating the details of existing users or groups in the target system, ensuring that changes made in Cymmetri are reflected accurately.
Delete Operation: This operation is used to delete users or groups from the target system, removing access or decommissioning identities as required.
Role Assign Operation: This operation assigns roles to users or groups in the target system, helping to manage permissions and access levels.
Role Unassign Operation: This operation unassigns roles from users or groups in the target system, removing permissions as necessary.
Quick Setup with Predefined Templates
The second image shows the Quick Setup screen, which provides predefined templates for popular applications. These templates simplify the process of setting up provisioning by offering pre-configured settings for the following applications:
Slack
ServiceNow
HubSpot
Azure
AWS Identity Center
Administrators can quickly start with these templates, which have standard configurations, and customize them as needed to suit their specific requirements. The search function at the top allows users to find other applications if the needed one is not listed among the predefined templates.
Consists of configuring the connector server. Enter the IP address of the host server and its password. The rest of the fields come pre-filled with default values; you can change them according to your use case.
This tab shows the list of operations supported by AMAYA
Hook Configurations If the administrator needs to write some custom action before and/or after provisioning the application, that can be enabled by configuring web hooks as shown in the Hook Configuration. The configuration supports a PRE and a POST HOOK for triggering custom code before and/or after provisioning of the application. Refer to webhooks here
Cymmetri can work with systems that handle user account provisioning manually, such as help desk or service request platforms. These systems typically rely on human intervention to create, modify, or deactivate user accounts, and Cymmetri can communicate or integrate with them to streamline these processes.
For example: If a company hires a new employee, the help desk team manually creates an account for the employee. Cymmetri connects with this help desk system to track or manage the account creation process.
Cymmetri provides a connector to remotely connect to a data source using SFTP and fetch flat-files to manage application user assignment data in Cymmetri. database provisioning involves setting up and managing database access for provisioning users from the Database Management System into Cymmetri. The CSV Directory can import common data types such as Comma Separated Values, Delimited Files or Flat-files from a configured location.
To configure the CSV Directory with Cymmetri we need to configure the CSV Directory application. Please follow the steps provided below.
First we need to create one CSV file locally then we need to place this file in the server.
For example if we connected to the server 10.0.0.99 then we need to place the csv file on that server. For example, we can transfer the file through the WinSCP application as well.
Click on the CSV Directory application from Cymmetri application catalogue
After Getting application from Cymmetri master activate provisioning of selected application i.e. CSV Directory.
After successfully activating provisioning, setup server configuration.
Note: Basic configuration is already provided in Cymmetri master application. If the connector server is configured externally then configure server config as per requirement.
Successfully configuring server configuration, next step is to configure User Configuration. This is the most important step to connect and perform operations with CSV Directory.
There are some fields which are compulsory
Source Path: Absolute path of a directory where the CSV files to be processed are located.
File Mask: Regular expression describing files to be processed. It can be the name of the csv file name.
Key Column Names: Name of the column used to identify user uniquely
Ignore header: Specify it first line file must be ignored
Column names: Column names separated by comma
Here the column name is the same as csv files column name.
Field Delimiter: Delimiter used to separate fields in CSV files
Key separator: Character used to separate keys in a multi-key scenario
Now fill the above fields and save the configuration and test the configuration.
Now we have to add Policy Attribute as per requirements. Go to Policy Attribute and click on Add New button.
After clicking on the new button we have to add Policy Attribute.
Now we also need to map the Policy Attribute name and description and save it.
After completing Policy Attribute we need to map these attributes with the Cymmetri fields.
Go to Policy Map and for user Policy Map click on Add Cymmetri Field.
After clicking Add Cymmetri Field, window will open
Inside User Configuration, add the Base Addresses of the target system SOAP APIs and add the Create, Update, and Delete Groovy Scripts. These scripts will perform the related CRUD operations at the target system using SOAP.
It is an example where the Create Script will be added. Similarly, add the other Scripts under the User Configuration
Add Relevant Connector Server, Port, and other details under the server configuration tab.
a. Set up Policy Attributes.
Go to the Policy Attributes on the left side menu. Add the user attributes that need to be involved in the CRUD Operations as named in the target system.
b. Set up Policy Map
This corresponds to the mapping of the fields in the target system with Cymmetri Fields
Step 1: Add and configure a new Custom Web Services Application
a. Go to Applications > Add New > Change Application Label > Click on Add Application.
This will add the application to be provisioned.
b. Set up Application Provisioning
Once the application is added, open the application and click on the provisioning
To add a mapping, click on the add Cymmetri field and add the field details.
Application Field - Field name of the target application
Cymmetri Field- Field name in the Cymmetri.
Check Is USER Principal option for the uniqueness of that particular field as per the target system,
Check Create Only and Update Only if the CREATE/UPDATE operation is required for that field.
Click on Save.
Now the application is ready for provisioning.
Step 2: Add/Update/Delete Application to the User.
Go to the user to whom the application needs to be assigned. Click on the add new button. Now select the newly created application for provisioning and click on assign.
Configure the Application Access Details and click on Save
Now User is Assigned to the target application.
Along with the Cymmetri adding the target application and its details to its database, the target application too will save the user details of the cymmetri.
Sending the details to the target application is done using a rest connector whose configuration is done under the provisioning section in step 1. This rest connector has groovy scripts for CRUD Operations.
The create groovy script is used to create the user in the target application. This create script prepares the required payload by referring to the policy attributes and policy mapping and calls the target system’s CREATE API. The target application returns a UID which is used for future purposes like update and delete.
We can edit the user details from the user profile. Along with updating the details into Cymmetri this will call the Update Groovy Script present in the User Configuration and perform the update operation in the target application for the user.
Delete a User is deprovisioning the user from the application. This is done using the delete option. This calls the delete groovy script to remove the user from the target application thus deprovisioning it. Once deleted the user is removed from the target system.
Step 3: Reconciliation/Syncing(PULL) user data into Cymmetri from the Target System.
The synchronization code is written inside the sync Groovy script. Sync Script fetches the user data from the target system and passes it to the Cymmetri, which further processes it according to the reconciliation condition specified.
Reconciliation is started by creating a reconciliation object under the tab mentioned below.
Click on ADD New to create a new Reconciliation PULL object. Add the cymmetri(Sync Field) and Target field (Source Attributes) mapping against which the sync action will be performed.
Now specify the pull conditions as per the requirement and click on save. A new recon object is created.
Click on the edit option on the recon object to run the reconciliation.
Clicking on Run Now will trigger the reconciliation PULL Process.
Reconciliation history can be checked under the history tab.
· The Target Application considered is any SOAP API and the groovy scripts are created to call these soap APIS.
· CRUD and Sync Groovy Scripts added in this Word document remain the same except for a few changes.
a. The request body of the target system to be sent will change. It will be in the form of a String XML.
b. The Sending/Receiving Response of the SOAP web services will remain the same.
c. Once the XML response is received from the SOAP API, this response has to be parsed into JSON by reading the child nodes of the XML.
d. After a user is created into the target system using the create groovy script, the user ID received in the xml response has to be parsed and saved. This UID is used later for update/delete operations.
e. Sync records received from target soap API has to be parsed and collected into an array and passed to the Cymmetri.
Add the relevant field and map it to the appropriate Cymmetri Field and save. Similarly, add all the required fields and this completes the mapping activity before setting up the task.
The Application Detail Page provides comprehensive management features for applications within the system. It includes various sub-pages for configuring assignments, sign-on protocols, policies, provisioning settings, roles, and more. Below we outline the functionalities and configurations available on each sub-page.
This page allows administrators to assign users and groups to an application. Users or group members can access the application if it is configured for Single Sign-On (SSO) or get provisioned in the application if it is a provisioning application.
Features:
Assign users and groups to the application.
View and manage existing assignments.
Configures the application for sign-on using various protocols.
Supported Protocols:
SAML: Configure SAML-based single sign-on.
OpenID: Set up OpenID Connect for authentication.
Reverse Proxy: Configure reverse proxy settings for sign-on.
API SSO: Set up API-based single sign-on.
Features:
Protocol selection and configuration.
Test and validate sign-on settings.
Manage sign-on settings for different environments.
Configure Multi-Factor Authentication (MFA) for the application’s SSO settings.
Features:
Configure MFA prompts and policies.
Manage MFA settings to ensure secure access.
Configure application provisioning with various settings organized into tabs.
Tabs:
User Configuration: Define application attributes and settings for provisioning.
Server Configuration: Set up connector server parameters.
Operations: View provisioning operations supported
Hook Configurations: Configure hooks for triggering provisioning actions.
Features:
Manage and configure provisioning details.
View and edit provisioning settings.
Monitor provisioning operations.
Create and manage application roles and import roles from CSV files.
Features:
Create new roles.
Import roles via CSV for bulk role creation.
Manage and edit existing roles.
Ensure roles are correctly provisioned in target applications.
Configure mapping between the provisioning source application and Cymmetri user fields.
Features:
Define and manage field mappings for data synchronization.
View data mappings for User Pull Reconciliation.
Ensure accurate data exchange between systems.
Configure general settings for the application. This section allows you to modify application label and description. You may also configure other settings as shown below:
This section lets you set application's risk which enables for identifying overall risks for users. The Risk level can be set to High, Medium, Low and Unknown
Administrator may configure visibility settings as shown below
Show to User: This setting when enabled lets the user see an application assigned to them.
User can request: This setting when enabled lets the user to request an application which is not assigned to the user.
Administrator may configure various role settings as shown below:
Multiple role assignments: which allows a user to have multiple roles in the said application and
Mandatory roles: This setting mandates that when the application is assigned atleast one role is assigned to the user
Add notes for end users and administrators.
This page lets you configure all the attributes from the provisioning source whose data needs to be synced on either sides.
Configure reconciliation settings for data synchronization.
Features:
Set up pull reconciliations to retrieve data from the source application.
Configure push reconciliations to update data in the source application.
Manage reconciliation schedules and tasks.
Configure dynamic forms used in workflows for additional data collection.
Features:
Create and manage dynamic forms.
Configure forms to collect data during workflow processes.
View and edit form data as required by administrators and users
Manage tags and meta information for applications.
Features:
Create and assign tags for categorization and search.
Add and manage meta information for various purposes.
Use tags and meta data to enhance application organization, search and categorization
Description: Provides a comprehensive reconciliation view for data synchronization across the system.
Features:
View detailed reconciliation data and statuses.
Analyze and resolve reconciliation issues.
Deprovisioning rules in any IAM system define the automated processes for managing the removal or deactivation of user accounts and access privileges when certain conditions are met.
These rules play a critical role in ensuring that access rights are promptly revoked when users no longer require them, enhancing security and compliance.
In Cymmetri, to establish deprovisioning rules, navigate to the "Deprovisioning" section within the rules under the User Lifecycle Management module.
Deprovisioning configuration includes the following:
Deprovisioning the user based on the Status or End Date of the user retrieved from the source system. Additionally, administrators can also choose to define provisioning based on any Hook Rule that provides users with the ability to insert custom logic for deprovisioning event.
Exclusion Application: This feature enables administrators to specify which applications should be exempt from the deprovisioning event in Cymmetri. Consequently, whenever deprovisioning is initiated, these selected applications will not be removed from a user's access.
Grace Period: The grace period allows you to set the number of days before the application is removed from the user's access.
Process Allocation Size: It refers to the number of simultaneous threads or parallel processes that Cymmetri allocates for executing the deprovisioning tasks. It determines how many user accounts or access revocations can be processed concurrently.
In Cymmetri, administrators can create a custom scheduler for a Deprovisioning rule to promptly eliminate unauthorized user access as per a specified timetable. This involves defining the scheduler using a cron expression, activating it, and saving the configured settings.
Once the applications have been configured to allow that the end-users have been provisioned into the managed application. We may now start configuring the reconciliation process for an application. The reconciliation process involves identifying the user attributes as stored in the Identity hub (Cymmetri platform) and their attributes as a user or a group account in the managed application; and the ensuring that the synchronization of the user and group accounts takes place either one-way or both ways between the managed application and the Identity hub, to ensure that there no discrepancies in the accounts stored by both the systems.
The reconciliation process may follow two strategies -
Full Reconciliation Full reconciliation is typically carried out when the managed application is first introduced into an organization’s Cymmetri platform. This involves ensuring all user accounts (and group accounts, wherever applicable) from the Cymmetri platform, are synchronized with the account information on the managed application. This type of reconciliation often takes a longer time, and is often only used as a one-time activity.
Filtered Reconciliation The Cymmetri platform and the managed application might lose synchronization due to a number of reasons, including backend changes to the user or group account information on the managed application or failure of communication between the identity platform and the managed application. In such cases, filtered reconciliation is employed on a regular, scheduled basis. This includes filters for a particular set of users, or to choose only the users that have been modified on either platforms, this is known as filtered reconciliation.
Cymmetri platform allows for both types of reconciliation phases, by allowing administrator to define an optional user filter during the reconciliation process.
The reconciliation process involves two major processes:
Pull In this mechanism, the Cymmetri platform allows for user and group account information to be pulled from the managed application.
Push In this mechanism, the Cymmetri platform pushes the user and group account information to be pushed to the managed application.
Regardless of the process employed, the configuration for the most part remains the same. Let us explore the reconciliation configurations on the Cymmetri Platform:
You may access the reconciliation menu by clicking on the application tile, and then clicking on the “Reconciliation” left-hand side menu.
Proceed to configure by clicking on the “+ Add New” button.
Name: Refers to the name of the Reconciliation process
Modes: FILTERED_RECONCILIATION (Currently the only mode supported by Cymmetri)
Sync Fields: The field from the user/group’s account information as available on the Cymmetri platform that must be used as a basis to identify the corresponding account on the managed application database.
Source Attributes: The field from the user/group’s account information as available on the managed application database that must be used as a basis to match with the “Sync fields”.
Status: Whether to run the reconciliation for Active/Inactive users.
Type: Some applications allow GROUP reconciliation, but most will have USER reconciliation only.
Filled Reconciliation basic configuration looks as above.
Let us assume we are synchronizing the Cymmetri Platform with a cloud provider using email or mail attribute as the Sync field. As such users on both platforms having the same email address will be matched/un-matched.
User does not exist in Target system & exists in Cymmetri: This indicates a situation during a pull phase or a push phase, where the user account exists on the Cymmetri platform, but not in the managed application. This typically occurs when the users have been pulled into the Cymmetri platform, but the managed application is yet to be synchronized with these users.
User exists in Cymmetri & Target system: This indicates a situation during a pull phase or a push phase, where the user account exists on the Cymmetri platform and in the managed application, but they may or may not have the same attributes or the same values of the attributes.
User exists in Target system & does not exist in Cymmetri: This indicates a situation during a pull phase or a push phase, where the user account exists in the managed application database but not on the Cymmetri Identity platform. This typically occurs when the users have been pulled into the managed application through its backend and the users have not been centrally managed through the Cymmetri platform.
User does not exist in Target system & exists in Cymmetri:
PROVISION: User is created in the target system with the attributes as present in their Cymmetri user profile.
IGNORE: User is not modified in either system.
UPDATE: Not relevant for this scenario.
DEPROVISION: User is removed from the Cymmetri platform to be consistent with the managed application user database.
UNASSIGN: Not relevant for this scenario.
ASSIGN: User is assigned access to this system in Cymmetri, this option may be used in the case of options like JIT being available to generate user profile in the managed application.
UNLINK: Not relevant for this scenario.
LINK: Not relevant for this scenario.
User exists in Cymmetri & Target system:
PROVISION: User is created in the target system with the attributes as present in their Cymmetri user profile.
IGNORE: User is not modified in either system.
UPDATE: User information from the Cymmetri Identity platform is updated using the account information from the managed application and vice versa.
DEPROVISION: Not relevant for this scenario.
UNASSIGN: Not relevant for this scenario.
ASSIGN: User is assigned the managed application on the Cymmetri platform in case they are already not assigned.
UNLINK: Not relevant for this scenario.
LINK: Not relevant for this scenario.
User exists in Target system & does not exist in Cymmetri:
PROVISION: User is created in the Cymmetri Identity platform deployment using the account information from the managed application.
IGNORE: User is not modified in either system.
UPDATE: Not relevant for this scenario.
DEPROVISION: User is removed from the managed application user database.
UNASSIGN: Not relevant for this scenario.
ASSIGN: Not relevant for this scenario.
UNLINK: Not relevant for this scenario.
LINK: Not relevant for this scenario.
Scheduling the reconciliation process:
Next Execution Date: This indicates the base date to start the execution date and time of the reconciliation process.
Cron Expression: This indicates the frequency with which the further reconciliation events will be run. There are 6 fields here - * * * * * * (e.g., 5 15 0 1 8 *) ; they refer to seconds, minutes, hours, days, months, and year after the first execution date.
In any Identity and Access Management (IAM) system, provisioning rules are predefined instructions or policies that dictate how user accounts and access privileges are automatically created, modified, or deactivated across various IT systems and applications.
These rules streamline the process of managing user identities and access rights throughout their lifecycle within an organization.
In Cymmetri, administrators have the ability to establish these rules within the "Rules" tab under the Lifecycle Management module. To do so, the administrator navigates to the "Provision" section, where the following page will be displayed.
On this page, administrators can view a comprehensive list of all the currently established rules within Cymmetri, along with an "Edit" button that allows them to make modifications to these rules.
On the top right corner of the page the admin can find the Add New button to add a new provisioning rule in Cymmetri.
To add a new rule you must do the following:
Add the name of the rule
Add Description of the rule
Activate the rule
Next select one or more applications with their corresponding roles (if defined).
If necessary, roles can be created for the application directly within the provisioning rule before adding them.
Note: Multiple application and roles can be added in a single provisioning rule
Just the way multiple applications can be assigned to users during provisioning, administrator can also assign one or more groups during the provisioning process.
For assigning groups the administrator needs to go to the Groups Tab and click on +Add New Group button.
Next a drop down appears where the user may select the group that the user needs to be a part of. Administrator may also assign multiple groups if required.
The next step is to add the condition upon which the rule will be activated within the system.
To add a condition navigate to the conditions section and click on + Add Condition button.
You can set up multiple conditions for the rule. For example, in the rule below, the conditions are that the user must be an "Employee," and their department should be "Sales."
A group of conditions can be added to be true/ false together.
The AND/ OR Switch allows to toggle if all the conditions are associated with an AND condition or an OR Condition
If required these conditions can be added, deleted or modified.
Once all the configurations are done the page needs to be saved. The Provision Rule creation page after all the configurations appears as below:
These rules automate and streamline the process of managing user accounts and access privileges across various systems and applications within an organization.
The 360 Degree Recon is one of a type feature of Cymmetri that enables administrators to have a holistic view of user data.
The 360-degree reconciliation process in Cymmetri is designed to ensure that identity data across different systems is consistent and up-to-date. The reconciliation process involves comparing records from Cymmetri with the records in target systems (like Active Directory) and identifying discrepancies that need to be addressed.
The 360-degree reconciliation process in Cymmetri is crucial for maintaining data integrity across all connected systems. By regularly running reconciliation, organizations can ensure that their identity data is accurate.
The 360 degree recon can be configured for all the provisioning applications supported by Cymmetri. Here we will be seeing an example of 360 Degree Recon with Active Directory.
As the first step for configuring 360 Recon the administrator needs to configure a pull recon as explained here.
Once the pull recon is configured the user next needs to go on the 360 Degree Recon page as shown below:
The 360-Degree Reconciliation page displays all the pull reconciliations configured for either users or groups. The administrator can select a configured reconciliation and run a 360-degree reconciliation for that specific pull.
Once the 360-degree reconciliation is started the administrator can then go to the History tab and view the results of the reconciliation on the reconciliation dashboard
Reconciliation Dashboard
The reconciliation dashboard provides an overview of the latest reconciliation run, including key metrics and visualizations to help administrators quickly identify and address issues.
Key Metrics:
Last Start Date: Indicates the start time of the most recent reconciliation run.
Last End Date: Indicates the end time of the most recent reconciliation run.
Total Processed Records: The total number of records processed during the reconciliation.
Records Pulled from Target App: The number of records pulled from the target application (e.g., Active Directory).
Present in Cymmetri only: Number of records that exist in Cymmetri but not in the target system.
Present in Target only: Number of records that exist in the target system but not in Cymmetri.
Accounts Overdue in the target: Number of accounts that are overdue in the target system but not reflected in Cymmetri.
Break Type Analysis
The break type analysis section uses a pie chart to categorize the types of breaks (discrepancies) identified during the reconciliation. In the example shown in the image, all breaks are categorized as "Present in Cymmetri only," indicating that certain records exist in Cymmetri but are missing from the target system.
Filter Options
Administrators can filter the results based on several criteria:
Login ID: Search for discrepancies related to specific user logins.
Break Type: Filter the results based on the type of break (e.g., "IDM exists, Target not exists").
Break Count Min/Max: Filter based on the minimum and maximum break counts.
Reconciliation Results Table
The results table provides detailed information on the discrepancies found during the reconciliation process.
Columns:
User Login: The login ID of the user in the Cymmetri IDM system.
Source Application Login: The corresponding login ID in the source application (e.g., Active Directory).
Application Login: The login ID in the application (if applicable).
Break Type: Describes the nature of the discrepancy (e.g., "IDM exists, Target not exists").
Break Count: Indicates how many times this particular break type was found for the user.
Actions: Provides option for viewing the user details for further understanding of the user data
Common Break Types
IDM Exists, Target Not Exists: This indicates that the user or identity exists in the Cymmetri IDM system but does not exist in the target system (e.g., Active Directory).
Target Exists, IDM Not Exists: This indicates that the user or identity exists in the target system but does not exist in the Cymmetri IDM system.
Actions to Resolve Discrepancies
Once discrepancies are identified, administrators can take the following actions:
Manual Review: Examine the discrepancy details and determine if the record should be updated, deleted, or if the discrepancy can be ignored.
Automated Actions: Depending on the configuration, some discrepancies can be automatically resolved by provisioning or de-provisioning the necessary accounts.


