Loading...
Loading...
Loading...
Loading...
Loading...
Loading...
Loading...
Loading...
Loading...
Loading...
For active directory configuration we need AD server with 636 port (ldaps protocol should be enabled).
Ensure that all your object classes are included here in the Entry object classes.
Configure the root suffix, which is the base DC and configure the Principal password.
Base Contexts for group entry searches is the base DN for searching for groups in the AD. Change the server hostname and use the domain name instead of IP address.
Enter the principal as the manager’s principal name, the principal is the user account that will be used for making LDAP queries to the Active Directory. SSL must always be true.
Test AD configuration before assigning an application to any user.
After testing AD configuration, Active Directory account will created for the user being provisioned into the Active Directory.
The Cymmetri Identity platform Active Directory provisioning supports the following functions -
Create user
Update user
Delete user
Server hostname needs to be configured for public access
For LDAP connector integration we need an LDAP server with the following detail sample.
Host/IP
LDAP Base Context
service user (Manager Username)
password (Manager User password)
After configure LDAP server we need to configure the Ldap application into the Cymmetri.
Check policy map to add proper attributes as needed by LDAP schema.
Integration REST Application
The REST connector is designed to manage provisioning by relying on RESTful service.
For REST applications we need target applications which support REST API’s.
Following configuration is tested for felicity application.
We need REST API’s to integrate with cymmetri.
Following are the cymmetri configuration which need to configure in user configuration in cymmetri.
It is Basic REST configuration which need to configure in application.
We need to provide Groovy code to run create user, update user, delete user and also recon pull and push (for recon pull we need to add sync script and for recon push we need to add search script)
For sample script please validate following link
https://drive.google.com/drive/folders/1Vs8y1ZHXV3AjqsPkQSnwUoVppL-yc8Vl?usp=sharing
Note: Please Configure script step by step
Configure test script at initial step and then test configuration for provided script (If configure successfully then only go for step b).
Configure create script and test configuration (If successfully configured then only go for step c).
Configure update script and test configuration (If successfully configured then only go for step d).
Configure delete script and test configuration (If successfully configured then only go for step e).
Configure sync(pull) script and test configuration (If successfully configured then only go for step f).
Configure search(push) script and test configuration (If successfully configured then only go to the next step).
Google Apps is a software-as-a-service platform (SAAS) that provides email, calendar, documents and other services. This connector uses the Google Apps provisioning APIs to create, add, delete and modify user accounts and email aliases.
Note: 1. Only the Premium (paid) or Educational versions of Google Apps provide access to the provisioning APIs. 2. Connector will not work on the free Google Apps Domain
First obtain the client_secret.json file from your Google Apps instance -
Log in to your Google Apps Admin Console (at https://www.google.com/a/domain-name) and verify that Security > Enable API access is checked (For more information on these APIs, navigate to the Google Developers interface, and search for these APIs).
In the OAuth 2.0 application of choice (at https://console.developers.google.com), create credential of type Oauth Client ID / Other, then download the related client_secrets.json file.
Enter https://console.developers.google.com/
Create New Project
Click on Enabled API & Services
Search for Admin SDK API
Click on Admin SDK API and then click on the Enable button
Once enabled, Click on CREDENTIALS tab
Now click on Create Credentials
And select OAuth client ID option
Select Desktop app as Application type, provide a name for the OAuth 2.0 client and then click on the CREATE button
A response screen is visible that shows that the "OAuth client created" It also displays Your Client ID and Your Client Secret. You may download the JSON here using the DOWNLOAD JSON option.
Click on OAuth consent screen and then Click on edit app
Enter the required details and Click on save and update
Select Internal as User Type if you want to restrict access only to the users of your organization.
Click on SAVE AND CONTINUE button on the Scopes screen
Search for Admin SDK API and select
Select for group
Click on credential
Download OAuth client
Change to the directory where you have downloaded the bundle and run the following command on the client_secrets.json file that you obtained earlier in this procedure:
This command opens the default browser, and loads a screen on which you authorize consent to access the Google Apps account.
When you have authorized consent, the browser returns a code. Copy and paste the code into the terminal from which you ran the original command
A response similar to the following is returned.
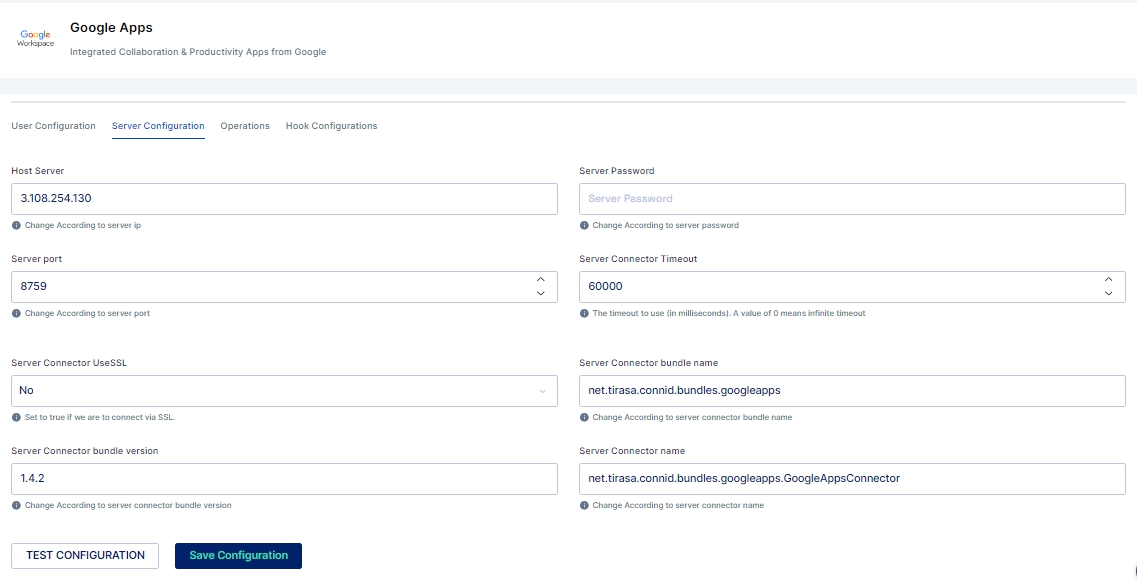
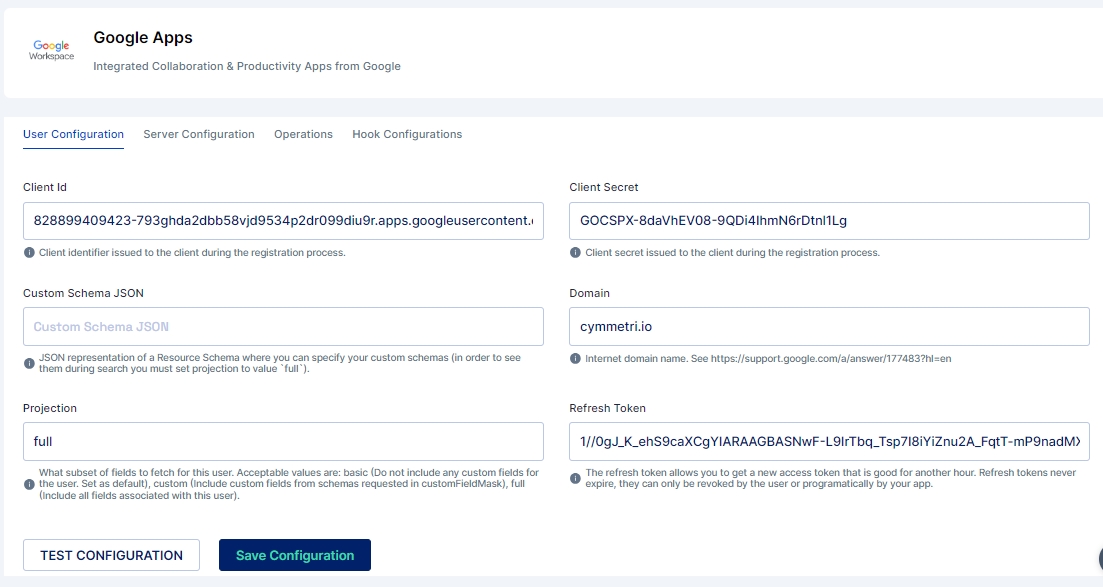
Once the above information is obtained we need to configure the Google App in Cymmetri with Server Configuration and User Configuration as shown below:
For the powershell connector we need a windows server machine with a connId server on it.
Configure powershell connector with following properties
Must configure powershell script with valid data using the reference below
Reference: https://drive.google.com/drive/folders/1XHt6aNmPzs7V7OKesk31FwqLxGf3u2ST?usp=sharing
Github Enterprise provides provisioning using SCIM 2.0
Pre-requisites
Create an account in Github (Enterprise).
Enable SAML for the Github tenant to be used with Cymmetri.
Step 1. Configure SSO in Cymmetri
Note the application URL received from the Git SAML configuration
Continue the configuration by logging into Cymmetri using at least Application Administrator role
Note: Public certificate gets from SSO metadata(cymmetri) and format it using following
https://www.samltool.com/format_x509cert.php
Note: Make sure when you test SAML then in cymmetri login with github admin users loginid which is added in cymmetri.
Configure Profile Mapping
Create User in Cymmetri and make sure login id of Cymmetri is same as gitHub Admin user login id.
Test SSO with the Cymmetri user.
Configure SCIM v2.0 (Github) application from master (cymmetri).
Basic provisioning policy attribute and policy map already aaded in default schema.
Github Application is run using Fixed Bearer token.
To get Fixed bearer token following steps used.
Step 1: Go to user settings in github
Step 2: Go to developer settings
Step 3: Go to personal access token and generate new token
Step4: Click on Configure SSO
Step 5: Click on Authorize
Use following cymmetri provision configuration and change according to github account.
Fixed Bearer Value copy from personal access token
Click on save
Click on Test Configuration with success message.
Check Policy map
Disable default for the respective attribute
Integration SCIM v2.0 with Basic
Any application which supports SCIM v2.0 with basic authentication is workable for application.
Following are configuration which is used for SCIM with basic authenticator.
Base address - It is the endpoint of the target system which supports SCIM v2 API’s.
Username - Username to authenticate SCIM API endpoint.
Password - Password to authenticate SCIM API endpoint.
Authentication type - It is Fixed Bearer compulsory.
Update method - Patch or Put method.
Accept - Http header which accepts (application/json etc).
Content Type - Http header which accepts (application/json etc).
Any application which supports SCIM v2.0 with bearer token is workable for application.
Following are configuration which is used for SCIM with bearer.
Base address - It is the endpoint of the target system which supports SCIM v2 API’s.
Username - Username to authenticate SCIM API endpoint.
Password - Password to authenticate SCIM API endpoint.
Security Token - It is a token which is used to authenticate.
Grant Type - It is grant type which is used to grant access for API’s.
Client Id - client id for authentication
Client Secret - client secret for authentication
Authentication type - It is Fixed Bearer compulsory.
Update method - Patch or Put method.
Accept - Http header which accepts (application/json etc).
Content Type - Http header which accepts (application/json etc).
Access Token Base Address - base address for access token
Access Token Node Id - node id for access token
Access Token Content Type - content type for access token.
Cymmetri Platform allows for pre-configured provisioning settings for Azure Portal.
For Azure integration we need an azure enterprise account with its own domain configured in the Azure AD.
Refer following document to configure azure application
Azure Document https://connid.atlassian.net/wiki/spaces/BASE/pages/308674561/Azure [ConnID]
Create a new OAuth2 Application and provide the following configuration in Azure OAuth2 application.
Application will be created and now we will be able to configure.
Let us now click on Authentication tab on the left-hand side menu. We can choose account either in a single Organization Directory or multiple directory.
Click on Add a platform and we can add a new Redirect URI as “http://localhost”.
Further we can allow the Public Client flows.
Create a new Secret by first, clicking on Certificate and Secrets on the left-hand side menu, and then click on the “+ New Client secret” link, Enter Description and select the Expires option.
Provide the right permissions for the Connector to work by clicking on API Permissions tab on the left-hand side menu, then click on Add, then click on Microsoft Graph and then click on Application Permission and Delegated.
Search and select the following permissions/scopes in OpenID
APIConnectors.Read.All
Directory.ReadWrite.All
OpenID
PrivilegedAccess.Read.AzureAD
User.ReadWrite.All
We need to take consent from admin for getting access to Microsoft Graph API, Click on add permission, Click on “Grant Admin content for Unotech Software”, and finally Click on Yes.
Click on Expose an API and Click on Set to expose the API to be used by the Azure API client on the connector.
Configure Azure user and server config as follows:
Configure the User Configurations
Copy the application authority from the User Configure.
Configure the Client ID.
Configure the Client Secret.
Configure the Domain from Azure Active Directory.
Configure the Redirect URI exposed from the Azure AD.
Graph API base endpoint (User Config Resource URI)
Add the Azure Tenant ID
Choose the base username.
Click on Save, and test the connection.
Any application which supports SCIM v2.0 with fixed bearer is workable for application.
Following are configuration which is used for SCIM with fixed bearer
Base address - It is the endpoint of the target system which supports SCIM v2 API’s.
Username - Username to authenticate SCIM API endpoint.
Password - Password to authenticate SCIM API endpoint.
Authentication type - It is Fixed Bearer compulsory.
Fixed Bearer Value - The value for fixed bearer.
Update method - Patch or Put method.
Accept - Http header which accepts (application/json etc).
Content Type - Http header which accepts (application/json etc).


