Password Filter
Introduction
The Cymmetri Architecture without the password filter utility allows for one-way synchronization of passwords from Cymmetri to managed applications like Active Directory. Active Directory passwords may therefore be updated, once the user password is updated in Cymmetri.
However, to keep both the Cymmetri database and Active Directory user passwords in synchronization, there is a need for Cymmetri database to receive password change notification from the Active Directory, when the password is directly updated in Active Directory.
Active Directory provides for the use of Password Filter which can intercept the request for password change and can make an API call to Cymmetri to update the password in Cymmetri database as well.
Flow Diagram

Flow Description
Cymmetri Password Filter dll will be deployed in the Active directory environment and system variables (environment variables) are configured to allow the password filter to connect to the Cymmetri deployment.
Active Directory server needs to be restarted once the configuration is performed.
Once the user changes the password on a domain-connected computer using Ctrl+Alt+Delete utility OR if the Active Directory administrator resets the user's password using Active Directory tools, the password filter will be triggered.
The password filter DLL will receive the username and the plaintext password from the Active Directory, once the password change has been applied on the Active Directory.
The password filter DLL will encrypt the password using RSA encryption with a public key and will send the encrypted password and the username to the Cymmetri deployment using a REST API call over HTTPS.
The Cymmetri deployment receives the username and encrypted password, it decrypts the password using private key.
Once the password is decrypted, the Cymmetri deployment updates the password in Cymmetri database for the given user.
If the user is assigned multiple applications for provisioning, the action of updating user's password in Cymmetri database will trigger password update for the user in other provisioned applications. However, Active directory application will not receive this password update, to avoid loops.
Configuration
CYMMETRI_APP_ID
<application-id-of-active-directory-in-Cymmetri>
CYMMETRI_CLIENT_TOKEN
Authorization: Bearer <token-from-api-client>
CYMMETRI_ENDPOINT_URL
https://<cymmetri-domain>/apiext/api/password/filter/updateUserPassword
CYMMETRI_PUBLIC_KEY_FILE
<path of public key file in Active Directory Server>
Steps for deploying Password Filter DLL
Download the dll file and the public key file from here - CPFv308.dll - https://drive.google.com/file/d/15uPQYnJr7HUWnxHLPSpYtsWGKkm5HnLC/view?usp=share_link public.pem - https://drive.google.com/file/d/1OdBLal4RTA5bMqABJEq3zQeLxNzSOE0R/view?usp=share_link
Place the CPFv308.dll file in the C:\Windows\System32 folder.
Run regedit and go to the following path: HKEY_LOCAL_MACHINE\SYSTEM\CurrentControlSet\Control\Lsa
You must now see a page similar to this:
Select the element Notification Packages and double click it
Add the line “CPFv308” and Click on OK to save the registry entry.
Exit the registry editor.
Save the public.pem file to any directory and note the name of the directory. Ex - C:\Users\Administrator\Desktop\public.pem
For testing the deployment, Login into the Cymmetri portal as an administrator and note the application ID of the Active Directory application configured for provisioning. Ex - 69125912519fb123
Also, create a new API client.
Click on renew secret and note the bearer token generated.
Ex - eyJhbGciOiJIUzI1NiJ9.eyJzdWIiOiJOZXcgQVBJIENsaWVudCIsInRlbmFudCI6IjI3NyJ9.L_q7I4MFcZSFXetdSvzD7hxvfcSrUUaJEkwhUTfHgus
Go to Control Panel > System > Advanced System Settings and click on environment variables.
Add the following System variables.
Key = CYMMETRI_APP_ID; Value = <application-id-of-active-directory>; Example = 6015991fdfeab12c
Key = CYMMETRI_CLIENT_TOKEN; Value = Authorization Bearer <token-from-api-client>; Example = Authorization: Bearer eyJhbGciOiJIUzI1NiJ9.eyJzdWIiOiJOZXcgQVBJIENsaWVudCIsInRlbmFudCI6IjI3NyJ9.L_q7I4MFcZSFXetdSvzD7hxvfcSrUUaJEkwhUTfHgus
Key = CYMMETRI_ENDPOINT_URL; Value = <domain>/apiext/api/password/filter/updateUserPassword; Example = https://277.newqa.cymmetri.in/apiext/api/password/filter/updateUserPassword
Key = CYMMETRI_PUBLIC_KEY_FILE; Value = <path of public.pem file>; Example = C:\Users\Administrator\Desktop\public.pem
Save the environment variables.
Create a folder as C:\passfilter_logs to store the logs.
Take a restart of the Active Directory Server.
Configuring Password Filter in Cymmetri
Navigate to the Configuration Menu.
Look for the Password Filter option in the Configuration Menu.
Once on the page click on "+Add New" button
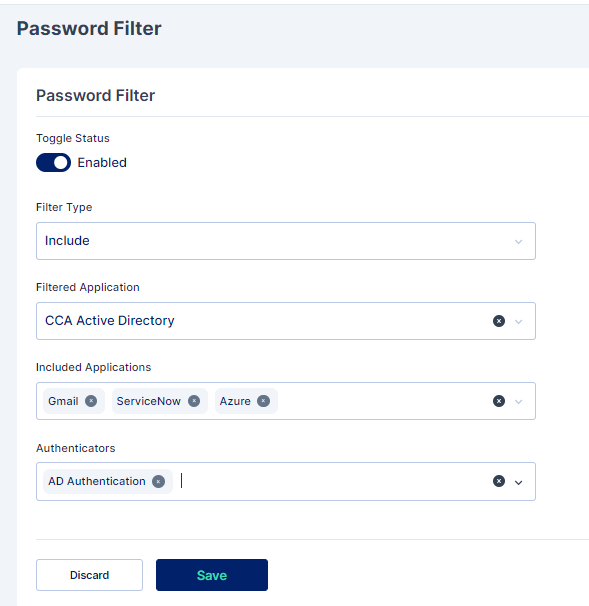
This will open the configuration page, You should find a toggle button to enable the Password Filter. Turn it on to enable the filter.
Once the Password Filter is enabled, you'll need to choose the filter type.There are two options: "Include" and "Exclude."
"Include" means that only the applications selected in the included applications dropdown will receive synced passwords and have their passwords changed correspondingly.
"Exclude" means that all applications except the ones selected in the excluded applications dropdown will receive synced passwords and have their passwords changed correspondingly.
Next you select the Filtered Application this is usually the managed application where the password changed has happened which in this case is Active Directory
Next, determine which type of authenticator you want to use for password synchronization.
You typically have three options: Cymmetri Authenticator, AD (Active Directory) Authenticator, or LDAP (Lightweight Directory Access Protocol) Authenticator.
Choose the appropriate authenticator based on your requirements and configuration.
After completing the above steps, make sure to save your configuration settings.Click on the "Save" button to save your changes.
