Azure Provisioning
Azure provisioning in Cymmetri involves setting up configurations to automate the creation and management of user accounts in Microsoft Entra ID. This allows for seamless user onboarding and offboarding processes.
To implement Azure provisioning in Cymmetri, follow these general steps:
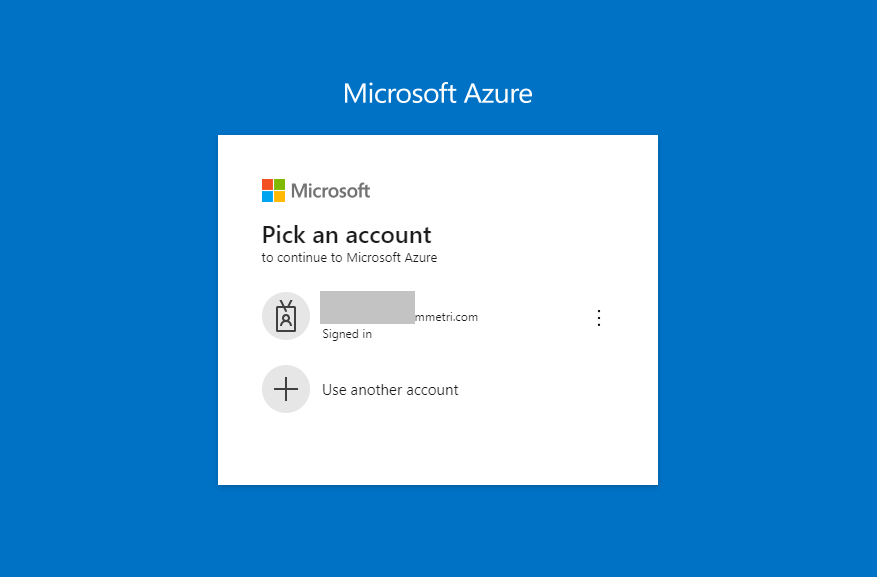
The administrator needs to login to Azure Portal: https://portal.azure.com
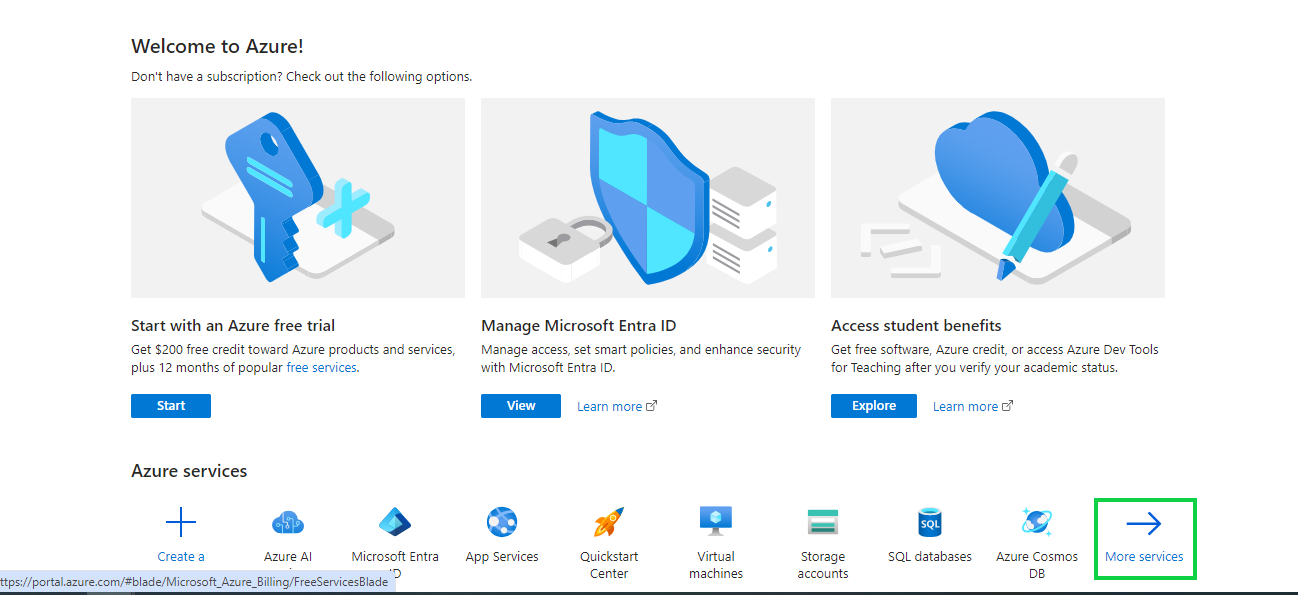
Once logged in click on More services-> button
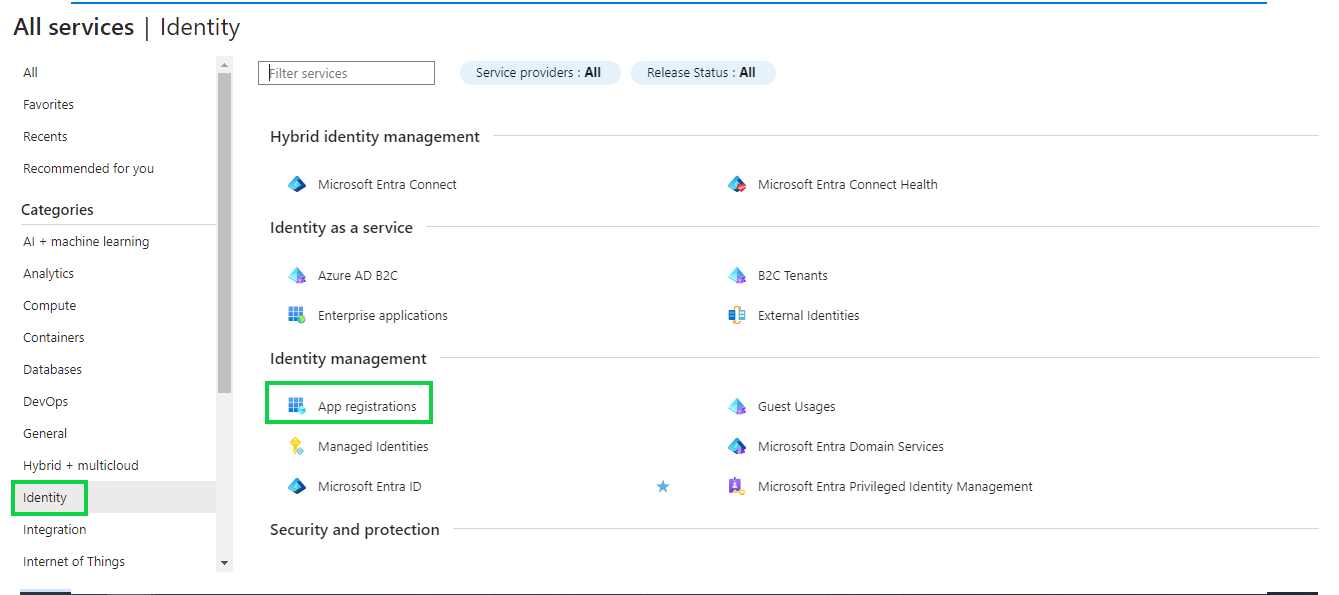
In the next screen click on Identity -> App registrations inside the Identity management section
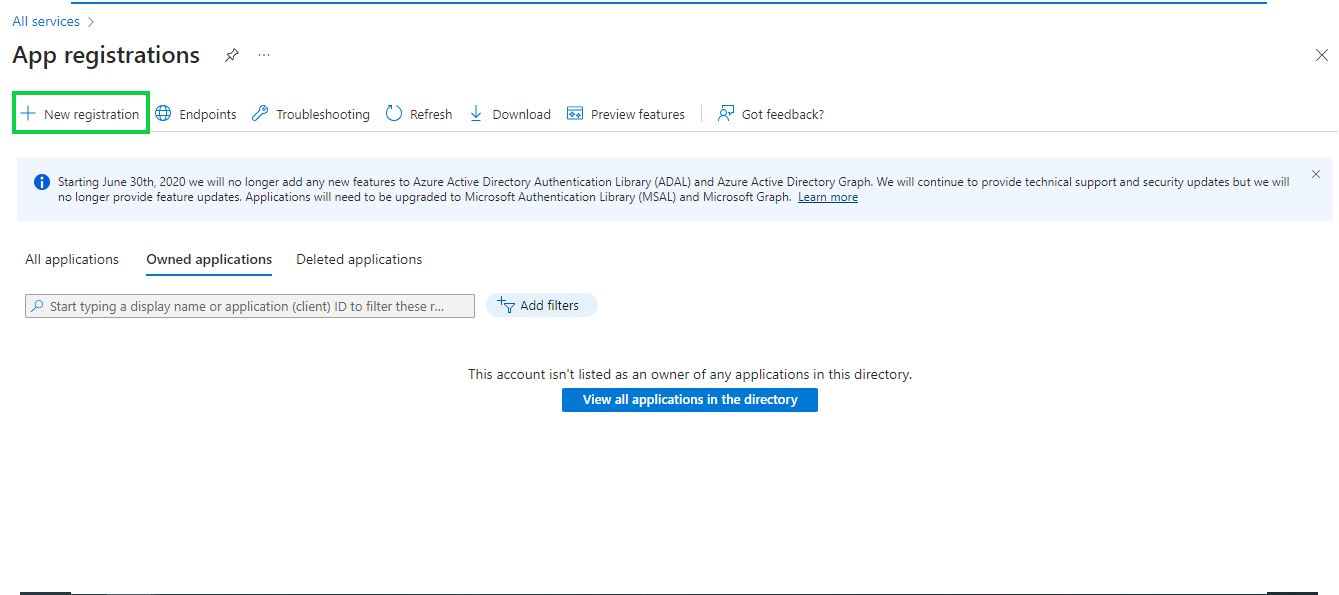
Next click on New registration to register a new App. Registering your application establishes a trust relationship between your app and the Microsoft identity platform. The trust is unidirectional: your app trusts the Microsoft identity platform, and not the other way around. Once created, the application object cannot be moved between different tenants.
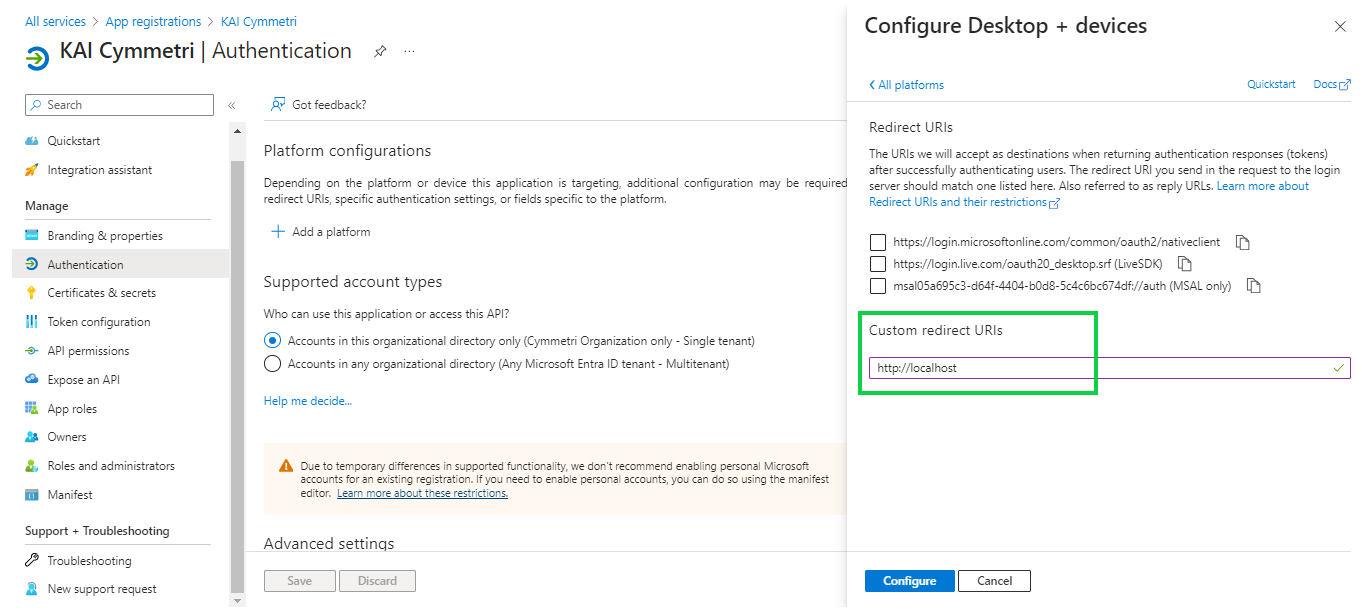
Next enter the Application Name and select the Supported account types to organizational directory only : Accounts in this organizational directory only (Cymmetri Organization only - Single tenant) and then click on Register
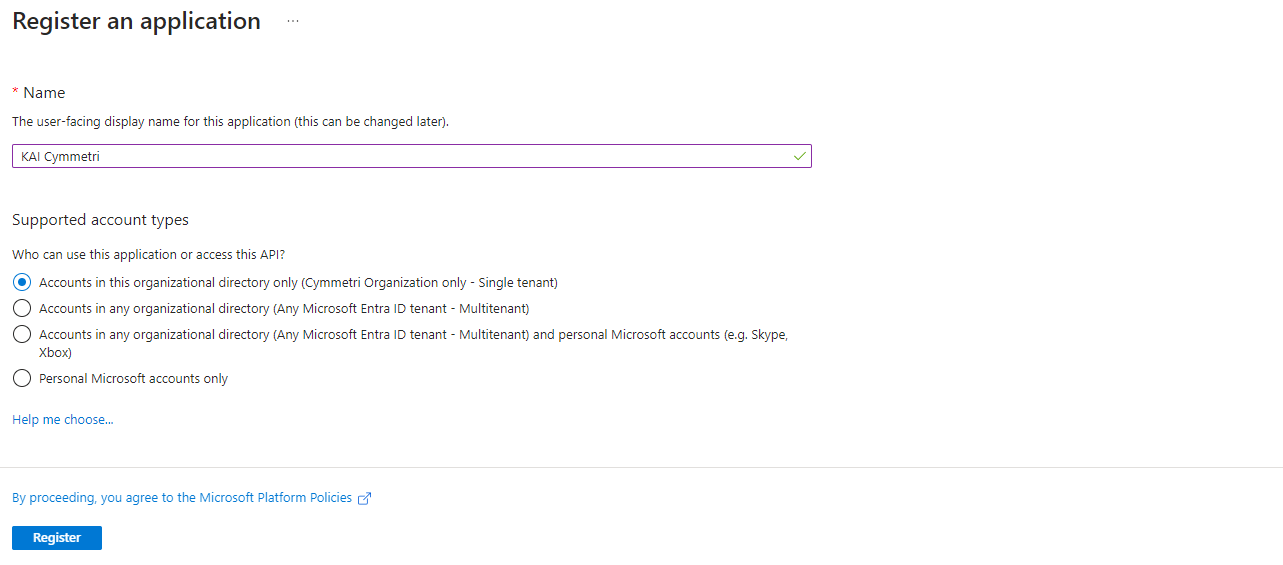
Once registered next click on Authentication menu and +Add a platform.
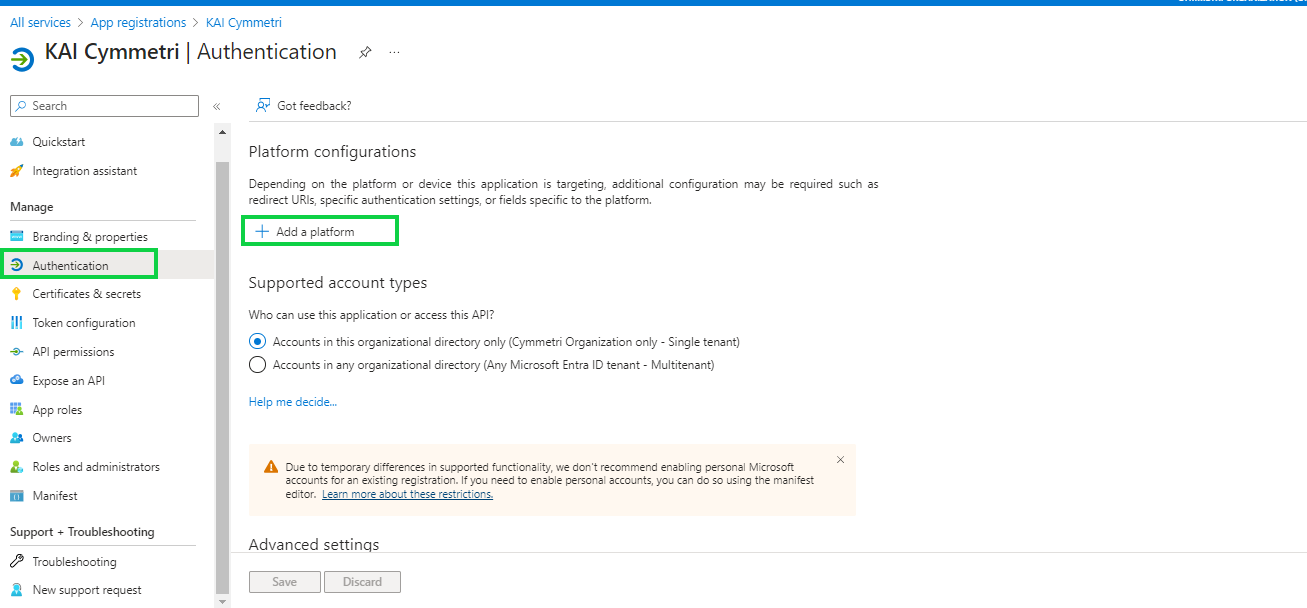
On the next screen select Mobile and desktop applications
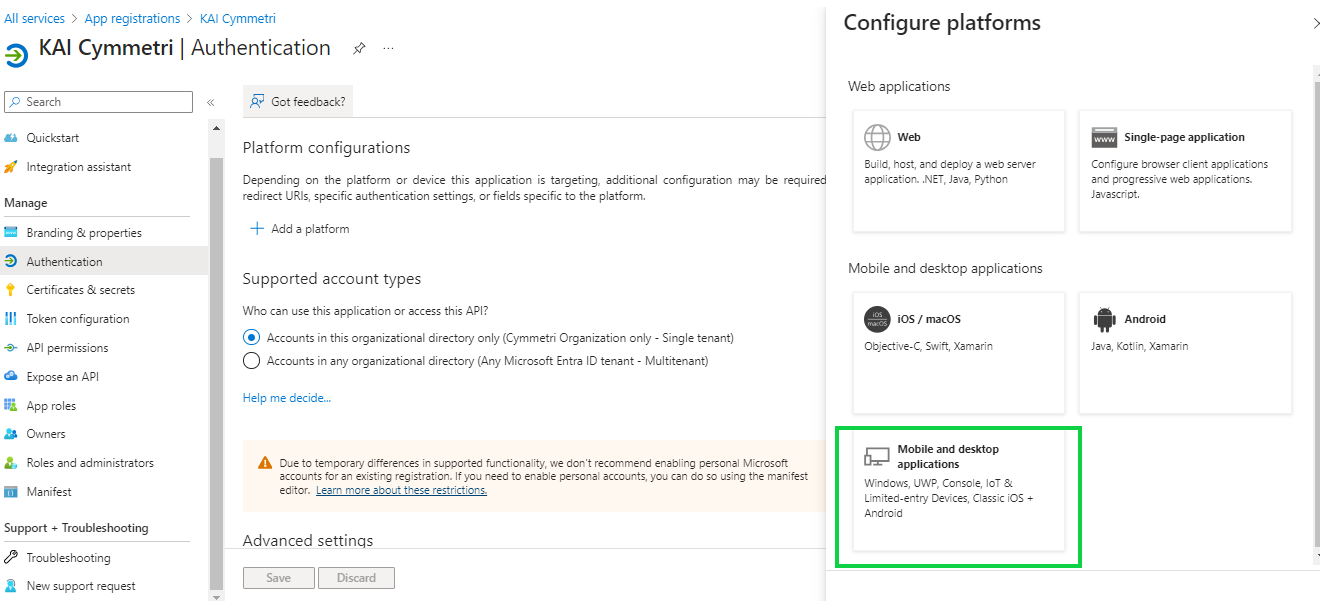
Enter a Custom redirect URIs: http://localhost and click on Configure
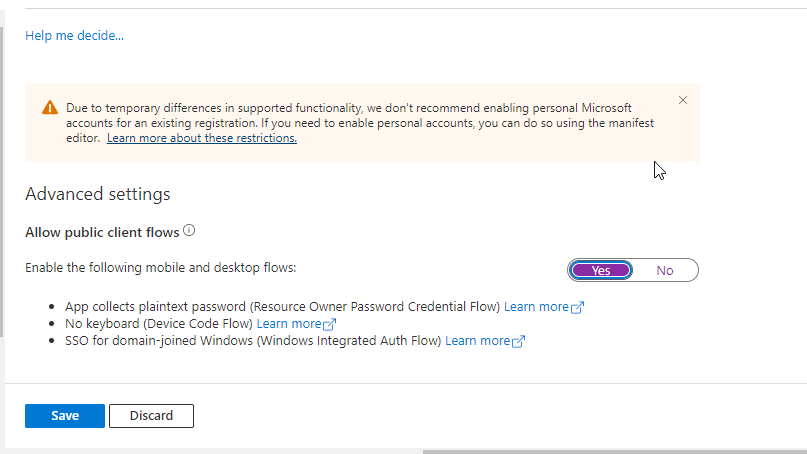
Further enable the Public Client flows and click on Save button
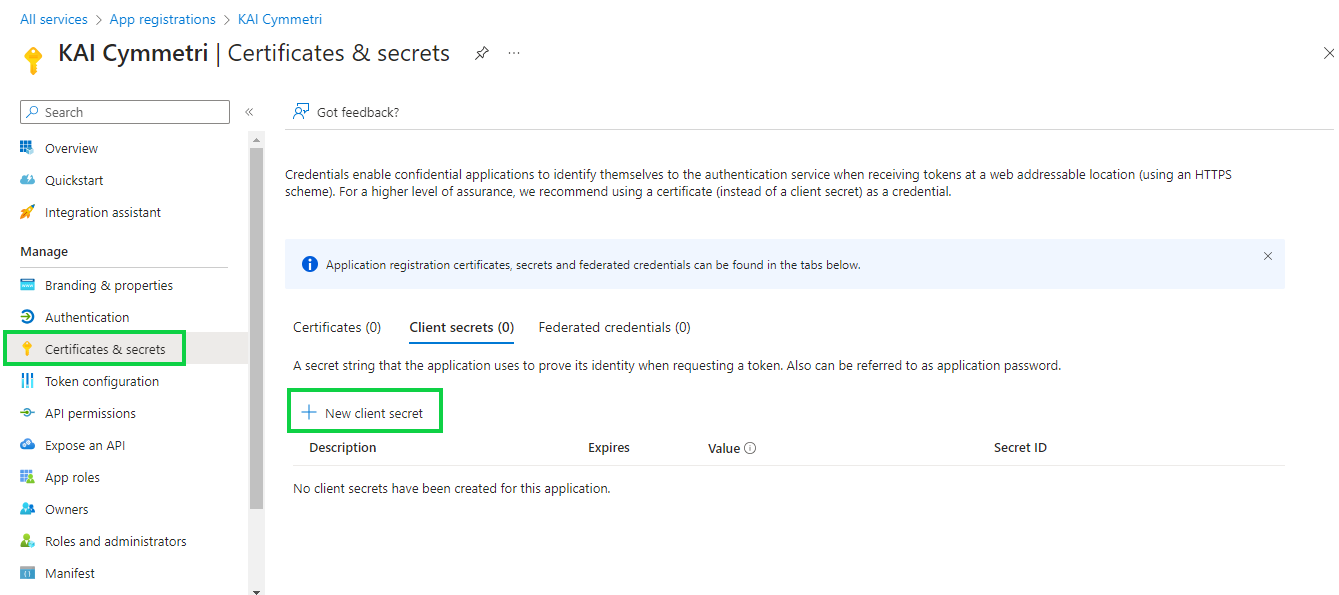
Next go to Certificates and secrets menu and create a new client secret:
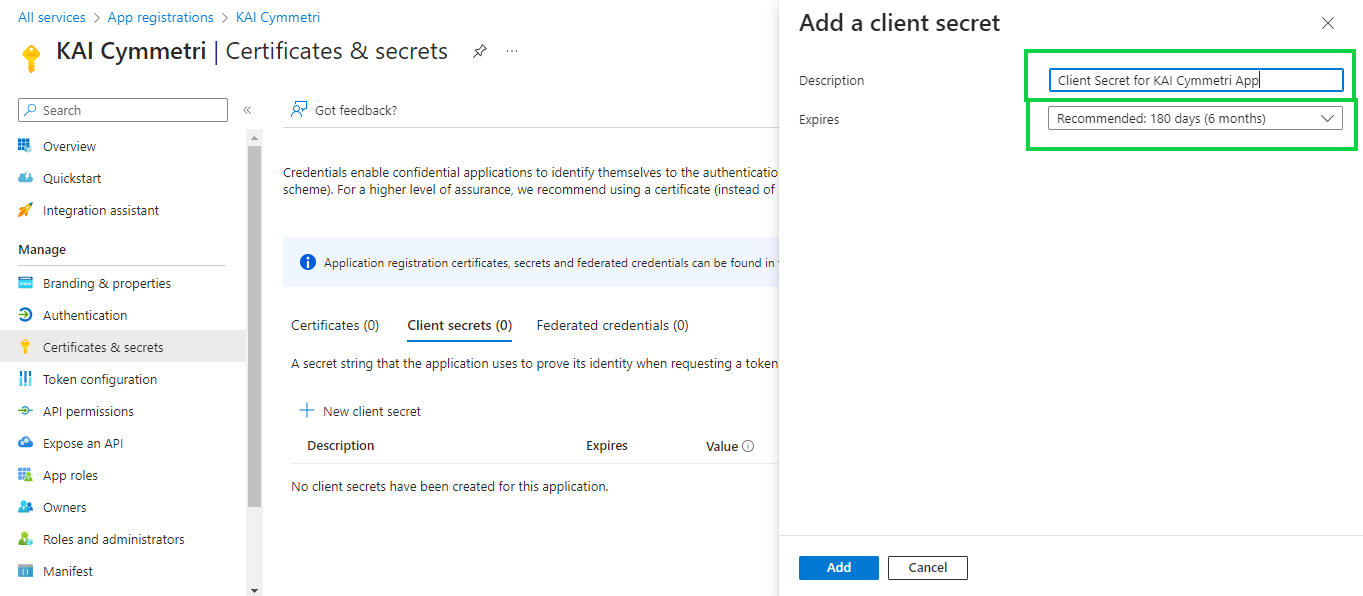
Next enter a Description for the and select the duration after which the secret would Expire -Recommended is 180 days (6 months) but can be changed as per the need. Once both the details are entered click on Add button
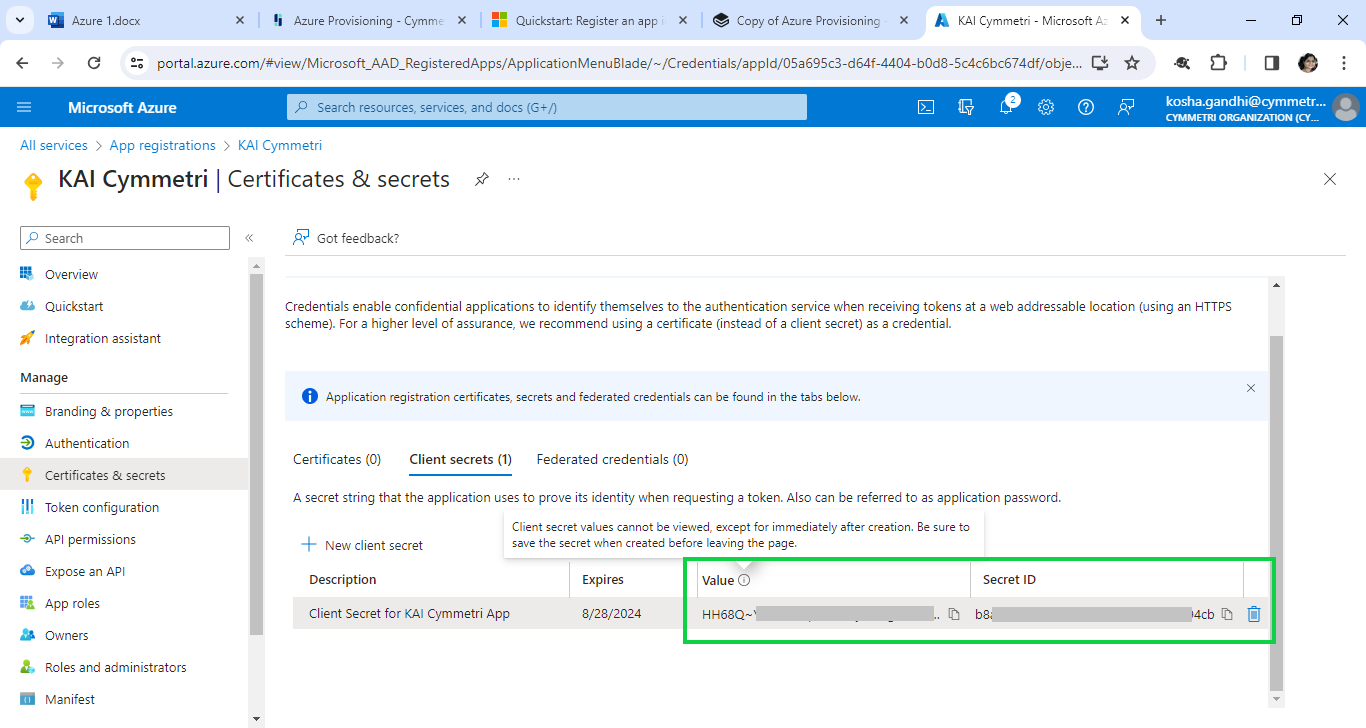
Next copy and save the Client Secret ID and Client Secret Value in a safe and accessible place. Client secret values cannot be viewed, except for immediately after creation. Be sure to save the secret when created before leaving the page.
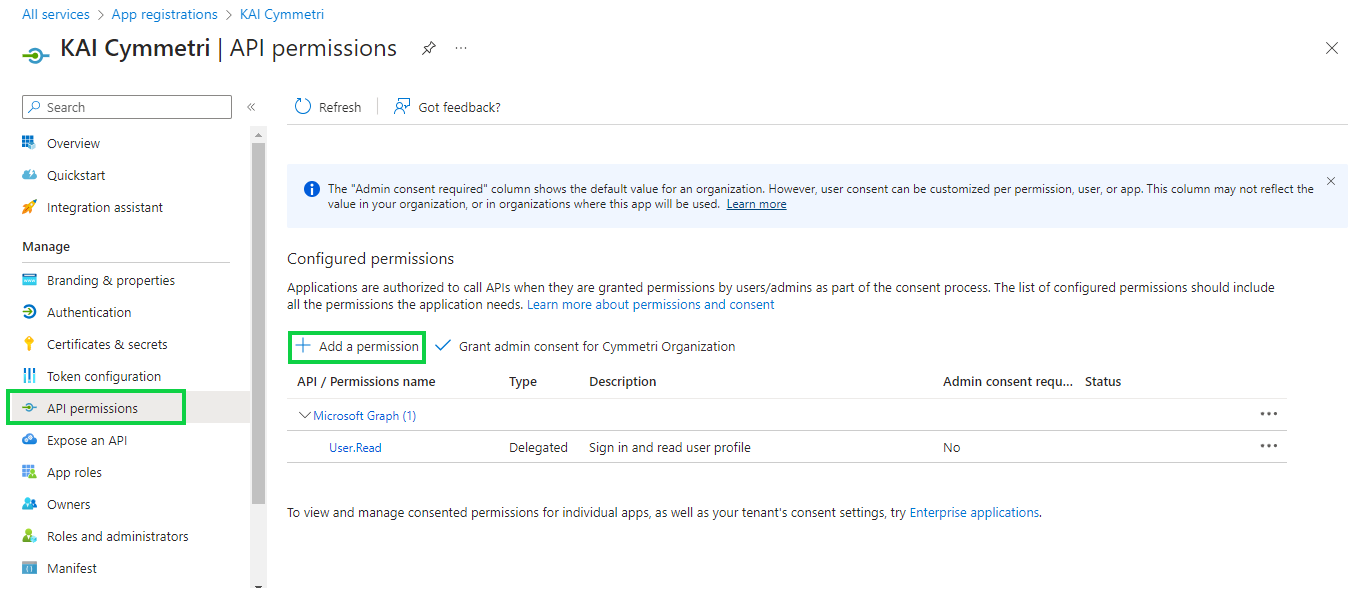
Once the client secret details are stored next click on API permissions menu and then + Add a permission
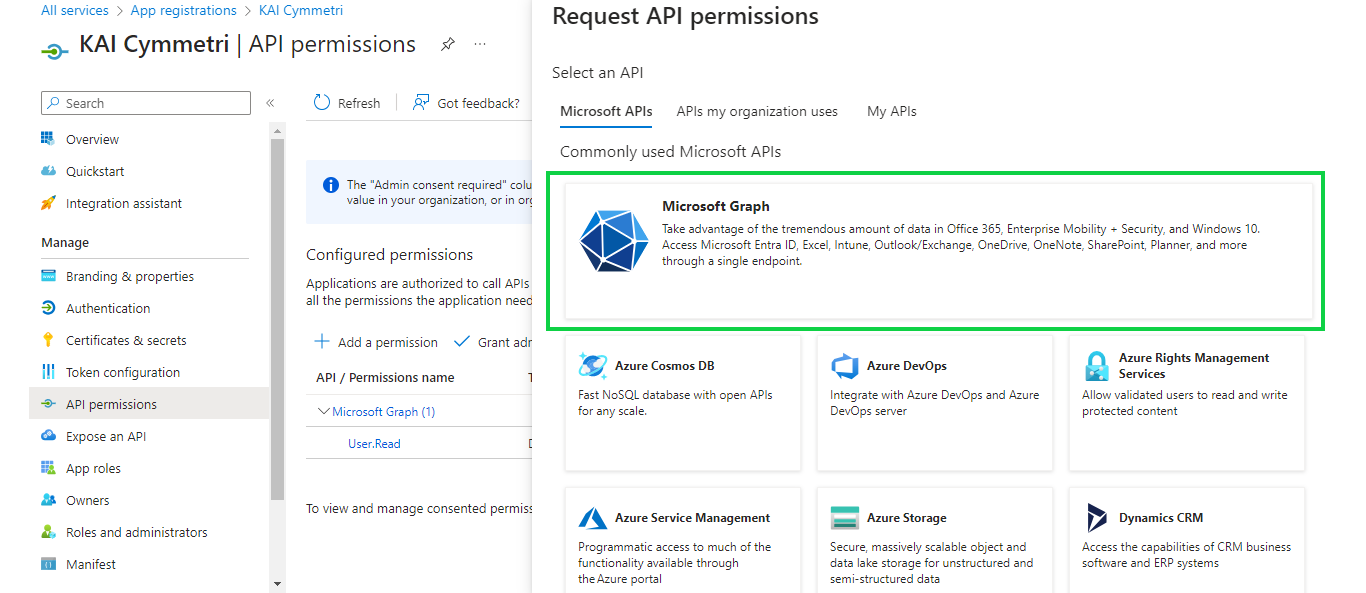
On this page select Microsoft Graph
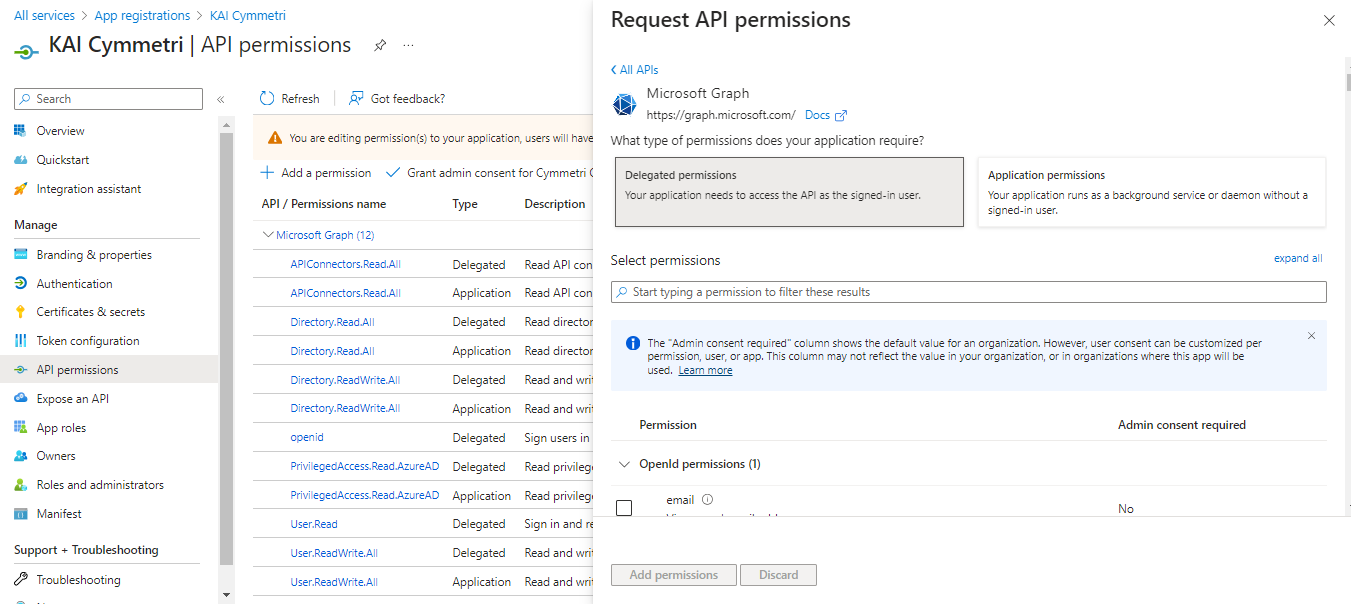
On the next page we require permissions for both Delegated and Application permissions. Select each type of permission and in that Search and select the following permissions/scopes:
APIConnectors.Read.All
Directory.ReadWrite.All
OpenID (Not available for Application Permissions)
PrivilegedAccess.Read.AzureAD
User.ReadWrite.All
Directory.Read.All
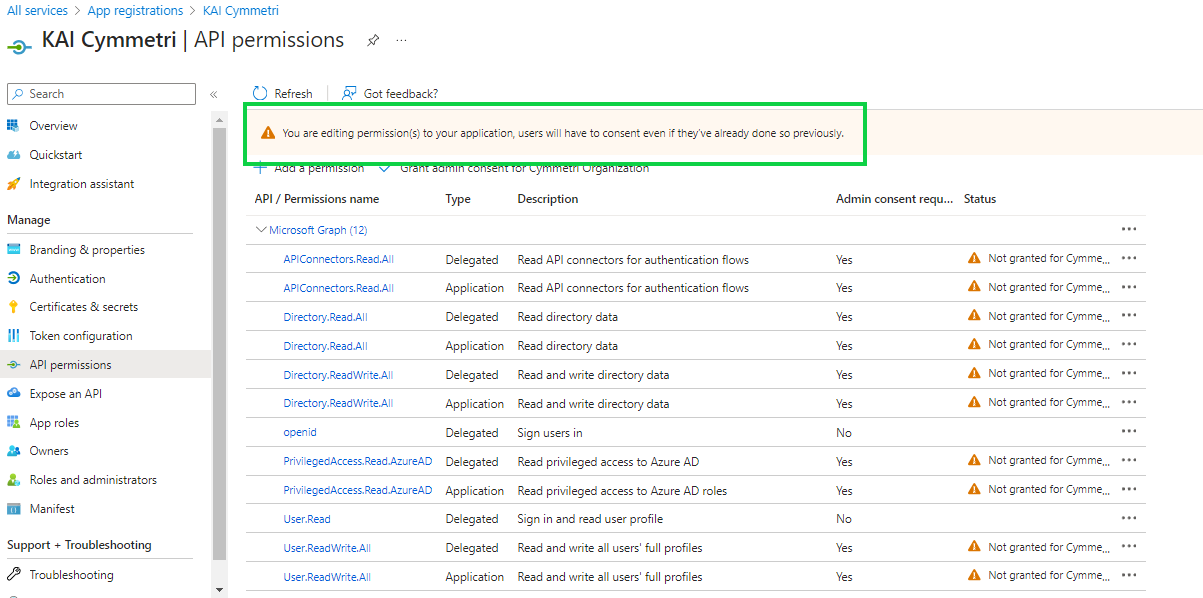
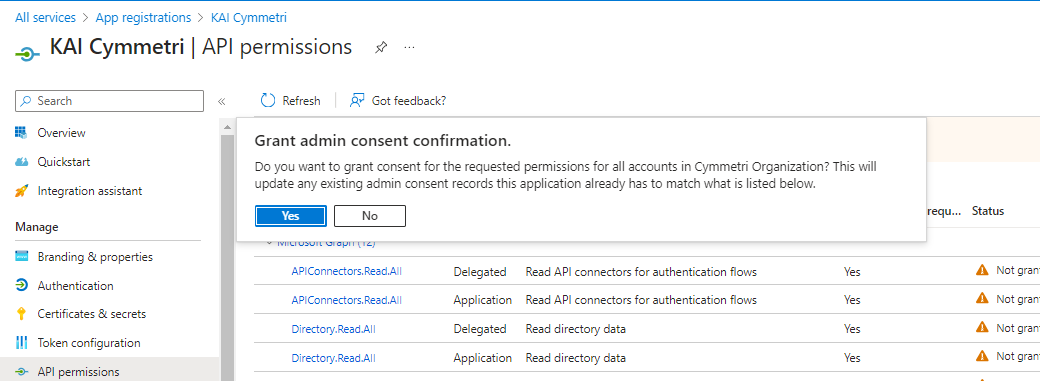
Once all the permissions are added a warning is shown: "You are editing permission(s) to your application, users will have to consent even if they’ve already done so previously." The administrator needs to click on the "Grant admin consent for Cymmetri Organization" link
On the click of the link a popup appears to grant admin consent, click on Yes
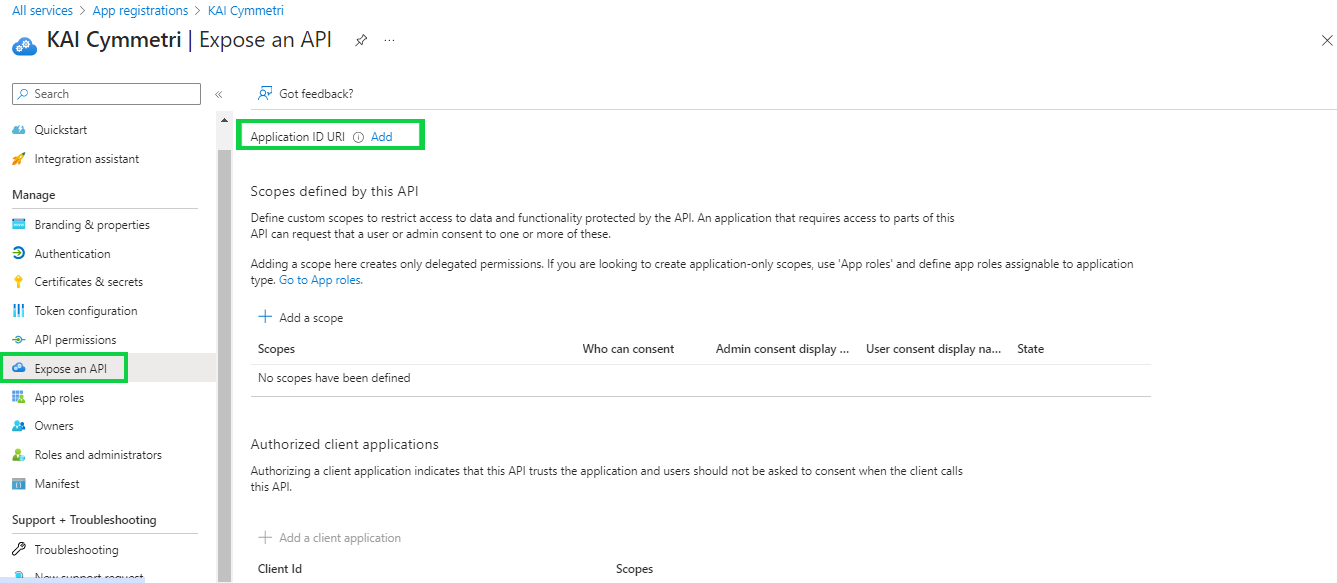
Next click on Expose an API and then click on Add to add an Application ID URI: The Application ID URI, also called identifier URI, is a globally unique URI used to identify the web API. This URI is the prefix for scopes in the Oauth protocol. You can either use the default value in the form of api://, or specify a more readable URI.
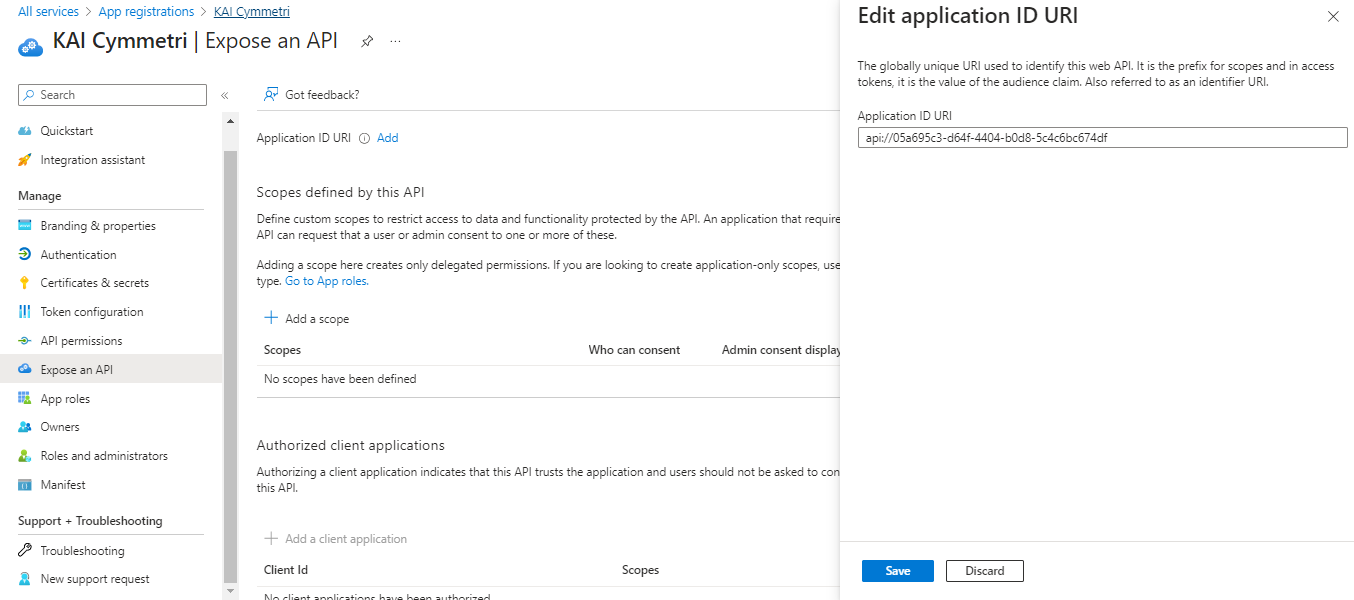
On the next page keep the default values intact and click on Save button
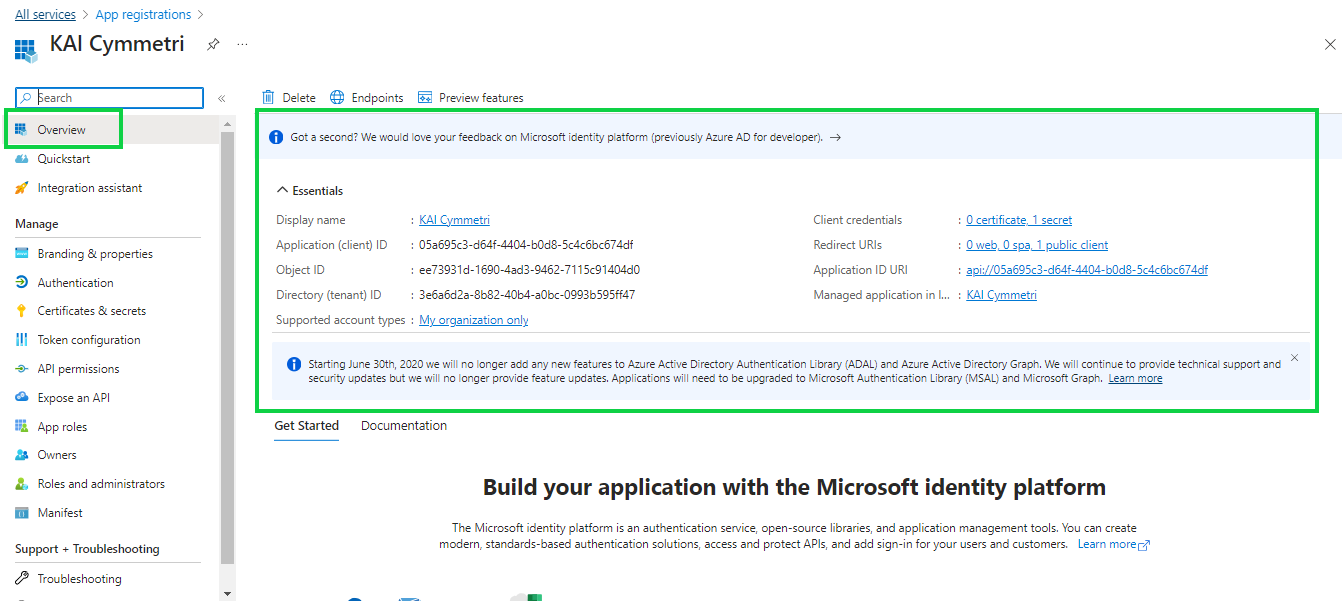
Finally you can see the Overview page that contains all the information you need to configure Azure in Cymmetri.
Also the User config Application Authority can be obtained from the endpoint section in the Overview page:
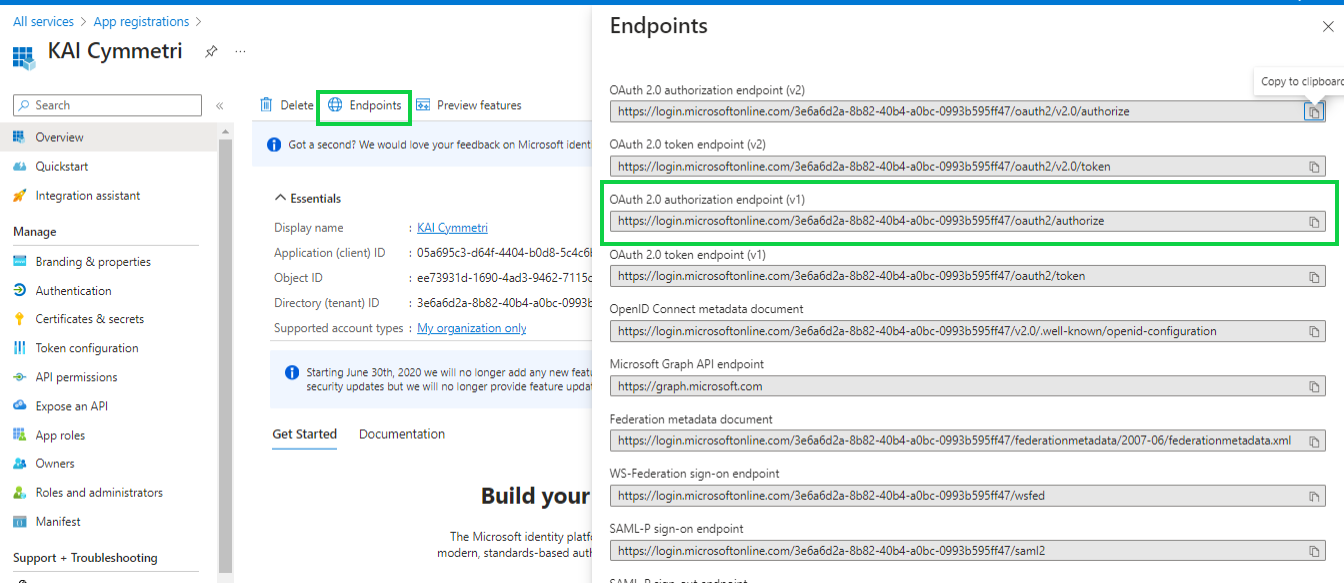
This completes the Azure side of the configuration, next the administrator needs to need to move to Cymmetri and configure the Azure application. Mentioned below are the steps required to configure Azure in Cymmetri:
Add a new Azure application Identity Hub->Applications and then click on the +Add New button
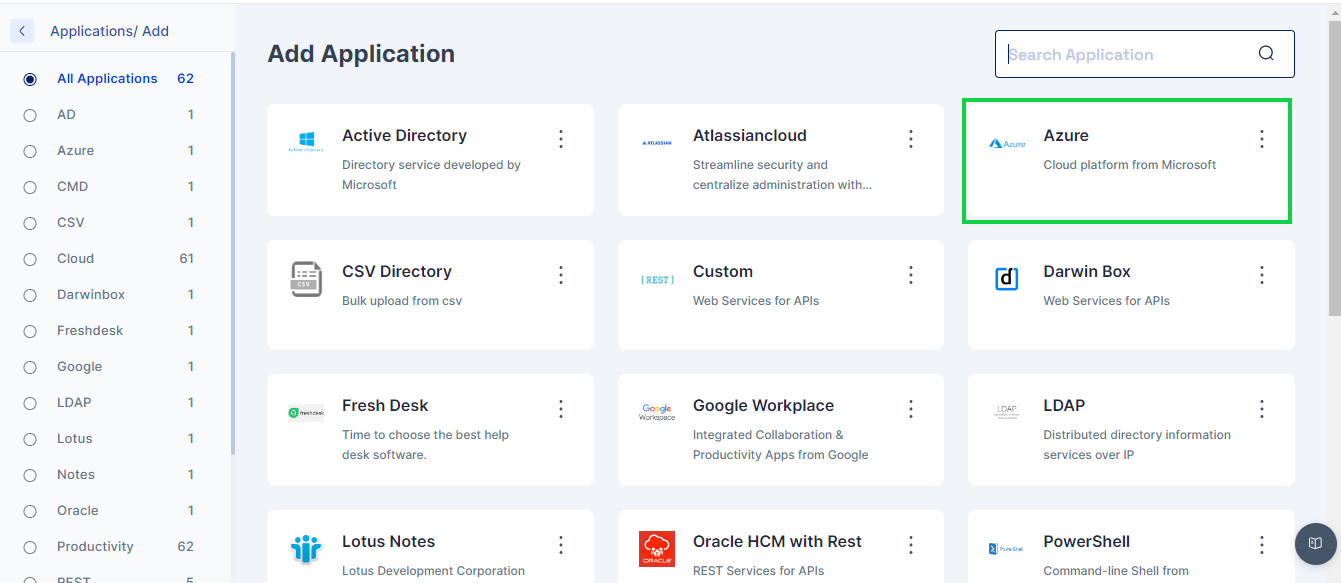
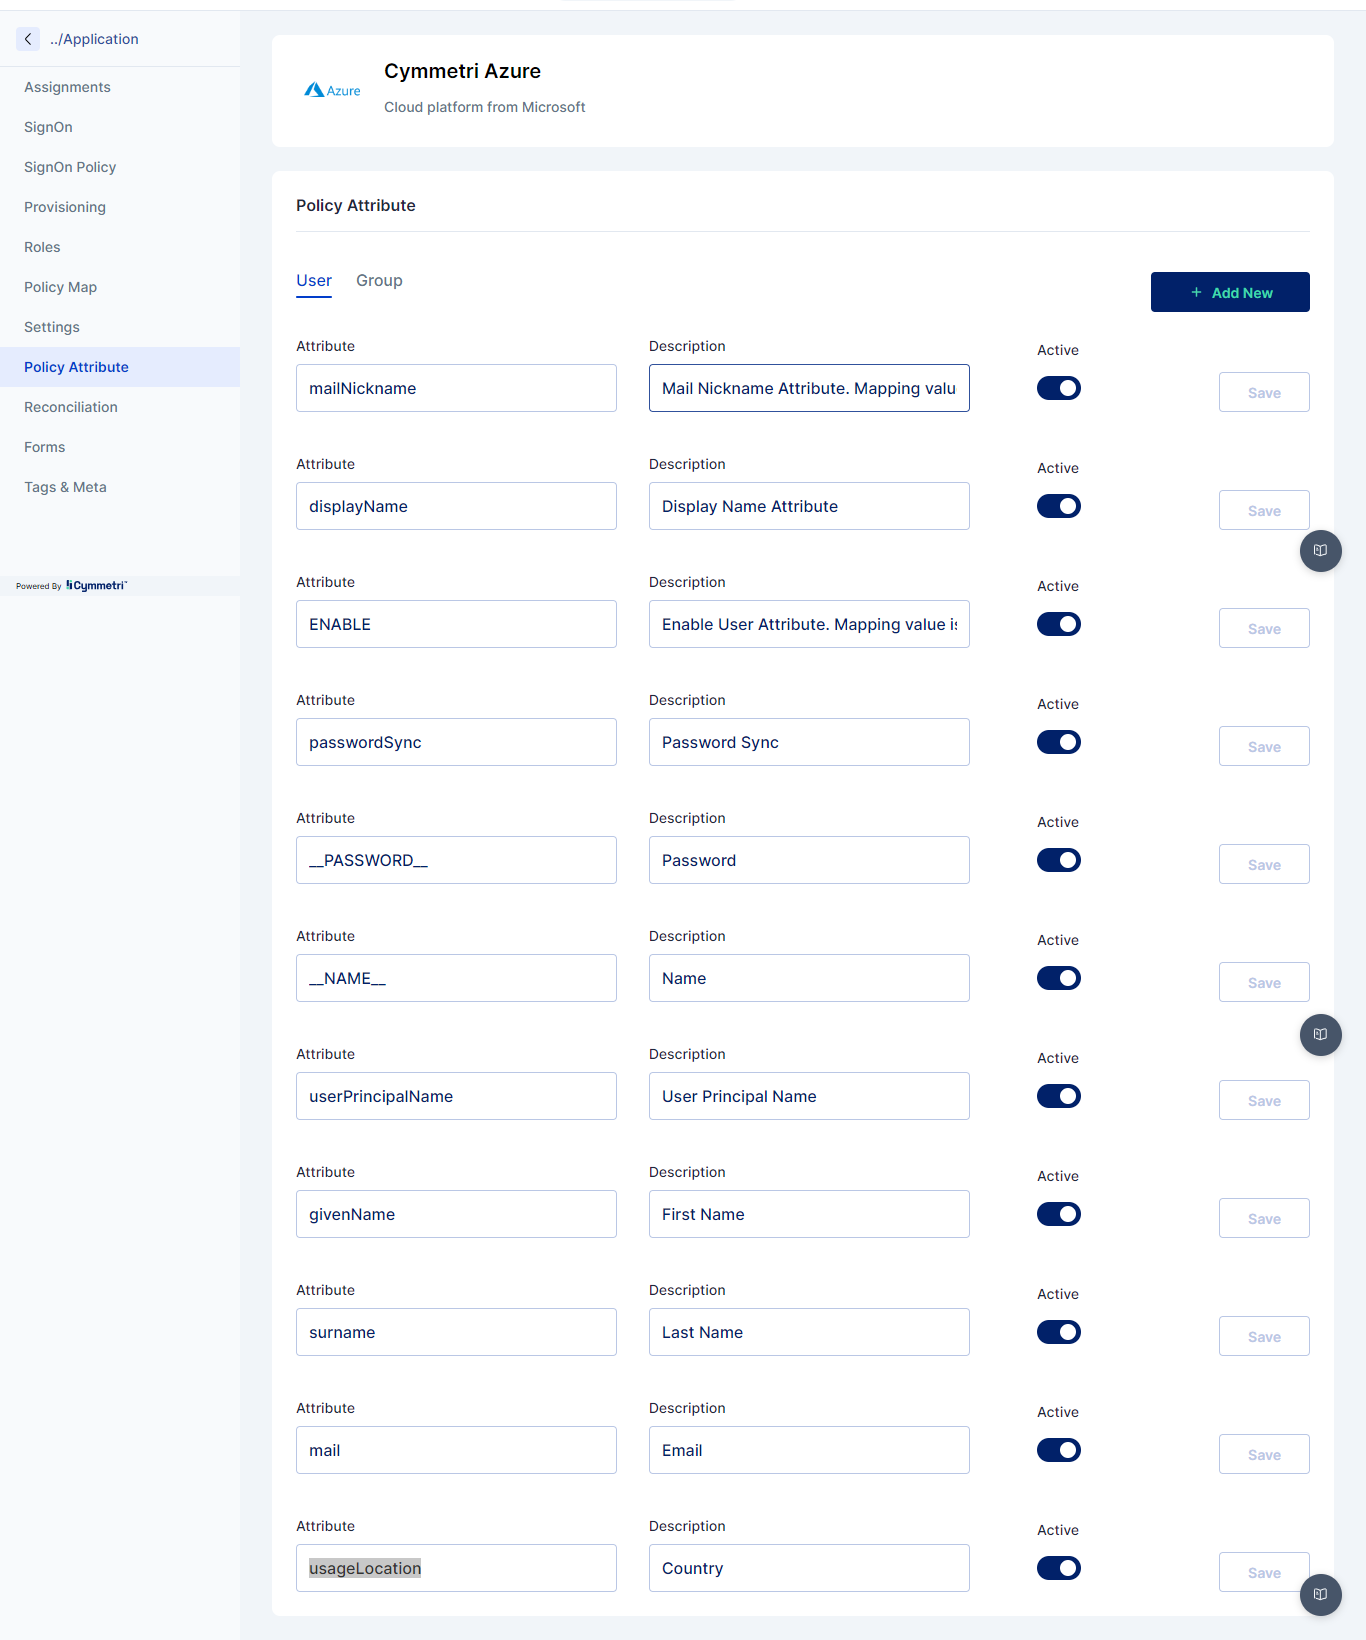
Once added the administrator needs to go to Policy Attribute section and ensure all the below mentioned attributes are present (Add if not already present):
mailNickname
displayName
__PASSWORD__
__NAME__
userPrincipalName
givenName
surname
mail
usageLocation
Next the administrator needs to go to the Policy Map section and ensure a mapping shown as below is created:
displayName
displayName
-
True
True
__NAME__
login
-
True
True
__PASSWORD__
password
-
True
True
mailNickname
mailNickName
-
True
True
userPrincipalName
login
True
True
True
givenName
firstName
-
True
True
surname
lastName
-
True
True
-
True
True
usageLocation
country
True
True
azureLicense
azureLicense
<actual license key>
True
True
Once the policy map is created next the administrator needs to go to Provisioning section and then to Server Configuration and need to configure the connector server as shown below:
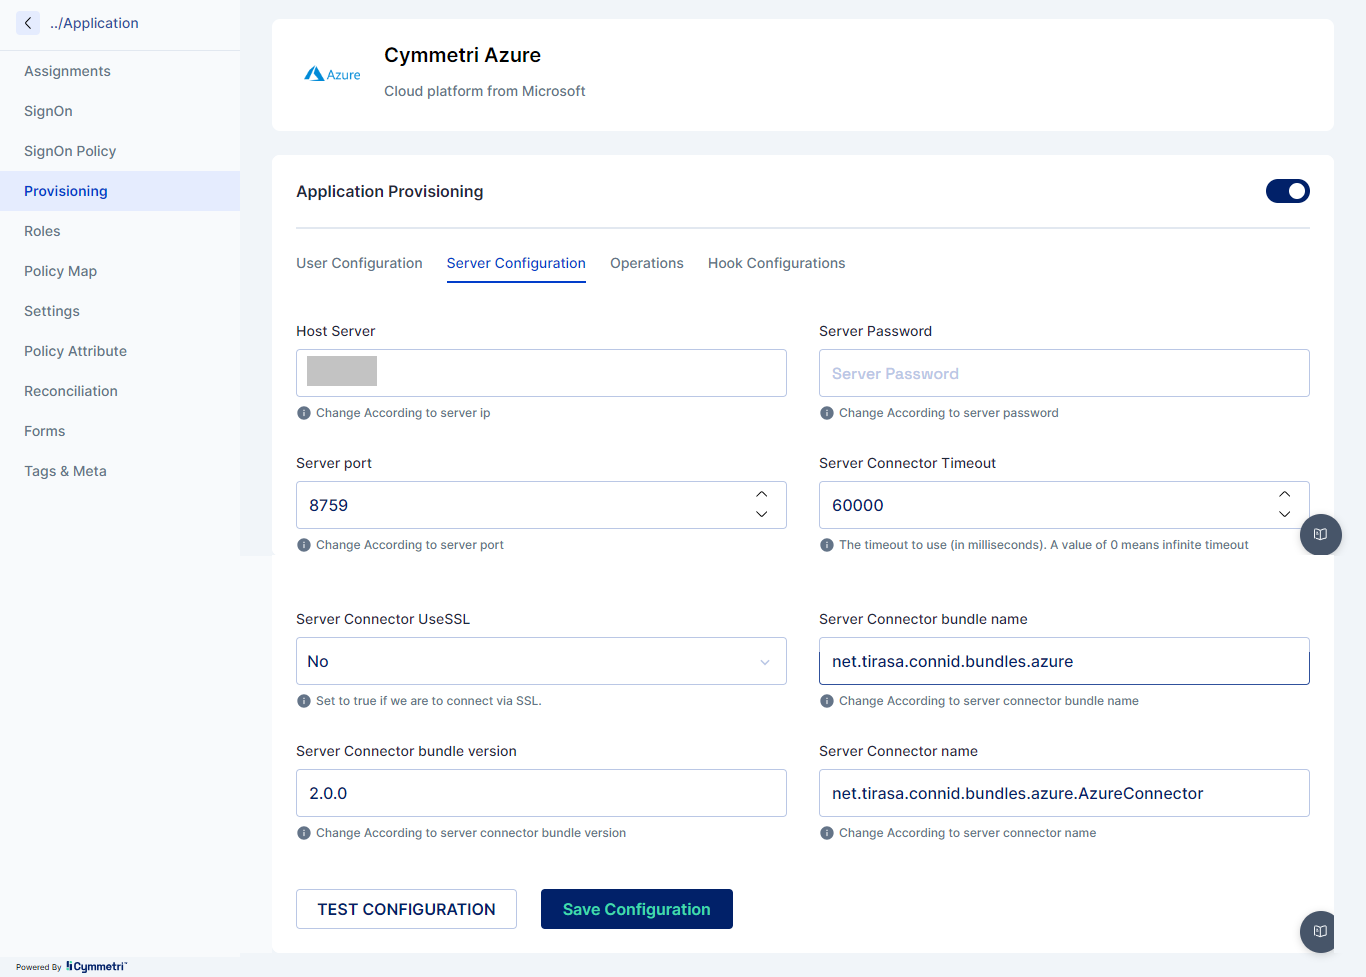
Once the Server Configuration is done next the administrator needs to implement User Configuration with the below mentioned fields:
User config Application Authority: This is the authority under which the application operates. For example, if you're using Azure AD, the application authority might be
https://login.microsoftonline.com/<tenant_id>/oauth2/authorizeUser config application client id: This is the unique identifier for your application. It is provided by Azure when you register your application. For example,
e9a5a8b6-8af7-4719-9821-0deef255f68e.Client Secret: This is a secret key used by the application to prove its identity when requesting access tokens. It should be kept confidential. For example,
7f7df45a-251e-49d3-a396-748bf8e05a3c.User config domain: This is the domain associated with your Azure AD. For example,
contoso.onmicrosoft.com.User config base password: This is the base password used for your application. For example,
MyBasePassword123.Redirect URI: This is the URI to which Azure AD will redirect the user after authentication. For example, api://05b765c3-d64f-7704-b0d8-5c4c6bc674df
User config resource URI: This is the URI of the resource (API, web app, etc.) that the application wants to access. For example,
https://graph.microsoft.com.Azure Tenant ID: This is the identifier for your Azure AD tenant. For example,
72f988bf-86f1-41af-91ab-2d7cd011db47.User config base username: This is the base username used for your application. For example,
[email protected].
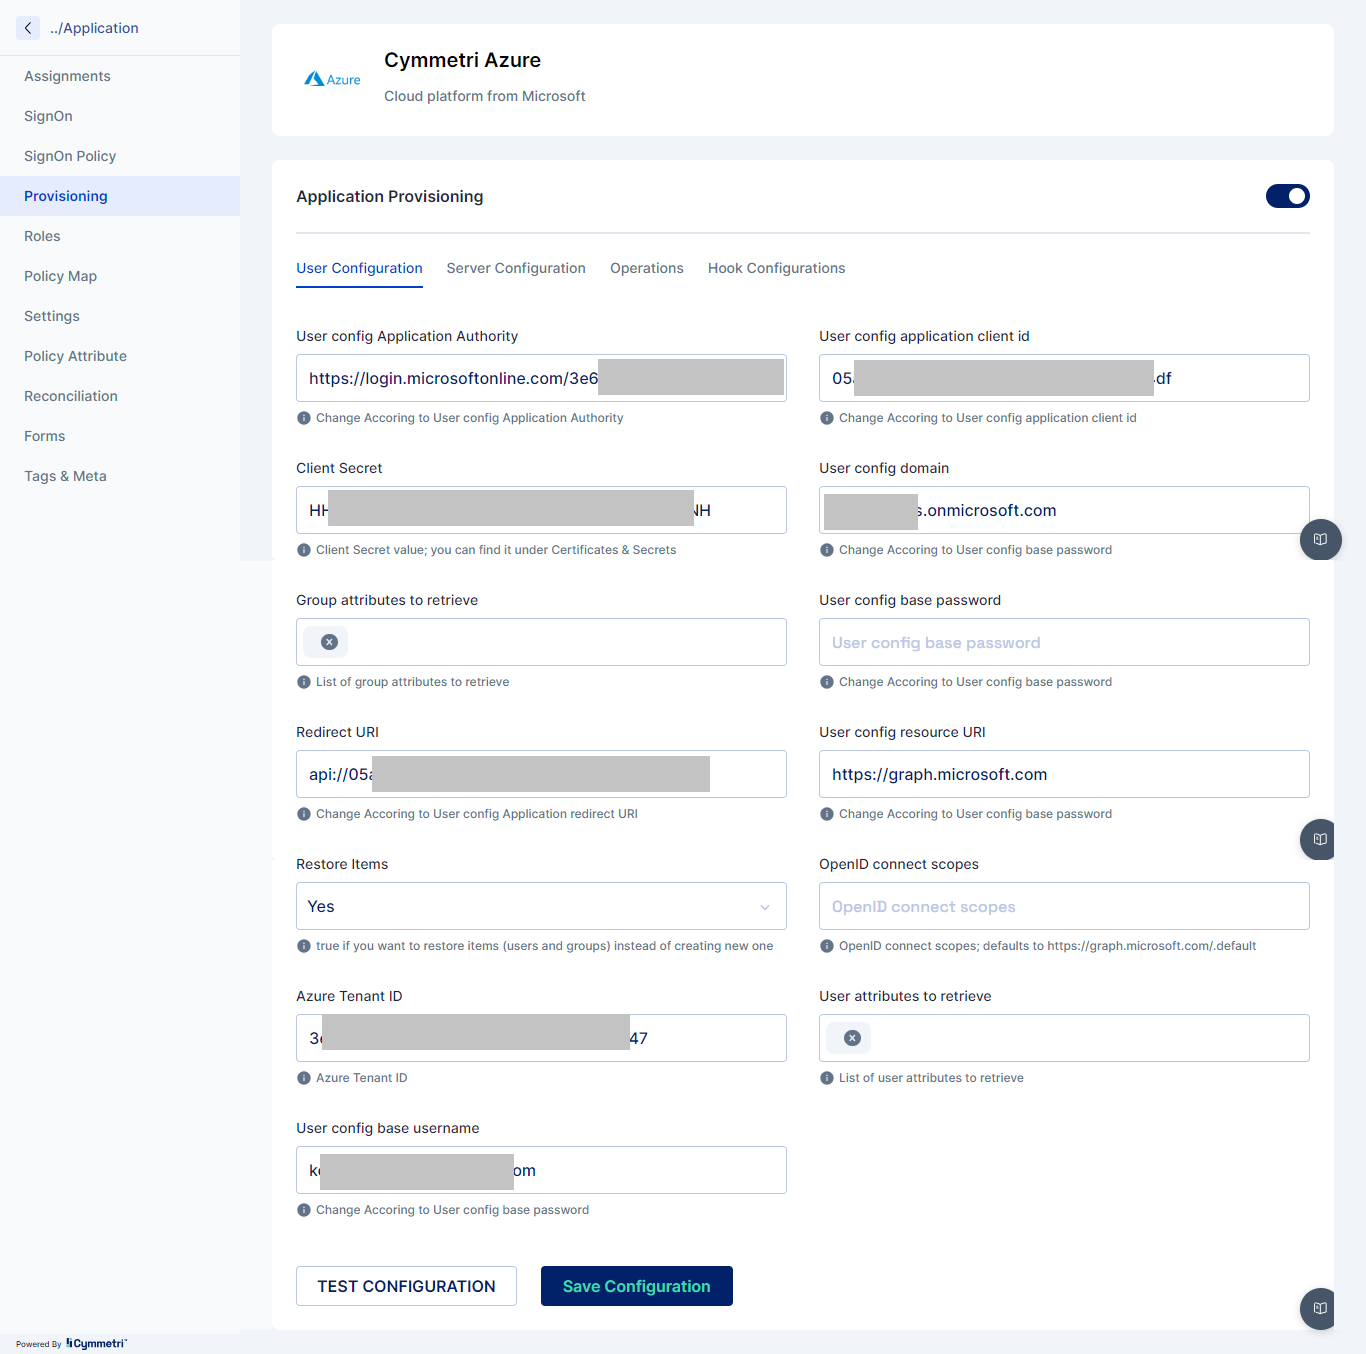
Once the configuration is done and saved, Next click on TEST CONFIGURATION to test if Cymmetri is able to connect to Azure Server.
Assign various Product Licenses to user
For assigning any sort of licenses to a user of various products two main policy map entries need to done as shown below:
azureLicense: Need to provide license key for the product you wish to assign to the user
usageLocation: This field needs a two-letter country code (ISO standard 3166). Required for users that are assigned licenses due to legal requirements to check for availability of services in countries. Examples include:
US,JP, andIN.

The value for azureLicense can be obtained as explained below:
Go to https://admin.microsoft.com/ and login using the admin credentials. Once logged in go to Billing->Licenses->Microsoft Teams Exploratory
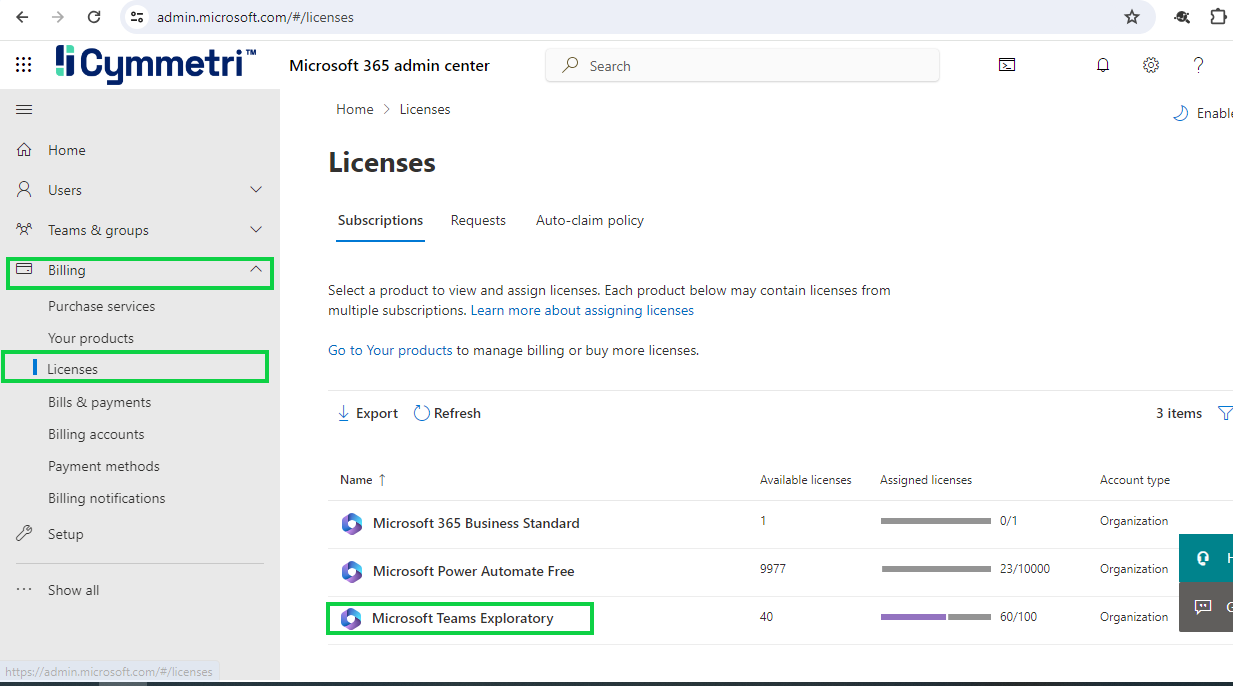
Once you click that it opens the page from which we can copy the product id from URL as shown below:
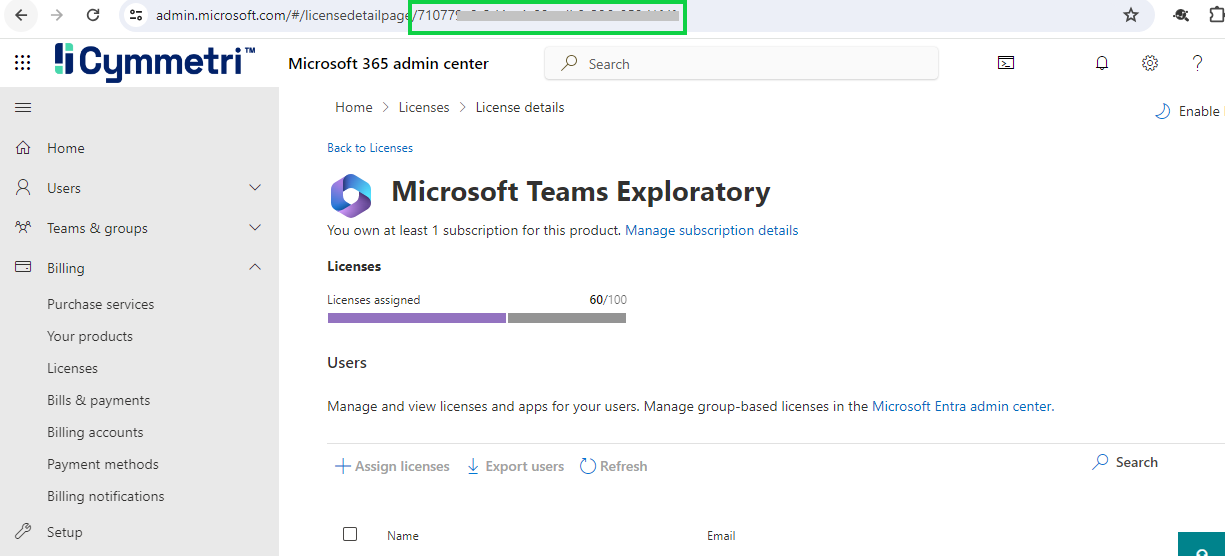
Once all the above configuration is done, on the same page in Cymmetri go to Assignments section and assign users to the application and ensure that these users are created in Azure's Microsoft Entra ID along with the Microsoft Teams license.